• Active
  • Blog
  • Cart
  • Checkout
  • Cooking Crew Recipes
  • Cooking Crew!
  • Disclaimer
  • Library
  • Media Kit
  • My account
  • Nutrition and Food Safety Disclaimer
  • Opt Out of 5 Chef Secrets
  • Press
  • Privacy Policy and Copyright
  • Recipe Index
  • Refund and Returns Policy
  • RSS Email Subscription Confirmation
  • Shop
  • Subscribe
  • Ultimate Recipes for Becoming a Rockstar Cook!
  • Welcome to Heather Likes Food!
  • Work With Me
  • About Heather Cheney
  • Contact
menu icon
go to homepage
subscribe
search icon
Homepage link
  • Recipe Index
  • About
  • Contact
  • Shop
    • Facebook
    • Instagram
    • Pinterest
    • YouTube
  • ×
    Home / Recipes

    Cooking School: How to Grill the Perfect Steak

    By Heather LAST UPDATED March 1, 2021 · FIRST PUBLISHED June 13, 2012, 2 Comments

    grilled steak cut into sliced on a wood cutting board

    My husband often jokes about how he wouldn't have married me if he knew before proposing that I liked to cook. This probably sounds weird, but when we started dating, I hadn't started cooking school yet, and we ended up getting engaged rather quickly (ahem.). So in his mind, it would have given him an "ulterior motive" to marry me... it was for the same reason that he wouldn't date girls who owned houses. He just didn't want to be swayed by something other than love (cue choir of angels). Silly boy.

    Imagine his excitement when he realized that I would likely be feeding him well his whole life! Needless to say, he's still excited, and incredibly, he still looks just like he did on our wedding day. Curse you, Men, and your fast metabolism!

    I've made it a tradition that on his holidays (birthday, Father's Day, Graduation day- one day, etc.) he get's to create an ultimate meal plan and I'll cook it for him. Last Father's Day he shared a "Shellfish Tower" with his dad and this year he and his dad have requested big T-bone steaks, baked potatoes, green beans, and creme brulee'. A little bit easier than last year's concoction, don't ya think?

    This post will be a bit of a dozy, but if you want to be able to grill a perfect steak for your Dad this weekend stick with me - you won't be disappointed. Especially when you get told that the steak you made was the best they've ever had!

    How to Pick Out A Steak

    The first and maybe hardest part of this whole process is choosing what kind of steak to prepare. There are so many different choices at the store, but here are my favorites for grilling:

    Top Loin (also called strip steak, new york steak): This is what I used in these pictures and is my favorite choice for grilling based on flavor, tenderness, and price.

    T-Bone: the bone separates a portion of top loin and a small portion of tenderloin.

    Porterhouse: This is basically a really big T-bone steak with a larger portion of tenderloin

    Top Sirloin: Not to be confused with top loin, it's a bit less expensive and not quite as tender, but still a good grilling choice

    Rib-Eye: These are super flavorful but have large pockets of fat, so if that's not your thing, don't do it.

    We really only have steaks once, maybe twice a year here, so when we do, I feel like it's worth the extra money to do it right.  But, regardless of what kind of steak you end up using here are a few things to look for when buying:

    Marbling: See those thin veins of fat running through the steak? That's called marbling, and the more a steak has, the better! These lines of fat add tons of flavor and keep your meat tender. The marbling is also how meat is graded on quality -Prime (most marbling), Choice, and Select.

    raw new york steak on a blue plate

    Color: Pick a steak that is a light cherry color, not dark red or gray (ew.)

    Firmness: Pick a steak that is firm to the touch

    Seasoning

    Surprisingly, you need very little to make a steak taste good. Good old fashioned salt and pepper do the trick just smashingly.  You'll notice that I use kosher salt in all my recipes. My reasoning behind this is for another post, but I recommend you get yourself a box and start using it, stat! I'll explain later :).

    kosher salt, pepper, and steak on a blue plate

    You've got a big piece of meat to season, so don't be stingy with the salt. Seasoning these steaks took me almost a whole teaspoon each! (note that kosher salt has a bigger grain than regular salt so you won't need quite as much if you use regular) You don't have to be quite as generous with the pepper, but still, give it a good amount.

    seasoned steak on a blue plate

    After seasoning, you'll want to give your steaks a little drizzle of olive oil. Is it just me or is the olive oil bottle totally photobombing the steak?

    close up of olive oil bottle with steak in background

    Mmm... all ready to go!

    steak drizzle with olive oil

    The Grill

    When you're ready to get grilling, you want to turn your grill on and let it heat for at least 15 minutes. The grill needs to be screaming hot and clean! If the grates are still a bit dirty, scrub them with your grill brush. Pour some oil into a small bowl dip a folded paper towel into the oil, and cover the grill grates well with oil.

    tongs holding a paper towel dipped in oil

    Why yes, I am using salad tongs to grill with. I'm tricky like that. Or poor, and don't have grilling tongs that aren't 7 feet long. We got a grilling utensil set last year, and the tongs are ginormous.

    tongs holding a paper towed dipped in oil to oil grill grates

    Cooking the Steaks

    Once your grill is hot, clean, and oiled you're ready to get cooking. The key to cooking a steak that isn't totally incinerated on the outside and raw in the middle is to start cooking it really hot to get that caramelization that we like, and then finish it low.

    In order to do this on the grill you'll have to turn one part of your grill to Hot, and the other to medium.

    How to Find Your Grill Temp For Steak

    To get a good sear on your steak, 450-500 degrees Fahrenheit is the temperature you want to shoot for on the hot side of your grill and around 350 for your medium side. If you don't have a grill thermometer, here's a good way to approximate the temp.

    After initially heating up the grill, hold your hand 5 inches above the grates and count how long you can comfortably keep it there. This works for both gas and charcoal grills.

    Hot: 2 seconds

    Medium-hot: 3-4 seconds

    Medium: 5-6 seconds

    Medium Low: 7 seconds

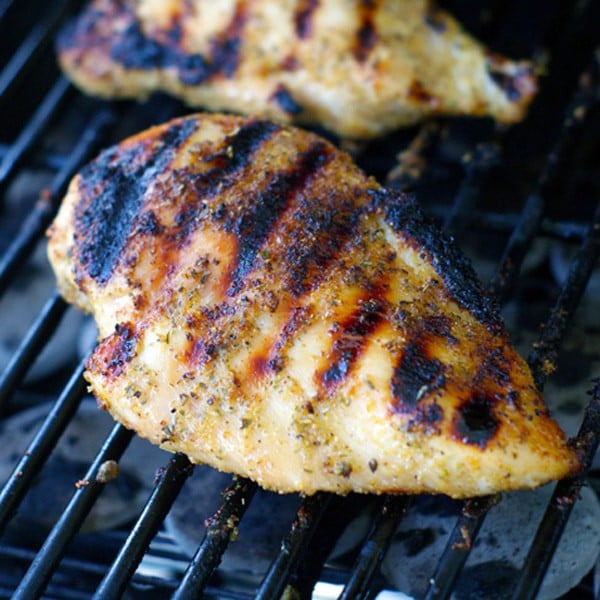
    Once you've got your zones ready to go, place your steaks over the hotter part of the grill and cook, with the grill covered, until browned on both sides, turning the steak half-way through- about 6 minutes total.

    It should look like this...

    grilled steak on the grill

    Now you're going to slide the steak to the cooler side of the grill and continue to cook it, covered until it reaches your desired level of doneness, about 5-12 minutes.

    How Do I Know When My Steak Is Done?

    One word -Thermometer.

    There are tricks out there that tell you that your steak is medium when it's the same squishiness as the fleshy part above your thumb when you make a fist, but I've found that I get the most consistent results when I use my tried and true thermometer. They are only a couple of dollars and are well worth having in the kitchen.

    cooking thermometer

    When you think your steak might be done, insert the thermometer into the side so that it has more surface area to read from, and see where you're at. Keep in mind that the more holes you poke in your steak, the more moisture you'll lose, but 1 or 2 holes won't make much of a difference. Sometimes I even use the same hole.

    Here is a chart that lists the temperature your steak should be upon serving for each level of doneness.

    Rare: 125°

    Medium-Rare: 130°

    Medium: 140°

    Medium Well: 150°

    Well-Done: 160°

    Keep Reading! Remember that these temperatures are what the meat should be at when serving. Since the temperature of the steak will rise as it rests off the grill, you'll want to pull the steak off the grill 5-10 degrees before it's where you want it. This is called carryover cooking. The amount of carryover will vary from steak to steak based on the thickness of the meat- a thicker steak will have more carryover than a thinner cut.

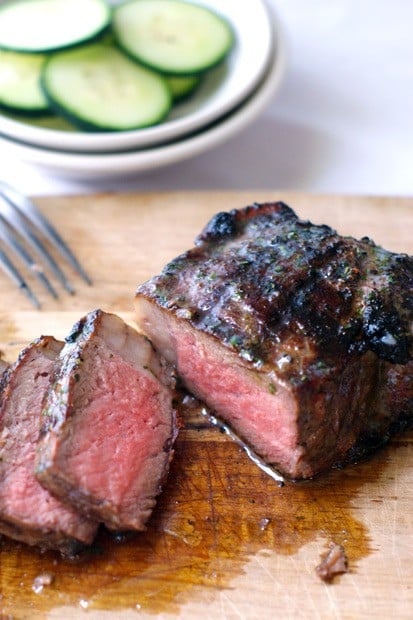
    I like my steak between medium and medium well, so I pulled it off at 140°. Here is my steak just after getting off the grill. Forget that the sun decided to glare through the window the very moment that I took the picture.

    grilled steak on a blue plate

    Once you remove your steak from the grill, cover it with foil and let it rest for at least 5 minutes before cutting- this will give it time to let the juices redistribute.

    Extras

    Want to make your steak REALLY rock? Make a compound butter to melt over the top of it after it comes off the grill. This is what fancy steakhouses do, so you should do it too! 🙂

    A compound butter is basically just flavored butter.  You can put anything from garlic, to sundried tomatoes, to chives, or fresh basil in it, but this time I made a simple garlic butter.

    ½ C softened butter+ ½ teaspoon garlic powder+ 1 teaspoon dried parsley

    For fun, you can spread it out on a piece of plastic wrap...

    seasoned butter spread on plastic wrap

    Roll it up into a log and pop it into the fridge until it's firm. Once it's firm, you can unwrap it and cut off little discs of flavored butter to top your steaks with. You'll do this just right after removing from the grill, before covering with foil and letting them rest.

    seasoned butter rolled in plastic wrap

    If this doesn't look good, I don't know what does!

    seasoned butter melting on a grilled steak

    So there you have it! A grilled, perfectly seasoned and cooked steak.  If you have any questions, don't hesitate to ask!

    Happy Father's Day!

    grilled steak sliced on a wooden cutting board

    📖 Recipe

    grilled steak sliced on a wooden cutting board
    Print Recipe
    4.80 from 10 votes

    Cooking School: How to Grill the Perfect Steak

    Ever wonder how to make the perfect stake on the grill. Look no further!
    Prep Time10 minutes mins
    Cook Time20 minutes mins
    Resting Time10 minutes mins
    Total Time30 minutes mins
    Course: Main Course
    Cuisine: American, Grilling
    Keyword: How to Grill A Steak
    Servings: 4 steaks
    Calories: 1880kcal
    Author: Heather Cheney

    Ingredients

    • 4 beef steaks 1-1 ½ in thick
    • Kosher salt
    • Pepper
    • Olive oil

    Instructions

    • Turn all you burners to high on the grill, and close the lid. Heat grill for at least 15 minutes.
    • Clean and oil the grill grates
    • Turn one section of your grill to medium heat, and leave the other on high.
    • Season each steak generously with salt and pepper and drizzle with olive oil.
    • Grill the steaks over the hottest part of the grill, covered, until browned on both sides. You'll turn them halfway through for about 6 minutes total.
    • Slide the steaks to the cooler part of the grill and continue to cook for 5-12 minutes until it reaches your desired temperature for doneness flipping the steaks over halfway through. (See chart above for temperatures)
    • Transfer the steaks to a plate, top with compound butter if desired, and tent with foil for 5 minutes before serving.

    Nutrition

    Serving: 1steak | Calories: 1880kcal | Protein: 181g | Fat: 127g | Saturated Fat: 56g | Cholesterol: 551mg | Sodium: 470mg | Potassium: 2422mg | Vitamin A: 135IU | Calcium: 63mg | Iron: 15.6mg

    Sweet Chili Lime Salmon

    By Heather LAST UPDATED May 21, 2020 · FIRST PUBLISHED June 8, 2012, 2 Comments

    baked chili salmon on a white plate with parsley and brussels sprouts

    I love cooking fish for dinner! I admit that there was a time when I didn't like fish AT ALL, and sadly it's only been the last 5 or 6 years that I've tackled my aversion and done a total turn-around. Why do I love cooking fish? Oh, let me count the ways.... [Read more...]

    Basic Grilled Chicken

    By Heather LAST UPDATED March 22, 2021 · FIRST PUBLISHED June 4, 2012, 1 Comment

    Seasoned chicken breast on grill

    With summer basically here, despite the fact that my kindergartner still has 2+ weeks left of school (grumble, grumble), I've cleaned our BBQ and am ready to get grilling! Today I thought I'd share my favorite way to grill chicken breasts. It's not very often that we sit down to eat a big piece of grilled chicken as a meal, but I love having it ready to chop up and toss in a salad, with pasta, make a sandwich with or stir into soup. This recipe adds just enough seasoning to the chicken to make it flavorful enough to stand on it's own, but is also not so overpowering that you can't add it to other things. Another plus is that it's SUPER easy.

    Observe:

    Bonelesss/skinless chicken breasts, olive oil, salt, honey, and Montreal Chicken Seasoning

    olive oil, honey, salt, Montreal chicken seasoning and chicken breasts on a blue plate

    I blow through this chicken seasoning like crazy in the summer! And I don't just put it on chicken either, if you keep reading my blog you'll notice that I use it alot. I love it!

    bottle of Montreal chicken seasoning

    Salt your chicken on BOTH sides and then sprinkle the Montreal seasoning GENEROUSLY on BOTH sides. Don't be stingy, people.

    2 seasoned chicken breasts on a blue plate

    Next up is to drizzle on some honey goodness... just a little though or you'll end up with a sticky mess on your grill. You could also just sprinkle on a little bit of sugar for the same effect- the sugar in the honey will caramelize on the grill and create really good flavor.

    drizzling honey on seasoned chicken breasts

    To finish it off, give your chicken a good drizzly dose of olive oil. At this point I usually put the chicken in the fridge to marinade for a couple of hours or even overnight. But, I have cooked it right off the bat after seasoning and it was still great.

    two seasoned chicken breasts on a blue plate

    Preheat your grill on medium and grill each breast for 15-20 minutes or until cooked through. Your cooking time will vary based on the temperature of your grill and how big your breasts are (not YOUR breasts, the chicken's, duh).

    Now go make some chicken! You can put it in this or this or this or eat it all by itself! Enjoy!

    Other Chicken Recipes You Might Like

    • Chicken lo mein recipe
    • Pesto Parmesan Chicken
    • Easy Chicken Cacciatore
    • Smothered Chicken Breast
    • Honey Dijon Chicken Thighs
    • garlic chicken thighs
    • Ranch Chicken Marinade
    • Barbecue Chicken
    • Chicken Keto Soup
    • Wingers Sticky Fingers
    • Sweet Chili Sauce Chicken
    • Oven Fried Chicken Breast
    • Chicken Ricotta
    • Chicken Curry with Coconut Milk

    📖 Recipe

    seasoned grilled chicken breast on the grill
    Print Recipe
    5 from 11 votes

    Basic Grilled Chicken

    My go-to recipe for grilled chicken that goes with just about anything!
    Prep Time10 minutes mins
    Cook Time20 minutes mins
    Resting Time4 hours hrs
    Total Time30 minutes mins
    Course: Chicken, Main Course
    Cuisine: American
    Keyword: Grilled Chicken Recipe
    Servings: 4 servings
    Calories: 181kcal
    Author: Heather Cheney

    Ingredients

    • 4 Boneless Skinless Chicken Breasts
    • Salt and Pepper
    • 1 tablespoon Honey
    • 2 tablespoons Montreal Chicken Seasoning
    • 1 tablespoon Olive oil

    Instructions

    • Season each breast with salt and pepper and liberally season with Montreal chicken seasoning.
    • Drizzle a little but of honey over each breast and then drizzle again with olive oil.
    • Let chicken marinade in fridge for a few hours or up to overnight.
    • Grill chicken over medium heat for about 15-20 minutes or until cooked through.

    Nutrition

    Serving: 1serving | Calories: 181kcal | Carbohydrates: 5g | Protein: 24g | Fat: 6g | Saturated Fat: 1g | Cholesterol: 72mg | Sodium: 131mg | Potassium: 431mg | Sugar: 4g | Vitamin A: 85IU | Vitamin C: 1.6mg | Calcium: 26mg | Iron: 1.1mg

    The BEST Coleslaw ever!

    By Heather LAST UPDATED May 21, 2020 · FIRST PUBLISHED June 1, 2012, Leave a Comment

    Cabbage coleslaw in white bowl on grey napkin and fork

    It seems to me that coleslaw is something that is either loved or despised...

    So, what's up coleslaw haters? I don't get it, much like I don't understand those who don't like cilantro. Weird.

    {If you don't like coleslaw or cilantro I'll still let you read my blog, but you better not ever tell me you don't like butter because fists will be flying!} [Read more...]

    Blueberry Muffin French Toast Souffle

    By Heather LAST UPDATED May 21, 2020 · FIRST PUBLISHED May 29, 2012, 6 Comments

    Square of french toast casserole on blue plate on blue checked napkin

    As I promised many many moons ago to all my adoring (at least I hope you are) fans on Facebook, here is the amazing french toast recipe I keep blabbing about.

    Recipes like these happen when I dream about food. No joke. I woke up one morning and remembered eating something in my dream that  was basically the love child between blueberry muffins and french toast. So naturally, I dropped my plans for the day and decided to make this dream food of mine a reality. Struesel + blueberries + muffins + french toast = mind blowing deliciousness. Or at least that's what I remembered in my dream. The truth of matter is that I was completely right. Once this was made, I basically had a piece for every meal and snack I could justify eating until the pan was gone.

    You've probably made or heard about some variation of a french toast casserole before. I've had my fair share  and am usually not impressed. If you feel the same, DON'T WRITE THIS OFF! Something magical happens when you combine 2 kinds of bread, one being light and rich croissants, with cream cheese, cream, eggs and blueberries AND top it with struesel. What can go wrong really, besides having to run an extra mile or 8?

    What you'll need: 4 Croissants, a loaf of french bread, milk, cream, eggs, creme cheese, butter, vanilla, blueberries, and maple syrup.

    croissants, eggs, butter, cream cheese, milk, vanilla, and syrup

    Cube up your bread into 1-2 inch cubes and toss until evenly distributed in a greased pan. Using the 2 types of bread in this keeps the texture varied and light. Croissants are my friend. At this point you'll toss the bread with the blueberries too. I used frozen, but fresh would work splendidly!

    cut up croissants and french bread in a glass dish

    You'll need a medium sized bowl to mix your liquids up in. Start by microwaving the cream cheese and butter until it's very soft. Slowly add in the syrup and vanilla and whisk until it's well combined.

    pouring syrup into egg mixture

    Add in the eggs, milk, and cream and whisk again until smooth.

    pouring milk into egg mixture

    Do you know how hard it is to take a picture of yourself pouring an egg mixture evenly over bread without making a mess?

    HARD!

    I'm done whining. Pour your egg mixture evenly over the bread -you want all the bread to be able to absorb the liquid so sometimes I even squish the bread down into the pan a bit to coat it.

    pouring egg mixture on top of bread and blueberries

    STREUSEL! This is where it gets good. Combine your sugars and cinnamon and pour your melted butter over the top. Using your fingers or a fork mix it until it looks like wet sand.

    pouring butter into sugar and cinnamon

    You want to build a sand castle out of this don't you? Me too, me too. Do, or don't and set it aside for a few hours or overnight.

    streusel mixture in green bowl

    Now, at this point the bread/egg/blueberry mixture needs to mellow for a while before being baked so the bread has time to soak up all the eggy goodness. Wrap it up, sans the streusel,  and plop it in the fridge for at least 2-3 hours or overnight.

    When you're ready to bake, sprinkle the streusel over the top and bake until its puffed up, golded brown, and a knife comes out clean when inserted into the middle.

    unbaked blueberry french toast casserole in glass dish

    baked french toast casserole in glass dish on turquoise stove

    Serve warm with syrup. We LOVE buttermilk syrup and it went perfect with this!

    square of french toast casserole on white plate with buttermilk syrup

    📖 Recipe

    blueberry french toast casserole on white plate with blue check napkin
    Print Recipe
    5 from 3 votes

    Blueberry Muffin French Toast Souffle

    If french toast and a blueberry muffin had a baby, this recipe would be it!
    Prep Time20 minutes mins
    Cook Time40 minutes mins
    Resting Time3 hours hrs
    Total Time1 hour hr
    Course: Breakfast
    Cuisine: American
    Keyword: French Toast Casserole
    Servings: 8 servings
    Calories: 2279kcal
    Author: Heather Cheney

    Ingredients

    • 4 large croissants
    • 4 C french or Italian bread
    • 8 oz. cream cheese softened
    • ¼ C butter
    • ½ tsp. vanilla
    • ½ C maple syrup
    • 8 eggs
    • ⅔ C cream
    • 11/2 C milk
    • 2 C fresh or frozen blueberries
    • Streusel
    • ⅓ C brown sugar
    • ⅓ C white sugar
    • ⅓ C flour
    • 3 tablespoon butter melted
    • 1 tablespoon cinnamon

    Instructions

    • Place bread cubes in a greased 9×13 pan. Toss bread with blueberries.
    • Soften cream cheese and butter in microwave and combine with vanilla and syrup, whisking until smooth.
    • Add eggs. Then add milk and cream, whisking to combine.
    • Combine sugars, flour and cinnamon for the streusel. Pour melted butter over sugar mix and combine with a fork or fingers until it looks like wet sand. Set aside.
    • Pour egg mixture over bread and refrigerate for 3 hours up to overnight.
    • when ready to bake, remove from fridge and sprinkle streusel evenly over the bread.
    • Bake at 375 for 30-40 minutes or until golden brown, set and a knife comes out clean when inserted in the middle.
    • Serve warm with buttermilk syrup if desired

    Nutrition

    Serving: 1serving | Calories: 2279kcal | Carbohydrates: 211g | Protein: 39g | Fat: 142g | Saturated Fat: 78g | Cholesterol: 284mg | Sodium: 1509mg | Potassium: 1075mg | Fiber: 12g | Sugar: 133g | Vitamin A: 1725IU | Vitamin C: 3.7mg | Calcium: 310mg | Iron: 7.9mg

    Green Chile and Cheese Enchiladas

    By Heather LAST UPDATED May 21, 2020 · FIRST PUBLISHED April 16, 2012, 2 Comments

    My hubby had knee surgery last week. It's been...um, fun. Yeah, that's it.

    Well, not really but it's all good. He's doing well now and I got to make some awesome enchiladas for him when he wasn't doing so hot. Eating Mexican food was his first request after waking up, so like any good wife does after her husband has surgery, I took out my camera and wrote a recipe.

    You'll need: Sour cream, Monterrey Jack Cheese, corn tortillas, green chiles, cilantro, cumin, flour, salsa verde, chicken broth, lime juice,  and a tomato. Let's just pretend all those things are in this picture and that my wallpaper isn't hideous. Okay?

    corn tortillas, monterey jack cheese, tomato, sour cream, salsa, and cans of green chiles on orange counter

    First up is the filling! We're going for rich and creamy here, so combine your cheese with the sour cream, 1 can of green chiles, a little bit of cumin, some chopped cilantro and a tablespoon of flour. Mix it up well and imagine what it would like like because I don't have a picture.

    I'm not a huge fan of prepared enchilada sauce. I feel like they taste more like the tin can they've been stored in than anything I want to pour over my food. So we're making our own... sort of.  You'll start with a can of Salsa Verde- I LOVE this stuff. If you've never tried it, don't be afraid of it because it's green. It's your friend. Use it, love it.  I find it in the Hispanic isle at the grocery store usually somewhere close by the green chiles. BUT, dear reader, BEWARE! Not all Salsa Verde is created equal. I've tried lots of different kinds and each one of them, regardless of what the "heat meter" on the side of the can says, are usually too spicy for my girls. Save one- La Costena. If you can't find this particular brand ( I found this at Safeway) I'm sure there are other mild ones out there. Give a shout-out if you have one that you like!

    close up of can of salsa verde

    Once you find a Salsa Verde that you like, you'll pour it into the blender with 1 cup of chicken broth, some lime juice and a few teaspoons of corn starch and let it roll. You'll end up with a thin, smooth green sauce. Don't worry, it will thicken up when it bakes

    green enchilada sauce in blender jar

    Now that you've got your filling and sauce ready to go, you'll need to warm up your tortillas and get them ready to roll. I usually spread mine out on a plate and microwave them from a minute or two until they are nice and pliable. If you find that the tortillas start to crack when rolling, they aren't warm enough.

    close up of corn tortillas

    This recipe will make about 14 enchiladas and I like to spread them out between 2 9x13" dishes.  Put ½ cup of green sauce in the bottom of each dish before filling with enchiladas.

    close up of filled tortillas in glass dishes

    You'll need about ¼ Cup of filling for each tortilla.

    corn tortilla filled with cheese mixture

    Plop, roll, and repeat.

    3 corn tortillas filled with cheese mixture in green enchilada sauce

    Top each pan with an additional ½ Cup of enchilada sauce, cheese, and diced tomatoes

    filled enchiladas in glass dish topped with cheese and tomatoes

    And bake for 15 minutes. The cheese will be melted and the top will start to brown. If you'd like it more browned, turn on the broiler and babysit it until it's where you want it to be.

    baked cheese enchiladas in glass dish

    Cheesy, melty, green chile goodness! Enjoy!

    📖 Recipe

    cheese enchiladas baked in glass dish
    Print Recipe
    4.25 from 4 votes

    Green Chile and Cheese Enchiladas

    Creamy, tangy and delicious!
    Cook Time15 minutes mins
    Total Time45 minutes mins
    Course: Main Course
    Cuisine: Mexican
    Keyword: cheese stuffed shells, green chile sauce, how to make enchilada sauce
    Servings: 14 Enchiladas
    Calories: 253kcal
    Author: Heather Cheney

    Ingredients

    • 14 corn tortillas
    • 1 cup sour cream
    • 1 tablespoon can chopped green chiles
    • 5 cup Monterrey Jack cheese
    • 1 teaspoon ground cumin
    • 1 tabelspoon flour
    • 2 tablespoon chopped fresh cilantro
    • 8 ounces Salsa Verde
    • 1 cup chicken broth
    • 2 teaspoon corn starch
    • 1 tablespoon lime juice
    • 1- 2 to tablespoon tomatoes diced

    Instructions

    • In a medium-sized mixing bowl combine sour cream, 4 cups Monterrey Jack cheese, cumin, cilantro, and flour.
    • In a blender combine green salsa, chicken broth, corn starch, and lime juice. Blend until smooth, mixture will be thin.
    • Spread ½ C sauce on the bottom of 2 9x13" pans. Warm tortillas until pliable and do not crack while rolling,
    • Spread about ¼ C of cheese filling down the center of each tortilla and roll. Place rolled tortillas in pans.
    • Top each pan of rolled tortillas with ½ C of sauce and remaining 1 C of cheese. Sprinkle diced tomatoes over the top.
    • Bake at 400° for 15 minutes for until the cheese is melted and starting to brown. If additional browning is desired, turn on broiler and continue to cook an additional 1-2 minutes.

    Notes

    Heather @ www.Heatherlikesfood.com

    Nutrition

    Calories: 253kcal | Carbohydrates: 14g | Protein: 11g | Fat: 16g | Saturated Fat: 9g | Cholesterol: 44mg | Sodium: 456mg | Potassium: 194mg | Fiber: 1g | Sugar: 2g | Vitamin A: 640IU | Vitamin C: 7.2mg | Calcium: 347mg | Iron: 0.9mg

    Crockpot Chicken Ranch Tacos

    By Heather LAST UPDATED May 21, 2020 · FIRST PUBLISHED February 20, 2012, Leave a Comment

    These Crockpot Chicken Ranch Tacos are creamy, slightly spicy and great served in warm tortillas with lettuce, pico, and avocado. Crockpot Chicken Ranch Tacos with lettuce and pico de gallo on a placemat

    Crockpot Chicken Ranch Tacos

    These Crockpot Chicken Ranch tacos are what would happen if my Cilantro Lime Ranch Recipe and Shredded Taco Chicken had a baby. I mean, that's basically what they are-- chicken mixed with ranch dressing mix, some spices, green chiles, and sour cream. The chicken is seriously delicious and would be great on all sorts of things from tacos to nachos,  on my steakhouse baked potatoes, on a taco salad or wrapped up in enchiladas.

    Where has this month gone? Seriously. I know it's a short month, but I can't believe it's almost March. MARCH! I'm super excited though because I totally dropped the ball on making cute Valentine's day food and now I get to make up for it with St. Patrick's day. Get excited people. Get excited.

    My poor husband spent his entire day on Saturday at work and school, we're talking 14 hours. Granted this is pretty normal during the school year and we've become quite accustomed, it still stinks. Major brownie points to all the military wives that rarely have their husbands home because I really don't think I/my kids would survive.

    Making Crockpot Chicken Tacos

    Anyways in an attempt at actually planning ahead for dinner and not resorting to "noodle soup"- our fancy name for ramen-  I came up with these crockpot chicken ranch tacos. After a long, husband-less day this ranch chicken totally made it okay for him to be gone for so long. Well, kind of.  If one of the tacos could have fished out the hairbrush, toilet paper roll, toothbrush, paper valentine, and the stick of gum that my 18-month-old put in the toilet that day, I would be all over it.

    It's the little things.

    Tips for Making the BEST Crockpot Chicken Ranch Tacos

    • Use Ranch DRESSING mix, not the DIP-- Dip mixes typically have thickeners and starches in them to make them a bit thicker. You don't need those to make these crockpot chicken tacos.
    • Watch the Chicken-- If you decide to cook these chicken tacos on high in the crockpot, watch the chicken after about hour three. Depending on how hot your crockpot cooks, the chicken may be done early.

    📖 Recipe

    2 corn tortillas with chicken, lettuce, tomato and avocado on a tabletop
    Print Recipe
    4.43 from 52 votes

    Crockpot Chicken Ranch Tacos

    These Crockpot Chicken Ranch Tacos are creamy, slightly spicy and great served in warm tortillas with lettuce, pico, and avocado. 
    Prep Time10 minutes mins
    Cook Time4 hours hrs
    Total Time4 hours hrs 10 minutes mins
    Course: Main Course, Slow Cooker
    Cuisine: Mexican
    Keyword: Slow Cooker Chicken Ranch Tacos
    Servings: 6 servings
    Calories: 87kcal
    Author: Heather Cheney

    Ingredients

    • 4 whole Chicken breast halves boneless skinless
    • 2 Envelopes ranch dressing mix
    • 1 cup Chicken broth
    • 1 tablespoon chili powder
    • 2 teaspoon ground cumin
    • 4 ounces diced green chiles
    • 1 cup sour cream
    • ½ cup chopped fresh cilantro
    • Juice from ½ lime

    Instructions

    • In a slow-cooker, combine chicken breasts, ranch dressing mix, chicken broth, chili powder, cumin, and green chiles. Stir around until chicken is coated and there aren’t any big lumps of dressing mix. 
    • Cover and cook on low for 4-6 hours or high 2-4 hour depending on how your crockpot cooks. Chicken should be cooked through and easily shred. Remove chicken from pot, shred, return to pot and stir in sour cream and chopped cilantro. Serve in tortillas with lettuce, cheese, avocado, and pico de gallo.

    Nutrition

    Serving: 1serving | Calories: 87kcal | Carbohydrates: 3g | Protein: 2g | Fat: 8g | Saturated Fat: 4g | Cholesterol: 20mg | Sodium: 225mg | Potassium: 166mg | Fiber: 1g | Sugar: 2g | Vitamin A: 755IU | Vitamin C: 5mg | Calcium: 61mg | Iron: 1mg

    Caramel Blondie Brownie Recipe

    By Heather LAST UPDATED March 22, 2021 · FIRST PUBLISHED February 11, 2012, 2 Comments

     TThis Caramel Blondie Brownie recipe gives you chewy blonde brownies that are brimming with caramel flavor. Top it with a divine maple butter sauce and you have one heck of a dessert. Caramel Blondie Brownie Recipe with caramel sauce on top

    Holy Hannah Montanna, have I got a recipe for you! Seriously, people, you've been to Applebee's, right? Does Maple Butter Blondie ring a bell? Of course it does! Everybody loves a warm caramel-y blondie brownie recipe topped with a luscious maple butter sauce!

    If it's done right - and believe me, I've had some that did me wrong- for shame Applebee's. For shame. - it's on my list of all time favorite desserts. I've tried a few copy cat recipes that have floated around the web but none of them really did it for me. Most blondie brownie recipes I've tried taste great but the texture is all wrong -- they are either too dense or buttery (did I really just say that?).

    Last weekend as I was plowing through some unloved cookbooks trying to find something sweet to make for our Super Bowl feasting, I found this blondie brownie recipe.  I thought it looked good, but it didn't even register that it might be just what I've been looking for- until I tried them.  Am I allowed to say "holy Hannah Montanna" again?

    Applebee's Blondie Brownie Copycat

    You're probably looking at the picture above and thinking  "that doesn't look anything like Applebee's dessert!" You're right, it doesn't.  Bear with me though. I didn't know these blondie brownies were going to be so similar to Applebee's so I didn't try to make it taste like it. I used cashews instead of white chocolate and walnuts and a jarred caramel sauce as topping instead of the maple butter sauce. Next time -OH YES there will be a next time- I will make these changes and I will have what I've been looking for all along! Although I did really like the cashews and caramel sauce too.

    What Is A Blondie?

    A blondie is, like the name suggests, a blonde brownie. Which basically means it's a chocolate-less brownie and substitutes vanilla flavoring for cocoa. They typically have brown sugar in them and have deep, rich caramel and vanilla notes. Don't get them confused with white chocolate brownies though, since they actually have white chocolate in them making them brownies. This blondie brownie recipe makes a true blondie since they don't have any chocolate mixed into the batter.

    Caramel Blondie Brownie Recipe with Caramel Drizzled on top

    Tips for Making the BEST Blondie Brownie Recipe

    • Add pre-made caramels! The secret to these blondies, I think, is the addition of melted caramels to the batter. Adding sugar that has already been caramelized adds so much flavor and gives them the texture that I love.
    • Grease your pan well! With the addition of the caramels to the batter, the likelihood of these blondie brownies wanting to stick to the pan increases. You shouldn't have any problems if you grease the baking pan really well with cooking spray. If you wanted to take it a step further you could even dust it with flour, but I haven't needed to do that yet.
    • Don't Overbake! Cook just until a toothpick inserted into the middle comes out clean, no longer. you want them to be just barely done so they stay tender and moist.

    Need More Killer Dessert Recipes?

    • This Banoffee Pie is one of my all-time favorite desserts! If you like bananas and caramel, this pie is for you!
    • Chocolate and Coconut? Yes, please! Try these Mississippi Mud Brownies (Coconut Bribery Version). You won't be sorry!
    • Salted Caramel Pretzel Chocolate Cake is another favorite here.

    📖 Recipe

    Caramel blondie brownie with a scoop of ice cream and caramel drizzled on top on a white plate
    Print Recipe
    4.75 from 4 votes

    Caramel Blondie Brownies and Maple Butter Sauce

    This Caramel Blondie Brownie recipe gives you chewy blonde brownies that are brimming with caramel flavor. Top it with a divine maple butter sauce and you have one heck of a dessert. 
    Prep Time14 minutes mins
    Cook Time25 minutes mins
    Total Time39 minutes mins
    Course: Dessert
    Cuisine: American
    Keyword: Blondie Brownies
    Servings: 24 servings
    Calories: 264kcal
    Author: Heather Cheney

    Ingredients

    For the Blondies

    • 36 Kraft caramels unwrapped
    • ⅔ cup butter
    • ¼ cup milk
    • 1 ½ cup granulated sugar
    • 4 eggs
    • 2 teaspoon vanilla extract
    • 2 cups All-purpose flour
    • 1 teaspoon baking powder
    • ½ teaspoon kosher salt
    • 2 cups mix-ins cashews, white chocolate chips, or walnuts

    For the Maple Butter Sauce

    • ½ cup butter softened
    • ½ cup powdered sugar
    • ¼ cup cream cheese softened
    • 2 tablespoons real maple syrup
    • ¼ teaspoon salt

    Instructions

    For the Blondies

    • Preheat oven to 350° Fahrenheit and grease a 9x13 inch baking pan.
    • In a saucepan, cook and stir the caramels, butter, and milk over low heat until the caramels are melted and mixture is smooth. Remove from the heat; stir in sugar. Combine eggs and vanilla; stir into caramel mixture.
    • Combine flour, baking powder and salt and stir into caramel mixture until blended. Fold in mix-ins. Transfer to a greased 9×13 inch baking pan.
    • Bake at 350° for 20-25 minutes or until a toothpick inserted near the center comes out clean. Don’t overbake, keep a close eye on it! You want them to be just barely done Cool on a wire rack, cut and serve with vanilla ice cream and maple butter sauce.

    For the Maple Butter Sauce

    • Combine all ingredients in a medium-sized bowl with an electric mixer until smooth. When ready to serve warm up in microwave, stirring often until hot.

    Notes

    Adapted from The Taste of Home Cookbook

    Nutrition

    Serving: 1serving | Calories: 264kcal | Carbohydrates: 37g | Protein: 3g | Fat: 11g | Saturated Fat: 6g | Cholesterol: 54mg | Sodium: 216mg | Potassium: 82mg | Sugar: 26g | Vitamin A: 360IU | Vitamin C: 0.1mg | Calcium: 43mg | Iron: 0.6mg

    Supreme Pepperoni Pizza Dip

    By Heather LAST UPDATED March 22, 2021 · FIRST PUBLISHED February 3, 2012, 3 Comments

    This Pepperoni Pizza dip has all your favorite pizza flavors wrapped up in a warm, cheesy, melty, dip. Make some breadsticks or dip slices of toasted baguette into it for the ultimate dipping experience. Baked Pizza Dip in pie dish with a white and red towel and toasted bread slices

    Making this pepperoni pizza dip reconfirmed my love for mozzarella and pepperoni. It's the perfect pair, really. And when you mix it with some cream cheese, sour cream and other pizza toppings you're in for a mighty fine treat.

    How to Make Pizza Dip

    1. It all starts with your pizza dip base that consists of cream cheese, mayonnaise, sour cream, and shredded cheese. Give it a good stir.
    2. Stir in some canned tomatoes and sliced olives.
    3. Saute your favorite pizza toppings- I used bell peppers, pepperoni and garlic- until tender and stir into the cheese mixture.
    4. Spread cheese mixture into a baking dish and top with your favorite pizza sauce. I like to make my own by following this recipe.
    5. Follow up the pizza sauce with more shredded cheese and decorate with toppings, just like you would a pizza.
    6. Bake and enjoy!

    pepperoni pizza dip on a toasted baguette slice

    Cooking Tips For Making the BEST Baked Pizza Dip

    • Use your Favorite Toppings-- The best part about this pizza dip, well one of the best parts aside from the melty cheese is that you can customize it to fit your pizza profile. I made this pizza dip with bell pepper, olives, and pepperoni, but any combination of toppings can be used. The key is to cook your raw ingredients first (bell peppers, onions, mushrooms, sausage, whatever) and then add them to the cheese mixture.
    • Use freshly grated cheese when you can-- Pre-grated cheese that you buy at the grocery store is coated in food starches that keep it from caking. This is all fine and good, but cheese that doesn't have these starches on them will melt better and give you a creamier end result.
    • Make ahead--  This pizza dip is one of our favorite party foods because we can make it ahead of time and just pop in the oven when we're ready to eat.

    What Should I Serve With Pizza Dip?

    I typically serve my pizza dip with baguette slices that I brush with garlic oil (¼ C olive oil + 1 clove minced garlic) and toast them in the oven until golden brown. Homemade breadsticks would be fabulous as well!

    Need More Crazy Delicious Dip Recipes?

    Try this Sour Cream and Onion Dip for a cool, creamy dip that's perfect with chips! If you want a little spice, this  White Queso Blanco Dip is one of my favorites. If you want something totally drool-worthy, this Ultimate California Cheesesteak Dip is crazy delicious and totally out of the ordinary!

    📖 Recipe

    Baked Pizza Dip in pie dish with a white and red towel and toasted bread slices
    Print Recipe
    4.60 from 5 votes

    Supreme Pepperoni Pizza Dip

    This Pepperoni Pizza dip has all your favorite pizza flavors wrapped up in a warm, cheesy, melty, dip. Make some breadsticks or dip slices of toasted baguette into it for the ultimate dipping experience. 
    Prep Time20 minutes mins
    Cook Time20 minutes mins
    Total Time40 minutes mins
    Course: Appetizer
    Cuisine: Italian
    Keyword: Baked Pizza Dip
    Servings: 10 servings
    Calories: 194kcal
    Author: Heather Cheney

    Ingredients

    • 4 oz. cream cheese softened
    • ¼ cup sour cream
    • ¼ cup mayonnaise
    • 2 cups Pizza Blend Cheese usually has mozzarella, provolone, parmesan, maybe more
    • ¾ cup favorite pizza sauce
    • 2 cloves garlic
    • 8 ounces can petite diced tomatoes drained (½ can)
    • ¾ cup bell pepper chopped
    • 25 slices pepperoni
    • ½ cup sliced olives

    Instructions

    • Preheat oven to 350°
    • In a medium mixing bowl combine cream cheese, sour cream, mayonnaise, 1 cup pizza cheese, drained tomatoes and olives, reserving some olives for the top. Set aside.
    • Chop 15 slices of pepperoni, bell pepper, and garlic and cook in a small saute pan until the peppers are tender and pepperoni starts to get crispy. Remove from the heat and add to the cheese mixture. Spread cheese mixture into the bottom of a 9" pie plate.
    • On top of the cheese mixture, spread the pizza sauce into an even layer and top with remaining 1 C of cheese, 10 pepperoni and reserved olives. Bake until bubbly and the cheese is melted and browned, about 20 minutes. Serve with crusty bread or garlic baguette slices.

    Nutrition

    Serving: 1serving | Calories: 194kcal | Carbohydrates: 3g | Protein: 8g | Fat: 17g | Saturated Fat: 5g | Cholesterol: 28mg | Sodium: 305mg | Potassium: 122mg | Fiber: 1g | Sugar: 2g | Vitamin A: 618IU | Vitamin C: 16mg | Calcium: 67mg | Iron: 1mg

    Mississippi Mud Brownies (Coconut Bribery Version)

    By Heather LAST UPDATED March 11, 2021 · FIRST PUBLISHED July 31, 2011, 4 Comments

    You'll be hard-pressed to find a brownie I like better than these Mississippi Mud Brownies! They are so fudgy, gooey, and absolutely delish. 

    Mississippi Mud Brownies with Coconut on top on a white plate


    Mississippi Mud Brownies-- How's Summer treatin' ya?  Heck! How have the past 6 months been? Seriously, people, I need a blogging intervention. I'm not going to make excuses or tell you why my life has been crazy because we all have crazy lives. BUT I am going to bribe you into being my friend again. You think it won't work, but you are so so SO wrong. It'll work- promise. These Mississippi Mud Brownies will have you knocking down my door for more recipes once you try them. If not, well, you've got seriously deranged tastes.

    How to Make My Mississippi Mud Brownies

    It all starts off with an ah-mazing basic brownie recipe. It's moist, fudgy, and best of all- EASY! In goes the flour, cocoa, sugar, baking powder, and salt.

    Dry ingredients for Mississippi Mud Brownies in a silver bowl

    Two sticks of melted butter can't hurt anything (in my humble opinion) and a few eggs. Make sure your eggs are room temperature before adding them in. Because what happens when cold eggs hit melted butter? Yup, your butter isn't melted anymore and it will change the texture of the brownies, yay for science! I usually just plop my eggs in bowl of warm water (with shells still on!) a few minutes before using them and it does the trick.

    Brownie batter in a silver bowl and whisk

    The original recipe suggests using an electric mixer and beating the batter for 3 minutes, but I skipped the mixer, used a whisk, and only stirred until everything was just incorporated. Mixing for a longer period of time only creates gluten and incorporates air in the batter which can make the Mississippi mud brownies turn out tough and dry.

    brownie batter in a glass dish ready for oven

    See my little cutie-pie giving me the "what-the-heck-are-you-doing-mom?" stink eye? I love her.  Spread your batter into a greased 9x13 pan and pop into a 350-degree oven. My brownies were done in about 35 minutes. The original recipe suggests 25-30, and the ladies of Our Best Bites say 40-50 minutes. It looks like this recipe really reacts to elevation so I'd say start checking at 25 and go from there. Stick a toothpick in the middle and when it comes out just barely clean, you're good to go! See all the holes in the middle? It took me a few tries too.

    brownies just out of the oven in a glass dish

    What Kind of Marshmallows Should I Use for Mississippi Mud Brownies?

    As soon as it comes out of the oven, you're going to want to top it with marshmallows. Big ones.  There will be none of this mini marshmallow crap. You want them big, ok? Well, you're not going to want to use those giant ones that all the rage though, just the ol' big marshmallows.

    bag of Toasted Coconut marshmallows

    BUT, if you really want to go crazy, which I totally encourage, try it with these toasted coconut marshmallows from Kraft. They. Are. Amazing. and totally make these Mississippi mud brownies do the jig on your tongue. No worries though, regular marshmallows will be just as good. Kinda. 😉 I found the coconut marshmallows here.

    Toasted Coconut Marshmallows lined up on Brownies

    All in a row... and back into the oven they go! Bake for another 3-4 minutes or until they are all puffed up and starting to brown.

    Toasted Coconut marshmallows melted on Mississippi mud brownies

    See? It was really hard resisting the urge to pull one of the perfectly melted marshmallows off the top but I succeeded. Yep, go me!  At this point, you'll want to let the brownies cool completely and remain unscathed by curious fingers. It will be hard, but you can do it. Just make the frosting and snitch from it while you're waiting.

    Once cooled, spread on the frosting, sprinkle on a little toasted coconut if you're feeling crazy and let the good times roll.

    Need More Chocolatey Dessert Recipes?

    Try this Milk Chocolate Coconut Cream Pie or this Hot Fudge Cake in A Cup! The cream pie is ridiculously delicious and the hot fudge cake is made in just a few minutes in your microwave!

    📖 Recipe

    Mississippi mud brownie square on a white plate and wood board
    Print Recipe
    5 from 2 votes

    Mississippi Mud Brownies

    You'll be hard-pressed to find a brownie I like better than these Mississippi Mud Brownies! They are so fudgy, gooey, and absolutely delish. 
    Prep Time20 minutes mins
    Cook Time45 minutes mins
    Total Time1 hour hr 5 minutes mins
    Course: Dessert
    Cuisine: American
    Keyword: Mississippi Mud Brownies
    Servings: 24 brownies
    Calories: 296kcal
    Author: Heather Cheney

    Ingredients

    For the Brownies

    • 1 ½ cups all-purpose flour
    • 2 cups Sugar
    • ½ cup unsweetened cocoa powder
    • 2 teaspoon baking powder
    • ½ teaspoon kosher salt
    • 1 cup melted butter 2 sticks
    • 4 eggs lightly beaten and room temperature
    • 1 tablespoon vanilla extract
    • 1 bag large marshmallows toasted coconut covered highly recommended

    For the Frosting

    • ½ cup melted butter
    • ⅓ cup unsweetened cocoa powder
    • ⅓ cup evaporated milk
    • 1 pound powdered sugar
    • 1 teaspoon vanilla
    • ½ teaspoon coconut extract only add if you’re using the coconut mallows or want it coco-nutty

    Instructions

    • Pre-heat oven to 350 and lightly grease a 9×13" pan. 
    • Combine flour, sugar, cocoa powder, baking powder, and salt in a medium bowl. Add the melted butter, whisked eggs, and vanilla. Using a whisk, stir until mixture is combined and no dry lumps remain.
    • Spread batter in 9×13" pan and bake for 30-40 minutes. Cooking time will vary based on altitude so start checking at 25 minutes. Brownies are done when a toothpick inserted into the center of the pan comes out clean and moist.
    • When brownies are done, remove from oven and place the marshmallows in a single layer on top. Return to the oven for 3-4 minutes or until the marshmallows are puffed and starting to turn light golden. Remove from oven and cool completely.
    • While brownies are cooling, beat together the frosting ingredients on high until light and fluffy. Spread over the cooled brownies and cut into squares. Makes about 24 brownies.

    Nutrition

    Serving: 1brownie | Calories: 296kcal | Carbohydrates: 44g | Protein: 2g | Fat: 12g | Saturated Fat: 7g | Cholesterol: 58mg | Sodium: 166mg | Potassium: 110mg | Fiber: 1g | Sugar: 36g | Vitamin A: 405IU | Vitamin C: 0.1mg | Calcium: 36mg | Iron: 1mg

    2 Ingredient Pumpkin Muffins

    By Heather LAST UPDATED May 21, 2020 · FIRST PUBLISHED January 26, 2011, 1 Comment

    You can make these moist, 2 Ingredient Pumpkin Muffins with 2 things you might already have in your pantry! Just stir, spoon into muffin cups and bake! A perfect recipe for the kids to make!
    Pumpkin muffins in white wrappers on a red cloth

    So, I have a daughter that loves muffins. She'd eat them all day if I let her.  These 2 Ingredient Pumpkin Muffins are some that I don't mind her eating more than one at a time because they are loaded with pumpkin goodness, super easy to make, and take all of 2 ingredients!

    How to Make Pumpkin Muffins with a Cake Mix

    You'll need 1 box of spice cake mix and 14 ounces of canned pumpkin. I doubled the recipe in the pictures. You'll also need any mix-ins you want to use. I used walnuts here and I'll go over some pumpkin muffin mix-in ideas below.

    a can of pumpkin, cake mix, nuts and a red bowl

    Are you ready for the hard part? Dump the cake mix and pumpkin into a bowl.

    pumpkin and cake mix in a red bowl

    Very good.  Now it's time to taste.  Not me, her.

    young girl licking her fingers while stirring muffin batter

    Stir until it's combined and there's no more dry parts.

    pumpkin batter in a red bowl with spatula

    Better taste again.young girl licking fingers in a pink apron

    Add your mix-ins.pumpkin muffin batter and walnuts in a red bowl

    Oh the excitement!young girl excited about muffin batter in a red bowl

    Time to scoop your 2 ingredient pumpkins up! I use an ice cream scoop for all my muffins and cupcakes to make scooping them easier and even. It also makes the tops smooth which is nice for this recipe because the shape of the muffins don't change very much while baking.

    muffins being scooped into a muffin tin with white liners

    Pop them in the oven at 350 for about 20 minutes and you've got muffins! And, in my case, a very happy four-year-old.

    pumpkin muffins in white wrappers on a red cloth

    Mix- In Ideas for 2 Ingredient Pumpkin Muffins

    There are so many things you could mix into these muffins that would be delicious. Here are some ideas:

    • Mini Chocolate chips or M&Ms
    • Nuts- walnuts or pecans will work best
    • Toasted Oats
    • Cinnamon Streusel (Sprinkle on the top before baking)
    • Cream Cheese Icing (drizzle on top after baking)

    Tips for Making the BEST 2 Ingredient Pumpkin Muffins

    • Use Canned Pumpkin NOT Pumpkin Pie Filling-- Pumpkin pie filling is not the same as just plain canned pumpkin, so make sure you grab plain pumpkin at the grocery store when you're getting ready to make these muffins.
    • Do not Over-Mix-- Stir the mixture just until no dry spots remain. The batter will be thick, but try hard to resist the urge to continue mixing. It will only make the muffins tough.
    • Use a cookie scoop to portion out the batter -- A cookie or ice cream scoop similar to this one will make the task of portioning the batter into the muffin pan a breeze.
    • Use Muffin Liners-- These muffins bake best when using paper liners.

    If you want some other muffin recipes, my Greek Yogurt Blueberry Muffins are on my list of all-time favorite muffin recipes and these Bacon Cheeseburger Meatloaf Muffins are mighty tasty, even if they aren't "technically" muffins. 🙂

    📖 Recipe

    pumpkin muffins in white wrappers on a red cloth
    Print Recipe
    5 from 1 vote

    2 Ingredient Pumpkin Muffins

    You can make these moist, 2 Ingredient Pumpkin Muffins with 2 things you might already have in your pantry! Just stir, spoon into muffin cups and bake! A perfect recipe for the kids to make!
    Prep Time10 minutes mins
    Cook Time20 minutes mins
    Total Time30 minutes mins
    Course: Bread
    Cuisine: American
    Keyword: 2 ingredient pumpkin muffins
    Servings: 18 muffins
    Calories: 131kcal
    Author: Heather Cheney

    Ingredients

    • 18 ounces spice flavored cake mix 1 box
    • 14 ounces canned pureed pumpkin 1 can
    • ½ cup mixins optional

    Instructions

    • Preheat oven to 350 degrees.
    • Combine cake mix and pumpkin in a large mixing bowl. With a spatula or wooden spoon, stir until combined and no dry spots remain — the batter will be thick.
    • Stir in mix-ins if desired and spoon into a lined muffin tin. Bake for 20-23 minutes or until a toothpick inserted in the center comes out clean.

    Nutrition

    Serving: 1muffin | Calories: 131kcal | Carbohydrates: 22g | Protein: 1g | Fat: 3g | Saturated Fat: 1g | Sodium: 187mg | Potassium: 142mg | Fiber: 1g | Sugar: 13g | Vitamin A: 3430IU | Vitamin C: 1mg | Calcium: 32mg | Iron: 1.6mg

    An Intro...

    By Heather LAST UPDATED January 9, 2019 · FIRST PUBLISHED May 21, 2010, Leave a Comment

    Hi, I'm Heather, and I like food.

    I'm starting this blog as a completely selfish way to keep my recipes organized. I've become tired of the messy pile well kept stack of recipes that accumulate on my microwave. Besides the fact that it's ridiculously difficult to find the recipe I'm looking for, I'm sure it's a fire hazard disaster waiting to happen. I'm not going to lie,  I've had many failed attempts at "blog keeping". But, I  feel like I'll be better at it if I'm not blogging for everybody else. Like I said, selfish.

    Although I'm being completely self-centered here, don't hesitate to make comments. PLEASE PLEASE PLEASE COMMENT!  I'd love to hear if you've tried one of my recipes, have questions, or just want to tell me I'm cool.

    I will do my very to best to give credit where credit is due. That being said, most of the recipes I post I consider my own, as it's just not in me to leave a recipe "as is". I usually make enough changes that they no longer resemble the original recipes.  I also have ALOT of recipes in my arsenal that are scribbled almost unintelligibly on scraps of paper from random, un-noted sources. If a recipe I post is yours, please let me know if I'm a dirty thief.

    I've been cooking my whole life and have loved food for eternities. Cooking and eating (much to my demise) is stress relief for me. I've graduated from culinary arts school, worked in restaurants and bakeries, and have dabbled in running a cake decorating/catering business for a while. Right now, I'm a stay-at-home mom with a 3 yr. old daughter and another one on the way. My hubby is a student, we're poor, and happy. Life is good, and food makes it better! Enjoy!

    • « Previous Page
    • 1
    • …
    • 11
    • 12
    • 13
    Headshot of Heather in an apron

    Hi, I'm Heather! Want to become a rockstar cook? I’m a former chef, caterer, and culinary arts school graduate that just wants to help you make some killer food! I truly believe that with a little know-how anyone can totally rock their kitchen. Stick around for ultimate recipes of your favorite foods, cooking tips, guides, and more!

    More about me →

    Popular Recipes

    • BBQ chicken cut on a cutting board with a bottle of bbq sauce
      The Best Super Moist Oven Baked BBQ Chicken
    • One Pan Sour Cream Chicken Enchilada Skillet
      One Pan Sour Cream Chicken Enchilada Skillet
    • Hawaiian Shoyu Chicken-- so flavorful you'll forget how easy it is to make! Filled with flavors of ginger, garlic and just a touch of red pepper.
      Hawaiian Shoyu Chicken
    • Sloppy Joe on a paper bag
      The Best Sloppy Joe Sauce
    • Coffee Cake In A Mug-- the perfect remedy for a sugar craving when you don't want to spend a lot of time or heat up the oven. #coffee #cake #microwave #mug
      Coffee Cake in a Cup
    • Baked Ricotta Chicken
      Baked Ricotta Chicken
    • Mom's Classic Meatloaf Recipe
    • Beef Teriyaki Stir Fry
    Email opt in image

    Cooking Method

    • Slow Cooker
    • Grilling

    Footer

    ↑ back to top

    About

    • Privacy Policy
    • Disclaimer

    Newsletter

    • Sign Up! for emails and updates

    Contact

    • About
    • Email
    • Work With Me

    As an Amazon Associate I earn from qualifying purchases. This site uses cookies and generates income via ads.

    Copyright © 2022 Heather Likes Food, LLC

    Rate This Recipe

    Your vote:


    A rating is required
    A name is required
    An email is required