• Active
  • Blog
  • Cart
  • Checkout
  • Cooking Crew Recipes
  • Cooking Crew!
  • Disclaimer
  • Library
  • Media Kit
  • My account
  • Nutrition and Food Safety Disclaimer
  • Opt Out of 5 Chef Secrets
  • Press
  • Privacy Policy and Copyright
  • Recipe Index
  • Refund and Returns Policy
  • RSS Email Subscription Confirmation
  • Shop
  • Subscribe
  • Ultimate Recipes for Becoming a Rockstar Cook!
  • Welcome to Heather Likes Food!
  • Work With Me
  • About Heather Cheney
  • Contact
menu icon
go to homepage
subscribe
search icon
Homepage link
  • Recipe Index
  • About
  • Contact
  • Shop
    • Facebook
    • Instagram
    • Pinterest
    • YouTube
  • ×
    Home / Recipes

    How To Cook Perfect Oven Bacon

    By Heather LAST UPDATED July 18, 2019 · FIRST PUBLISHED February 11, 2013, Leave a Comment

    How to Cook Perfect Bacon

    It's amazing to me how bacon has become a figure in pop culture. Who would have thought that a pork product would have such a following let alone a statue erected in it's honor at a university (that's for real, guys)! Not to mention all the bacon flavored/scented swag there is to be had. Bacon gum anyone?

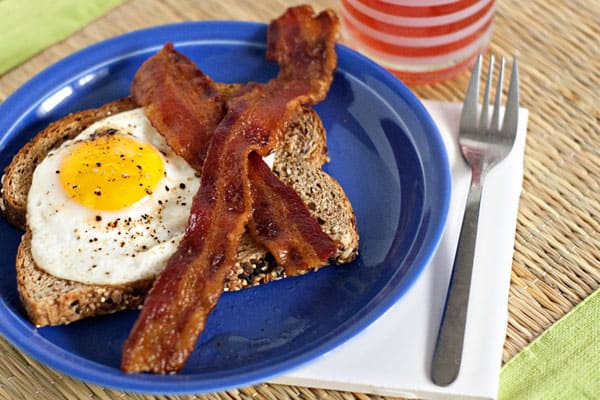
    I'll admit that I've indulged in the bacon craze and have tried a bacon chocolate bar, an apple bacon pie, and multiple bacon maple bars (swoon). But my favorite way to eat it is straight up out of the pan or nestled between some toast, tomatoes and avocado. There's lots of debate about how people should eat their bacon;  I'm a crispy-to-the-point-of-almost-burnt kind of gal, the hubs likes his nice and chewy and I've even known some people who like theirs soggy (I will never, ever understand this). With this method of cooking you can have your bacon any way you like it with very minimal mess.

    For a long time I just assumed everybody knew how to cook oven bacon. I mean it's so simple, why wouldn't they? But lately it's become apparent through talking with friends that I needed to get this out there. I guess not everybody is as enlightened as I am (I kid, I kid). But really, all I need is one less person standing helplessly over a pan of sizzling and spattering grease to make putting this post up worth it. One person. Is it you?

    All we're doing is baking the bacon -laying it out on a baking sheet, putting it in the oven and letting it cook. Seems simple, right? It is if you have a few little tricks up your sleeve.

    The first trick:

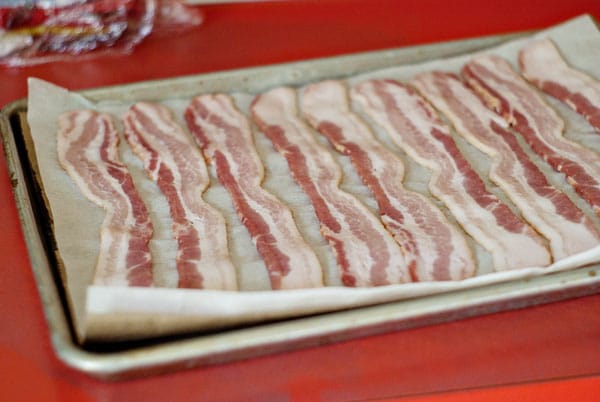
    Double layer your baking sheet. I like to lay a brown paper grocery sack on the baking sheet first and then cover with a piece of parchment paper. The parchment paper will keep the bacon from sticking and the bag on the bottom absorbs any grease that escapes from the top leaving you with a virutally clean baking sheet (usually).
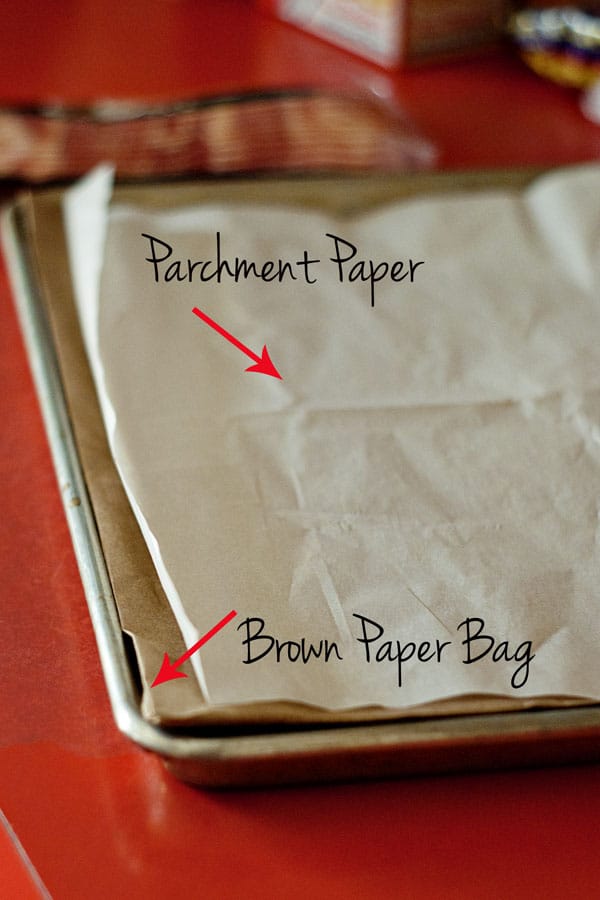
 How To Cook Perfect Bacon

    The second trick:

    Start it in a cold oven. You want the bacon to heat up gradually so it doesn't curl up and the most fat can be rendered to make it crisp. Just slide the pan into the oven, turn it on at 400 degrees and walk away.

    SONY DSC

    For nicely crisp, generally favored bacon, cook about 16 minutes or adjust to suit your tastes. Remove pan from the oven and place the bacon on paper towels to drain.  SONY DSC

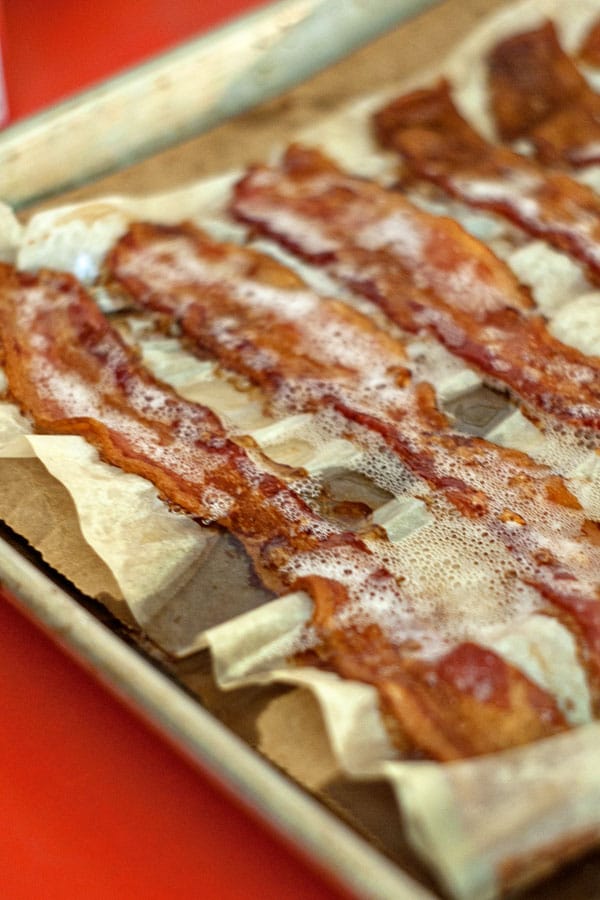
    That's it! No grease burns, no running mascara from standing over a hot pan, and no mess! See that paper bag doing its job? It totally knows who's boss around here.

    Can I get an hallelujah?!

    📖 Recipe

    Print Recipe
    4.80 from 10 votes

    How To Cook Perfect Bacon

    If you've never cooked bacon in the oven, once you try it you'll never go back to cooking it on the stovetop again!
    Prep Time5 minutes mins
    Cook Time16 minutes mins
    Total Time21 minutes mins
    Course: Breakfast
    Cuisine: American
    Keyword: kitchen hack, oven baked bacon, perfect crispy bacon
    Servings: 4 serving
    Calories: 473kcal
    Author: Heather Cheney

    Ingredients

    • 1 lb Bacon
    • 1 brown paper bag
    • 1 sheet parchment paper
    • 1 baking sheet

    Instructions

    • Lay the paper bag on the baking sheet and top with parchment paper.
    • Lay the bacon strips in a single layer across the sheet.
    • Place pan into a cold oven and turn on to 400 degrees.
    • Bake for about 16 minutes for nicely crisp bacon, adjusting time to fit your tastes.
    • Remove pan from oven and transfer bacon to paper towels to drain.

    Nutrition

    Serving: 1serving | Calories: 473kcal | Carbohydrates: 1g | Protein: 14g | Fat: 45g | Saturated Fat: 15g | Trans Fat: 1g | Cholesterol: 75mg | Sodium: 751mg | Potassium: 225mg | Vitamin A: 42IU | Calcium: 6mg | Iron: 1mg

    Layered Jello Squares, Valentine's Day Style

    By Heather LAST UPDATED July 18, 2019 · FIRST PUBLISHED February 9, 2013, 2 Comments

    Valentine's Layered Jello Squares

    My mom is the queen of Jello.

    If it jiggles, is molded, or layered she's probably made it, though she never jumped on the grated carrot or raisin train and for that, I am grateful.  I'm sure I'll hear it for outing her like this, but it had to be said. It was never a holiday in our home without some themed jello creation waiting for our sticky little fingers to steal it from the refrigerator shelf. Her layered Jello Easter eggs were my favorite.

    Since my mom's kiddos are now(mostly) grown, her jello production has slowed, but I expect I'll see it pick up as more grandkids enter the picture. Until then, I thought I'd break out my inherited jello skills and put together something Valentine's day themed for my lil' munchkins.

    You can make this layered jello with any color/flavor combination you'd like, but I chose raspberry and strawberry for their bright red colors. I also used plain Greek yogurt  as a stir-in for the creamy layers but regular yogurt or even sour cream works great.

    Valentine's Layered Jello Squares

    You'll start by combining the darker of the two jello colors with 2 C boiling water and stirring until dissolved. You're going to want to make a creamy layer first so that you'll end up with a clear layer to put the strawberries in.

    Valentine's Day Jello Squares


    Remove 1 C of the gelatin mixture and set side. Stir ⅔ C room-temperature yogurt into remaining gelatin and whisk until completely combined. It will look curdled and lumpy and first, but it will come together. If the yogurt it super cold you'll likely run into problems, so leave it on the counter until it's room temp or throw it in the microwave for a few seconds to warm it up.

    Valentine's Day Jello SquaresPour the first layer into a smooth 9x13" pan and let chill in the fridge until just about set, about 30 minutes. You'll then take the gelatin mixture you set aside earlier, warm it up if it's gotten thick, and add a ⅔ cup of water to it. Pour this mixture over the first layer and place in the fridge once again to set-up.SONY Valentine's Day Jello Squares

    You'll end up repeating the above process with the second box of jello, but first you'll want to make some strawberry hearts to place on the 3rd layer before topping it off with the final layer of jello. They are super simple and easy cut. Most strawberries are already pretty heart-shaped, but cutting a little notch out of the top gives them that extra push.

    Stawberry HeartsI was putting the strawberries on this particular pan at about midnight, so I completely forgot to take pictures, but I'll give you a little tip. You'll notice that  in my final picture, half the pan has strawberries in tidy rows and on the other half they are all over the place. Before I poured the final layer over the top they were ALL in tidy rows but as soon as  picked it up to put in the fridge they went hay-wire. I managed to keep half of the pan in place for pictures and just left the rest as-is. To avoid this, paint the backside of each strawberry with the gelatin you'll be pouring over the top and place on the 3rd layer where you'd like them to be. The thin layer of gelatin will set as soon as it touches the cold creamy layer and will act like glue to keep the strawberry in place.

    Let the finished pan chill for at least a couple of hours or even overnight before slicing. If not, all your hard work will likely turn into a pink glob on your plate. A tasty blob, but a glob nonetheless.

    Valentine's Layered Jello Squares

    📖 Recipe

    Print Recipe
    5 from 9 votes

    Layered Jello Squares, Valentine’s Day Style

    Layers of pink and red jello topped with a strawberry heart! A perfect treat for Valentine's Day!
    Prep Time20 minutes mins
    Cook Time0 minutes mins
    Chilling Time4 hours hrs
    Total Time4 hours hrs 20 minutes mins
    Course: Dessert
    Cuisine: American
    Keyword: greek yogurt, Jello Salad, Layered Valentine'd Day Jello
    Servings: 12 servings
    Calories: 26kcal
    Author: Heather Cheney

    Ingredients

    • 1 6 oz package Raspberry Jello
    • 1 6 oz package Strawberry Jello
    • 1 ⅓ C plain Greek or regular yogurt room temperature
    • 4 C boiling water
    • 1 pint fresh strawberries cut into heart shapes

    Instructions

    • Start by combining the raspberry jello with 2 C of boiling water, and stir until dissolved. Remove 1 C of the mixture and set aside in a separate bowl.
    • Combine remaining mixture with ⅔ C room temperature yogurt and whisk until smooth. Pour into a 9x13" pan and place in fridge to chill until set, about 30 minutes.
    • Take reserved gelatin and warm slightly if it's become thick. Stir in ⅔ C water and pour over first layer. Place in fridge to chill until set, about 30 minutes.
    • Repeat this process for the remaining box of jello. Before pouring final layer, place heart-shaped strawberry slices on the 3rd layer in desired pattern. To keep strawberries in place, brush the backside of each slice with a bit of the final layer of gelatin before placing.
    • Pour final layer of gelatin and place in fridge to chill a final time, at least 3 hours.
    • Slice and serve.

    Nutrition

    Serving: 1serving | Calories: 26kcal | Carbohydrates: 4g | Protein: 3g | Fat: 1g | Saturated Fat: 1g | Trans Fat: 1g | Cholesterol: 1mg | Sodium: 13mg | Potassium: 92mg | Fiber: 1g | Sugar: 3g | Vitamin A: 6IU | Vitamin C: 23mg | Calcium: 33mg | Iron: 1mg

    Beef and Blue Cheese Sliders

    By Heather LAST UPDATED April 12, 2018 · FIRST PUBLISHED January 26, 2013, 14 Comments

    Beef and Blue Sliders | heatherlikesfood.com

    Confession time: Up until recently, I've had a fear of blue cheese.

    I don't really know why. Well, okay I do but I'm over it now so I don't really want to talk about it. What if talking about why I didn't like it so much talks me back into not liking it? That wouldn't be cool.  [Read more...]

    Wonton Wrapped Mozzarella Sticks

    By Heather LAST UPDATED April 12, 2018 · FIRST PUBLISHED January 22, 2013, 6 Comments

    Wonton Wrapped Mozzarella Sticks

    I love cheese. I do. I really, really do.

    Cheese has seen me through teenage grilled cheese sandwich obsessions, health class bacon-cheeseburger study sessions in college, one pregnancy where all I craved was cheese pizza, another pregnancy where cheese slices and apple wedges were like manna, and many, many late-night movie-watching nacho dates with my man. [Read more...]

    Fiesta Slow Cooker Chicken Tortilla Soup

    By Heather LAST UPDATED October 14, 2019 · FIRST PUBLISHED January 17, 2013, 14 Comments

    This Fiesta Slow Cooker Chicken Tortilla Soup is, hands-down my favorite slow cooker recipe. It takes just a few minutes to throw into the crockpot and cooks up full of flavor!Slow Cooker Chicken Tortilla Soup

    I've shared a lot of recipes over the years with friends and family but, this slow cooker chicken tortilla soup is hands down the one that gets requested the most often. Honestly, I'm really surprised I haven't already shared it if only to prevent me from having to email it to someone new. Forwarding emails are such taxing work, you know. I'd much rather sit and eat bon bons and watch Parenthood (do bon bons still exist?).

    Here are a few reasons why I think this slow cooker chicken tortilla soup is a favorite (in no particular order):

    1. It's absolutely the BEST tortilla soup I've ever tried. Lots of trial and error has gone into making this soup my be-all-end-all. If soup eating were a sport, I would win something while eating this and you would too.
    2. It's drop dead easy. Put (mostly) all of the ingredients into the slow cooker in the morning and come dinner time you have a hot, hearty soup that took you 10 minutes to make.
    3. It makes you feel amazing and has healing abilities. This is the direct result of #1 and #2. People will love it. You'll feel really cool. You'll start day dreaming about cooking for Graham Elliot on Master chef. You'll eventually realize Graham will want you to cook more than just tortilla soup and decide not to audition. You'll feel sad until you realize there's still soup in the fridge. All is well. All is well.
    4. It's a texture thing. Crunchy tortilla chips topped with cheese turn magical when you add a ladle-full of hot soup brimming with beans and chicken. Throw some diced avocado and a dollop of sour cream into the mix, and you just created a euphoric textural symphony of taste in a bowl. The only thing that could make it better would be a unicorn sitting at your dining room table with you. And maybe some flan.

    Now that I've pretty much covered the "why," let's focus on the "how." You'll start by adding red enchilada sauce, chopped green chiles, diced tomatoes, and black beans into your slow-cooker.

    Chicken Tortilla Soup

    Followed by some frozen corn kernels...

    Slow Cooker Chicken Tortilla Soup

    ...spices like cumin and chili powder, salt, oregano, and a bay leaf. You'll also chop up an onion and a few cloves of garlic and add them into the mix. You'll then pour a few cups of chicken broth over everything and stir it.

    Slow Cooker Chicken Tortilla Soup

    As a general rule, I never like to add frozen meat to my slow-cooker since it takes so long for it to come up to temperature. But, I break that rule whenever I make this soup. Such a rebel, I know. But I reason that the chicken breasts are individual, and the soup itself is brothy so they defrost really quickly and it saves me a step. Add two boneless skinless chicken breasts into the slow-cooker.

    Slow Cooker Chicken Tortilla Soup

    Let it rip and roll and do it's thing on HIGH for 3-4 hours or on LOW for 6-8. It's ready when the chicken shreds easily. Remove that easily shred-able chicken from the soup and shred it up. Meanwhile, stir a big handful of chopped fresh cilantro and the juice of 2 limes into the soup.

    Slow Cooker Chicken Tortilla SoupReturn the chicken to it's home and serve hot with corn chips and cheese for maximum effect. The melted cheese paired with the still-slightly-crisp tortilla chips is heaven.

    Slow Cooker Chicken Tortilla Soup

    Other Soup Recipes You Might Like

    • Southwest Potato Corn Chowder
    • Keto Chicken Soup
    • Award Winning Best Crockpot chili recipe
    • Slow Cooker Tortellini Soup
    • Thai Ramen
    • Instant Pot Lentil Soup
    • Chicken Salsa Chili
    • BBQ Chicken Chili
    • Instant Pot Chicken Dumpling Soup

    Tools used in making this Slow Cooker Chicken Tortilla Soup

    Ninja 3-in-1 Cooking System: I've owned this slow cooker for about six years (when they were first introduced), and I still love it. The stovetop feature allows me to sear and cook meats before allowing them to slow cook (fewer dishes) and there's a bake feature as well.

    📖 Recipe

    Chicken Tortilla Soup
    Print Recipe
    4.83 from 40 votes

    Fiesta Slow-Cooker Chicken Tortilla Soup

    This slow cooker recipe is tortilla soup at its perfection! Tender chicken and a tangy broth stuffed with veggies and beans, and topped wtih fresh avocado, cheese and tortillas chips!
    Prep Time10 minutes mins
    Cook Time6 hours hrs
    Total Time6 hours hrs 10 minutes mins
    Course: Soup
    Cuisine: American
    Keyword: Enchilada Sauce Soup, Fresh Cilantro, Slow Cooker
    Servings: 6 servings
    Calories: 348kcal
    Author: Heather Cheney

    Ingredients

    • 1 can 15oz petite diced tomatoes
    • 1 can 10 oz red enchilada sauce
    • 1 can 4 oz diced green chilies
    • 1 can 14.5 oz black beans, drained
    • 10 oz frozen corn kernels
    • 1 medium onion diced
    • 2 cloves garlic minced
    • 4 C chicken broth
    • 1 teaspoon ground cumin
    • 1 teaspoon chili powder
    • 2 teaspoon kosher salt
    • 1 teaspoon oregano
    • ¼ teaspoon black pepper
    • 1 bay leaf
    • 2 boneless/skinless chicken breasts
    • ½ C fresh cilantro chopped
    • 2 limes juiced
    • tortilla chips cheese, sour cream, avocado for serving

    Instructions

    • Combine all ingredients except for the cilantro and lime juice in a slow-cooker.
    • Cook on HIGH for 3-4 hours or LOW for 6-8 hours.
    • Remove chicken from soup, shred into bite-sized pieces and return to soup.
    • Stir in chopped cilantro and lime juice.
    • Serve with tortilla chips, cheese, sour cream, and avocado if desired.

    Nutrition

    Serving: 1serving | Calories: 348kcal | Carbohydrates: 42g | Protein: 33g | Fat: 6g | Saturated Fat: 1g | Cholesterol: 71mg | Sodium: 1274mg | Fiber: 10g | Sugar: 11g

    Bite-Sized Boston Cream Pie

    By Heather LAST UPDATED March 18, 2021 · FIRST PUBLISHED December 11, 2012, 4 Comments

    Bite-sited Boston cream pie

    I'm not going to even come up with some clever anecdote to start this post with today because, let's be honest, few things are better than mini food.  And since these Boston cream pies are pretty much the epitome of adorable vittles, we're just going to dive right in.

    I made these cuties a few weeks back for a brunch I was catering with an "around the world" theme. While they might not seem very ethnic (because they're not) I included them in the menu alongside desserts like coconut lychee fruit rice pudding, and flan de leche as an homage to good ole' American cuisine. Who doesn't love Boston cream pie? Like, really.

    Bite-sited Boston cream pie

    The three components of this lovely dessert are cake, pastry cream, and chocolate glaze. I went with a yellow cake mix for the base and used a recipe from America's Test Kitchen for the pastry cream and glaze (recipes below). If you're feeling baking-adventurous, a basic yellow sponge cake recipe will work well for the base. Or, if you're on the other side of the spectrum, chilled vanilla pudding will work in place of the pastry cream. I will however, forbid you to use anything but the glaze recipe below. Its it delicious. It is decadent. It is pretty. The end.

    Spoon heaping tablespoonfuls of yellow cake batter into the wells of a greased mini muffin pan. Bake for about 8 minutes (check after 6, darker pans bake more quickly). Remove from pans and let cool completely.

    Bite-sited Boston cream pie

    Using a serrated knife, slice the curved dome off of each muffin/cupcake. If I call these muffins can I justify eating more?

    Bite-sited Boston cream pie

    Make your pastry cream, let cool and then spoon into a pastry bag or even a large ziplock bag. Snip off the end and squeeze a nice little dollop of the cream on ½ of the cake rounds.

    Bite-sited Boston cream pie

    Place the remaining ½ of the cake rounds on the tops of the cream to create a little sandwich. Adorable, no?

    Bite-sited Boston cream pie

    Make the glaze and transfer into a squeeze bottle if you have one and top each cake with the glaze. If you don't have a squeeze bottle you can just spoon it onto the tops, but for the sake of these ending up pretty you might want to splurge and buy one.

    Bite-sited Boston cream pie

    Plus, squeezing warm chocolate onto cake might be one of life's choicest activities. Second only to eating these.

    Bite-sited Boston cream pie

    📖 Recipe

    Bite-sited Boston cream pie
    Print Recipe
    5 from 2 votes

    Bite-Sized Boston Cream Pies

    Mini Boston Cream Pies that are perfect for parties
    Prep Time10 minutes mins
    Cook Time30 minutes mins
    Total Time40 minutes mins
    Course: Dessert
    Cuisine: American
    Keyword: bite-sized desserts, chocolate ganache, party desserts
    Servings: 30 servings
    Calories: 191kcal
    Author: Heather Cheney

    Ingredients

    • 1 yellow cake mix prepared as directed on box
    • 1 ⅓ cups heavy cream
    • 3 large egg yolks
    • ⅓ cup 2 ⅓ ounces sugar
    • Pinch salt
    • 4 teaspoons cornstarch
    • 2 tablespoons unsalted butter cut into 2 pieces
    • 1 ½ teaspoons vanilla extract
    • 8 ounces bittersweet chocolate chopped
    • ⅔ cup heavy cream
    • ¼ cup light corn syrup
    • ½ teaspoon vanilla extract

    Instructions

    For the pastry cream:

    • Bring the cream to a simmer in a medium saucepan over medium heat. Meanwhile, whisk the egg yolks, sugar, and salt together in a medium bowl, then whisk in the cornstarch until pale yellow and thick, about 30 seconds.
    • Slowly whisk the hot cream into the egg mixture to temper, then return the mixture to the saucepan and cook over medium heat, whisking constantly, until thick and glossy, about 1½ minutes. Off the heat, whisk in the butter and vanilla. Transfer the mixture to a small bowl, press plastic wrap directly on the surface, and refrigerate until chilled and set, about 2 hours.

    For the Glaze:

    • Microwave all of the ingredients together, whisking often, until melted and smooth, 1 to 2 minutes. Let the glaze cool, uncovered, until it is thickened but pourable, about 20 minutes.

    For the Cake:

    • Prepare cake mix according to directions on the box. Spoon heaping tablespoonfuls into the wells of greased mini muffin pans. Bake for about 8 minutes or until a toothpick inserted into the center comes out clean. Invert on a baking rack and let cool completely.

    For Assembly:

    • With a serrated knife, cut the curved dome off the top of each muffin.
    • Spoon chilled pastry cream into a pastry bag or ziplock bag and snip of the end. Squeeze a dollop of cream onto ½ of the trimmed cakes. Place the remaining cakes on top of the cream to create a sandwich.
    • Transfer glaze into a squeeze bottle or use a spoon to top each sandwich with the glaze.

    Nutrition

    Serving: 1serving | Calories: 191kcal | Carbohydrates: 20g | Protein: 2g | Fat: 12g | Saturated Fat: 6g | Trans Fat: 1g | Cholesterol: 44mg | Sodium: 128mg | Potassium: 105mg | Fiber: 1g | Sugar: 13g | Vitamin A: 287IU | Vitamin C: 1mg | Calcium: 40mg | Iron: 1mg

    Hearty Cheese Potato Soup

    By Heather LAST UPDATED March 22, 2021 · FIRST PUBLISHED December 3, 2012, Leave a Comment

    Hearty Cheese Potato Soup

    Well, hello strangers. Apparently I fall off the face of the blogging earth when I have a catering job. I can't believe it's been a whole week since I've been on, kinda. I volunteered to head up a brunch for about 50 people over the weekend at my church and I've been running around like a crazed woman trying to get it all done. Feeding 50 people may not sound like a completely over-whelming task but when you factor in that my hubby has basically been MIA because it's finals week at school and I have to still be mommy full-time to 2 little girls, things get real. REAL. [Read more...]

    Baked Crunchy Taco Casserole

    By Heather LAST UPDATED March 22, 2021 · FIRST PUBLISHED November 26, 2012, 9 Comments

    Baked Crunchy Taco Casserole

    If I had to eat one type of food for the rest of my life it would be Mexican, hands down. I love the bold flavors, textures, and that you can basically turn the same 5(6,7,8) ingredients into countless different meals. Taco Bell really has this concept down. I don't think they've had to change their ingredient lists, like, ever. Well, except for that one time that they decided to sell Frito Burriots. That was weird.

    Anyway...

    This taco casserole is proof that you can create a completely different eating experience with the same basic ingredients just by by switching up the cooking style. In this case we're stuffing the taco shells and baking them all together in one pan. You're not going to end up with a completely crunchy taco that you're able to eat one-handed while driving to work (remember $0.29 Tuesdays? Those were the days!). But you ARE going to end up with a plate full of Mexican goodness that is half crispy, half saucy, and flavorful all-around.

    Start by browning a pound of ground beef or turkey. Add in some cheese, canned diced tomatoes, taco seasoning, and salsa verde. If you want a little info on what kind of salsa verde to use read this post because not all are created equal. Meaning, that some are burn-your-face-off hot!

    Baked Crunchy Taco Casserole

    Give it a stir until it's nice and combined...

    Baked Crunchy Taco Casserole

    Stand 12-15 shells up in a 9x13" casserole dish. If they aren't all standing up straight they will be easier to move around once they are filled and have some weight to them. I might try the shells with the flat bottoms next time and see it that makes things a bit easier.

    Baked Crunchy Taco Casserole

    Top with some glorious cheesey cheese.

    Baked Crunchy Taco Casserole

    And bake for about 15-20 minutes or until the cheese it melted and the meat is hot. Remove from the oven and top with all of your favorite taco fixin's. I like to top the whole thing with shredded lettuce, tomato, and cilantro and then serve with sour cream, guacamole, and a squeeze of lime juice.

    Baked Crunchy Taco Casserole

    Other Mexican Inspired Recipes You Might Like

    • Chile Colorado
    • Oven Pork Carnitas
    • Chipotle Guacamole
    • Easy Mexican Rice Recipe
    • One Pan Black Bean Burrito
    • Pozole Verde

    📖 Recipe

    Baked Crunchy Taco Casserole
    Print Recipe
    5 from 5 votes

    Baked Crunchy Taco Casserole

    The easiest (and tastiest!) way to make tacos for a crowd! Assemble, load into a casserole dish, bake, and top with your favorite fixings!
    Prep Time30 minutes mins
    Cook Time30 minutes mins
    Total Time1 hour hr
    Course: Main Course
    Cuisine: American, Mexican
    Keyword: baked tacos, easy dinner, party tacos
    Servings: 15 tacos
    Calories: 166kcal
    Author: Heather Cheney

    Ingredients

    • 1 pound ground beef or turkey
    • 1 14.5 oz can petite diced tomatoes, drained
    • 1 packet taco seasoning
    • 1 C cheese divided
    • ¼ C salsa verde
    • 15 crunchy taco shells
    • Shredded lettuce tomatoes, cilantro, sour cream, guacamole, lime juice to top

    Instructions

    • Preheat oven to 400 degrees.
    • Brown and drain meat.
    • Stir tomatoes, seasoning, ½ C cheese, and salsa into meat.
    • Arrange taco shells standing up in a 9x13" pan. Fill each shell with the meat mixture, dividing equally until all the meat is used.
    • Sprinkle remaining ½ C of cheese over the tops of the filled tacos and bake for 15-20 minutes. Cheese will be melted and the meat hot.
    • Top with shredded lettuce, tomatoes, cilantro, sour cream, guacamole and lime juice.

    Nutrition

    Serving: 1taco | Calories: 166kcal | Carbohydrates: 8g | Protein: 8g | Fat: 11g | Saturated Fat: 5g | Trans Fat: 1g | Cholesterol: 29mg | Sodium: 129mg | Potassium: 125mg | Fiber: 1g | Sugar: 1g | Vitamin A: 107IU | Vitamin C: 1mg | Calcium: 71mg | Iron: 1mg

    Saucy Slow-Cooker BBQ Beef Sandwiches

    By Heather LAST UPDATED March 22, 2021 · FIRST PUBLISHED November 18, 2012, 9 Comments

    Saucy Crock Pot BBQ Beef Sandwiches

    I'm kind of a sucker for onion rings--breaded, beer battered, ranch-dunked, or sandwich-nestled--I just love them. My favorite part might be how they require an eating strategy as to not let the inner onion slide out of the breading. Only highly skilled ring eaters can conquer the most challenging of onion ring varieties with the perfect breading-to-onion ratio in every bite. Not to brag or anything, but I pretty much take home the gold every time. It's just what I do. [Read more...]

    Brined and Roasted Turkey Breast {Thanksgiving Blitz #3}

    By Heather LAST UPDATED July 18, 2019 · FIRST PUBLISHED November 6, 2012, 2 Comments

    The moistest, most tender turkey breast, EVER! If a whole turkey is too much for you and you won't miss the dark meat, just buy a turkey breast! It's much easier to handle, cooks quicker and allows you to cook the breast to tender, moist perfection! This recipe uses a flavorful brine to hydrate the meat and plump up those cells so they retain all the moisture during roasting. And don't worry, you can still make gravy from the drippings! The best!

    When I was in college (pre-cooking school days) my roommates and I decided to put on a Thanksgiving dinner. Having always been a little over-zealous in the kitchen, I volunteered to make the turkey- a 19 pound turkey! I had never made a turkey, let alone a behemoth one. I had remembered hearing that brining the turkey first made it super juicy so that's what I set out to do. So there I was, giant bird staring me down, giblets and neck sitting on the counter (ew. sick.), massive amounts of brine ready to go, and roommates coming in and out of the kitchen gagging because I was making the turkey dance. And then it hit me that I hadn't planned on what to actually put the turkey in. Whoops. So one kitchen garbage bag to hold the turkey and brine and a clean…er… college standards clean, trash can later we were in business. But where do we store it to keep it cold? The fridge wasn't big enough to hold the trash can. We could have just buried it in the snow outside but were afraid that an animal would dig it up in the night. Where do we put it? My car. Strapped in to the front seat of my little Saturn coupe was a nearly 20 pound bird housed in an un-used trashcan and bag ready to brine the snowy, cold night away. [Read more...]

    Fancy Pants Street Vendor Hot Dogs

    By Heather LAST UPDATED March 1, 2021 · FIRST PUBLISHED October 21, 2012, 3 Comments

    Fancy Pants Hot Dogs

    I don't know why, but when I think of what kind of food should be eaten on Halloween it usually comes down to either nachos or hot dogs. Oddly enough I can't recall enjoying either one of these foods in the holiday's past, but nonetheless that's where I'm taking us today. It might have to do with the fact that I know if I serve hot dogs on Halloween I can call them "halloweenies" and I'm all over justifiably throwing the word weenie into my everyday vernacular if only to make my 6 yr. old roll her eyes.

    I recently heard tell of a few food carts that marinade their hot dogs in a mixture of apple cider vinegar and brown sugar. So, clearly,  as soon as I learned about this I knew I had to try it. But first, what to top it with? Mustard… pickles? It didn't take long before I remembered a little hot dog stand in Provo, Utah called J. Dawgs who tops their dogs with their "special sauce" that's basically a sweet BBQ sauce of sorts. Perfect!  So today I'm going to show you a sweet/tangy marinated hot dog topped with a sauce that could definitely award any given hot dog cart a run for their money. These dogs are so good that I don't even know if I can feel good about calling them "halloweenies" come the 31st. Though I make no promises, my daughter is pretty cute when she thinks I'm ridiculous.

    You'll start by combining ½ C of apple cider vinegar, 1 C of brown sugar, and 2 cloves minced garlic. Stir until the sugar dissolves and set aside.

    Using a sharp knife, score the hot dogs in a diamond-shaped pattern. Doing this will allow them to soak in more marinade and also gives lots of surface area for the sauce to adhere to when all is said and done.

    Place the dogs into the prepared marinate and let them do their thing for 30 minutes up to overnight. The longer they marinade the better.

    Prepare your sauce by combining chili sauce, prepared BBQ sauce, honey, soy sauce, and apple cider vinegar. When I say chili sauce, I don't mean sriracha, or even sweet chili sauce from the Asian food aisle. I'm talking about the chili sauce found next to the ketchup at the market, like this one. They really need to be more creative with names for sauces, don't you think?

    Give all the ingredients a stir and you're good to go.

    Grill the marinated hot dogs until hot and just starting to char around the edges. Serve on buns topped with the sauce, onions, pepperoncinis and pickles.


    📖 Recipe

    Print Recipe
    4.36 from 14 votes

    Fancy Pants Street Vendor Hot Dogs

    This sweet marinade is the perfect way to dress up those boring, basic hot dogs for your next backyard bbq!
    Prep Time30 minutes mins
    Cook Time10 minutes mins
    Total Time40 minutes mins
    Course: Main Course
    Cuisine: American
    Keyword: easy dinner, grilled, party food
    Servings: 6 servings
    Calories: 459kcal
    Author: Heather Cheney

    Ingredients

    • 6 all beef hot dogs
    • ½ C apple cider vinegar
    • 1 C brown sugar
    • 2 cloves garlic minced
    • ½ C Chili Sauce found in the ketchup aisle
    • 1.2 C prepared BBQ sauce
    • ¼ C honey
    • 1 tablespoon soy sauce
    • 1 tablespoon apple cider vinegar

    Instructions

    • Combine apple cider, brown sugar, and garlic for the marinade and stir until sugar is dissolved
    • Score hot dogs in a diamond shaped pattern and place in marinade for 30 minutes up to overnight
    • Remove from the marinade and grill until hot and slightly charred around the edges.
    • Combine all sauce ingredients and stir. Serve over hot dogs with onions, pepperoncinis, and pickles.

    Nutrition

    Serving: 1serving | Calories: 459kcal | Carbohydrates: 77g | Protein: 7g | Fat: 14g | Saturated Fat: 6g | Cholesterol: 25mg | Sodium: 1533mg | Potassium: 358mg | Fiber: 2g | Sugar: 69g | Vitamin A: 283IU | Vitamin C: 4mg | Calcium: 63mg | Iron: 2mg

    Homemade Ranch Dressing Mix

    By Heather LAST UPDATED May 21, 2020 · FIRST PUBLISHED October 15, 2012, 4 Comments

    homemade ranch dressing in a white bowl

    Ranch dressing is a multifaceted mistress of sorts. You either like it and can enjoy it on a salad, LOVE it and dunk everything from pizza to shoe leather in it, or think it's an epicurean abomination all together and are lobbying to remove it from the shelves of grocery stores.   If you're of the last camp, feel free to stop reading now. I love you, but this post is just not for you.

    If you fall somewhere in between the realm of LIKE and LOVE, you're in for a treat. I happen to think that bottled ranch dressings are an atrocity, but love a nice, freshly made ranch. In the past I've made it with a packet of ranch dressing mix, but hated paying over $1 for half of an ounce of salt and garlic powder.

    Making your own mix is super easy, really fun (think sand art), and is significantly less expensive than buying the packaged mixes. Another bonus is that you'll always have a stash of it in the pantry as one recipe makes enough mix to keep your salad, pizza and hot wings well dressed for quite sometime.

    You'll start with a mason jar, parsely, black pepper, garlic salt, kosher salt, granulated onion and garlic, and dill weed. Be as artistic as you want to be and layer all the herbs and spices into the jar. Screw on the jar lid and mess up your beautiful layers by giving it a good shake. You're done!

    seasonings for ranch dressing layered in a mason jar

    When you're ready to make some dressing just add 1 tablespoon + 1 teaspoon of the mix to 1 cup mayonnaise, 1 cup milk, ¾ C sour cream, and 2 tablespoons lemon juice. Stir, stir, stir!

    ranch dressing made in a large measuring cup with wire whisk

    This mix works interchangeably with other recipes that call for a packet of ranch dressing mix. Use 1 tablespoon for every packet needed. I'll be back on Wednesday with an awesome recipe using this mix, but in the meantime if you need to get your ranch fix, try these Slow-Cooker Cilantro Ranch Chicken Tacos, or this BBQ Chicken Chopped Salad.

    Pin it! You know you want to...

    📖 Recipe

    homemade ranch dressing in a white bowl
    Print Recipe
    5 from 1 vote

    Homemade Ranch Dressing Mix

    This recipe make a ranch that is a pour-able consistency. perfect for salads. If you like your ranch thicker, add a little bit of milk at a time until it's the consistency that you like.
    Prep Time10 minutes mins
    Cook Time0 minutes mins
    Total Time10 minutes mins
    Course: Condiment
    Cuisine: American
    Keyword: fresh, make it yourself, no ranch seasoning
    Servings: 10 servings
    Calories: 24kcal
    Author: Heather Cheney

    Ingredients

    • ¾ C dried parsley
    • 2 tablespoon black pepper
    • ¼ C garlic salt
    • 1 tablespoon kosher salt
    • 2 tablespoon granulated garlic
    • ¼ C + 2 tablespoon granulated onion
    • ½ C dill weed

    Instructions

    • Combine all herbs and spices in a jar and shake to mix.
    • Combine 1 tablespoon + 1 teaspoon mix with 1 C mayonnaise, 1 C milk, ¾ C sour cream, and 2 tablespoon lemon juice.
    • Use mix interchangeably in recipes calling for ranch dressing mix. Use 1 tablespoon mix for every packet needed.

    Nutrition

    Serving: 1serving | Calories: 24kcal | Carbohydrates: 5g | Protein: 1g | Fat: 1g | Saturated Fat: 1g | Sodium: 3540mg | Potassium: 131mg | Fiber: 1g | Sugar: 1g | Vitamin A: 224IU | Vitamin C: 5mg | Calcium: 46mg | Iron: 1mg

    Broiled Fish Tacos w/ Tangy Slaw

    By Heather LAST UPDATED March 22, 2021 · FIRST PUBLISHED October 8, 2012, 1 Comment

    Broiled Fish Tacos in tortillas on a white and blue plate with limes

    Irrational fear confession time: having a stinky house.

    You know what I'm talking about. Whether you're willing to admit it or not, we all have at least one place we go that's been dubbed "the stinky house". The unpleasant aroma could be from a menagerie of natural or unnatural sources, but the worst part about it is that the dwellers don't usually know they're swimming in stench filled air. It's easy to become accustomed to smells we're around often that we can't smell it any more. So, how's one to know?

    "…um, so by the way, your house really smells" said no one, ever.

    The house we're renting right now is 98 years old. The walls are the original plaster, my kitchen was "updated" in the 40's, and the industrial low-pile carpet the owners decided to install is less than desirable. I probably sound like I'm complaining, but I'm not. We love it here and it's been the perfect fit for us in this time in our life-- nevertheless, I'm afraid. Any object this old has acquired its own smell over the years. Does my house smell 100 years old? Am I the stinky house person? Would you tell me?

    Cooking fish always turns my smell-fighting powers on over-drive. I don't need my house smelling ancient AND like a washed up fishing boat. The thing that I've found works best is to keep an opened jar of vinegar out of the counter while I'm cooking. I don't know how or why it works, but it does! I saw it on a cooking forum a while back and have done it ever since. No more lingering fish smell! Guess it's time to make some fish tacos…

    These fish tacos are a go-to meal for my family as the fish is done in under 10 minutes, and the rest of it can be on the table in just about the same amount of time. I usually open up a can of black beans to have on the side and it leaves us full and happy!

    I like to make the slaw first and let it sit in the fridge while the fish is cooking. You'll need a bag of coleslaw mix, sour cream, lime juice, cilantro, onion powder, and kosher salt. Give it a good mix together and you're set.

    tangy slaw in a metal bowl and red spatula

    Place your fish (I used rockfish in the pictures, but any firm fish works well—I often use tilapia) on a lined baking sheet and season one side with some kosher salt, garlic powder, chipotle chili powder, oregano, chili powder, cumin and drizzle each fillet with a bit of olive oil.

    seasoned raw white fish on a baking sheet

    Place the fish under the broiler for 6-8 minutes or until the meat flakes easily with a fork. If you use parchment paper like I did, it will likely smoke and turn black.

    baked white fish on a baking sheet

    Remove fish from pan, separate into pieces for tacos and squeeze a bit of fresh lime juice over the top if desired.

    pieces of cooked whitefish in a blue and white bowl

    Serve on warm tortillas topped with the slaw, salsa or pico de gallo, and guacamole. If you haven't already, don't forget to enter the giveaway for the Ninja Cooking System going on right now! You can enter here.

    Broiled Fish Tacos with Tangy Slaw on a blue and white plate

    📖 Recipe

    Broiled Fish Tacos with Tangy Slaw on a blue and white plate
    Print Recipe
    4.50 from 4 votes

    Broiled Fish Tacos w/ Tangy Slaw

    Seasoned broiled white fished topped with a quick and easy slaw is the perfect quick and easy weeknight dinner!
    Prep Time10 minutes mins
    Cook Time10 minutes mins
    Total Time20 minutes mins
    Course: Main Course
    Cuisine: American
    Keyword: baked tacos, fresh, healthy dinner
    Servings: 4 servings
    Calories: 213kcal
    Author: Heather Cheney

    Ingredients

    • 1 14 oz bag coleslaw blend
    • ⅓ C sour cream
    • ¼ C fresh cilatnro chopped
    • ½ teaspoon onion powder
    • 1 tablespoon lime juice
    • ⅛ teaspoon kosher salt
    • 1 lb firm fish rockfish, cod, tilapia, etc.
    • ¼ teaspoon kosher salt
    • ¼ teaspoon garlic powder
    • ⅛ teaspoon chipotle chili powder
    • ¼ teaspoon dried oregano
    • ½ teaspoon chili powder
    • ½ teaspoon ground cumin
    • 2 tablespoon olive oil
    • ½-1 tablespoon lime juice

    Instructions

    • Combine all ingredients in a medium sized bowl and mix thoroughly. Place in refrigerator.
    • Place fish fillets on a lined baking sheet and season evenly with the spices and herbs. Drizzle olive oil over each fillet.
    • Place fish under broiler for 6-8 minutes or until it flakes easily with a fork. Cooking times will vary based on thickness of fillet used.
    • Remove from oven and separate into small pieces. Squeeze fresh lime juice over fish if desired and serve on warm tortillas topped with the slaw, salsa, and guacamole.

    Nutrition

    Serving: 1serving | Calories: 213kcal | Carbohydrates: 2g | Protein: 23g | Fat: 13g | Saturated Fat: 4g | Cholesterol: 67mg | Sodium: 299mg | Potassium: 399mg | Fiber: 1g | Sugar: 1g | Vitamin A: 288IU | Vitamin C: 2mg | Calcium: 41mg | Iron: 1mg

    Pumpkin Spice Waffles w/ Praline Pecan Syrup

    By Heather LAST UPDATED May 21, 2020 · FIRST PUBLISHED September 30, 2012, 5 Comments

    Pumpkin Waffles w/ Praline Pecan Syrup on a green plate

    I'm doing the pumpkin baking happy dance right now along with every other recipe writer on the planet. Why we wait until September rolls around to use pumpkin in our cooking is beyond me. Are we really so trained that pumpkin is less appetizing in the spring and summer months? It's bizarre, people.

    As for me, I am perfectly content eating pumpkin anything year round. These pumpkin spice waffles present the perfect example of what pumpkin should do in our baking and why it's ridiculous for us to wait for the "perfect season". The pumpkin makes these waffles moist and rich with earthy undertones while the spices complement the pumpkin without overpowering. They are crisp on the outside, just barely sweet and are the perfect base for something a little naughty… like, oh, praline pecan syrup? Can I get a hallelujah!?

    On the flip-side I thought I'd give you a little glimpse into my world. I usually don't allow myself in the kitchen before noon. I'm convinced that my brain doesn't work at it's full capacity until well after I arise, so if we have fun breakfast food it's usually for dinner. Well, I decided to tempt the fates when making these waffles and I was proved right once again. I successfully managed to burn the snot out of the remaining syrup AND leave a waffle in the iron for at least 20 minutes. Winning!

    burnt pecan sauce in a pot with a burnt waffle beside it

    Let's get cooking…

    In a bowl mix together the milk, pumpkin, eggs, oil, sugar and vinegar.

    yellow bowl with pumpkin, eggs, and sugar in it

    Sprinkle the flour, baking powder, baking soda, allspice, ginger, cinnamon, and salt over the pumpkin mixture and stir lightly just until no dry spots remain.

    pumpkin waffle batter in a yellow bowl with whisk

    Heat a lightly oiled waffle iron and cook according to the directions for your particular model.

    pumpkin waffle baking in waffle maker

    For the syrup melt the butter over medium heat in a semi-large pan (use one bigger than you think you'll need as this tends to boil over).

    butter melting in a pan on the stove

    Stir in the sugars, lemon juice and evaporated milk, bring to a boil and let cook for 1 minute. Remove from heat.

    praline pecan syrup in a pan on the stove

    Stir in the baking soda, mixing continuously until it stops foaming – this is where it could make a mess and stir in your pecans.

    adding pecans to the syrup in the pan

    And there you have it! A  lovely little syrup to adorn your hot waffles with.

    Pumpkin Waffles w/ Praline Pecan Syrup on a green plate

    Hallelujah!

    📖 Recipe

    Pumpkin Waffles w/ Praline Pecan Syrup on a green plate
    Print Recipe
    5 from 4 votes

    Pumpkin Spice Waffles w/ Praline Pecan Syrup

    These tender and moist pumpkin waffles are topped with a sweet and salty praline pecan syrup. It's the ultimate fall breakfast!
    Prep Time10 minutes mins
    Cook Time5 minutes mins
    Total Time15 minutes mins
    Course: Breakfast
    Cuisine: American
    Keyword: autumn, fall, holiday breakfast
    Servings: 4 waffles
    Calories: 936kcal
    Author: Heather Cheney

    Ingredients

    • 2 C milk
    • 1 C pumpkin puree
    • 1 egg
    • 3 tablespoon brown sugar
    • ¼ C vegetable oil
    • 2 tablespoon vinegar
    • 2 C all-purpose flour
    • 4 teaspoon baking powder
    • 1 teaspoon baking soda
    • 1 teaspoon ground allspice
    • 1 teaspoon ground cinnamon
    • ½ teaspoon ground ginger
    • ½ teaspoon kosher salt
    • ¼ C butter
    • ½ C evaporated milk
    • ¼ C sugar
    • ¾ C brown sugar
    • ½ teaspoon baking soda
    • ½ teaspoon lemon juice
    • ½ C pecans chopped

    Instructions

    • In a bowl mix together the milk, pumpkin, eggs, oil, sugar and vinegar.
    • Sprinkle the flour, baking powder, baking soda, allspice, ginger, cinnamon, and salt over the pumpkin mixture and stir lightly just until no dry spots remain.
    • Heat a lightly oiled waffle iron and cook according to the directions for your particular model.
    • Melt the butter over medium heat in a semi-large pan.
    • Stir in the sugars, lemon juice and evaporated milk, bring to a boil and let cook for 1 minute. Remove from heat.
    • Stir in the baking soda, mixing continuously until it stops foaming and stir in the pecans.

    Nutrition

    Serving: 1serving | Calories: 936kcal | Carbohydrates: 129g | Protein: 16g | Fat: 42g | Saturated Fat: 23g | Trans Fat: 1g | Cholesterol: 93mg | Sodium: 928mg | Potassium: 1011mg | Fiber: 5g | Sugar: 73g | Vitamin A: 10236IU | Vitamin C: 4mg | Calcium: 494mg | Iron: 5mg

    Pasta Al Forno

    By Heather LAST UPDATED May 21, 2020 · FIRST PUBLISHED September 27, 2012, 3 Comments

    Pasta Al Forno on a fork in a baking dish

    Right after giving birth to my first daughter I was bombarded with a myriad of problems resulting from the delivery and anesthesia. The baby was healthy, but I wasn't doing so hot. My mom was coming to help, but I had a few days to get through once my hubby went back to work before she could come. So there I was, sick with a newborn and totally clueless as to how to survive. Nothing sounded good to eat, I felt like I had an elephant sitting on top of my head, and I was a human pacifier.

    After one particularly long day of Gilmore Girls reruns, sporadic napping, smelling of the plague and eating nothing but microwave popcorn and pineapple juice, I got a knock on my door. A friend from church was holding a hot casserole dish and had her own one week old curled up in the Baby Bjorn. A saint, right? That meal she brought over that night, 6 years ago, has forever won a place in my heart. I needed it that night, more than she knew and probably more than I even knew. It restored my energy, fed my body and soul, and filled my house with aromas sweeter than those permeating from me.

    You can probably guess that this pasta al forno is what was brought to me that night. It's creamy, saucy, super flavorful, and might be one of the most perfect comfort foods ever. This recipe comes straight from the saint that carried it to my doorstep. She spent 18 months in Italy as a missionary and told me that it was one of the dishes she learned to make while there. In Italian "al forno" references food that has been cooked in the oven, so pasta al forno is simply pasta cooked in the oven. This recipe pairs a meaty tomato sauce with creamy béchamel, mozzarella cheese, and rigatoni—what's not to love?

    Let's make it!  Start by browning 1 ½ lbs of mild Italian sausage until cooked through and drain off the fat.

    close up of crumbled sausage in a pan

    To the sausage add 2 cans of petite diced tomatoes a few chopped cloves a fresh garlic. Stir together and let simmer, covered,  for as long as possible.
    tomatoes, sausage, and garlic in a pan on the stove
    Just before it's ready to go into the pasta,  you'll stir in some fresh basil. Wanna know how to make a chiffonade of basil? Stack picked basil leaves on top of one another until you have a fairly good sized pile.
    a stack of fresh basil leaves
    Roll the pile of leaves into a cigar shape...
    rolled basil leaves on a cutting board
    And cut, cut, cut! Thinly slice the basil "cigar" and you'll end up with pretty little thin strands of basil.
    chopped basil leaves on a cutting board
    Melt a stick of butter in a medium sized sauce pan (yes,  a whole stick. It's worth it, promise)
    melted butter in pot on the stove
    Stir in enough flour to make it about the same consistency of toothpaste. Cook for 1 minute, stirring constantly.
    butter and flour in a pot on the stove
    Stir the milk into the roux and continue to stir until it comes to a boil and is thickened. As far as types of milk go, I like to use whole milk. It  helps that have a toddler so I always have it available, but the whole milk makes it super creamy. You can sub 2%, or even 1% but please, for the love, don''t use skim.
    Bechamel sauce on a wooden spoon over a metal pot
    Cook the rigatoni per the package directions and drain. Once you have the sausage sauce, bechamel, and pasta you're ready to asseble.
     I've used 9x13" pans in the past, just be aware that it will be a VERY full pan. If you have something bigger, use it! You'll start with placing half of the pasta in the bottom of  the pan and topping with half of the sausage sauce and then half of the bechamel.
    bechamel sauce drizzled over meat sauce and pasta in foil pans
     Sprinkle with some mozzarella cheese and repeat the layering once more: pasta, sausage/tomatoes, bechamel, and mozzarella.
    unbaked pasta al forno in foil pans
    Bake uncovered at 350° for about 45 minutes or until the cheese is browned and the sauce is bubbly. These also make excellent freezer meals. Just freeze once assembled, thaw when ready to eat, and bake like normal. It's the perfect thing to take to, say, some one who just had a baby? 🙂
    Oh, and if you're reading this Cari, THANK YOU!
    Pasta Al Forno on a fork over a baking dish

    📖 Recipe

    bechamel sauce drizzled over pasta al forno in foil pans
    Print Recipe
    5 from 7 votes

    Pasta Al Forno

    One of my all-time favorite baked pasta recipes! This Pasta al Forno is creamy, cheesy, and full of Italian flavor!
    Prep Time30 minutes mins
    Cook Time45 minutes mins
    Total Time1 hour hr 15 minutes mins
    Course: Main Course
    Cuisine: Italian
    Keyword: Bechamel, creamy, homemade
    Servings: 8 servings
    Calories: 667kcal
    Author: Heather Cheney

    Ingredients

    • 1 ½ lbs mild italian sausage
    • 2 14.5 oz cans petite diced tomatoes
    • 4 cloves garlic minced
    • 2 tablespoon fresh basil chopped
    • 1 4 oz stick butter
    • ½ C + 2 tablespoon all purpose flour
    • 2 ½ C whole milk
    • ¼ teaspoon kosher salt
    • pinch nutmeg
    • 1 lb dry rigatoni cooked
    • 2 C mozzarella cheese shredded

    Instructions

    • Brown sausage until cooked through and drain off excess fat. Stir in tomatoes and garlic and bring to a simmer. Cook covered on low for at least 30 minutes, longer if time allows. Stir in basil just before assembly.
    • Make the bechamel by melting butter in a medium sized sauce pan. Stir the flour into the butter, adding more flour if needed to create a toothpaste-like consistency. Cook for 1 minute, stirring constantly.
    • Using a whisk, stir in milk and continue to stir until it comes to a boil and is thickened. Remove from heat and stir in salt and nutmeg.
    • In a large casserole dish (9x13" or bigger) place half of the pasta followed by half of the tomato sauce and bechamel. Top with 1 C of mozzarella cheese.
    • Repeat the layering one more time with the remaining ingredients.
    • Bake at 350° for about 45 minutes or until the sauce is bubbly and the cheese is browned.

    Nutrition

    Serving: 1serving | Calories: 667kcal | Carbohydrates: 54g | Protein: 29g | Fat: 36g | Saturated Fat: 15g | Trans Fat: 1g | Cholesterol: 95mg | Sodium: 908mg | Potassium: 480mg | Fiber: 2g | Sugar: 6g | Vitamin A: 343IU | Vitamin C: 2mg | Calcium: 260mg | Iron: 2mg

    6 Layer Miracle Cobbler

    By Heather LAST UPDATED May 21, 2020 · FIRST PUBLISHED September 25, 2012, 3 Comments

    close up of dump cake in a glass dish on a pink napkin

    I've had a lot of amazing desserts in my lifetime; I've dined at fancy pants restaurants and been served teeny tiny little hand-dipped chocolate tea cups filled will all sorts of heavenly mousses, baked and sampled all manner of tortes and cream-filled cakes, engorged myself on fresh French pastries until I had to buy new jeans, and have licked my way through time trying to consume every possible ice cream flavor I can. But regardless of the incredible sweets I've savored, I'm always drawn back to one thing--pie. And since pie = fruit + crust and cobbler = fruit + crumb crust, it's only natural that cobbler is up there on my to-die-for list as well.

    This cobbler is one of my absolute favorite desserts of all time. Seriously.

    I know, you'd think that I would have moved beyond the cake mix and canned pie filling concoctions by now, but guys, this stuff is good. One of the best parts about it is that you can have it in the oven in 5 minutes and be enjoying hot cobbler in under an hour from start to finish. This recipe has been around for a long time and has all sorts of variations, but I find the recipe below to be the very best. Its most common name is "Dump Cake", referencing the fact that all the ingredients just get dumped into the pan, but I prefer to call it by a more sophisticated name:  6 Layer Miracle Cobbler. It makes it sound mysterious.

    Let's find out where these 6 layers come from and why it's such a miracle, shall we?

    Layer 1: Cherry pie filling. Pour it into a 9x13" pan

    canned cherries in a glass baking dish

    Layer 2: Crushed pineapple, juice and all. Dump it on top of the cherries and smooth it out with a spatula into an even layer.

    canned pineapple being poured on top of the cherries in a glass dish

    Layer 3: 1 box of DRY yellow cake mix. Yes, DRY cake mix. Sprinkle the entire box over the cherries and pineapple into an even layer.

    yellow cake mix spread out on top of the fruit in a baking dish

    Layer 4: Butter. You knew butter would be an ingredient, didn't you? Cube 1 stick of butter into small pieces and place evenly over the cake mix.

    cubed butter on top of the cake mix in a baking dish

    Layers 5 & 6 Walnuts and Coconut. Sprinkle over the top of the butter.

    chopped walnuts on top of the butter and cake mix in a glass baking dish

    Miracle time: Bake for about 40 minutes at 350° until golden brown and bubbly. The butter will melt, moistening the cake mix from the top, aiding in browning and crisping while the pineapple and cherries will moisten the bottom of the cake mix. When it's all done you'll have a perfectly crisp, sweet, tart, crumbly, gooey, chewy, and slightly salty cobbler. Serve hot with vanilla ice cream for maximum enjoyment!

    Cherry dump cake in a glass baking dish on a pink napkin

    📖 Recipe

    Cherry dump cake in a glass baking dish on a pink napkin
    Print Recipe
    4.75 from 4 votes

    6 Layer Miracle Cobbler

    Some know this as dump cake, I just call it a miracle dessert. 🙂 
    Prep Time10 minutes mins
    Cook Time45 minutes mins
    Total Time55 minutes mins
    Course: Dessert
    Cuisine: American
    Keyword: Dump Cake
    Servings: 8 servings
    Calories: 314kcal
    Author: Heather Cheney

    Ingredients

    • 1 21 oz can cherry pie filling
    • 1 20 oz can crushed pineapple, UNDRAINED
    • 1 18.25 oz box yellow cake mix
    • 1 4 oz stick butter, cut into small pieces
    • ½ C shredded coconut
    • ½ C chopped walnuts

    Instructions

    • Preheat oven to 350°
    • Pour cherry pie filling into a 9x13" pan. Pour pineapple over cherries, smoothing into an even layer of fruit.
    • Sprinkle entire box of DRY cake mix over the fruit, spreading into an even layer.
    • Distribute small pieces of butter all over the top of the cake mix and top with the coconut and walnuts.
    • Bake @ 350­° for 40-45 minutes or until the top of the cobbler is golden and the fruit is bubbling up from the bottom in spots.

    Nutrition

    Serving: 1serving | Calories: 314kcal | Carbohydrates: 56g | Protein: 3g | Fat: 8g | Saturated Fat: 3g | Sodium: 486mg | Potassium: 81mg | Fiber: 1g | Sugar: 30g | Calcium: 144mg | Iron: 1.7mg

    Orange Sticky Finger Ribs

    By Heather LAST UPDATED May 21, 2020 · FIRST PUBLISHED September 18, 2012, Leave a Comment

    sticky ribs on a baking sheet with sauce on them

    Yesterday was a day where cooking or eating like a normal person just wasn't in the cards. Nothing crazy occurred and our schedule wasn't jam-packed, it just didn't happen. The girls were happy with a piece of cold pizza for dinner and Ammon fended for himself like a real man can. Meanwhile, my pickle and I were quite happy together and my brined companion proved to be and oddly satisfying dinner.

    I think days like these need to happen every once in a while. Let the stress of making dinner and eating responsibly flee for a night- your family won't starve and maybe you'll realize that sustenance can be achieved with less than you think! Nevertheless, no matter how much I enjoyed my pickle there's always something that sounds better…

    Things I ate yesterday:

    An apple, Costco samples, pita chips, peach mango salsa, string cheese, carrot sticks, a cherry Danish, a few Dreyer's Dibs, and a jumbo dill pickle.

    What I wish I would have eaten yesterday:

    Orange Sticky Finger Ribs.

    Sweet, tangy, and just spicy enough, these ribs are fall-off-the-bone fabulous. They can be made entirely in the oven, or taken outside to grill after the initial cooking in the oven.

    You'll need 1 rack of pork spare ribs, trimmed. To figure out where to trim, hold the side without the ribs and try to fold it over the top of the ribs.  Bones don't bend so you know to cut down the line where it stops folding. There's a lot of good meat on the trimmed portion so don't throw it away. I usually cut it into chunks and throw it in with my ribs to cook.

    1 rack of pork ribs trimmed

    This next part it totally optional, but I always do it- removing the membrane. There's a thick, tough membrane that covers the back of the ribs. Removing it makes eating and cutting the ribs a little easier. Using the tip of the knife, loosen a corner of the membrane. With your fingers (using a paper towel can help you get a better grip on it), pull it off. It usually comes off in one or two big pieces.

    removing the membrane from the back of pork ribs

    Cut the meat into sections of 3 or 4 ribs,  and season front and back with kosher salt and Montreal Steak seasoning.

    bottle of Montreal steak seasoning

    Place in a baking dish big enough to fit all the sections of ribs in one layer.

    seasoned ribs in a glass baking dish

    And pour enough orange soda into the dish so that it comes half-way up the sides of the ribs.

    orange soda being poured over the ribs

    Cover pan tightly with foil and bake until the meat is tender, but not quite falling off the bones. Remove ribs from pan and drippings and place on a lined baking sheet, leaving a bit of space between each section of ribs. Brush meat all over with prepared sauce.

    brushing the sauce over the ribs on a baking sheet

    Cook under the broiler for about 4 minutes, brush with more sauce and continue to broil until the sauce is bubbly and slightly charred.

    Yummers. This is TOTALLY football worthy food- what do you think?

    📖 Recipe

    sticky ribs on a baking sheet with sauce on them
    Print Recipe
    4.78 from 9 votes

    Orange Sticky Finger Ribs

    These pork spare ribs are first slow-baked in orange soda until fall-off-the-bone-tender and then bathed in a sweet and sticky orange bbq sauce.
    Prep Time10 minutes mins
    Cook Time2 hours hrs
    Broiling Time4 minutes mins
    Total Time2 hours hrs 14 minutes mins
    Course: Main Course
    Cuisine: American
    Keyword: baked ribs, orange soda, oven
    Servings: 4 servings
    Calories: 437kcal
    Author: Heather Cheney

    Ingredients

    • 1 rack pork spare ribs about 3-4 lbs
    • 1 ½ tablespoon Montreal Steak Seasoning
    • 1 teaspoon kosher salt
    • 2 C orange soda
    • ¾ C prepared BBQ sauce
    • ¾ C brown sugar
    • ½ C orange juice concentrate
    • 2 tablespoon hot sauce or to taste

    Instructions

    • Preheat oven to 375°
    • Trim ribs and cut into sections of 3 or 4 bones each. Season front and back with salt and Montreal Steak seasoning and place in a baking dish in a single layer. Pour just enough orange soda over the ribs to cover them half-way.
    • Cover dish tightly with foil and bake for about 2 hours or until the meat is tender but not quite falling off the bone.
    • Remove ribs from baking juices and place on a lined baking sheet.
    • Prepare sauce by combining BBQ sauce, brown sugar, orange juice concentrate (not orange juice), and hot sauce in a small sauce pan and heat on the stove until sugar is dissolved.
    • Brush sauce over cooked ribs and place under the broiler for about 4 minutes. Remove from oven and brush with more sauce. Return to the oven and continue to cook until the sauce is bubbly and slightly charred.

    Nutrition

    Serving: 4servings | Calories: 437kcal | Carbohydrates: 89g | Protein: 6g | Fat: 7g | Saturated Fat: 2g | Trans Fat: 1g | Cholesterol: 23mg | Sodium: 1352mg | Potassium: 508mg | Fiber: 1g | Sugar: 83g | Vitamin A: 305IU | Vitamin C: 54mg | Calcium: 86mg | Iron: 2mg

    7-Up Grilled Chicken

    By Heather LAST UPDATED May 21, 2020 · FIRST PUBLISHED August 19, 2012, Leave a Comment

    Grilled chicken breast on the grill

    Well, welcome to Monday friends. Has it been hot where you are? We're not so used to the triple digits in the Pacific Northwest and Mother Nature blessed us with such temperatures last week. What a dear, dear woman.

    No A/C + Lack of pina colada serving cabana boys and private pools = me grumpy. It also makes for a good time to turn on the grill- to both keep my house cool and to take my heat induced aggression out on cleaning the grill grates. It's a win-win situation, really.

    This marinade works great on all cuts of chicken (breast, thighs, drumsticks), but also works well with turkey breasts, and even cuts of beef (think skirt steak or tri-tip). It's kind of reminiscent of teriyaki, just sweeter with a bit of a zip. The longer the meat is in the marinade, the more flavorful it will be. I wouldn't go longer than overnight though as the meat could take on a weird texture if left in it for too long. The meat is great on its own or makes for delicious chicken sandwiches. You could also brush on a little BBQ sauce during the last few minutes of cooking for a twisted BBQ chicken masterpiece.

    You'll need 5 ingredients: soy sauce, 1 can of lemon-lime soda (not diet), olive oil, 2 minced garlic cloves and Dijon mustard.

    Place chicken in a Ziploc bag and add in all the marinade ingredients.

    chicken breasts in a ziplock bag

    Let the bag do its thing for a few hours or overnight.

    chicken breasts in marinade in a ziplock bag

    Season each breast with salt and pepper and grill chicken over medium-high heat until cooked through, about 15-20 minutes.

    Grilled chicken breast on the grill

    Now, who wants to bring me a pina colada? …anybody?

    📖 Recipe

    Grilled chicken breast on the grill
    Print Recipe
    4.88 from 8 votes

    7-Up Grilled Chicken

    This super simple chicken marinade uses lemon-lime soda (7-UP or Sprite) to up the flavor and bring some sweetness. The end resule is chicken that is flavorful, tender and juicy!
    Prep Time3 hours hrs
    Cook Time20 minutes mins
    Total Time3 hours hrs 20 minutes mins
    Course: Main Course
    Cuisine: American
    Keyword: easy marindae, juicy, soda
    Servings: 4 Servings
    Calories: 273kcal
    Author: Heather Cheney

    Ingredients

    • 4 chicken breast halves boneless/skinless
    • 1 12 oz can lemon-lime soda
    • ½ C soy sauce
    • ¼ C olive oil
    • 2 cloves garlic minced
    • 2 tablespoon Dijon mustard
    • salt and pepper

    Instructions

    • Place chicken in a Ziploc bag and add soy sauce, soda, garlic, mustard, and olive oil.
    • Seal bag and let marinade for 3 hours up to overnight.
    • Remove chicken from marinade, season with salt and pepper and grill over medium-high heat for 15-20 minutes or until cooked through.

    Nutrition

    Serving: 1serving | Calories: 273kcal | Carbohydrates: 3g | Protein: 27g | Fat: 17g | Saturated Fat: 3g | Trans Fat: 1g | Cholesterol: 72mg | Sodium: 1837mg | Potassium: 496mg | Fiber: 1g | Sugar: 1g | Vitamin A: 39IU | Vitamin C: 2mg | Calcium: 19mg | Iron: 1mg

    Easy French Dip Sandwiches

    By Heather LAST UPDATED March 22, 2021 · FIRST PUBLISHED August 1, 2012, Leave a Comment

    French Dip Sandwiches on a wicker plate with a bowl of au jus


    Do you ever have your mom come for a visit and get so caught up in the fun you're having that you forget that the world hasn't stopped turning and you still need to blog? I do. I blame the Olympics. And ice cream.
    And mom (love you!). It's been fun to watch the athletes while eating a big bowl of ice cream. I totally make myself feel superior because they probably can't eat a cookie without feeling guilty.
    Sadly, my good feelings are gone after about 30 seconds when I realize that no matter how I try, I will never be able to stick a landing on a double-twirly-somersault-thing(technical term) no matter how I try. Turns out I can't eat a guilt-free cookie either. Eh. Here are the killer easy french dip sandwiches that I promised on Friday. They are quick, easy, and literally can be on the table in 15 minutes (if you make the aioli ahead of time).

    EASY FRENCH DIP SANDWICHES

    When choosing what kind of deli roast beef to use, I feel like it's worth spending a few extra dollars to get a good quality meat; it will make a difference. The real deal maker with these sandwiches is the lemon-garlic aioli. The lemon brightens the otherwise super-savory meat and just rounds out the whole sandwich.

    The recipe calls for beef consomme. You can find it in the soup aisle and I like to use it in place of beef broth for this as it has a more intense flavor and lacks the sometimes tinny aftertaste the broth can have.

    can of beef consomme These would make a perfect meal to go along with your Olympic game viewing. Add some ice cream to the mix and you have quite the guilt-inducing par-tay! Yeehaw!

    Other Sandwich Recipes You Might Like

    • Italian Beef Recipe with Pepperoncini 
    • Garlic Bread Grilled Cheese
    • Pork Tenderloin Sandwich
    • Easy Pulled BBQ Chicken Sandwiches
    • Banh Mi Sandwiches
    • Slow Cooker BBQ Beef Sandwiches
    • Sloppy Joe Sauce
    • Onion Soup Mix Burger
    • Pork Burger
    • Greek Turkey Burger Recipe
    • Doritos Burgers

    📖 Recipe

    French dip sandwiches on a wicker plate with a bowl of au jus
    Print Recipe
    4.75 from 4 votes

    Easy French Dip Sandwiches

    Deli-sliced roast beef, onion soup mix, and a can of beef consomme come together in this super quick and easy recipe to make juicy, flavorful sandwiches!
    Prep Time10 minutes mins
    Cook Time1 minute min
    Total Time11 minutes mins
    Course: Main Course
    Cuisine: American
    Keyword: dip, easy dinner, sandwich meat
    Servings: 8 big sandwiches
    Calories: 309kcal
    Author: Heather Cheney

    Ingredients

    • 2 lbs deli-sliced roast beef
    • 1 packet french onion soup mix
    • 2 14.5 oz cans beef consomme
    • 1 soup can of water
    • 1 tablespoon Worcestershire sauce
    • 1 ½ teaspoon dijon mustard
    • 8 crusty sandwich rolls
    • 8 slices swiss or provolone cheese
    • 1 recipe lemon-garlic aioli

    Instructions

    • In a skillet combine consomme, soup mix, dijon mustard, Worcestershire sauce, and water sitrring to combine. Bring to a simmer.
    • Prepare sandwich rolls by spreading lemon-garlic aoli on one side of the bread a placing a slice of cheese on the other half.
    • Add roast beef into the simmering broth and leave it there just until it’s hot. Remove meat from broth and divide among prepared rolls.
    • Ladle the au jus (broth) into bowls and serve with the sandwiches for dipping.

    Nutrition

    Serving: 1g | Calories: 309kcal | Carbohydrates: 31g | Protein: 31g | Fat: 7g | Saturated Fat: 2g | Cholesterol: 65mg | Sodium: 2068mg | Potassium: 400mg | Fiber: 1g | Sugar: 1g | Vitamin A: 11IU | Vitamin C: 51mg | Calcium: 382mg | Iron: 4mg

    Lemon-Garlic Aioli

    By Heather LAST UPDATED May 21, 2020 · FIRST PUBLISHED July 27, 2012, Leave a Comment

    lemon garlic aioli in a white bowl on a green napkin

    Have you ever wanted impress your friends with your mad cooking skills and knowledge but in reality wanted to put very little effort into woo-ing them? I've got your solution! It starts with an "A" and ends with "ioli". Say it with me now, AYE-O-LEE. [Read more...]

    Pizzeria-Style Homemade Deep Dish Pizza Dough

    By Heather LAST UPDATED May 21, 2020 · FIRST PUBLISHED July 15, 2012, 2 Comments

    This homemade deep dish pizza dough is a super easy recipe that reminds me of Pizza Hut's deep dish pizza crust. Deep dish pizza in a cast iron skillet

    Happy Monday I'm so excited to share this Deep Dish Pizza with you! But first, I hope you all survived the weekend well and are ready for another week of doing whatever it is you do! We're down to only kid in the house right now because Grandma is doing her annual summer spoiling session with our other. I'm positive she (my almost 6 yr. old) is going to come home thinking that the world revolves around her—won't that be fun?

    Really, she's thought that her whole life so not a whole lot will change besides having me around to try to bring her back down to earth. Maybe I need to stop trying… her confidence will make her uber successful someday and then she can thank me for being such a great mom by giving me an early retirement and an island vacation home with a cabana boy that looks like Robert Downey Jr..

    Suddenly I'm rethinking everything I thought I knew about parenting.

    (Now, watch how I seamlessly segue into what this post is really about)

    Deep Dish Pizza!

    You like pizza right? Everybody likes pizza! Even celebrity-look-alike cabana boys like pizza. (Which is why he and I will get along so well!) When it comes to pizza everyone has their idea of what the crust should be like—how thick, how dense, crispy, etc. For me, I love a good deep dish pizza crust that is thick, but still light and airy. This pizza fits the bill perfectly.

    The deep dish pizza dough starts out simply- water, yeast, sugar, non-fat dry milk, flour, salt and olive oil. Combine the first 4 ingredients, wait until its bubbly and add the remaining flour, oil and salt. Knead the dough for about 5 minutes until it's smooth, cover with plastic wrap and let rise for about an hour or until it's doubled in size. While it's raising make the sauce by combining a can of tomato sauce with a little bit of oregano, basil, garlic salt, and sugar. Stir until combined and you're done!

    What Pan Should I Use For Deep Dish Pizza?

    You'll need 3, 8-10" pans for this recipe. I've used both cake pans and cast iron skillets in the past and have good results with both, but I prefer the cast iron because it produces a bit of a crisper crust. Of course, you can use whatever size pans you have, just divide your dough up accordingly. You want the dough to be about ¼" thick and to cover the bottom of the pan completely.

    How do I get a crisp crust on my deep dish pizza?

    Now, here's the secret to getting a really nice, crisp bottom crust: oil. Calm down, the dough doesn't have to bathe in it, but you'll need at least 2 tablespoon per 8 inch pan, a bit more for larger pans. Oil is an excellent conductor of heat and will give you that nice crisp bottom that great deep dish pizza is known for. I use equal amounts of canola oil and olive oil.

    olive and canola oil in a cake pan Once the dough has doubled in size, turn it out onto a floured surface.

    pizza dough sprinkled with flour on an orange countertop

    Divide your dough into 3 even rounds (I made a double batch for the pictures). Using a rolling pin, roll each round to about a ¼" thick to the diameter of the pan and place on top of oil.

    pizza dough split into portions on an orange countertop

    Spread a couple of spoonfuls of sauce over each pizza—just a couple!  You will have sauce left over so pop it in the freezer for the next time you make pizza or add it to spaghetti sauce later in the week. Too much sauce will cause it to be soggy and  will make it hard to taste anything but the sauce. Leave about a 1" edge around the pizza unscathed by sauce.

    pizza dough in pans topped with sauce

    Top with about 2 oz of mozzarella cheese and any other toppings you'd like. With deep dish I try to stay away from toppings that give off a lot of water while being cooked like thick-cut mushrooms or peppers (thin sliced is okay), tomatoes and zucchini. These tend to make the pizza soggy and heavy. Once the pizza is all topped and ready to go, brush the exposed edges of the dough with olive oil and sprinkle with a mixture of parmesan cheese (from the shaker), dried oregano, and basil. Doing this gives it another dimension of flavor and makes it look pretty J.

    unbaked pizza topped with cheese, pepperoni and olives

    Crank up your oven as hot as it will go (usually 475- 500°) and bake until the cheese is bubbling and outer crust is browned.

    baked deep dish pizza in a cast iron pan

    Sound good? I thought so.

    📖 Recipe

    baked deep dish pizza in a cast iron pan
    Print Recipe
    4.60 from 5 votes

    Pizzeria-style deep dish pizza

    This homemade pizza dough is a super easy recipe that reminds me of Pizza Hut's deep dish pizza crust. Forget take-out and make it better at home!
    Prep Time1 hour hr 10 minutes mins
    Cook Time15 minutes mins
    Total Time1 hour hr 25 minutes mins
    Course: Main Course
    Cuisine: American, Italian
    Keyword: copycat, pizza hut, thick crust
    Servings: 4 Servings
    Calories: 757kcal
    Author: Heather Cheney

    Ingredients

    Crust

    • 1 ⅓ C warm water
    • ¼ C non-fat dry milk
    • 1 tablespoon sugar
    • 2 ¼ teaspoon 1 packet instant yeast
    • 2 tablespoon olive oil
    • ½ teaspoon salt
    • 3 C all-purpose flour
    • ¼ C olive oil for the pans
    • ¼ C canola oil for the pans

    Sauce

    • 1 8 oz can tomato sauce
    • 1 teaspoon dry oregano
    • ½ teaspoon dry basil
    • ½ teaspoon garlic salt
    • 1 teaspoon sugar

    Herb topping

    • ⅓ C parmesan cheese from the shaker
    • 1 teaspoon dry basil
    • 1 teaspoon dry oregano

    Instructions

    • Mix yeast, sugar, dry milk, and water in a large bowl or mixer. Allow to sit for 5 minutes or until mixture starts to get bubbly.
    • Add 2 tablespoon olive oil, salt, and flour and mix until combined. Continue to knead for about 5 minutes or until dough is smooth.
    • Cover bowl with plastic wrap and allow dough to rise until doubled in size, about 1 hour.
    • Combine tomato sauce with herbs and garlic salt and set aside.
    • In a separate bowl, combine Parmesan cheese with herbs for topping and set aside.
    • Once the dough has risen, remove from bowl and divide into 3 equal portions.
    • Prepare pans by adding about a tablespoon of both olive oil and canola oil to the bottom of each pan, making sure the bottom is covered. Add more oil if necessary.
    • Using a rolling pin, roll each round of dough until it’s about ¼? thick and will cover the bottom of the pan completely.
    • Place the dough on top of the oil and spread a couple of spoonfuls of sauce over each one to within 1" of the edge.
    • Top each pizza with about 2 oz of mozzarella cheese and any other desired toppings.
    • Brush the outer edges of the crust with olive oil and sprinkle with the herb and cheese mixture.
    • Bake at 475-500° until the cheese is bubbling and outer crust is browned, about 12-15 minutes.

    Nutrition

    Calories: 757kcal | Carbohydrates: 84g | Protein: 17g | Fat: 40g | Saturated Fat: 7g | Cholesterol: 14mg | Sodium: 670mg | Fiber: 4g | Sugar: 10g

    5 Cheese Stuffed Manicotti

    By Heather LAST UPDATED May 21, 2020 · FIRST PUBLISHED July 8, 2012, 3 Comments

    I'm going to go out on a limb and throw out there that this 5 cheese stuffed manicotti isn't exactly "authentic Italian". But for what it lacks in authenticity it makes up for in deliciousness.Cheese stuffed manicotti in a glass bowl on a white and green towel


    Maybe it has something to do with Mario, but I'm feeling all Italian lately. Pasta has been on the menu a lot the past few weeks and I kind of don't want to stop eating it. This could get ugly.

    So, before I go all carb-a-holic on you, here are my cuties playing at the beach on the 4th. I meant to share some of these on my last post and probably got distracted by pasta. Whoops.

    See, we're active! Carbs are good for active people. J

    dad and daughter running on the beach

    I sure like this girl.

    young girl holding a starfish on the beach

    We had an awesome Fourth playing on the beach, eating good food, watching fireworks, and getting puked on by my other cutie. Well, the walk home after fireworks covered in my toddlers un-mentionables might not have been a highlight, but I'll take what I can get.

    Okay, pasta time! I'm going to go out on a limb and throw out there that this manicotti isn't exactly "authentic Italian". But for what it lacks in authenticity it makes up for in deliciousness. I'm a cheese girl {see one of my many aspirations here} so anything that can pack a five-cheese-punch is right up my alley, especially when it's stuffed inside of pasta. The glory of this dish is that it comes together really quickly and tastes like you've been cooking all day! A total win in my book.

    You'll start by cooking your tomato sauce which consists of just 2 cans of petite diced tomatoes, olive oil, salt, basil and a touch of sugar. Bring those ingredients to a boil and let simmer until you're ready to use it. Next up is cooking your pasta: cook the manicotti tubes (or jumbo shells work well too) by following the package instructions for al dente -not all the way soft and cooked, or in Italian "to the tooth", draining them and lying to dry on some paper towels. Meanwhile, the cheeses are simply mixed together until combined and then scooped into a Ziploc bag to make filling the shells easy – a cake decorating bag without a tip on it does the trick too. Push all of the cheese mixture to one corner of the bag, snip off the end and you're ready to fill your shells.

    manicotti filling in a ziplock bag on a countertop

    Prepare your baking dish by spreading about a cup of the tomato sauce over the bottom and begin to fill the pasta tubes by squeezing a steady stream of cheese into each one until they expand a bit.

    piping manicotti filling into a manicotti shell

    Lay the filled pasta side-by-side on top of the sauce until all the cheese is used, top with the remaining sauce and a sprinkle of parmesan cheese. Cover with foil and bake until bubbly, removing foil for the last 10 minutes to let cheese brown on top.

    Can you resist? I really wish I still had some of these left-overs in my fridge right now because I'd be all up in its business. Watch out my pasta-lovin' peeps, this stuff is whack!

    Holla!

    {sorry, sometimes it's hard to stop}

    close up bite of manicotti

    📖 Recipe

    cheese manicotti in a glass dish on a green and white towel
    Print Recipe
    2.84 from 91 votes

    5 Cheese Stuffed Manicotti

    5 cheeses, one delicious pasta dish!
    Prep Time15 minutes mins
    Cook Time1 hour hr
    Total Time1 hour hr 15 minutes mins
    Course: Main Course
    Cuisine: Italian
    Keyword: 5 Cheese Manicotti
    Servings: 4 servings
    Calories: 1107kcal
    Author: Heather Cheney

    Ingredients

    • 12-16 manicotti pasta tubes or jumbo shell pasta
    • 32 oz ricotta cheese
    • 2 C mozzarella cheese grated
    • 1 C cheddar cheese grated
    • 4 oz. cream cheese softened
    • 1 C parmesan cheese grated
    • ½ teaspoon kosher salt
    • 1 egg
    • 2 teaspoon garlic minced
    • ½ C additional parmesan cheese for top
    • Sauce
    • 2 cans 14.5 oz petite diced tomatoes
    • 1 tablespoon olive oil
    • ¼ teaspoon kosher salt more to taste
    • 1 teaspoon sugar
    • 2 teaspoon dried basil

    Instructions

    • Preheat oven to 400 degrees.
    • Sauce
    • Combine tomatoes, olive oil, salt, and sugar and bring to a boil. Reduce to a simmer and let cook for 10-15 minutes. Remove from heat and stir in dried basil. Set aside.
    • Cook pasta tubes or shells according to the package directions for “al dente” or just slightly under cooked. Drain from pasta water and lay on paper towels to slightly dry.
    • Cheese Mixture
    • Combine cheeses, egg, salt, and garlic until well mixed and spoon into a large ziploc bag. Squeeze mixture into one corner of the bag and snip off the end.
    • Spoon about a cup of sauce over the bottom of a large baking dish. Working one at a time, squeeze a steady stream of cheese into each pasta tube until the sides firm up. Place each filled shell into the baking dish and spoon remaining tomato sauce over the filled pasta once all the cheese mixture is used. Sprinkle remaining ½ C of parmesan cheese over the filled pasta and cover with foil.
    • Bake for 35-40 minutes or until bubbly, removing foil for last 10 minutes of cooking to help brown the cheese.

    Nutrition

    Serving: 1serving | Calories: 1107kcal | Carbohydrates: 48g | Protein: 63g | Fat: 73g | Saturated Fat: 42g | Cholesterol: 278mg | Sodium: 1663mg | Potassium: 501mg | Fiber: 1g | Sugar: 4g | Vitamin A: 2305IU | Vitamin C: 0.4mg | Calcium: 1306mg | Iron: 2.7mg

    Travel Michigan

    By Heather LAST UPDATED May 21, 2020 · FIRST PUBLISHED July 7, 2012, Leave a Comment

    Surprise! I'm not dead!

    I know you were worried.

    It's been a ridiculously long time since I've been on here (a whole week! Gasp!) and it feels a little weird. Does anybody still read this? I sure hope I haven't lost you. It turns out that whirlwind trips to the other side of the country, my family, holidays, and a couple days of much needed down-time equal a blog that needs some lovin'. But hey! I'm here now and ready to get back to my regularly scheduled programming. today I wanted to give you a little recap of my trip and what we've been up to the past few weeks, but don't worry I'll be back with a killer recipe on Monday. And when I say killer, I mean get your fat pants on now. You'll want to make it stat.

    I mentioned here last week that I was visiting northern Michigan for a few days on a trip put on by Pure Michigan. Holy moley guys, do they know how to put on a party! I'm basically packing up my house right now so we can move there next week. I'm sold. I'm in love. I want to go back. In my time there I enjoyed perfect weather, copious amounts of fantastic food, beautiful scenery, and charming little towns dotted across the shores of Lake Michigan that I couldn't get enough of. Of course, most of the pictures I want to share today are of the food, but really, this place is amazing and I could spend all day showing you pictures of fun things to do and see.

    My first night there I wanted to bang my head against a curb because I left my camera battery in the hotel room so I have no pictures of our amazing dinner and dessert. We visited a little place called The Cook's House and it was delicious. The owners strive to locally source all of their ingredients and it makes all the difference. Coincidentally, Mario Batali has also named it his favorite place to eat in Michigan, which was why we were there. Our whole itinerary was based on places that Mario has recommended in the past and continues to visit when he lives there in the summer. I must say, he's got good taste J Our next stop was dessert and again, no pictures, but I had what was maybe the best piece (or 6) of pie that I've ever eaten. I would go back to Michigan just for The Grand Traverse Pie Company. It might have had to do with the fact that they had 12 whole warm pies waiting for us to sample (which equated to about ¾ of a pie per person, btw), but I've never seen a group people get so excited about pie before. It was thrilling! Of all the good food we had on the trip, the pie company was the one place that each of us talked about wanting to go back to before we left. The good news is that you can order their pies online and have them shipped right to you!

    Yay, I finally have pictures to show you! Our next day started out on a tall ship as we sailed around the bay. It was gorgeous, and breezy.

    Heather sitting on the side of a boat

    Next up we got to spend a little time with somebody you might recognize…

    close up of Mario Batalli's crocks

    Mario Batali! He demoed a few new recipes for us and then had some time with the press… including me! My story and interview with him will be up soon on the The Daily Meal. Sadly he was so busy I could only get a group shot of myself with him, which I haven't even seen yet, but here he is cooking. He made us stuffed beef tenderloin, and a prosciutto wrapped walleye fish. The recipes can be found here. Mario's steak= the best steak I've ever eaten. EVER. Amen.

    Mario Batali cooking in a kitchen

    One trend I found during my time in Michigan was that there are so many restaurants and markets that really try hard to keep all of their products local. I love the cherries in the wood baskets here. We had cherries A LOT.

    Cherries and other produce in a produce case

    I fell in love with these cheese knives that I found at a winery. What I didn't love was the price tag…

    Cheese knife set with smiling faces

    I found this guy at Black Star Farms and loved his little smirk. His whole back was covered in those cute blonde ringlets.

    large pig with curly hair behind a fence

    Black star farms also has a little café on the property that serves awesome wood fired pizza.

    pizza on a rack with a fire behind

    Breakfasts at the Grand Traverse Resort were amazing.

    danish on a plate and yogurt parfaits

    The view from the rooms at the Homestead Resort wasn't too shabby either.

    lake Michigan and a sandy beach

    Whitefish was served at almost every meal and it really was delish.

    fried white fish on a white plate

    The ambiance at this little grill in Leland was maybe my favorite of the trip. We ate on the deck over-looking the water and watched the sunset. Just fifty feet away we could walk down a dock that housed fishing boats and old shanties that were turned into shops.

    Rick's cafe in Traverse City, MI

    Lake Michigan sunset

    This is a coconut cream pie topped with a pineapple compote that was amazing. Below it is more whitefish.

    Coconut cream pie with pineapple compote on white dish and whitefish with caper sauce

    My first, and probably last oysters. No matter how I try, I just don't get it.

    fresh oysters on ice with sauces

    And then, of course, we visited Sleeping Bear Dunes. It really is just as pretty as all the pictures make it look. I wish we would have had more time for laying around on the beach and playing in the water, but alas, there was eating to do! I can't complain really. It was such a fun trip and I'm so glad I was able to be a part of it. Sleeping bear dunes

    I have a few more stories about my time in Michigan that will be up on The Daily Meal soon. I'll keep you updated and let you know when they go live. Until then, go here, scroll to the bottom and watch the Pure Michigan Commercials. It's kind of like being there, sorta. Especially if you have pie shipped to you!

    Crème brûlée

    By Heather LAST UPDATED May 21, 2020 · FIRST PUBLISHED June 22, 2012, 6 Comments

    Two Creme Brulee in white dishes with strawberries

    If you're all impressed by the fact that I knew how to type all the accent marks on the recipe title, don't be. I totally just wiki'ed it and used my good friend copy and paste. I'm pretty cool, but not that cool. Sorry if I'm ruining the illusion for you.

    You know what though? Eating crème brûlée makes me feel special, like I am cool enough to know how to type in French. It's something about the velvety texture of the custard against the crunchy sugar crust. It's the way that the top half of the ramekin is warm from cooking the sugar and the bottom half is still cold from the refrigerator. It's because when I take a bite, I know that there are very few, if any, people in my neighborhood eating something as insanely delicious as I am. Vive la France!

    My baking teacher at culinary school described crème brûlée as the easiest-to-make-most-over-priced-delicious-dessert-ever. She wasn't exaggerating. Once you see how easy these are to make, you'll cringe at spending $8 ($10! $13!) for a single serving. Don't let the accent marks scare you. With 5 ingredients, a whisk, a few ramekins, and a couple tips from me you'll be tap, tap, tappin' away on the top of your perfectly cooked crème brûlée- not to mention how special you'll feel eating it!

    Here's the breakdown; You'll need heavy cream, whole milk, eggs, sugar and vanilla. I spaced taking pictures of making the custard base so this is how it goes- Over medium heat pour the milk and cream into a sauce pan. Take half of a vanilla bean, and split it down the middle so you have two long halves. With the backside of a knife scrape the tiny seeds of the bean out and stir both the seeds and seed pod into the cream (you'll strain it out later). You want to bring the cream mixture to just before a boil; once steam is rising rapidly you know it's ready. Whisk the eggs and sugar in a separate bowl and slowly temper the egg mixture into the cream. Meaning, you'll stir ladle-fulls of the hot cream into the eggs one at a time until the egg mixture is warm to the touch. Once it's warm you can add the rest of the cream. Tempering prevents the egg from cooking when it meets the hot cream. Pour your egg mixture through a strainer and let cool- it should be smooth and velvety.

    milk and eggs in a measuring cup

    For baking you'll need some ceramic ramekins placed in a larger baking dish. Like my mismatched set? Goodwill, baby!

    white ramekins in a glass casserole dish

    Pour equal amounts of the custard mixture into each ramekin.

    pouring custard mixture into ramekins

    Cover the entire baking dish with foil keeping one side folded up.

    covering filled ramekins with foil

    Creme Brulee is cooked in a water bath to keep it creamy and smooth just like you do cheesecake. Place the foil covered dish with the filled ramekins inside on the oven rack. Carefully fill the baking dish with boiling water until the water comes halfway up the sides of the ramekins, making sure water doesn't splash up into the custard. Soggy custard = no bueno

    pouring boiling water in casserole dish to bake

    Cover the open portion of the now water-filled dish and bake at 300 for about 45 minutes. You want the custard to be set around the edges and to be slightly underdone in the center- it will shake like jello when gently shaken. Remove the ramekins from the water bath and refrigerate until they are well chilled.

    Here comes the fun part! The brulee-ing of the cremes! Notice how I've given up on the accents? Gig's up, I guess.

    You have two options when it comes to creating that crunchy sugar crust: the torch and the broiler. Each method has it's positives and negatives so I'll go over the technique for each one and you can take your pick.

    The Torch:

    This is my favorite way to make them. Using the torch gives you more control over how brown the sugar gets and let's you concentrate on spots that need some extra heat- not to mention how fun it is! If you don't already own a torch, promise me you won't run to Williams-Sonoma and drop $40 on an itty-bitty baby torch- ok? All you need to do is head over to The Home Depot and get one of these bad boys! They're cheap and the propane tank lasts forever.

    propane blow torch on kitchen counter

    Sprinkle about 2 teaspoons of sugar over the top of each custard and start to cook the sugar with the torch until it starts to melt.

    close up of torch melting sugar

    The sugar will start to melt and caramelize, it happens fast so watch out! Keep your torch moving around to keep it even.

    Almost there...

    close up of torch melting sugar on top of custard

    And it's done!

    Creme Brulee with caramelized sugar on top

    The Broiler:

    If you don't want to commit to buying a torch that's okay. Your other option is to put it under your oven's broiler to melt the sugar. You'll cover the tops of each custard with about 2 teaspoons of sugar and place them in an COOL oven with the rack situated as closely as possible to the broiling element. Putting the custard in a cool oven keeps it from getting too warm. Turn on the broiler and let it roll until the sugar has melted and caramelized to your liking. All ovens run their broilers at different temperatures so your cooking time will vary. It takes mine about 6 minutes.

    The only real difference between using the broiler and a torch is aesthetics. Sometimes the sugar doesn't form a complete shell across the top and browns unevenly.  Broiling gives your creme brulee a more "rustic" appearance. It's kind of the Robert Downey Jr. of french desserts; a little rough around the edges, but still delightfully yummy.

    2 Creme Brulees-- 1 cooked under the broiler, the other with the torch

    So that's it, now you have all the tools to make yourself a little piece of French heaven. Now, if you'll excuse me, I'm on my way to cuddle up on the couch with Ally Mcbeal in her Larry era.

    Au revoir!

    spoonful of creme brulee up close

    📖 Recipe

    spoonful of creme brulee up close
    Print Recipe
    5 from 2 votes

    Crème brûlée

    If I could only eat one dessert for the rest of my life, these Crème brûlée would be it!
    Prep Time20 minutes mins
    Cook Time45 minutes mins
    Total Time1 hour hr 5 minutes mins
    Course: Dessert
    Cuisine: French
    Keyword: Crème brûlée
    Servings: 4 servings
    Calories: 1020kcal
    Author: Heather Cheney

    Ingredients

    • 6 large egg yolks
    • 2 large eggs
    • ¾ C sugar
    • pinch salt
    • 1 C whole milk
    • 3 ½ C heavy cream
    • ½ vanilla bean

    Instructions

    • Preheat oven to 300
    • Split vanilla bean and scrape seeds into the milk and cream.
    • Scald mixture over medium heat.
    • Whisk remaining ingredients together. Slowly temper in the egg mixture and strain through a fine strainer.
    • Cool and pour into ramekins. Place ramekins in a baking dish, cover part way with foil and place into oven.
    • Pour boiling water into dish until water comes half-way up the sides of the ramekins. Cover open portion with foil and bake for about 45 minutes.
    • When custards are gently shaken they will be set around the edges but remain slightly underdone in the center (will move like jello).
    • Cool completely in fridge.
    • Sprinkle about 2 teaspoons of sugar over tops of each custard. Using a torch or broiler caramelize the sugar until it forms a shell over the custard.

    Nutrition

    Serving: 1serving | Calories: 1020kcal | Carbohydrates: 47g | Protein: 13g | Fat: 88g | Saturated Fat: 52g | Cholesterol: 666mg | Sodium: 149mg | Potassium: 296mg | Sugar: 40g | Vitamin A: 3670IU | Vitamin C: 1.2mg | Calcium: 251mg | Iron: 1.2mg

    • « Previous Page
    • 1
    • …
    • 10
    • 11
    • 12
    • 13
    • Next Page »
    Headshot of Heather in an apron

    Hi, I'm Heather! Want to become a rockstar cook? I’m a former chef, caterer, and culinary arts school graduate that just wants to help you make some killer food! I truly believe that with a little know-how anyone can totally rock their kitchen. Stick around for ultimate recipes of your favorite foods, cooking tips, guides, and more!

    More about me →

    Popular Recipes

    • BBQ chicken cut on a cutting board with a bottle of bbq sauce
      The Best Super Moist Oven Baked BBQ Chicken
    • One Pan Sour Cream Chicken Enchilada Skillet
      One Pan Sour Cream Chicken Enchilada Skillet
    • Hawaiian Shoyu Chicken-- so flavorful you'll forget how easy it is to make! Filled with flavors of ginger, garlic and just a touch of red pepper.
      Hawaiian Shoyu Chicken
    • Sloppy Joe on a paper bag
      The Best Sloppy Joe Sauce
    • Coffee Cake In A Mug-- the perfect remedy for a sugar craving when you don't want to spend a lot of time or heat up the oven. #coffee #cake #microwave #mug
      Coffee Cake in a Cup
    • Baked Ricotta Chicken
      Baked Ricotta Chicken
    • Mom's Classic Meatloaf Recipe
    • Beef Teriyaki Stir Fry
    Email opt in image

    Cooking Method

    • Slow Cooker
    • Grilling

    Footer

    ↑ back to top

    About

    • Privacy Policy
    • Disclaimer

    Newsletter

    • Sign Up! for emails and updates

    Contact

    • About
    • Email
    • Work With Me

    As an Amazon Associate I earn from qualifying purchases. This site uses cookies and generates income via ads.

    Copyright © 2022 Heather Likes Food, LLC

    Rate This Recipe

    Your vote:


    A rating is required
    A name is required
    An email is required