• Active
  • Blog
  • Cart
  • Checkout
  • Cooking Crew Recipes
  • Cooking Crew!
  • Disclaimer
  • Library
  • Media Kit
  • My account
  • Nutrition and Food Safety Disclaimer
  • Opt Out of 5 Chef Secrets
  • Press
  • Privacy Policy and Copyright
  • Recipe Index
  • Refund and Returns Policy
  • RSS Email Subscription Confirmation
  • Shop
  • Subscribe
  • Ultimate Recipes for Becoming a Rockstar Cook!
  • Welcome to Heather Likes Food!
  • Work With Me
  • About Heather Cheney
  • Contact
menu icon
go to homepage
subscribe
search icon
Homepage link
  • Recipe Index
  • About
  • Contact
  • Shop
    • Facebook
    • Instagram
    • Pinterest
    • YouTube
  • ×
    Home / Recipes

    Soft and Cheesy Garlic Breadsticks

    By Heather LAST UPDATED July 23, 2019 · FIRST PUBLISHED September 12, 2014, 1 Comment

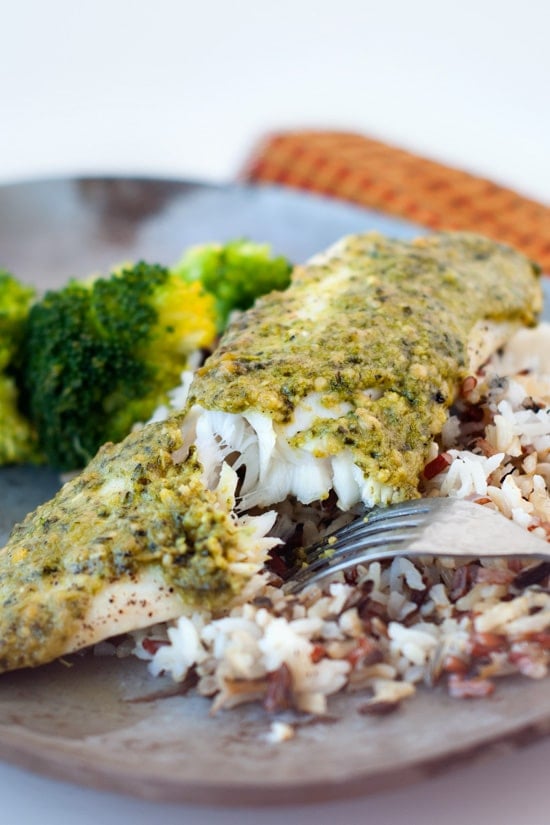
    Soft and Cheesy Garlic Breadsticks - Has the beginning of the school year this year felt like getting hit with a bag of bricks for you too? Where the heck did summer go, and why am I spending my entire afternoon as a chauffeur?!  I've already answered these questions for myself, but I don't want to accept it. So I eat carbs. Well, actually I'm not right now-- heeeellllo baby weight!-- but I want to! Reeeeeallly, reaaaaalllly bad.

    Like bad.

    Pulling Cheesy Garlic Breadsticks apart in a baking sheet.


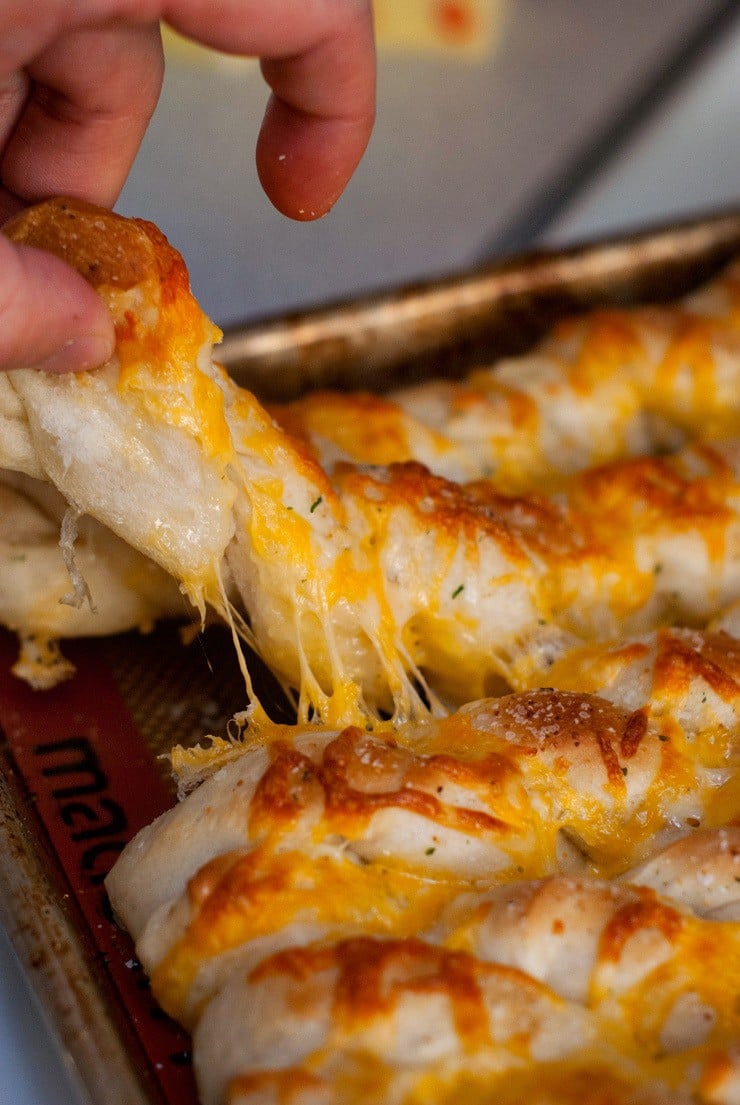
    I saw these cheesy garlic breadsticks on Lauren's Latest a while back and had to give them a go and I'm not sorry I did! They are so soft and cheesy and embody everything that is perfect in the world (that might be my diet talking).

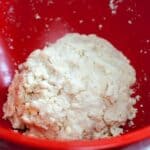
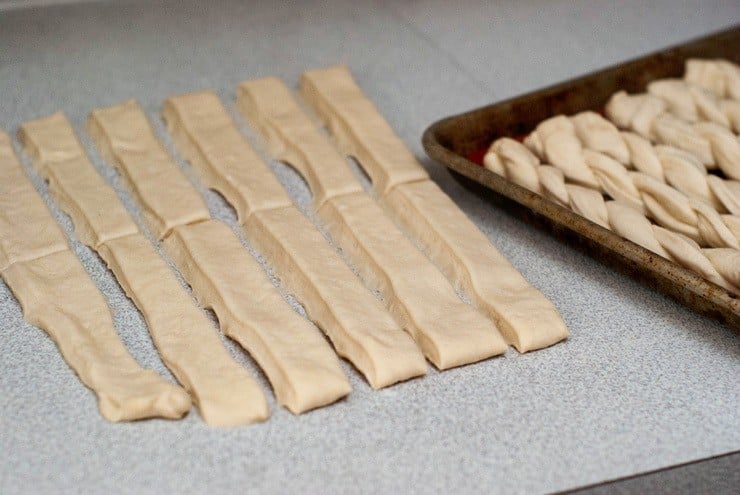
    You'll start by mixing up your dough in an electric mixer and then letting it raise until doubled. From there you'll roll it out into a large rectangle and cut it into strips that you'll twist together to make the breadsticks.

    Bread stick dough in rectangle cutouts.

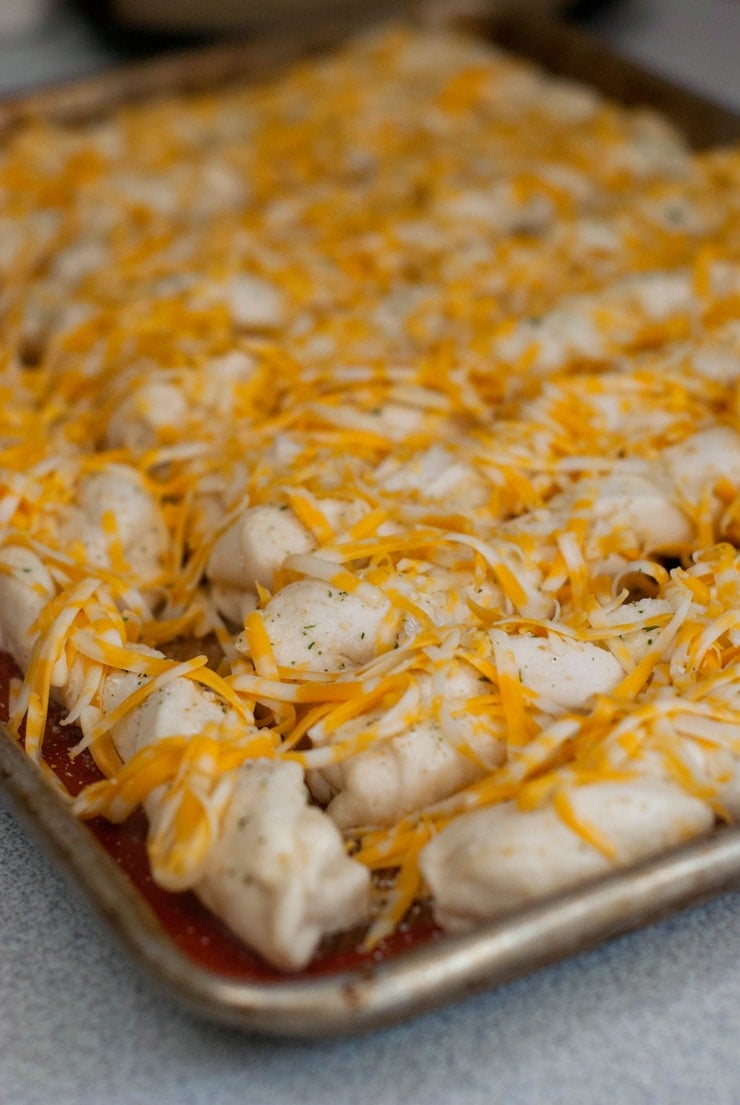
    You'll let them raise again and then top with butter, garlic salt and cheese which is basically the holy trinity of bread.

    Butter, garlic salt and cheese on bread dough in a baking sheet.

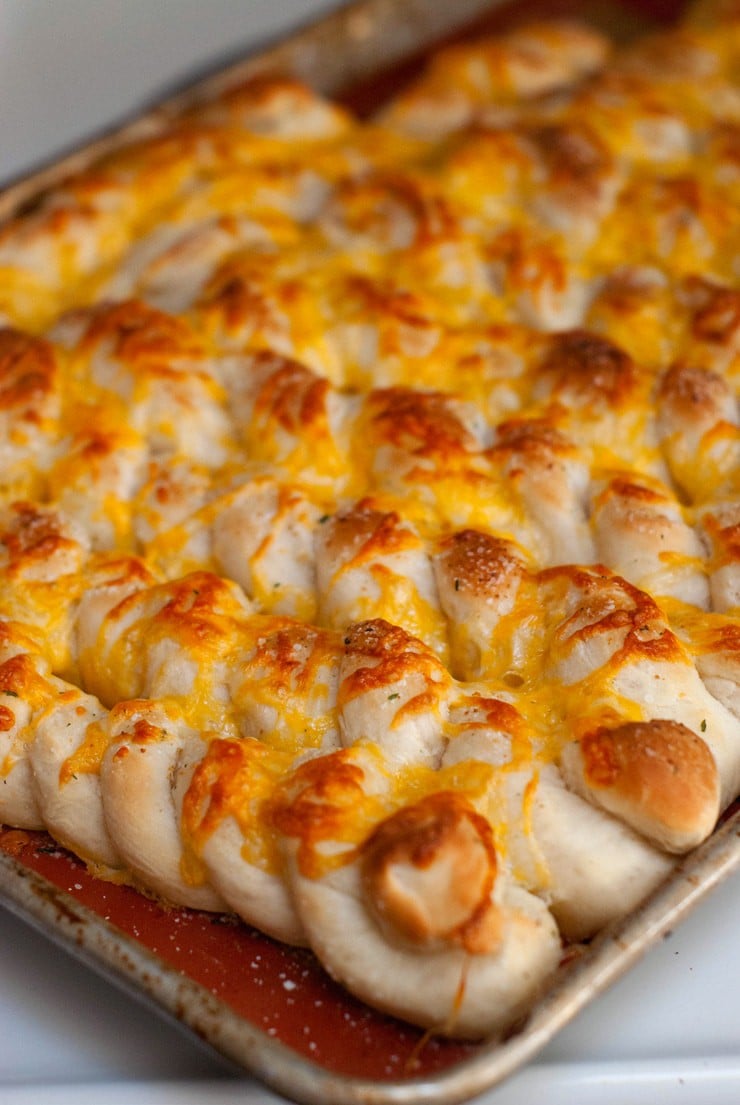
    Throw those bad boys in the oven for a few minutes until they are browned and melty and try, TRY, not to burn your fingers off because you'll want to dig right in.

    Delicious Soft and Cheesy Garlic Breadsticks in a baking sheet.

    I'm seriously rethinking my protein bar lunch that's starring me down right now.  Enjoy you Soft and Cheesy Garlic Breadsticks!

    Pulling cheesy Breadsticks apart.

    Interest in more cheesy recipes?

    • Garlic Parmesan Grilled Cheese Sandwiches
    • Better Than Costco Mac and Cheese
    • Five Cheese Stuffed Lumaconi
    • Instant Pot Broccoli and Four Cheese Soup

    📖 Recipe

    Soft and Cheesy Garlic Breadsticks | heatherlikesfood.com
    Print Recipe
    5 from 2 votes

    Soft and Cheesy Garlic Breadsticks

    The softest breadsticks topped with lots of cheese and garlic butter! The ultimate bread for pasta night or just to eat on their own!
    Cook Time30 minutes mins
    Total Time30 minutes mins
    Course: Bread
    Cuisine: American
    Keyword: bread twists, garlic parmesan, soft
    Servings: 20 Breadsticks
    Calories: 147kcal
    Author: Heather Cheney

    Ingredients

    • 1 ½ cups warm water
    • 2 envelopes quick rise yeast
    • 2 tablespoons sugar
    • ¼ cup butter melted
    • 1 ½ teaspoons salt
    • 4 cups all purpose flour
    • 1 ½ tablespoons garlic salt
    • ¼ c butter melted
    • ½ cups grated parmesan
    • 1-2 cups desired cheese I used colby jack, but mozzarella, straight cheddar or jack would be delish too!

    Instructions

    • In bowl of an electric mixer, combine warm water, yeast and sugar. Mix until combined and let rest to let the yeast activate- about 10 minutes
    • Once the yeast is bubbly, add in the flour and salt. Mix on low until all the ingredients are incorporated and then drizzle in the first ¼ C of butter. The dough should be sticky but not so sticky that it's unmanageable to roll out. If it's started to come away from the sides of the bowl, you're good. If it's too dry you can add in a little bit of water to loosen it up. Continue to knead for 6-7 minutes-- the dough will be elastic and smooth.
    • Form the dough into a loose ball, set back into the bowl, cover and let rise for about an hour or until it has doubled in size.
    • Remove the risen dough and place on a lightly floured counter top. Roll out into a rectangle (2'x1') and cut into strips . Then, cut the strips in half so that they fit in a baking sheet width-wise.
    • Take two strips of dough, twist them together, and place on a lined baking sheet. Continue with the remaining strips and let them rise for an additional 30 minutes or until doubled in size. Brush the dough with the second ¼ C of butter and sprinkle with garlic salt. Top with grated cheese,
    • Bake at 425 degrees for 8-10 minutes or until just light golden brown.

    Nutrition

    Serving: 1breadstick | Calories: 147kcal | Carbohydrates: 20g | Protein: 4g | Fat: 6g | Saturated Fat: 3g | Trans Fat: 1g | Cholesterol: 14mg | Sodium: 778mg | Potassium: 32mg | Fiber: 1g | Sugar: 1g | Vitamin A: 163IU | Vitamin C: 1mg | Calcium: 34mg | Iron: 1mg

    Gorgeous Grilled Chicken

    By Heather LAST UPDATED July 25, 2019 · FIRST PUBLISHED September 10, 2014, Leave a Comment

    Gorgeous Grilled Chicken - I've probably mentioned it here before, but I'm kind of squeamish about eating meat off a bone. I don't know what's wrong with me, but something about it has just never worked for me. I know I'm probably going to get hate mail saying that it's my inner vegetarian screaming at me and that I should listen, but whatever, I'm over it.  My husband on the other hand as well as my girls love chicken wings, ribs, drumsticks and basically anything else that is bone-bearing. Go figure.

    Grilling chicken wings and drumsticks on a grill.

    Follow me on Pinterest

    Making Gorgeous Grilled Chicken

    But sometimes I make it for them and I actually like it. Enter this this Gorgeous Grilled Chicken. We've made this a few times and each time it's a hit with everybody. Plus, it's just pretty lookin'. This last time I was only able to marinade them for about an hour and they weren't as flavorful, so make sure to give yourself plenty of time for them to soak up the goodness. BUT don't let them marinade for more than 4 hours or so because the lemon juice in the marinade will actually  start to cook the chicken and will give it a funky texture in the end. I used all drumsticks here, but any cut of chicken will work well. Just remember that dark meat takes longer to cook than white so keep an eye on them and remove from the heat when the juices from them run clear and not cloudy when pierced.

    This grilled chicken would be prefect for any tail gating and end-of-summer bashes you have coming  up!

    Delicious Grilled Chicken on a fire grill.

    Interested in other juicy chicken recipes?

    • Skillet Honey Dijon Chicken Thighs
    • One Pan Garlic Herb Chicken Thighs
    • Bacon Wrapped Pesto Chicken
    • Cheesy Broccoli Pasta with Barber Foods Crispy Stuffed Chicken Breasts

    📖 Recipe

    Simple Grilled Chicken on a fire grill.
    Print Recipe
    4.80 from 5 votes

    Gorgeous Grilled Chicken

    Grilled chicken that doesn't just taste great, but looks pretty too! Marinade chicken legs or thighs in this flavorful mix and grill until perfection.
    Prep Time2 hours hrs
    Cook Time20 minutes mins
    Total Time2 hours hrs 20 minutes mins
    Course: Main Course
    Cuisine: American
    Keyword: chicken legs, chicken marinade, grilled
    Servings: 5 servings
    Calories: 295kcal
    Author: Heather Cheney

    Ingredients

    • ⅔ cup olive oil
    • ⅔ cup soy sauce
    • 1 lemon juiced
    • 1 tablespoon brown sugar
    • 2 tablespoons dijon mustard
    • 1 teaspoon fresh ground black pepper
    • 1 teaspoon garlic powder
    • ½ teaspoon liquid smoke flavoring
    • 1 teaspoon- 1 tablespoon Sriracha depending on how spicy you like them
    • 2 to 3 pounds assorted chicken pieces

    Instructions

    • Combine every ingredient except for the chicken in a large gallon-size ziplock bag. Shake or massage bag to mix and then add in chicken. Let marinade for at least 2 hours, up to 4 hours (anything past four will start to cook the chicken and make it a funky texture).
    • Grill chicken over medium heat until cooked through and it's juices run clear.

    Nutrition

    Serving: 1serving | Calories: 295kcal | Carbohydrates: 7g | Protein: 4g | Fat: 29g | Saturated Fat: 4g | Sodium: 1799mg | Potassium: 114mg | Fiber: 1g | Sugar: 3g | Vitamin A: 9IU | Vitamin C: 12mg | Calcium: 18mg | Iron: 1mg

    Ayres Inn, Orange California

    By Heather LAST UPDATED September 4, 2019 · FIRST PUBLISHED September 9, 2014, 1 Comment

    Ayres Inn, Orange California - The end of July I decided it would be a good idea to drag a 6 week old baby to southern California so that we could take the older girls to Disneyland and spend some time on sunny San Diego Beaches.

    Little girl laying on top of a white pillow.

    We knew the excitement would be a little too overbearing if we let them know about it before hand (is it time yet? How much longer? When are we going?), so we kept it under wraps until it was time to head to the airport. There were a few times that it either me or the hubs let something slip about it, but we’re so glad that they didn’t catch on because their reaction to our announcement was absolutely priceless!

    We took off a few hours later on their very first plane ride and made our way to Orange, CA where we would be spending the next 5 nights. The main objective of this leg of our trip was Disneyland and I went back and forth as to how close we really needed to be to the parks. There are several hotels within walking distance to the main gates but their prices were high and we finally decided on the Ayres Inn in Orange.

    While it’s not within walking distance —unless you get a severely skewed sense of entertainment by dragging exhausted, whiney kids 4+ miles at 10pm by foot—it’s a short 10-15 minute shuttle ride to the main entrance of the parks and back to the hotel lobby. No big deal.

    The Ayres Inn has a homey, European feel to its décor. It’s a smaller inn but had everything we needed for an extremely comfortable stay. The picture below is kind of an awkward shot of a staff member, but I wanted to include it because the staff was amazing. We had a bit of a mix up with our reservation when we first arrived mid-evening but they quickly corrected it and went out of their way to make sure we had what we needed even if we were tired and cranky (and maybe not the nicest) after traveling all day with small kiddos.

    European decor at Ayres Inn.Stupid me forgot to take a picture of our room before the chaos and filth that 4 days in Disneyland and a family of 5 can conjure, but you get the idea. It’s a basic hotel room, but we found it to be exceptionally clean and the beds, THE BEDS, were uber comfortable. Maybe that’s just my aching theme park body talking, but for reals.

    Hotel room at Ayres Inn with two beds and a tv.Oh The Breakfast!

    A big deciding factor in choosing the Ayres Inn for us was that included with your stay is a hot breakfast every morning! The breakfast is good, filling and there's a pretty good variety of offerings. There were always eggs, potatoes, a breakfast meat (sausage or bacon) and pancakes or french toast that were hot as well as cold cereal, breads, coffee cake, fruit, tea, juice and coffee. I'm not going to say it's the best breakfast I've ever had, but it filled out bellies and saved us a good chunk of change. I loved the funky colors and style of the breakfast room. Depending on when we went down for breakfast, the line was sometimes long but it moved pretty quickly.

    Breakfast room at the Ayres Inn with pink and black chairs.

    We spent a few evenings enjoying the pool and easing sore muscles in the hot tub. Okay, we usually didn't last very long in the hot tub before we were beckoned to the pool, but we tried. We were actually surprised by how empty the pool was, but I'm assuming most were still enjoying the parks. It's on the small side, but again, served its purpose. Our first night there before we had been to the parks, we could hear the fireworks from the pool and it was fun to get some excitement and anticipation growing in the girls just from hearing them.

    The Ayres Inn Is Family Friendly

    The Inn was very family friendly and it looked like most were Disney-goers just based on dress alone, but it wasn't the least bit loud or had any "unruly kid" feel to it which can happen at some bigger hotels when there are a lot of families. I appreciated that there was a laundry room with coin-op machines having brought a small baby. I didn't end up having to use them, but was glad that they were there. There was also a small fitness room, but chasing 2 kids around Disney was enough exercise for me so I didn't try it out.

    Pool area at Ayres Inn.

    I thought the grounds were really pretty too.

    Grounds at Ayres Inn in Orange California.All in all, we had a great stay and we'll definitely be back. For the price, breakfast, comfort, and all-around service I don't think you can beat it!

    Family picture at Disneyland California.

    Leg two of our trip in San Diego will be up soon!

    **I was not compensated for this post, but was offered a discounted rate during our stay in exchange for an honest review. All thoughts and opinions are my own!**

    Easy Red Velvet Cupcakes

    By Heather LAST UPDATED March 22, 2021 · FIRST PUBLISHED September 8, 2014, Leave a Comment

    Easy Red Velvet Cupcakes - Waaaaaay back in May before the craziness of a new baby and summer came to pass, I had the chance to make a cake/cupcake combo for the wedding of a friend's daughter. It had been a while since I had a legit excuse to make a cake so it was fun to dip my toes back into cake decorating territory.

    So here's the deal, I used to make all sorts of cakes for all sorts of people and had a pretty good business doing it. There was a summer where I almost had a wedding cake scheduled for every weekend and had smaller cakes due throughout the week-- it was crazy! I know it doesn't sound like much if you're comparing me to Carlos' Bakery, but for this one-woman show it was basically chaos covered in frosting. And, I loved it. Well, there was that one time a cake collapsed in the trunk of my car but that story is for another day. Today I have a confession.

    Two Easy Red Velvet Cupcakes with cream cheese frosting and a blue decorative flower on top.

    My "Recipe" for Easy Red Velvet Cupcakes

    I was often told that the cakes I made were so different from other bakeries and were "soooo good" that they wanted my recipe. I'm not gonna lie, they are reeeeeally good. But when I'd hear this, I'd just laugh because they wanted my "recipe" but I never gave it to them because I'm a big meanie. I'm not a meanie anymore, though.

    My recipe?  Yeah, it's cake mix.

    Delicious cake with white frosting and blue flowers surrounded by white cupcakes.

    Follow my Pinterest!

    BUT, with the right frosting and a few additions to the cake mix it turned it into something awesome. I'm all for making cakes from scratch but when you have a 3-day turn around for a 5 tier wedding cake that you're making BY YOUR SELF, you can't afford to have a batch of chocolate sponge fail on you. So I use cake mix.

    These red velvet cupcakes are one of my favorites. They are moist, dense and with a cake mix base are super easy to throw together and will turn out every. single. time.

    Easy cake with white frosting and decorative blue flowers.

    Interested in more yummy cupcake goodness?

    • Snowball Cupcakes
    • Cupcakes for Grandma
    • Mini Chocolate Box Cupcakes

    📖 Recipe

    Two simple Red Velvet Cupcakes with delicious cream cheese frosting and a blue flower on top.
    Print Recipe
    5 from 1 vote

    Easy Red Velvet Cupcakes

    Red velvet cupcakes that taste as good as scratch, made with a cake mix and a few extra ingredients!
    Prep Time10 minutes mins
    Cook Time20 minutes mins
    Total Time30 minutes mins
    Course: Dessert
    Cuisine: American
    Keyword: cake mix recipe, easy cupcakes, quick
    Servings: 24 cupcakes
    Calories: 134kcal
    Author: Heather Cheney

    Ingredients

    • 1 box white cake mix
    • 1 box 3.4oz instant vanilla pudding mix
    • 4 large eggs
    • 1 tablespoon unsweetened cocoa powder
    • 1 cup buttermilk
    • ½ cup vegetable oil
    • 2 ounces red food coloring

    Instructions

    • Combine the cake mix, pudding mix, oil, eggs, cocoa, buttermilk, and food coloring; beat for 4 minutes on medium speed, scraping the sides and bottom of the bowl several times. Distribute the batter among cupcake liners, filling about ½-¾ full. Bake at 350° for 15-20 minutes or until the cakes spring back when gently pressed on. Let cool and frost with your favorite cream cheese icing.

    Nutrition

    Serving: 1cupcake | Calories: 134kcal | Carbohydrates: 14g | Protein: 2g | Fat: 8g | Saturated Fat: 5g | Trans Fat: 1g | Cholesterol: 28mg | Sodium: 170mg | Potassium: 86mg | Fiber: 1g | Sugar: 7g | Vitamin A: 57IU | Calcium: 43mg | Iron: 1mg

    5 Minute Perfect Chocolate Frosting

    By Heather LAST UPDATED June 18, 2020 · FIRST PUBLISHED August 17, 2014, 5 Comments

    This perfect chocolate frosting is absolute perfection in my book-- it's sweet, slightly salty, chocolate-y, fluffy, rich, but not too rich and super creamy.

    Mixing Perfect Chocolate Frosting in a mixing bowl with a blue spatula.

    Hello there, Monday-ers. I hope the start of  your week has began just smashingly. <--- is that a word?

    Yesterday was a big day for the Cheney household; not only did we get to church ON TIME, we were able to see the bottom of our kitchen sink for the first time  in over a month! This is big news, guys. You know how when that one side of your sink just perpetually has a pile of dishes in it no matter how many times you run the dishwasher throughout the week? Yeah, that's been us for waaaaaaay to long. It turns out that our sink is not,  in fact, and endless abyss of dishes and woe. Who woulda' thunk?

    Absolutely Perfect Chocolate Frosting

    Today's perfect chocolate frosting recipe is one of my favorite things in the entire world. I'm not usually a big frosting person, but this frosting is something magical. It looks like your basic chocolate frosting, right? WRONG. It's sweet, slightly salty, chocolate-y, fluffy, rich, but not too rich and creamy. Basically, the only thing that would make it a better frosting is nothing. I know this is a tall order to live up to, but It's the absolutely perfect chocolate frosting in my book.

    The best way to make this super fluffy is to use an electric mixer to put it together. If you don't own one, it can be done by hand with good results, you'll just have to put a little muscle into it.

    Chocolate cake mix with butter in a silver mixing bowl.

    Follow me on Pinterest!

    Butter, cocoa powder, and salt start it off and then powdered sugar gets added. Whip it up until it's good and mixed.

    Mixing Chocolate Frosting in a mixing bowl with an electric mixer. 
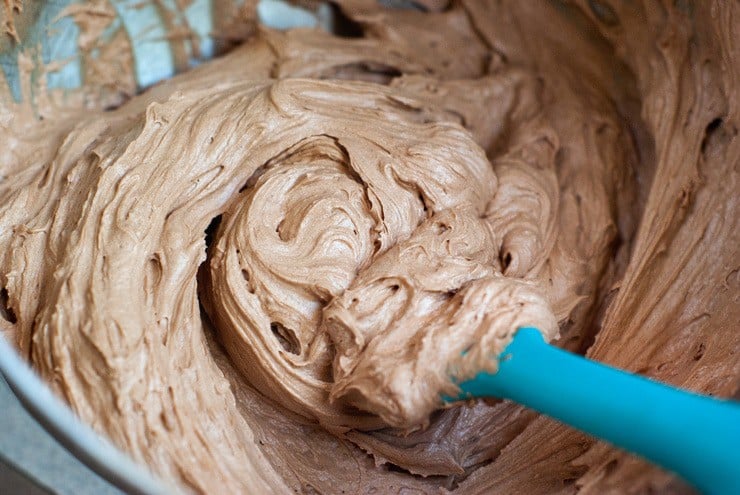
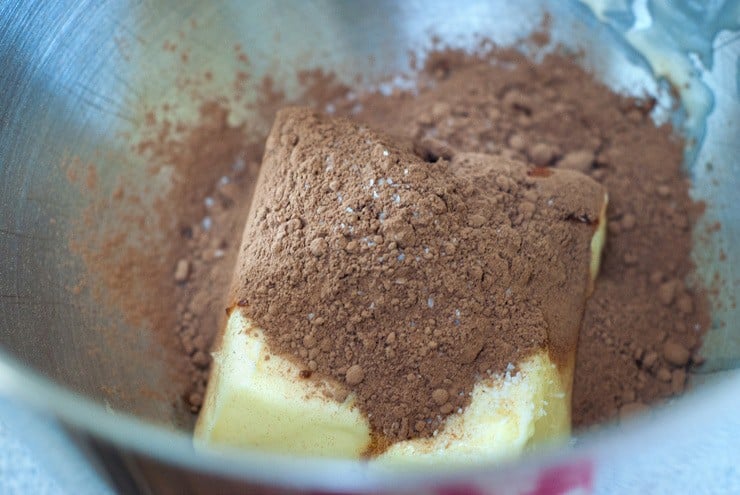
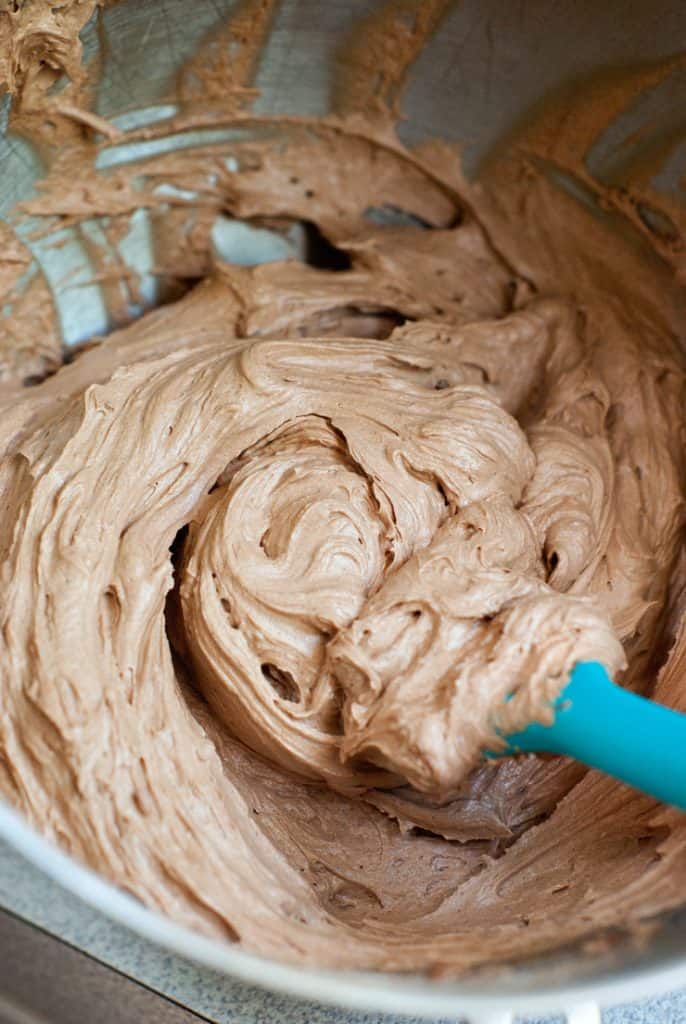
The magic comes now. With the mixer going, slowly stream in some heavy cream and vanilla extract and whip, whip, whip until it's super fluffy and creamy.

    Pouring Heavy Cream and Vanilla Extract into an electric mixer.
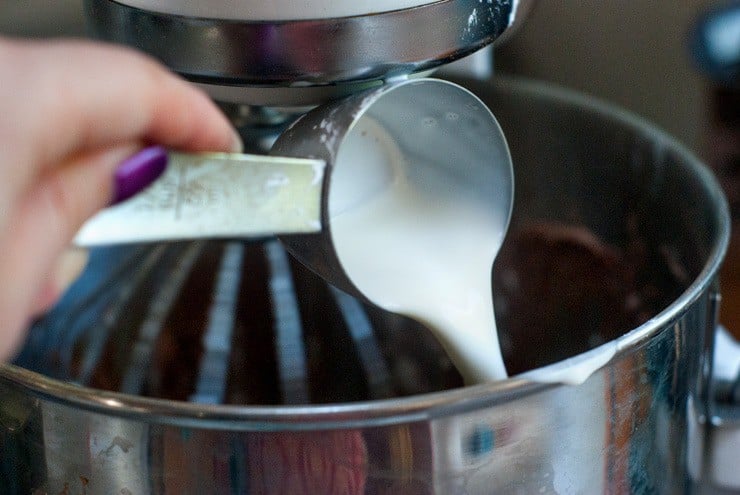
And that's it! If I had to eat cake everyday for the rest of my life, it would have this frosting on it. I hope you enjoy it too!

    Mixing simple Chocolate Frosting in a mixing bowl with a blue spatula.

    📖 Recipe

    Mixing fluffy chocolate frosting in a mixing bowl with a blue spatula.
    Print Recipe
    4.55 from 11 votes

    5 Minute Perfect Chocolate Frosting

    The fluffiest, creamiest chocolate frosting you'll ever make!
    Prep Time10 minutes mins
    Cook Time0 minutes mins
    Total Time10 minutes mins
    Course: Dessert
    Cuisine: American
    Keyword: buttercream frosting, cocoa powder, frosting with heavy cream
    Servings: 10 servings
    Calories: 347kcal
    Author: Heather Cheney

    Ingredients

    • 1 Cup salted butter 2 sticks
    • ½ Cup cocoa powder
    • ¼ teaspoon kosher salt
    • 3 ¼ Cup powdered sugar
    • ¼ Cup heavy whipping cream
    • 2 teaspoon vanilla

    Instructions

    • Using an electric mixer, whip together butter, cocoa powder,and salt until fluffy. Add in powdered sugar and whip again until fluffy.
    • With the mixer running on low, slowly stream in the cream and vanilla. Turn the mixer up to high and whip until super light and fluffy once again.

    Nutrition

    Serving: 1serving | Calories: 347kcal | Carbohydrates: 42g | Protein: 1g | Fat: 21g | Saturated Fat: 13g | Trans Fat: 1g | Cholesterol: 57mg | Sodium: 224mg | Potassium: 77mg | Fiber: 1g | Sugar: 38g | Vitamin A: 655IU | Vitamin C: 1mg | Calcium: 15mg | Iron: 1mg


    Interested in more delicious sweets?

    • Raspberry Oreo Fluff
    • Chocolate Covered Strawberry Candy Bars
    • Banana Split Chocolate Crepes
    • Delicious Sour Cream and  Brown Sugar Dipped Strawberries

    One Pan BBQ Chicken Sandwiches

    By Heather LAST UPDATED March 22, 2021 · FIRST PUBLISHED May 22, 2014,

    One Pan BBQ Chicken Sandwiches - Ready to have your mind blown? ...{Pop!}...

    Alright, what if I told you you could have tender, flavorful, BBQ chicken sandwiches ready on your table in about an hour-- would you believe me? Well, of course you would because I've never led you astray in the past. But really, if I was just some crazy chick on the internet that posted random recipes on a website that she made up, would you believe me?

    Wait a minute.

    Delicious BBQ Chicken Sandwich on a plate on top of a red tablecloth.

    Follow me on Pinterest

    Let's back up here and forget anything I just said. All I really want to say here is that these sandwiches are awesome. The End.

    What's The Secret To These One Pan BBQ Chicken Sandwiches?

    The secret to these BBQ Chicken Sandwiches? We're using boneless skinless chicken thighs that are full of flavor and stay tender and moist as they simmer away in BBQ sauce. Oh, and I used a pretty darn good sauce to make these too! This KC Masterpiece® Kansas City Classic limited-edition sauce just came out to celebrate the brand's 35th anniversary and it's a pretty excellent way to celebrate.

    You'll brown up some chicken thighs in bit of olive oil and season with salt and pepper and then remove them to make way for some onion and green bell pepper. Once the veggies are tender, chicken get's put back in the pan aaaaaand.....

    Smothered with some KC Masterpiece® sauce. From here all that's left to do is put a lid on the pan, reduce the heat to a simmer and let cook until the chicken is tender and easily shreds-- about 30-40 minutes.

    Top hamburger buns, kaiser rolls. or whatever your bread of choice is with the shredded chicken and you've got a quick and super filling meal! This BEST EVER Cole Slaw, or Sweet Broccoli Salad would make a super pairing as well.

    For more recipe ideas or to learn more about KC Masterpiece® barbeque sauces visit the KC Masterpiece® website or connect with them on Facebook or Twitter.

    KC Masterpiece® barbecue sauce has been delivering authentic barbecue taste and creating culinary masterpieces for 35 years. For more recipe ideas, tips and tricks visit www.KCMasterpiece.com.

    This is a sponsored conversation written by me on behalf of KC Masterpiece®. The opinions and text are all mine.

    Other Sandwich Recipes You Might Like

    • Italian Beef Recipe with Pepperoncini 
    • Garlic Bread Grilled Cheese
    • Pork Tenderloin Sandwich
    • Sloppy Joe Sauce
    • Banh Mi Sandwiches
    • Slow Cooker BBQ Beef Sandwiches
    • Easy French Dip
    • Onion Soup Mix Burger
    • Pork Burger
    • Greek Turkey Burger Recipe
    • Doritos Burgers

    📖 Recipe

    Simple BBQ Chicken Sandwiches on a grey plate on top of a red cloth.
    Print Recipe
    5 from 2 votes

    One Pan BBQ Chicken Sandwiches

    A quick and easy way to make shredded bbq chicken sandwiches without having to slow cook the chicken for hours!
    Prep Time5 minutes mins
    Cook Time50 minutes mins
    Total Time55 minutes mins
    Course: Main Course
    Cuisine: American
    Keyword: chicken thigh recipe, one pan, store bought bbq sauce
    Servings: 6 sandwiches
    Calories: 185kcal
    Author: Heather Cheney

    Ingredients

    • 2 tablespoon olive oil
    • salt and pepper
    • 6 boneless skinless chicken thighs trimmed of excess fat
    • ½ C onion chopped
    • 1 med green bell pepper chopped
    • 1 21 oz bottle KC Masterpiece® Kansas City Classic BBQ Sauce
    • Bread and other sandwich toppings

    Instructions

    • Heat olive oil over medium high heat in a large skillet. Season chicken thighs with salt and pepper and brown on both sides until lightly golden. Remove from pan.
    • Add onions and peppers to the pan and saute for 4 minutes or until tender. Return chicken to the pan and pour in BBQ sauce. Stir to coat, cover and lower heat to a simmer.
    • Cook 30-40 minutes or until the chicken is tender and easily shreds. Top bread with shredded chicken and any desired toppings.

    Nutrition

    Serving: 1sandwich | Calories: 185kcal | Carbohydrates: 2g | Protein: 22g | Fat: 9g | Saturated Fat: 2g | Trans Fat: 1g | Cholesterol: 107mg | Sodium: 104mg | Potassium: 331mg | Fiber: 1g | Sugar: 1g | Vitamin A: 101IU | Vitamin C: 17mg | Calcium: 15mg | Iron: 1mg

    Chicken and Bacon Garlic Bread Pizza

    By Heather LAST UPDATED July 17, 2019 · FIRST PUBLISHED May 12, 2014, Leave a Comment

    Chicken and Bacon Garlic Bread Pizza - When life hands you an extra loaf of garlic bread because your amazing hubby thought that your little family of 4 would be able to eat 2 whole loaves with your Mother's Day meal on Sunday, what do you do? Make garlic bread pizza! Or at least that's what I did.

    Splitting Chicken and Bacon Garlic Bread Pizza on a wooden board.

    Starting Your Chicken and Bacon Garlic Bread Pizza

    You can start with either a pre-made loaf of garlic bread from the grocery store bakery or make your own garlic butter and smather it on a loaf of french bread.

    Pre made garlic bread load on white napkins.

     Once your loaf is nicely buttered, don't put in the oven just yet but top with shredded mozzarella cheese, cooked chicken, and crumbled bacon. You can actually go all sorts of directions with this and top with tomato sauce and other traditional pizza toppings. I like the simplicity of the garlic butter with the chicken and bacon here so I opted to go sans the sauce. For bacon, I like to keep a bag of the precooked bacon crumbles from Costco in my fridge to throw into salads, eggs, etc.

    Garlic bread with with shredded mozzarella cheese, cooked chicken, and crumbled bacon on a baking sheet with parchment paper.

     Tomatoes and some fresh chives finish it off. Sliced green onions would also be great on this but I have a ridiculous amount of chives growing in my garden right now and they're making their way into just about everything lately.

    Delicious Garlic Bread Pizza with mozzarella, tomatoes and chicken.

    Follow me on Pinterest

    Bake at 350 for 10 minutes or until the cheese is melted and then broil for a minute or two until it's bubbly and lightly browned.

    Split apart Garlic Bread Pizza with fresh tomatoes, mozzarella on a wooden board.

    Easy Chicken and Bacon Garlic Bread Pizza being split apart on a wooden board.

    📖 Recipe

    Simple Garlic Bread Pizza with mozzarella and tomatoes on a wooden board.
    Print Recipe
    4.17 from 6 votes

    Chicken and Bacon Garlic Bread Pizza

    Have a loaf of store-bought garlic bread to use? Make this pizza and you'll be happy you did!
    Prep Time10 minutes mins
    Cook Time12 minutes mins
    Total Time22 minutes mins
    Course: Main Course
    Cuisine: American
    Keyword: french bread pizza, Garlic Butter, store bought french bread
    Servings: 4 servings
    Calories: 446kcal
    Author: Heather Cheney

    Ingredients

    • 1 loaf of garlic bread unbaked
    • 1 ½ C mozzarella cheese grated
    • 1 C cooked chicken diced
    • 3-4 tablespoon crumbled and cooked bacon
    • ½ C fresh tomatoes diced
    • 2 tablespoon fresh chives chopped

    Instructions

    • Top buttered side of garlic bread with cheese, chicken, bacon, tomato and chives.
    • Bake at 350 for 10 minutes or until cheese is melted. Turn oven to broil and cook for an additional 1-2 minutes or until lightly browned.

    Nutrition

    Serving: 1serving | Calories: 446kcal | Carbohydrates: 60g | Protein: 23g | Fat: 13g | Saturated Fat: 6g | Cholesterol: 33mg | Sodium: 871mg | Potassium: 242mg | Fiber: 3g | Sugar: 4g | Vitamin A: 596IU | Vitamin C: 5mg | Calcium: 266mg | Iron: 4mg

    Oven Roasted Potato and Sausage Skillet

    By Heather LAST UPDATED July 17, 2019 · FIRST PUBLISHED May 2, 2014, 4 Comments

    Oven Roasted Potato and Sausage Skillet - Totally off topic,  but I just need to tell you about how awesome my 3 yr. old is today. Yesterday I was absolutely exhausted and felt like my baby was 14 lbs and trying to dig himself out of my uterus with a plastic spoon. Not so fun. So I casually said to M ( my 3 yr old) "I'm pretty sleepy and I think we should go take a nap" totally not expecting her to be compliant. But what does she do? She jumps up, runs into my room and tucks herself into my bed! Maybe one of the proudest moments of my life. And then, THEN, she proceeds to sleep for 2 and half hours cuddled up next to me. Best day of my pregnancy? Probably.

    Moving on...

    Oven Roasted Potato and Sausage in a skillet.

    How to Make an Oven Roasted Potato and Sausage Skillet Recipe

    I'm all about super easy meals these days. Okay, let's face it, I'm pretty much always about easy meals but this one is so easy that I can even throw it together on my laziest of days and serve it with carrot sticks to satisfy my veggie requirement.

    All you need is some potatoes, a bell pepper, onion, and some smoked sausage to make this easy oven roasted potato and sausage skillet recipe.

    Potatoes, a bell pepper, onion, and some smoked sausage in a large skillet.

     Quickly dice it up  (potato skins and all), throw it in a large oven-save skillet or baking dish, drizzle with some olive oil and season with your favorite steak seasoning.  For steak seasoning I usually use montreal steak, but any type of rub or seasoning with pepper, salt, garlic, onions and other seasonings should work good for you.

    Delicious Potato and Sausage recipe in a blue skillet.

    Follow me on Pinterest

    Pop that baby into a 400 degree oven for about 40 minutes, stirring it about every 10 to help with even browning and you're done! I like to chop up a little bit of fresh parsley to sprinkle over the top. It gives it a little pop of color and adds some freshness to the meal.

    Simple Potato and Sausage in a blue skillet.

    That's all for today, happy Friday friends!

    📖 Recipe

    Delicious Potato and Sausage in a large skillet.
    Print Recipe
    4 from 4 votes

    Oven Roasted Potato and Sausage Skillet

    Crispy potatoes and peppers roasted with smoked sausage for a delicious one pan meal!
    Prep Time10 minutes mins
    Cook Time45 minutes mins
    Total Time55 minutes mins
    Course: Main Course
    Cuisine: American
    Keyword: easy dinner, one pan, recipe with smoked sausage
    Servings: 4 servings
    Calories: 550kcal
    Author: Heather Cheney

    Ingredients

    • 4-6 medium russet potatoes washed and diced
    • 1 red bell pepper diced
    • 1 small yellow onion diced
    • 14 oz smoked sausage sliced and cut in half
    • 1 tablespoon favorite steak seasoning I used Montreal Steak
    • 2 tablespoon olive oil
    • ¼ C fresh parsley finely chopped (optional)

    Instructions

    • Preheat oven to 400 degrees
    • Combine all ingredients except for parsley in a large oven-proof skillet or baking dish and toss to combine.
    • Cook uncovered, stirring every 10 minutes for about 40-45 minutes total or until potatoes are tender and browned.
    • Top with parsley and serve.

    Nutrition

    Serving: 1g | Calories: 550kcal | Carbohydrates: 45g | Protein: 17g | Fat: 34g | Saturated Fat: 10g | Cholesterol: 70mg | Sodium: 857mg | Potassium: 1200mg | Fiber: 4g | Sugar: 4g | Vitamin A: 1250IU | Vitamin C: 57mg | Calcium: 48mg | Iron: 3mg

    Restaurant Style Salsa

    By Heather LAST UPDATED March 25, 2021 · FIRST PUBLISHED April 28, 2014, 1 Comment

    Restaurant Style Salsa - I'm kind of freaky when it comes to chips and salsa. Like I can't stop eating them sort of freaky. Basically if you put me in front of a bag of tortilla chips and a bowl of salsa I'm not walking away until they are gone.Restaurant Style Salsa in a small white bowl surrounded by tortilla chips.

    Making Restaurant Style Salsa

    My one caveat on this is that it has to be the right kind of salsa-- I'm not that into the jarred stuff and anything that is spicy enough to make me cry and keep me up all night with heartburn can go too. I guess I'm more of a fresh, mild-medium type of girl and that's probably why this recipe is my go-to when I don't want to pay $32 for a plate of rice and beans at a restaurant just to eat their warm chips and salsa. I know, I'm exaggerating. But for reals people, just make it at home!

    While this restaurant style salsa uses canned tomatoes, it gets it's freshness from all the other ingredients it includes: limes, jalepenos, garlic, onion and cilantro.

    Lime, jalapeno and a garlic clove on a wooden cutting board.

    Everything is getting tossed in the blender so just give it a quick chop before throwing it in and you'll be good. Also, when you're only 3 feet tall, squeezing lime juice into the blender on the counter is kind of difficult, but she insisted. Also, also, what's up with the price of limes these days?!

    Delicious Salsa ingredients in a blender.

     I don't have a good caption for this picture but had to include it because it was pretty. The blender I'm using is a Ninja Ultima Blender and I LOVE it. Be on the look out for my review coming up soon on the blog. If you're on the market for a new blender this might be what  you're looking for.

    Fresh tomatoes, cilantro, onions and garlic inside of a blender.

    It doesn't take much time in the blender for it to come together, especially if you like yours a little bit chunky. I'm more of a smooth Stanley when it comes to that so pulse it as many times as you'd like and you're done.

    Easy Restaurant Style Salsa inside of a blender.

     Now, if only I wasn't so high maintenance about my tortilla chips I'd have it all!

    Scooping simple Salsa with a tortilla chips out of a small white bowl.

    Did I mention that this recipe come from The Pioneer Woman? Ree, I'm eternally grateful that you posted this recipe like 4 years ago. That is all.

    Scooping easy Restaurant Style Salsa out of a small white bowl with a tortilla chip.

     Interested in more delicious meals?

    • Amazing Pineapple Salsa Chicken, So Quick and Easy!
    • Slow Cooker Green Salsa Soup
    • Slow Cooker Salsa Chicken Chili

    📖 Recipe

    Fast Salsa recipe in a small white bowl surrounded by mexican tortilla chips.
    Print Recipe
    5 from 3 votes

    Restaurant Style Salsa

    Fresh and easy to make, this salsa recipe will save your pocket book from unneccesary trips to the mexican food restaurant!
    Prep Time20 minutes mins
    Cook Time0 minutes mins
    Total Time20 minutes mins
    Course: Appetizer
    Cuisine: Mexican
    Keyword: blender salsa, canned tomatoes, pioneer woman
    Servings: 12 servings
    Calories: 5kcal
    Author: Heather Cheney

    Ingredients

    • 1 can 28 Ounce whole tomatoes with juice
    • 2 cans 10 Ounce Rotel (diced tomatoes w/ green chilies)
    • ¼ cup chopped onion
    • 1 clove garlic minced
    • 1 whole jalapeño quartered And sliced thin
    • ¼ teaspoon sugar
    • ¼ teaspoon salt
    • ¼ teaspoon ground cumin
    • ½ cup fresh cilantro more to taste
    • ½ whole lime juiced (more to taste)

    Instructions

    • In a large food processor or blender, combine whole tomatoes, Rotel tomatoes, onion, jalapeno, garlic, sugar, salt, cumin, lime juice, and cilantro. Pulse until you get the salsa to the consistency you'd like. Taste and adjust seasonings, if necessary.
    • Refrigerate salsa for at least an hour. Serve with tortilla chips.

    Nutrition

    Serving: 1serving | Calories: 5kcal | Carbohydrates: 1g | Protein: 1g | Fat: 1g | Saturated Fat: 1g | Sodium: 49mg | Potassium: 11mg | Fiber: 1g | Sugar: 1g | Vitamin A: 46IU | Vitamin C: 1mg | Calcium: 2mg | Iron: 1mg

    Oven Baked Pesto Tilapia

    By Heather LAST UPDATED July 17, 2019 · FIRST PUBLISHED April 17, 2014, 2 Comments

    All you need is 2 ingredients, a little salt and pepper and 20 minutes to have this pesto tilapia on your dinner table!

    Oven Baked Pesto Tilapia | heatherlikesfood.com

    I've taught a couple of classes to my church group on quick weeknight meals over the past few years. Slow-cooker and freezer meals somehow always make it into my class, but those take planning and preparation before hand. If you're like me, you don't have the motivation/freezer space to make 30 gagillion freezer meals and be set for the month. I know some people do it and LOVE it and there are all sorts of amazing blogs that tell you how, but I just haven't found my way onto that train yet. So when I teach a class like this I like to focus on foods that take very little preparation and cook time and quickly take on different flavors. Fish is one of these foods.

    Tilapia is a relatively inexpensive, firm white fish. It's flavor is super mild so even if you don't think you're a fish person, you might give this one a go.  I most often buy my fillets frozen from Costco where they come individually vacuum sealed so all I have to do is throw however many I need to cook for the night in the sink with some warm water and within 15 minutes they are thawed and ready to go.

    To start this pesto tilapia all I do is place the thawed fillets in a baking dish and season them with salt and pepper.

    Oven Baked Pesto Tilapia | heatherlikesfood.com

    The pesto I use, is again, from Costco (I promise this isn't sponsored) and it's one my favorite things to get there. This big jar is right around $8 and gives us at least 5 different meals each time I buy it.

    Oven Baked Pesto Tilapia | heatherlikesfood.com

    Spread 1- 1 ½ tablespoon of the pesto on top of each seasoned fillet. It's okay if you don't completely cover the sides because as it bakes it will move down and all will be well.

    Oven Baked Pesto Tilapia | heatherlikesfood.com

    From here it's just a quick bake in the oven-- 10-15 minutes depending on how big your fillets are. The fish is done when you twist a fork in the thickest part and it flakes easily. Also, the flesh will be opaque when cooked through.

    Oven Baked Pesto Tilapia | heatherlikesfood.com

    It's super flavorful, great served with rice or pasta and is done in 30 minutes!

    Oven Baked Pesto Tilapia | heatherlikesfood.com

    📖 Recipe

    Oven Baked Pesto Tilapia | heatherlikesfood.com
    Print Recipe
    4.47 from 41 votes

    Oven Baked Pesto Tilapia

    This easy tilapia recipe makes dinner a snap with the help of a little prepared basil pesto.
    Prep Time5 minutes mins
    Cook Time12 minutes mins
    Total Time17 minutes mins
    Course: Main Course
    Cuisine: American
    Keyword: Baked Fish, Easy Tilapia, Ways to use pesto
    Servings: 4 servings
    Calories: 223kcal
    Author: Heather Cheney

    Ingredients

    • 4 tilapia fillets or other firm white fish
    • ¼-1/3 C prepared pesto I like Costco brand best
    • salt and pepper

    Instructions

    • Preheat oven to 400
    • Place fillets in a greased 9x13" baking dish and season with salt and pepper.
    • Spread 1-1½ tablespoon of pesto over each fillet
    • Bake uncovered for 10-12 minutes or until the fish flakes easily and is opaque.

    Nutrition

    Serving: 1serving | Calories: 223kcal | Carbohydrates: 1g | Protein: 35g | Fat: 9g | Saturated Fat: 2g | Cholesterol: 86mg | Sodium: 233mg | Potassium: 513mg | Fiber: 1g | Sugar: 1g | Vitamin A: 312IU | Calcium: 42mg | Iron: 1mg

    Creamy Vanilla Bean No Bake Cheesecake

    By Heather LAST UPDATED July 17, 2019 · FIRST PUBLISHED April 15, 2014, Leave a Comment

    SONY DSC

    Including my own, I have 9 baby showers to attend over the next few months. NINE! You'd think that we all drank the same punch or something wouldn't you? It's pretty crazy. And so far every single one of these women are having girls except for me.  I'm totally fine with this since I already have 2 girls, but this poor boy is not only going to have 2 sisters, but all of his play-group buddies (my friend's kids) are going to be girls. He's going to be quite the ladies man!

    I started my marathon of baby showering and celebrating last week and brought this cheesecake to the party. If you're in the mood for cheesecake but don't want to fiddle with ovens and water baths, this recipe is for you. Sadly when I made this last week I only gave it like 2 hours to chill before slicing into it so it didn't stay pretty for long, but it sure tasted good! If you want it to keep it's shape just make sure to give it a good 4- 24 hours to set up in the fridge before slicing. Let's make it!

    I don't have pictures of the crust but it's a simple graham cracker, brown sugar, cinnamon, and melted butter combo. Press it into a pie dish or spring form pan, pop into the fridge for 3o minutes to chill and it's done!

    For the filling you'll beat 2, 8 oz packages of softened cream cheese with sugar, lemon juice and some vanilla bean seeds. When you're beating the cream cheese scrape the sides of the bowl down a couple of times to make sure you're getting it all incorporated. If you wait until you add the cream to scrape the bowl you'll end up with chunks of cream cheese in your finished cake. <---- no bueno

    Creamy Vanilla Bean No Bake Cheesecake | heatherlikesfood.com

    Remember that one time I made my own homemade vanilla extract? I'm using a vanilla bean that has been soaking in vodka for the past 5 months. This looks a little different than just splitting a vanilla bean in half and scraping out the seeds but either way works just as well.

    Creamy Vanilla Bean No Bake Cheesecake | heatherlikesfood.com

    Liquid gold, this stuff is. I luurrrrvve vanilla.

    Creamy Vanilla Bean No Bake Cheesecake | heatherlikesfood.com

    Next up, the cream. First of all, make sure the cream you use says "Heavy Whipping Cream" or "35% fat cream" or something to alert you that you are using the real deal and not glorified half and half. Sometimes cream that just says "whipping cream" doesn't have enough fat in it to keep it stable and let it thicken. Sorry folks, low-fat options just aren't going to work here! 🙂 Second, add the cream in slooooowly. Add some, scrape the bowl. Add some more, scrape the bowl again. Doing this will keep your mixture super smooth and prevent any lumpy-ness.

    Creamy Vanilla Bean No Bake Cheesecake | heatherlikesfood.com

    Once all the cream is mixed in you can let the mixer rip and whip until it's thick and still peaks form.

    Creamy Vanilla Bean No Bake Cheesecake | heatherlikesfood.com

    Spoon into the chilled crust, smooth out the top, cover and pop in the fridge for at least 4 hours.

    Creamy Vanilla Bean No Bake Cheesecake | heatherlikesfood.com

    You can really top this cheesecake with whatever you want, but I'm always in the mood for some fresh strawberries. Instead of mixing them with a bit of sugar I like to stir them up with a few tablespoons of strawberry jam to give them a little glaze and sweetness.

    Creamy Vanilla Bean No Bake Cheesecake | heatherlikesfood.com

    And that's about it. Top, eat, and enjoy!

    Creamy Vanilla Bean No Bake Cheesecake | heatherlikesfood.com

    📖 Recipe

    Creamy Vanilla Bean No Bake Cheesecake
    Print Recipe
    5 from 2 votes

    Creamy Vanilla Bean No Bake Cheesecake

    You don't have to turn on the oven to make a great cheesecake! Just mix and chill this cheesecake recipe in the fridge until firm!
    Prep Time30 minutes mins
    Cook Time0 minutes mins
    Chilling Time4 hours hrs
    Total Time4 hours hrs 30 minutes mins
    Course: Dessert
    Cuisine: American
    Keyword: graham cracker crust, no oven, whipping cream cheesecake
    Servings: 12 servings
    Calories: 294kcal
    Author: Heather Cheney

    Ingredients

    • 1 ½ cups graham cracker crumbs
    • ⅓ cup brown sugar packed
    • ¼ teaspoon ground cinnamon
    • ⅓ cup butter melted
    • 2 packages 8 oz each cream cheese, softened
    • ⅓ cup sugar
    • 1 tablespoon lemon juice
    • seeds of 1 vanilla bean
    • 2 cups heavy whipping cream
    • 1-2 lbs fresh strawberries sliced
    • 2 tablespoon strawberry jam

    Instructions

    • In a bowl combine graham cracker crumbs, cinnamon, brown sugar and butter. Press into the bottom of an ungreased 9" pie or spring form pan. Refrigerate for 30 minutes.
    • With an electric mixer, beat cream cheese, sugar, lemon juice and vanilla until smooth, scraping the sides of the bowl as needed. Slowly add the cream and continue to beat until still peaks form.
    • Spoon into chilled crust, cover and refrigerate for at least 4 hours, overnight is preferable.
    • Toss strawberries with strawberry jam and let sit for 30 minutes or until the strawberries start to release some of their juice. Slice cheesecake and serve with strawberries.

    Nutrition

    Serving: 1serving | Calories: 294kcal | Carbohydrates: 26g | Protein: 2g | Fat: 21g | Saturated Fat: 13g | Trans Fat: 1g | Cholesterol: 68mg | Sodium: 133mg | Potassium: 120mg | Fiber: 1g | Sugar: 17g | Vitamin A: 748IU | Vitamin C: 23mg | Calcium: 48mg | Iron: 1mg

    Hugs on the Beach

    By Heather LAST UPDATED March 12, 2021 · FIRST PUBLISHED February 25, 2014, 17 Comments

    Hugs on the Beach - It's about this time every year that I start to feel a little bit like Olaf and am wishing for all things summer. You've seen Frozen, right? With two little girls in my house I hear "Let it Go" in some way, shape, or form at least a dozen times a day. It was all fine and good at first but as much as I love Idina, I can't take it anymore! You'd think at times like these I'd pour myself a drink, put my feet up and let the littles sing their hearts out. But alas, not only am I preggers but I don't drink even when I'm not letting a tiny human suck all the life out of me.

    Hugs on the Beach drink garnished with sliced orange and a cherry.

    Today's Hugs on the Beach Recipe

    From the name of today's recipe you can probably tell that we're making-over the well know "sex on the beach" and turning it into a G-rated version that all can enjoy, hence the name Hugs on the Beach. Last summer our family was pretty obsessed with these and it was a rare day when the hubs wasn't making a variation of it. He even re-named it "Hugs on the beach" on whim and it totally stuck to the point where the girls could ask for "hugs" and we'd know they weren't asking for love and affection from us.

    We often mix these up just like punch, but anytime I can find an excuse to make a pretty layered drink I'm all over it. So that's how we're doing it today! The trick with layering drinks is to pour the liquid with the highest sugar content first because it will sink and then progressively follow it with those that have less sugar. Since we only have 2 layers that are different colors, this makes it pretty easy.

    Fruit Punch a drinking cup.

    Start by combining cranberry juice, grenadine, and peach nectar in a glass, give it a stir and add a generous scoop of ice.

    Pouring cranberry juice, grenadine, and peach nectar in a glass.

     How to Make Hugs on the Beach

    Pour the orange juice very slowly directly over the ice because it will break the fall into the cranberry mixture and keep those layers separated. If it's not staying separated chances are that you're pouring too fast.

     Garnish with a cherry and orange slice if you like and that's it!

    Hugs on the Beach non alcoholic drink in a drinking glass with ice, sliced oranges and cherries.


    📖 Recipe

    Non alcoholic drink in a drinking glass with fresh oranges and cherries.
    Print Recipe
    4.98 from 89 votes

    Hugs on the Beach

    An alcohol-free version of sex on the beach
    Prep Time5 minutes mins
    Cook Time0 minutes mins
    Total Time5 minutes mins
    Course: Drinks
    Cuisine: American
    Keyword: cocktail with grenadine, cocktail with orange juice, virgin cocktail
    Servings: 2 drinks
    Calories: 127kcal
    Author: Heather Cheney

    Ingredients

    • ½ C cranberry juice
    • ¼ C peach netcar
    • 2 tablespoon granadine
    • ½ C orange juice

    Instructions

    • Combine cranberry juice, peach nectar and grenadine and pour into 2 individual glasses
    • Add a scoop of ice and slowly pour ¼ of orange juice over the ice into each glass to make layers.
    • Garnish with an orange slice and cherry.

    Nutrition

    Serving: 1drink | Calories: 127kcal | Carbohydrates: 32g | Protein: 1g | Fat: 1g | Saturated Fat: 1g | Sodium: 9mg | Potassium: 191mg | Fiber: 1g | Sugar: 26g | Vitamin A: 233IU | Vitamin C: 39mg | Calcium: 15mg | Iron: 1mg

    Bowtie Chicken Caesar Salad

    By Heather LAST UPDATED March 22, 2021 · FIRST PUBLISHED February 19, 2014, Leave a Comment

    Bowtie Chicken Caesar Salad - This kid that I'm growing right now is wrecking havoc on any resolve I had to eat a well-balanced diet during this pregnancy. You guys, ALL I want is sugar! And I'll tell ya, those cute little girl scouts aren't helping any at the moment. I never had this happen with my other 2 pregnancies. In fact, sugar was pretty low on the must-have list. But right now if it's even remotely sweet it's going in my face with reckless abandon. Soooo, I'm trying to squeeze in as many salads and veggies as I can so that in the event that my baby comes out a raging sugar fiend, I can say that it wasn't my fault.

    Squeezing lemon onto Bowtie Chicken Caesar Salad.

    How to Make This Bowtie Chicken Caesar Salad

    I've been making this bowtie chicken caesar salad for years and it's always a crowd favorite when made for events. It's basically a chicken caesar salad with the addition of bowtie pasta, grape tomatoes, slivered almonds, and a squeeze of fresh lemon juice. The chicken and pasta make it hearty enough for a main course, but definitely leaves enough room for a brownie or two.  Any cooked chicken breast will do for this salad, but I definitely recommend this grilled chicken recipe as the Montreal chicken seasoning adds a big punch of flavor to the salad as well.

    Picking up easy Bowtie Chicken Caesar Salad with a silver fork.

    As far the dressing goes I say to go with your favorite pre-made dressing. Sure, homemade ceasar dressing is DIVINE but there are a few high quality caesar dressings that do the trick. My absolute favorite is Cardini's and I rarely buy anything else.  (not sponsored 🙂 )

    Fast Chicken Caesar Salad on a silver fork.

    Wanna bite? Happy Thursday!

    Simple Bowtie Chicken Caesar Salad with fresh Parmesan, tomatoes and croutons.

    Interested in other salad recipes?

    • Cilantro Lime Ranch Layered Salad
    • Antipasti Chicken Salad
    • Chopped Asian Chicken Salad

    📖 Recipe

    Delicious Caesar Salad on a plate with croutons. tomatoes and fresh Parmesan.
    Print Recipe
    4.84 from 6 votes

    Bowtie Chicken Caesar Salad

    This easy salad is full of flavor and hearty enough for dinner! Half green salad, half pasta salad you're going to love this!
    Prep Time5 minutes mins
    Cook Time0 minutes mins
    Total Time5 minutes mins
    Course: Salad
    Cuisine: American
    Keyword: Caesar Salad Dressing, dinner salad, easy salad for a crowd
    Servings: 4 servings
    Calories: 367kcal
    Author: Heather Cheney

    Ingredients

    • 2 cooked chicken breasts sliced
    • ½ lb cooked bowtie pasta
    • 1 large head romaine lettuce washed, dried and chopped
    • 3 scallions finely chopped
    • 4 oz grape tomatoes halved
    • ½ C parmesan cheese shredded
    • ½ C slivered almonds toasted
    • croutons caesar dressing, lemon wedges

    Instructions

    • Toss all ingredients in a large bowl, dress with caesar dressing, and serve with fresh lemon wedges for squeezing on individual portions.

    Nutrition

    Serving: 1serving | Calories: 367kcal | Carbohydrates: 23g | Protein: 38g | Fat: 14g | Saturated Fat: 4g | Trans Fat: 1g | Cholesterol: 82mg | Sodium: 268mg | Potassium: 461mg | Fiber: 3g | Sugar: 2g | Vitamin A: 1051IU | Vitamin C: 6mg | Calcium: 212mg | Iron: 3mg

    Super Soft Sour Cream Sugar Cookies

    By Heather LAST UPDATED March 22, 2021 · FIRST PUBLISHED February 5, 2014, 4 Comments

    Super Soft Sour Cream Sugar Cookies - Sometimes I just want to sit on the couch with plateful of frosted cookies while watching some trashy TV and use my finger to methodically lick every cookie free of frosting-- and then eat the cookies. Is that weird? I'm not saying I've ever done it, but if I did it would be with these sour cream sugar cookies. They remind me of the ever-so-famous Lofthouse cookies without all the ingredients my 7-year-old can't sound out.  Which totally justifies me in eating more than 6 in a sitting.

    Delicious soft sugar cookies in heart shaped with pink frosting. [Read more...]

    How To Make: Chocolate Cups

    By Heather LAST UPDATED July 17, 2019 · FIRST PUBLISHED February 3, 2014, 3 Comments

    Ever wonder how to make chocolate cups like you see on those decadent dessert trays? They are much easier to make than you might think!How to Make Chocolate Cups | heatherlikesfood.com

    I've been wanting to share how to make chocolate cups with you for a while now and I'm so excited to share them just before Valentines Day!

    They would make a seriously fun dessert after a romantic (or not-so-romantic dinner if you're home with kids) and are super easy to make.

    The best part about them is that you can fill them with ANYTHING and decorate them to match any theme you want. In the past, I've filled them with mousse, ice cream, fresh fruit, candy-- just about anything goes. Plus, people think you're a fancy pants if you serve them dessert in a delicate chocolate cup and that's always fun.

    The trick behind these little babies is water balloons. Actually, in full disclosure, this time I used a package of small balloons from the dollar store and didn't blow them up all the way.

    It turns out that water balloons are hard to find in Oregon in the dead of winter. Go figure. The finished cups will be the size of the balloon used so blow them up as big or little as you'd like.

    How to Make Chocolate Cups | heatherlikesfood.com

    Next up: Chocolate.

    Real chocolate can be finicky when melted down and re-hardened so I like to use chocolate candy coating to make things easy. I find mine in the bulk bins at Winco and craft stores like Michaels often have it in lots of different colors. I haven't ventured into the world of colored chocolate cups, but if you do I want to see pictures!

    How to Make Chocolate Cups | heatherlikesfood.com

    How To Make Chocolate Cups

    Melt down the chocolate in a bowl that is deep enough for you to dip the balloon into it. I like to use a smaller sized bowl that just fits the balloon so I don't have to melt down a ton of chocolate. Before dipping the balloons, let the chocolate cool down just a bit. If it's not cool enough it could cause the balloon to pop and you can imagine what a big mess that would be. I've found that as long as the chocolate is around bath water warm and the balloon isn't blown up super tight I don't have any problems though.

    How to Make Chocolate Cups | heatherlikesfood.com

    Place each dipped balloon onto a baking sheet lined with wax or parchment paper. I LOVE my Silpat Baking Sheets for things like this because nothing sticks to them and they are so easy to use.

    How to Make Chocolate Cups | heatherlikesfood.com

    Give the chocolate plenty of time to set up before poking a little hole in the top of each balloon. I find that the slower I can let the air out of the balloons the better so I aim for a slow deflation over a quick pop.

    How to Make Chocolate Cups | heatherlikesfood.com

    Sometimes you'll end up with a hole in the bottom of the cup where the balloon sat on the sheet. If needed, you can fix this by pouring a bit more chocolate into the bottom.

    How to Make Chocolate Cups | heatherlikesfood.com

    They are pretty impressive on their own but can be dressed up, too! One of my favorite ways is with sprinkles! Dip the tops of the cups in a bit more melted chocolate and then press into some sprinkles.

    How to Make Chocolate Cups | heatherlikesfood.com

    Think you can do it? I do!

    Want More Valentine's Day Recipes?

    • Layered Jello Squares, Valentine's Day Style
    • Raspberry Oreo Fluff
    • Mini Chocolate Box Cupcakes
    • Chocolate Covered Strawberry Candy Bars

    How to Make Chocolate Cups | heatherlikesfood.com

    📖 Recipe

    How to Make Chocolate Cups | heatherlikesfood.com
    Print Recipe
    4.58 from 7 votes

    Chocolate Cups

    Ever wonder how to make chocolate cups like you see on those decadent dessert trays? They are much easier to make than you might think!
    Prep Time15 minutes mins
    Cook Time0 minutes mins
    Total Time15 minutes mins
    Course: Dessert
    Cuisine: American
    Keyword: candy melts, made with a balloon, party food
    Servings: 16 servings
    Calories: 144kcal
    Author: Heather Cheney

    Ingredients

    • 1 lb chocolate candy coating
    • 12-16 water or small sized balloons

    Instructions

    • Inflate balloons to desired size.
    • Melt chocolate until smooth and place in a bowl deep enough to dip the balloons into.
    • Dip the bottom ⅓-½ of each balloon into the chocolate and place on a lined baking sheet.
    • Let chocolate fully harden and slowly deflate each balloon, removing after deflation.
    • Fill any holes in the bottom of the cup with additional melted chocolate and decorate as desired.

    Nutrition

    Serving: 1serving | Calories: 144kcal | Carbohydrates: 17g | Protein: 1g | Fat: 10g | Saturated Fat: 6g | Sodium: 5mg | Potassium: 82mg | Fiber: 2g | Sugar: 15g | Calcium: 7mg | Iron: 1mg

    Basic Cheese Sauce

    By Heather LAST UPDATED April 12, 2018 · FIRST PUBLISHED January 21, 2014, 3 Comments

    Basic Cheese Sauce - This cheese sauce is one of the first things I remember my mom teaching me how to make in the kitchen. I loved how she didn't follow a strict recipe and it was more about how the sauce looked than making sure we were using the right amount of ingredients. Definitely one of my first realizations that cooking was an art and was something flexible that took creativity.

    Basic Cheese Sauce on fresh asparagus on a blue serving plate.

    Follow me on Pinterest

    How to Make This Basic Cheese Sauce

    Knowing how to make a basic cheese sauce can take you many places in the kitchen. It can be kept simple and served over steamed veggies, mixed into cooked pasta for incredible mac and cheese, spiced up, made with any cheese, and much more. In fact, the preparation for this sauce can be altered to make just about any thickened sauce you want. Swap chicken stock for the milk and you've got a basic chicken gravy. Omit the cheese and you got a basic white sauce or bechamel. Basically, the sky's the limit here.

    The first step of making this cheese sauce is by making a roux which is a combination of equal parts fat and flour. This will be the thickening agent for the sauce. Butter is my go-to fat when making a roux but you'll find that recipes for things like gumbo will use oil.  All you have to do is combine the butter and flour in small sauce pan, give a stir until the butter is melted and let cook for 1 minute to let the raw flour taste cook out.

    Butter and flour in a silver mixing bowl.

    Whisking together eggs and flour in a silver mixing bowl.

    Once you've got the roux ready to go, it's time to add some liquid. In general, milk with 2% fat content and higher will create a creamier sauce. That's not to say that it will flop if you use something lower in fat, it just won't be quite as creamy. When the cheese melts it likes to disperse and hang on to fat molecules. If there isn't enough fat the cheese has nothing to hang on to and will be a bit more grainy in texture. Not a deal breaker though if you're counting calories.

    Mixing milk to make this simple Cheese Sauce with a whisk in a silver saucepan.

    Use a whisk to combine the milk with the roux and continue to stir until the mixture comes up to a boil and is thickened. Let boil for one minute and remove from the heat.

    Mixing hot cheese sauce with a silver whisk in a silver saucepan.

    Use Your Favorite Cheese!

    Really any cheese can be used here. I had some colby-jack on hand which made a super mild, creamy sauce. Sharp cheddar is great for mac and cheese and topped on just about anything. Adding a bit of parmesan cheese to any type of cheese sauce you makes adds a little bit of sharpness and great flavor. Play with what you've got and the results can be awesome!

    Mixing shredded colby jack cheese in to this easy Cheese Sauce in a silver sauce pan.

    Dip, pour, smother, and enjoy!

    Fresh Asparagus dipped in homemade Cheese Sauce.

    Asparagus smothered in Easy Cheese Sauce on a large blue plate.

    • Fresh Chimmichurri Sauce
    • Crispy Ravioli with Roasted Red Pepper Sauce
    • Homemade Enchilada Sauce

    📖 Recipe

    Asparagus drizzled with this Basic Cheese Sauce on a large blue plate.
    Print Recipe
    4.82 from 11 votes

    Basic Cheese Sauce

    A cheesy bechamel sauce that can be used on veggies, pasta and more!
    Prep Time5 minutes mins
    Cook Time10 minutes mins
    Total Time15 minutes mins
    Course: Sauce
    Cuisine: American
    Keyword: cheese bechamel, cheese sauce for vegetables, roux
    Servings: 6 servings
    Calories: 105kcal
    Author: Heather Cheney

    Ingredients

    • 2 tablespoon Butter
    • 2 tablespoon All-Purpose Flour
    • 1 C milk
    • ½-1 C cheese your choice, grated
    • salt and pepper to taste

    Instructions

    • Melt butter in heavy saucepan on top of stove.
    • Add flour, stir and let cook for 1 minute, being careful not to scorch.
    • Slowly add milk, whisking to combine. Stir constantly until mixture comes to a boil. Cook and stir 1 minute longer.
    • Remove pot from heat and stir in cheese until melted. Season with salt and pepper to taste.

    Nutrition

    Serving: 1serving | Calories: 105kcal | Carbohydrates: 4g | Protein: 4g | Fat: 8g | Saturated Fat: 5g | Trans Fat: 1g | Cholesterol: 24mg | Sodium: 109mg | Potassium: 67mg | Fiber: 1g | Sugar: 2g | Vitamin A: 277IU | Calcium: 115mg | Iron: 1mg

    Black Bottom Banana Cream Pie

    By Heather LAST UPDATED July 17, 2019 · FIRST PUBLISHED January 14, 2014, 11 Comments

    Black Bottom Banana Cream Pie - Over the weekend I did a little teasing on Instagram and Facebook by posting a picture of this pie and you guys went kind of crazy. I wasn't actually planning on posting this for another couple of weeks but I thew caution to the wind and here I am. Because really, what's going to happen? I have to post pulled pork tacos in a few weeks instead of this pie? I think I can live with that.

    Black Bottom Banana Cream Pie with whipped cream and chocolate on a small white plate.

    My hubby and I have a birthday agreement that on my birthday we go out somewhere I want to go and on his birthday I cook him whatever his little heart desires. Sometimes he goes a little over-board but its fun and gives me a chance to make something I wouldn't ordinarily make. This year he chose a big pot of crab and shrimp gumbo, dirty rice (minus the chicken livers), french bread, and this banana cream pie. It was his idea to include a layer of chocolate ganache beneath the custard and at first I thought it was a totally original idea. But it only took Google a total of 8.7 seconds to burst that little bubble. Turns out it's been done but let me tell you, it's for good reason! This pie is so darn good! Let's make it!

    How to Make This Black Bottom Banana Cream Pie

    You'll start out with a pre-baked pie crust. I decided to use a frozen shell (Marie Calendar's frozen crusts are my favorite) to save on time but making your crust is pretty easy peasy if you follow my no-fail recipe. No matter what crust you use, before baking use a fork and give the crust a good poking. This will keep the crust from puffing up and shrinking during baking.

    Marie Calendar's frozen pre-made pie crust.

     While you're letting the crust cool, start working on the chocolate ganache. Ganache sounds super fancy but it's really just a mixture of cream, chocolate, and sometimes butter. Heat the cream and butter on the stovetop until the butter is melted and the cream has just come to a simmer.

    Cream and butter mixture in a silver saucepan.

     Pour the cream and butter over some good-quality semi-sweet chocolate chips and stir, stir, stir. It will look gloppy and gross at first but once all the chocolate melts it's shiny, smooth, and gorgeous.

    Fresh cream and butter poured of semi sweet chocolate chips in a large purple bowl.

     See what I mean? It's purrrrdy.

    Smooth and creamy chocolate ganache in a large purple bowl with a blue spatula.

    Pour about half of the mixture into the bottom of your cooled pie crust. You want enough to create about a ¼" layer (or more if you want it REALLY chocolately). Set aside the remaining ganache to drizzle over the top of the pie when complete.

    Pouring chocolate ganache into pre-made pie crust.

     My Tip For Homemade Custard

    Next up: Custard!  When I make homemade puddings or custards I always use whole milk. Yes, it add more calories. Yes, I know it's January and you're trying to eat better. But just do it. If you REALLY want to you can use 2%, but under no circumstances should you attempt to use anything under that. The extra fat keeps the custard smooth and creamy and I take no responsibility for an icky custard.

    Two cups of Whole milk in a glass measuring cup.

     You'll heat the milk and half of the sugar on the stovetop until it is at almost a boil. While it's heating combine the other half of the sugar, 2 egg yolks, 1 whole egg, and some cornstarch in a separate bowl, whisking until smooth.

    Eggs and cornstarch in a small red bowl.

     Once your milk is just about boiling, use a ladle or small cup to take some of that hot milk and whisk it into the egg mixture. This process is called "Tempering" and brings the eggs slowly up to temperature so they don't curdle when they are added to the pot. Continue adding hot milk  and whisking until the egg mixture is warm to the touch.

    Pouring hot milk into egg mixture.

     Whisk the warmed-up egg mixture into the pot and DON"T STOP WHISKING! It might take just a few minutes, it might take up to 10, but whatever you do, don't stop stirring until the custard is thickened, glossy, has come to a boil for 1 minute, and is off the heat. If you follow this you will have a super smooth, lump-free filling!

    Whisking egg mixture together in a large black saucepan.

    Delicious custard on a silver whisk.

     Stir a little butter and vanilla into the finished custard and top the chocolate ganache with sliced bananas. Pour the warm custard over the bananas, smooth the top, and place in the fridge to chill completely.

    Sliced bananas and ganache in a pie crust.

     Once chilled it can be topped with fresh whipped cream and a drizzle of the reserved chocolate ganache.

    Homemade Banana Cream Pie in a small white plate on a table.

     The hubs snuck in a Banana Cream Pie slice I photographed the morning before his party and wholeheartedly approved. I think we're going to try it with coconut next time. Because there WILL be a next time.

    Taking a bite out of this simple Banana Cream Pie.

    Delicious Black Bottom Banana Cream Pie in a small white plate.

    📖 Recipe

    Easy Banana Cream Pie drizzled with chocolate and whipped cream in a small white plate.
    Print Recipe
    4.66 from 20 votes

    Black Bottom Banana Cream Pie

    The best banana cream pie with a chocolate ganache base. The perfect banana chocolate dessert!
    Prep Time10 minutes mins
    Cook Time10 minutes mins
    Chilling Time3 hours hrs
    Total Time3 hours hrs 20 minutes mins
    Course: Dessert
    Cuisine: American
    Keyword: chocolate banana pie, chocolate ganache, vanilla pastry cream
    Servings: 8 servings
    Calories: 527kcal
    Author: Heather Cheney

    Ingredients

    • 1 baked pie crust
    • ¼ C butter
    • ½ C heavy cream
    • 8 oz semi sweet chocolate chips
    • 2 C whole milk
    • ½ C sugar
    • ¼ teaspoon kosher salt
    • 2 egg yolks
    • 1 egg
    • ¼ C corn starch
    • 1 oz butter
    • 1 ½ teaspoon vanilla extract
    • 1 banana sliced
    • sweetened whipped cream

    Instructions

    • In a sauce pan, combine butter and cream and bring to a simmer. Pour over chocolate chips in a separate bowl and stir until the chocolate is melted and the mixture is smooth and glossy. Pour ½ of the mixture into the pie shell, spread to make even and set aside. Reserve remaining gananche.
    • In a heavy-bottomed sauce pan combine the milk with ¼ cup of the sugar and salt. Dissolve the sugar and bring just to a boil.
    • In a separate bowl whisk together the egg yolks, egg, remaining ¼ cup of sugar, and cornstarch and beat until smooth.
    • Temper the egg mixture by slowly streaming the hot milk into the egg, stirring constantly until the egg is warm.
    • Add the egg mixture to the rest of the milk on the heat and continue to cook, stirring constantly until it comes to a boil and thickens. Remove from heat.Stir in vanilla and butter.
    • Arrange sliced bananas over the cooled ganache and spoon the warm custard over the bananas. Smooth the top of the custard and place in fridge to cool completely.
    • Top with sweetened whipped cream and a drizzle of the reserved ganache.

    Nutrition

    Serving: 1serving | Calories: 527kcal | Carbohydrates: 48g | Protein: 7g | Fat: 34g | Saturated Fat: 19g | Trans Fat: 1g | Cholesterol: 120mg | Sodium: 281mg | Potassium: 342mg | Fiber: 3g | Sugar: 28g | Vitamin A: 702IU | Vitamin C: 1mg | Calcium: 113mg | Iron: 3mg

    White Chocolate Macadamia Nut Cookies

    By Heather LAST UPDATED September 4, 2019 · FIRST PUBLISHED December 10, 2013, 26 Comments

    White Chocolate Macadamia Nut Cookies - These my friends, are just a pain ol' classic cookie studded with sweet white chocolate and salty roasted macadamia nuts. It's probably the sweet and salty combo that forces me to eat the whole batch of these every time I make them-- I. Just. Can't. Stop. This recipe has withstood the test of time and still stands to be in my top 5 cookie recipes of all time, regardless of how many different cookies I've made in my lifetime. It's a keeper I tell ya, and it makes some of the best cookie dough known to mankind.

    Stacked White Chocolate Macadamia Nut Cookies on parchment papers.

    White Chocolate Cookies Recipe

    I busted out this recipe last week as I had the opportunity to send out a few dozen cookies to some blogging friends for the Great Food Blogger Cookie Swap, and I'm so glad that I had an excuse to buy macadamia nuts for something! Apparently this pregnant mama needs more macadamia nuts in her life because I almost polished them off before the cookie baking began. It was nearly tragic. Deliciously, totally-worth-it, tragic. But alas! I conquered and cut myself off just in time.

    I show you this first picture strictly to show you how my kitchen NEVER looks when I'm baking. On this particular day my 3 year old layed herself down for a nap moments earlier and I had just got done doing a total kitchen deep clean. Weird things were already happening so when I saw how neat and tidy my little work space was, I had to take a picture to hopefully engrave its image upon my soul so I could recreate it.

    White Chocolate Macadamia Nut Cookies ingredients next to an electric mixer.

    How to Make  These White Chocolate Macadamia Nut Cookies

    Like most drop cookie recipes, this one is pretty simple: cream the butter, sugar, vanilla (use the real stuff for these, please? The vanilla is what makes them soooo good) and salt together until is combined and slightly fluffy.

    Cream, butter, sugar and vanilla in an electric mixer.

    Add in a few eggs, scraping the bowl between additions to make sure it's mixing well.

    Cracking eggs into an electric mixer.

    Mix in some flour and baking soda...

    Flour and baking soda with cookie mixture in an electric mixer.

    And add in whatever additions you like.

    Pouring white chocolate chips into an electric mixer.

    Today we're using white chocolate chips and a good helping of chopped macadamia nuts. Why do these things have to be so good?

    Chopped macadamia nuts on a wooden cutting board.

    Scoop by rounded tablespoons (my cookie scoop is about 1 ½ tbsp) onto a greased or lined baking sheet.

    White Chocolate Cookie balls on a parchment lined baking sheet.

    Bake at 375 for 7-10 minutes or until the edges and highest tips of the cookie are just golden brown and the middles are mostly set. I know 7-10 minutes is a big gap but all ovens are different and the magic of these cookies comes when they are cooked perfectly. For your first batch I would start watching them at 6 minutes and take them out when you think they are good.

    Homemade White Chocolate Macadamia Nut Cookies on parchment paper.

    Interested in other cookie recipes?

    • Ranger Cookies
    • Lime Meltaway Cookies
    • Soft and Chewy Almond Butter Cookies

    📖 Recipe

    Stacked easy white chocolate chip macadamia nut cookies on parchment paper.
    Print Recipe
    4.72 from 14 votes

    White Chocolate Macadamia Nut Cookies

    My favorite white chocolate macadamia nut cookie recipe! It's soft and chewy in the middle and crispy on the edges!
    Prep Time20 minutes mins
    Cook Time10 minutes mins
    Total Time30 minutes mins
    Course: Dessert
    Cuisine: American
    Keyword: soft and chewy, vanilla cookie recipe, white chocolate with macadamia nuts
    Servings: 48 cookies
    Calories: 156kcal
    Author: Heather Cheney

    Ingredients

    • 1 C butter softened
    • 1 C granulated sugar
    • ¾ C brown sugar packed
    • 2 teaspoon REAL vanilla extract
    • ½ teaspoon salt
    • 2 eggs
    • 3 C All-Purpose flour
    • 1 teaspoon baking soda
    • 1, 12 oz bag white chocolate chips
    • 1 C chopped roasted and salted macadamia nuts

    Instructions

    • Preheat oven to 375 degrees
    • Cream butter, sugars, vanilla and salt until well combined and slightly fluffy.
    • Add eggs one at a time, scraping the bowl between each addition. Mix well.
    • Stir in flour and baking soda and mix until no dry spots remain.
    • Fold in chocolate chips and nuts.
    • Scoop by rounded tablespoons onto a lined or greased baking sheet. Bake for 7-10 minutes. Do not over-bake. Cookies are done when the edges and highest peaks of the cookie are golden brown and the middle just set.
    • Remove from pan and let cool on a wire rack.

    Nutrition

    Serving: 1cookie | Calories: 156kcal | Carbohydrates: 18g | Protein: 2g | Fat: 9g | Saturated Fat: 4g | Trans Fat: 1g | Cholesterol: 19mg | Sodium: 92mg | Potassium: 49mg | Fiber: 1g | Sugar: 12g | Vitamin A: 130IU | Vitamin C: 1mg | Calcium: 24mg | Iron: 1mg

    Herbed Sweet Potato Gratin

    By Heather LAST UPDATED March 2, 2021 · FIRST PUBLISHED December 3, 2013, 11 Comments

    Herbed Sweet Potato Gratin - Today I'm exited to be a part of Anolon's "Make It Yours" campaign where I get the chance to make a recipe my own by tweaking it to my little heart's content. Now if I'm being honest, I do this in some way, shape or form everyday but this time it was fun to actually have a "mission" to take a classic recipe and give it a twist. And, what's more of a classic than Julia Child's recipe for Gratin Daphinois (Potato Gratin)? Alright, I know I'm messing with the queen here, but bear with me. The result is a decadent sweet potato gratin that is ridiculously good.

    Herbed Sweet Potato Gratin in a black skillet.

    How to Start Making Your Herbed Sweet Potato Gratin

    We're starting with a pound each of russet and sweet potatoes that have been both scrubbed and peeled.

    russet potatoes and sweet potatoes on a table.

     Slice them up about an ⅛th of an inch thick and place in a bowl. If you'd like to slice the potatoes up ahead of time you can leave them in a bowl of cold water until you're ready for them. Cut potatoes will brown if left for more 5-10 minutes in the open air.

    Sliced sweet potatoes and russet potatoes in a large green bowl.

    Simple Herbed Sweet Potato Gratin

    Julia's recipe is pretty simple: potatoes, cream, cheese, salt, and pepper. I decided to bring out some of the earthy-ness of the sweet potatoes by using some herbs. I used dried herbs for this, but if you have fresh use 'em! It takes about 3 times the amount of fresh herbs as is needed for dry. So if you need ½ teaspoon of dried thyme, you'll want 1 ½ teaspoon if you're using fresh thyme. Make sense? I like to put the salt, pepper, and herbs in a little bowl to make it easier to dump right into the cream when it's time. 

    Rosemary leaves and thyme leaves mixture in a small bowl.

    I've had the chance to try out several of Anolon's Nouvelle Copper pans over the past several months and I'm in love! The one I'm using here is a 3 quart saute pan that comes with stainless steel lid. The pans are gorgeous and I'm loving how well they distribute the heat while cooking. I also love that the non-stick coating is metal utensil safe so I don't have to be the silicone spatula nazi just to keep my pans looking nice. Keep reading for a chance to win one of your own!

    Heat some cream, butter and garlic over medium heat and bring to a simmer.

    Cream, butter and garlic in a large black skillet.

     Remove from the heat and stir in the herbs, salt, pepper and cheese. I decided to go with sharp cheddar as opposed to Julia's swiss cheese to offset some of the sweetness from the sweet potatoes. The cheese doesn't have to be all the way melted, just stirred into the cream.

    Mixing simple Potato Gratin ingredients in a large black skillet.

     If you're smart you'll take the spatula out of the pan before adding in the potatoes. Regardless, add the sliced potatoes to the pan...

    Pouring sliced potatoes into ingredient mixture in a large skillet.

     ...and arrange them so that most of them potatoes are submerged in the cream mixture. Cover the pan with foil or a lid and bake for 3o minutes at 375 degrees.

    Cooking Sweet Potato Gratin recipe in a large black skillet.

     30 Minutes Later ...

    After 3o minutes they should look like these. The potatoes will be tender but there will still be a lot of liquid in the pan.

    Herbed Sweet Potato Gratin recipe in a large black skillet.

     Continue to cook uncovered until they are golden brown on top and crispy around the edges-- about 20 minutes longer.

    Cripsy Sweet Potato Gratin in a large black skillet.

     What you'll pull out of the oven can only be described as a big pan of splendor. It's savory and creamy and slightly sweet and the perfect side dish for a holiday dinner party! I think Julia would approve.

    Delicious Herbed Sweet Potato Gratin in a large black skillet next to a wooden spoon.

    Update: Giveaway closed

    Giveaway!

    Want to win your very own Anolon 3 qt. Covered Saute Pan? Anolon wants you to as well! Use the widget below to enter. Good luck!

    a Rafflecopter giveaway

    This post is sponsored by Anolon and I’ve received compensation for my time and work. As always, recipes and opinions are 100% my own. 


    Interested in other delicious potato recipes?

    • Perfect Baked Sweet Potatoes
    • Steakhouse Baked Potatoes
    • Super Crispy Oven Roasted Garlic Potatoes

    📖 Recipe

    Easy Sweet Potato Gratin recipe in a large black skillet next to a wooden spoon.
    Print Recipe
    5 from 4 votes

    Herbed Sweet Potato Gratin

    Two types of potatoes mixed with a creamy, cheesy sauce. The perfect side for your holiday meal!
    Prep Time10 minutes mins
    Cook Time50 minutes mins
    Total Time1 hour hr
    Course: Side Dish
    Cuisine: American
    Keyword: potatoes with cream sauce, scalloped potatoes, thanksgiving side
    Servings: 6 servings
    Calories: 435kcal
    Author: Heather Cheney

    Ingredients

    • 1 lb russet potatoes peeled and thinly sliced
    • 1 lb sweet potatoes peeled and thinly sliced
    • 1 ⅓ cups heavy cream
    • 3 tablespoon butter
    • 1 clove garlic minced
    • ½ teaspoon dried rosemary
    • ½ teaspoon dried thyme
    • 1 teaspoon kosher salt
    • ½ teaspoon black pepper
    • 1 cup sharp cheddar grated

    Instructions

    • Preheat oven to 375.
    • In a 3 qt. oven-safe pan, heat cream, butter and garlic over medium heat and bring to a low simmer. Remove pan from heat.
    • Stir in salt, pepper, and herbs followed by the grated cheese.
    • Add potatoes to the pan, arranging the slices so that most of them can be submerged in the cream mixture.
    • Cover pan with a lid or foil and bake in the oven for 30 minutes. Remove cover and continue to bake until the top is golden and edges are crispy-- about 20 more minutes.
    • Allow to rest for 10 minutes before serving.

    Nutrition

    Serving: 1serving | Calories: 435kcal | Carbohydrates: 31g | Protein: 9g | Fat: 32g | Saturated Fat: 20g | Trans Fat: 1g | Cholesterol: 107mg | Sodium: 620mg | Potassium: 635mg | Fiber: 3g | Sugar: 4g | Vitamin A: 11871IU | Vitamin C: 7mg | Calcium: 208mg | Iron: 1mg

    Caramel Apple Pie

    By Heather LAST UPDATED March 25, 2021 · FIRST PUBLISHED November 12, 2013, 10 Comments

    Caramel Apple Pie-- everything you love about caramel apples wrapped up in a flaky pie crust and topped with the most delicious crumb topping. One of my favorite pies of ALL time!

    After Monday's post I am all about the pie right now. Or maybe it's because I still have one lonely piece of this beauty waiting for me in the fridge right now. You guys, this caramel apple pie has totally made my week.

    I usually don't like to give my recipes names like "the world's best" or "super duper ooper good" fill in the blank, because it feels a little hoity-toity (I'll admit there are a few here from way back). But this caramel apple pie has me tempted. It. Is. So. Darn. Good.

    So without further adieu, let's just get down to it!

    Granny Smith apples are absolutely the way to go here. We want them tart so that it balances out the sweet caramel that we're going to pour over the top of them. I also like to make sure that my apples are cut pretty thin so that they cook quickly and evenly. Just mound them up in your pie crust and you're set.

    Caramel Apple Pie | heatherlikesfood.com

    Instead of mixing the raw apples with sugar and spices like you normally do for an apple pie, we're going to make a little caramel sauce to pour over the apples instead. Bring a little butter, sugar, cinnamon, salt, water, and flour to a boil, let cook for a minute and remove from the heat.

    Caramel Apple Pie | heatherlikesfood.com

    Next up is the crumb topping! I love a good crumb topping and this one is sweet, slightly chewy, and plenty crumbly. If you have a stand mixer just throw all the ingredients into the bowl and let it roll until it looks like coarse sand. Otherwise you can mix this by hand with a fork. It's ready when you can take a handful of it and it sticks together in a clump after squeezing it.

    Caramel Apple Pie | heatherlikesfood.com

    Pour the caramel sauce over those delicious apples...

    Caramel Apple Pie | heatherlikesfood.com

    Top with ALL of the crumb topping. I emphasize the ALL because it will look like a lot, but just keep piling it on. I like some bigger crumbs so when I top the pie I make clumps by the handful and then put it on the pie.

    Caramel Apple Pie | heatherlikesfood.com

    Once all the crumbs are on you're ready to bake! The crumb has a tendency to burn during the first part of baking since we cook it at a high temperature at the beginning to set the crust,  so just loosely lay a piece of foil over the top during the first 15 minutes and it shouldn't be a problem. Towards the end of baking-- right around the last 20 minutes or so --  if the crust is looking a little dark, wrap some foil around the crust to keep it from browning any more.

    Caramel Apple Pie | heatherlikesfood.com

    AND, if you really want to your guests to be bamboozled by your pie making skills, drizzle a little bit of jarred caramel sauce over the top of the pie.

    You're welcome.

    Caramel Apple Pie | heatherlikesfood.com

    Other Recipes For Your Thanksgiving Dinner Menu

    • Sweet Potato Casserole With Coconut
    • Corn Spoon Bread
    • Best Dinner Roll Recipe
    • Fresh Green Bean Casserole
    • Homemade Creamed Corn
    • Cranberry Fluff
    • Pumpkin Turnovers
    • Never Fail Pie Crust
    • Au Gratin Potato Recipe

    📖 Recipe

    Caramel Apple Pie-- everything you love about caramel apples wrapped up in a flakey pie crust and topped with the most delicious crumb topping. One of my favorite pies of ALL time!
    Print Recipe
    4.63 from 8 votes

    Caramel Apple Pie

    A saucy, caramel-y apple pie that will become your go-to apple pie recipe! 
    Prep Time30 minutes mins
    Cook Time45 minutes mins
    Total Time1 hour hr 15 minutes mins
    Course: Dessert
    Cuisine: American
    Keyword: caramel sauce, fall pie, thanksgiving
    Servings: 8 servings
    Calories: 386kcal
    Author: Heather Cheney

    Ingredients

    • 3-4 large granny smith apples peeled and thinly sliced
    • 6 Tablespoons butter
    • ½ cup brown sugar
    • ¼ C water
    • ¼ teaspoon cinnamon
    • ¼ teaspoon kosher salt
    • 3 Tablespoons all purpose flour
    • 1 Cup All Purpose Flour
    • 1 Cup Brown Sugar
    • ¼ Cup butter
    • 1 Prepared 9 inch pie crust-- I love my no-fail recipe https://heatherlikesfood.com/secret-ingredient-no-fail-pie-crust/

    Instructions

    • Preheat oven to 425 degrees.
    • Place sliced apples in prepared pie crust.
    • In a small saucepan, whisk together the butter, brown sugar, water, cinnamon, salt, and first portion of  flour and bring to a boil. Cook for 1 minute and remove from the heat. Set aside.
    • Using a stand mixer make the crumb topping by mixing the second portion of flour, brown sugar and softened butter until it resembles coarse sand-- about 3-4 minutes.
    • Pour the caramel mixture over the apples in the pie crust. Use your hands to form the crumb mixture into small clumps and place on top of apples ( it will seem like a lot of crumbs, but use them all).
    •  Very loosely place a piece of foil on top of the crumbs, place pie on a baking sheet and bake for 15 minutes at 425 degrees.
    • Remove foil from the top of the pie and lower temperature to 350. Bake an additional 35-40 minutes. Check the pie during the last 20 minutes of baking to see if the crust is getting too dark. If so, wrap foil around the edges of the pie and continue to bake.Pie is done when
    • Pie is done when crust is golden and filling is bubbly.
    • Top the finished pie with jarred caramel sauce if desired.

    Notes


    Nutrition

    Serving: 1serving | Calories: 386kcal | Carbohydrates: 64g | Protein: 2g | Fat: 15g | Saturated Fat: 9g | Trans Fat: 1g | Cholesterol: 38mg | Sodium: 211mg | Potassium: 152mg | Fiber: 2g | Sugar: 47g | Vitamin A: 477IU | Vitamin C: 3mg | Calcium: 46mg | Iron: 1mg

    Secret Ingredient No-Fail Pie Crust

    By Heather LAST UPDATED March 25, 2021 · FIRST PUBLISHED November 11, 2013, 6 Comments

    Secret Ingredient No-Fail Pie Crust - Confession: I don't like to think of myself as a snob about a lot of things but when it comes to pie crust my nose is flying high. No shame.

    Is it such a sin to want a flaky, tender, buttery crust on the pies I stuff my face with? I don't think so. I mean, if I'm going to eat a piece of pie that will surely take it's aggression out on my thighs, gosh darn-nit, it's going to be worth it!

    Secret Ingredient Pie Crust on a table.

    How to Make My Secret Ingredient No-Fail Pie Crust

    So just in case you ever have to make me a pie, today I'm sharing my favorite secret ingredient no-fail pie crust recipe. It's REALLY hard to mess up with the addition of a little secret ingredient and it produces some of the flakiest most tender pie crusts there is! **Okay, if you ever really do make me a pie, please use whatever pie crust you'd  like so I don't feel like a big, fat jerk. I'll gladly eat it and be ever-so-grateful you made me pie. Really.**

    It starts off like any ol' pie crust-- a little flour, butter, and shortening. The original recipe uses a food processor and if you have one please use it because the results will likely be a little superior. But if you don't, you can certainly make this by hand and still come out with great results.

    The first trick to making a good pie crust is to use COLD butter and shortening- like out of the freezer cold. This keeps it from becoming too incorporated into the flour creating a tough dough. So once your butter and shortening is cold, cut it up and place it into the food processor with all but 1 C of the flour called for.

    Butter and cold shortening in a food processor.

    Give it just about 2, 1 second pulses and it will come together pretty quickly-- you want there to be uneven clumps and no dry flour remaining.

    Secret Ingredients and dry flour in a food processor.

    Now that the fat is cut up nicely you can add in the reserved cup of flour and pulse just until the flour is evenly distributed and the large clumps have been broken up a bit-- about 4 quick pulses.

    Pouring flour into a food processor.

    Your mixture should look like this. Pour it into a mixing bowl and set aside.

    Homemade pie crust ingredients in a large red bowl.

    The Secret Ingredient

    Time for the secret ingredient!  This recipe comes from Cook's Illustrated and is genius! Instead of using just plain water to bring the crust together we're using equal parts water and vodka. Why Vodka? Because it has a high alcohol content and doesn't promote gluten development which helps the dough to stay tender and flaky even if we overwork it. The vodka also evaporates much faster than water so when it enters the oven it leaves the crust much quicker than the water which results in little steam "pockets" that then translates into a flaky crust.

    Hand Crafted Vodka next to a glass measuring cup on a table.

    This Secret Ingredient No-Fail Pie Crust recipe calls for ¼ c each of  cold water and vodka. Mix it together but don't pour it all into your flour mixture at once. I like to sprinkle about half of it over the dough and then add more if needed. You want the dough to just barely hold together and not be wet or sticky. If you can form it into a ball in the bottom of your bowl without it falling apart, you're there. 

    Pie Crust recipe in a large red mixing bowl.

    This Pie Crust  recipe makes enough dough for 1 double or 2 single pie crust. Divide the dough into half and place on two separate pieces of plastic wrap.

    Two separate pie crust balls in clear plastic wrap.

    Wrap up each dough ball tightly in the plastic so no air can get in.

    Easy pie crust dough rolled into balls in plastic wrap.

    Flip each ball so that seam side of the plastic faces down and press each one into a disk.

    Pressing pie crust ingredients in plastic wrap into flat disks.

    You now have two pie dough disks that will be easy to roll out into a circle when the time comes!

    Secret Ingredient Pie Crust balls made into circles on a table.

    Don't Skip This Step!

    Before rolling out the dough it needs to be refrigerated for at least 45 minutes. Skipping this step will only leave you with a sticky mess so don't do it! When I roll out my pie dough, I like to do it between 2 sheets of parchment paper.  You still have to flour the parchment but it makes handling the dough so much easier, especially when it comes time to put it in the pan. Parchment can be found at most grocery stores now, and sometimes the bakery will even sell you a few sheets if you ask the right person. I like to get mine at a restaurant supply store like Cash N' Carry. And while you do have to buy it in bulk ( like $30.00 for 1,000 full sheets), it lasts FOREVER. And when I say forever, I mean it. I bought my last box 6 years ago, have used it for catering many an event, and still have a good stack to last me a while longer. Totally worth it.

    Flour the bottom piece of parchment paper, place your chilled pie dough on top and then flour the top of the pie dough.

    Chilled pie dough on floured parchment paper.

    Place another piece of parchment on top and use a rolling pin to roll the pie dough out. You can turn the parchment and dough as needed on your counter top to help make rolling easier. Just check to make sure that there is enough flour between the paper and dough every once in a while so you can get the dough off of the paper when the time comes.

    Parchment paper with delicious pie dough in the middle with a rolling pin on top.

    Once you dough is rolled to the thickness you'd like, peel off the top layer of paper...

    Rolled pie crust dough.

    Place you pie pan on top...

    Silver pie pan on top of simple pie crust dough.

    Slide your hand under the bottom piece of parchment and quickly flip it over.

    No Fail pie crust dough on top of pie dish on a table.

    From here you can gently ease the dough into the pan. I like a thick crust and like to tuck the extra edges of the pie dough up and under the edge as opposed to trimming them off.

    Tucking edges of pie crust dough onto a pie dish.

    Crimp the edges however your little heart desires and you're done! Do you see all of those little flecks of butter in the finished dough? That butter is going to melt when it goes into the oven and along with the vodka in the dough is going to create one flaky, out-of-this-world crust!

    Buttered pie crust dough in a pie dish on a table.

    Follow me on Pinterest

    Come back on Wednesday and we'll put this pie crust to use with an awesome recipe for Caramel Apple Pie! Enjoy your Monday!

    Other Recipes For Your Thanksgiving Dinner Menu

    • Sweet Potato Casserole With Coconut
    • Corn Spoon Bread
    • Best Dinner Roll Recipe
    • Fresh Green Bean Casserole
    • Homemade Creamed Corn
    • Cranberry Fluff
    • Pumpkin Turnovers
    • Au Gratin Potato Recipe
    • Caramel Apple Pie with Crumb Topping

    📖 Recipe

    Easy pie crust dough ingredients in a large red bowl.
    Print Recipe
    4 from 5 votes

    Secret Ingredient No-Fail Pie Crust

    A super easy pie crust that uses vodka instead of water to keep the dough light and flaky!
    Prep Time30 minutes mins
    Cook Time0 minutes mins
    Chilling Time2 hours hrs
    Total Time2 hours hrs 30 minutes mins
    Course: Dessert
    Cuisine: American
    Keyword: butter and shortening, flaky pie crust, vodka pie crust
    Servings: 2 single pie crusts
    Calories: 1740kcal
    Author: Heather Cheney

    Ingredients

    • 2 ½ cups all-purpose flour
    • 1 teaspoon table salt
    • 2 tablespoons sugar
    • 12 tablespoons 1 ½ sticks cold unsalted butter, cut into ¼-inch slices
    • ½ cup cold vegetable shortening cut into 4 pieces
    • ¼ cup cold vodka
    • ¼ cup cold water

    Instructions

    • Process 1½ cups flour, salt, and sugar in food processor until combined, about 2 one-second pulses. Add butter and shortening and process until homogeneous dough just starts to collect in uneven clumps, about 15 seconds (dough will resemble cottage cheese curds and there should be no uncoated flour). Scrape bowl with rubber spatula and redistribute dough evenly around processor blade. Add remaining cup flour and pulse until mixture is evenly distributed around bowl and mass of dough has been broken up, 4 to 6 quick pulses. Empty mixture into medium bowl.
    • Sprinkle ½ of the vodka and water over mixture. Using your fingertips, bring the dough together into a ball, adding more of the vodka and water if needed to form a ball until it just barely stays together. Divide dough into two even balls and flatten each into 4-inch disk. Wrap each in plastic wrap and refrigerate at least 45 minutes or up to 2 days. Disk can be frozen for up to 2 months.

    Nutrition

    Serving: 1pie crust | Calories: 1740kcal | Carbohydrates: 131g | Protein: 17g | Fat: 121g | Saturated Fat: 56g | Trans Fat: 10g | Cholesterol: 181mg | Sodium: 1770mg | Potassium: 188mg | Fiber: 4g | Sugar: 12g | Vitamin A: 2099IU | Calcium: 46mg | Iron: 7mg

    Banh Mi Style Pulled Pork Sandwiches

    By Heather LAST UPDATED March 22, 2021 · FIRST PUBLISHED October 21, 2013, Leave a Comment

    Banh Mi Style Pulled Pork Sandwiches - Truth: I'm basically smitten by anything that includes both bread and pulled, saucy meat.

    Truth: "Banh Mi" is actually the Vietnamese term for all types of bread and baguettes but it's evolved and now refers to a meat-filled sandwich found in Vietnamese bakeries.

    Truth: Vietnamese food rocks

    Truth: I've taken some liberties with this recipe and don't claim this as an authentic banh mi.

    Truth: It's amazing.

    Banh Mi Style Pulled Pork Sandwich with a side of pickles on a wooden board.

    How to Start Your Banh Mi Style Pulled Pork Sandwiches

    The meat starts off in the slow cooker where it slow-roasts for hours and gets fall-apart tender. The sauce it's cooked in is a combo of sweet chili sauce (click here to learn a little about it), lime juice, and fish sauce. Fish sauce is a key ingredient in Thai and Vietnamese cooking and doesn't actually taste as "fishy" as one would think. While I fully encourage you to give it a go, soy sauce can be substituted if you can't get past the name.

    Tiparos Fish Sauce.

    Stir up the sauce and pour over the pork in the slow-cooker. I usually like to use a pork shoulder, but this time I used a pork sirloin roast which is a good choice if you want something a bit leaner.

    Pouring fish sauce over pork shoulders in a slow cooker.

     While the pork is cooking, let's put together a little cool, crisp, slaw. One of the main components of this slaw is daikon and if you haven't had it it's a super mild white raddish that you can find in most produce sections. Sometimes it's called Japanese raddish but you'll be able to spot it because it basically looks like a long, giant root.

    Daikon vegetable on a table.

     Shred some daikon and carrot, throw in some fresh cilantro and toss with a dressing made of rice wine vinegar, sugar, sesame oil, and  a little salt. It's okay if you get this put together a few hours before you're ready to serve because the carrots and daikon hold their crunch really well.

    Homemade Pulled Pork Sandwich ingredients in a green bowl.

    Now Wait

    After 6-8 hours your meat should be full cooked and ready to go. Take the pork out of the slow cooker and place on a plate to easily shred. Pour the cooking liquid from the slow cooker into a separate bowl, skim the fat off the top and combine 1 cup of that liquid with another ¼ C of sweet chili sauce. Toss the shredded meat with the cooking liquid sauce and you're ready start making Banh Mi Style Pulled Pork Sandwiches!

    Pouring sweet chili sauce over pulled pork in a slow cooker.

    Assembling Your Pulled Pork Sandwiches

    Before starting to assemble the pulled pork sandwiches, mix a dollop of mayonnaise with a squirt of sirracha and spread each side of a toasted baguette with it. From there, pile high with the hot pork, a spoonful of the slaw, and top with a few thin slices of cucumber.

    Take a bite and enjoy the crunchy, smooth, cool, and spicy-ness. Yup- it's good.


    From Scratch Korean Pulled Pork Sandwiches on a wooden board.

    Other Sandwich Recipes You Might Like

    • Italian Beef Recipe with Pepperoncini 
    • Garlic Bread Grilled Cheese
    • Pork Tenderloin Sandwich
    • Easy Pulled BBQ Chicken Sandwiches
    • Sloppy Joe Sauce
    • Slow Cooker BBQ Beef Sandwiches
    • Easy French Dip
    • Onion Soup Mix Burger
    • Pork Burger
    • Greek Turkey Burger Recipe
    • Doritos Burgers

    📖 Recipe

    Delicious Pulled Pork Sandwiches wrapped in parchment paper with a sliced pickle on the side.
    Print Recipe
    4.75 from 4 votes

    Banh Mi Style Pulled Pork Sandwiches

    Slow Cooker pulled pork piled high with pickled veggies and a spicy mayo.
    Prep Time20 minutes mins
    Cook Time8 hours hrs
    Total Time8 hours hrs 20 minutes mins
    Course: Sandwich
    Cuisine: Vietnamese
    Keyword: easy sandwich, Slow Cooker, vietnamese sandwich
    Servings: 8 sandwiches
    Calories: 215kcal
    Author: Heather Cheney

    Ingredients

    • 3 lb pork shoulder
    • salt and pepper
    • ¼ C sweet chili sauce
    • ¼ fish sauce
    • 1 lime juiced
    • ¼ C sweet chili sauce
    • 1 ½ C shredded carrots
    • 1 ½ C shredded daikon
    • ½ C fresh cilantro coarsely chopped
    • 2 tablespoon rice vinegar
    • 2 teaspoon sesame oil
    • 2 teaspoon sugar
    • ¼ teaspoon salt
    • cucumber thinly sliced
    • mayonnaise mixed with sirracha to taste
    • french baguettes sliced and toasted

    Instructions

    • Season pork shoulder with salt and pepper and place in a slow cooker.
    • Combine fish sauce, ¼ sweet chili sauce, and lime juice in a small bowl and pour over the pork. Cook on low for 6-8 hours or until the meat shreds easily. Remove meat from cooking liquid and shred.
    • Pour cooking liquid into a separate container, skim off fat and combine 1 C of this skimmed liquid with the remaining ¼ of sweet chili sauce. Toss the meat with this sauce and set aside.
    • In a large mixing bowl combine daikon, carrots and cilantro. Whisk together the vinegar, sesame oil, salt, and sugar and pour over the veggies. Toss to combine and set aside.
    • Spread each baguette with the sirracha mayo, a few slices of cucumber, and a spoofull each of the meat and slaw.

    Nutrition

    Serving: 1sandwich | Calories: 215kcal | Carbohydrates: 13g | Protein: 21g | Fat: 9g | Saturated Fat: 3g | Cholesterol: 70mg | Sodium: 337mg | Potassium: 474mg | Fiber: 1g | Sugar: 10g | Vitamin A: 3387IU | Vitamin C: 9mg | Calcium: 32mg | Iron: 2mg

    Brown Butter Fettuccini Alfredo

    By Heather LAST UPDATED April 12, 2018 · FIRST PUBLISHED October 15, 2013, 1 Comment

    Brown Butter Fettuccine Alfredo - You know those days when you feel like eating apple pie and bacon for breakfast just because if feels naughty and  you can do it because you're an adult? This Brown Butter Fettuccine Alfredo is kind of one of those recipes. I'll tell you now that it won't get the the check-mark of approval from your doctor, but this Brown Butter Fettuccine Alfredo is worth it.

    Brown Butter fettuccine Alfredo noodles in a large skillet.

    Case in point: butter. The shining star of this alfredo sauce is the brown butter we're using as a base-- it's nutty and aromatic and turns an already good sauce into something worth writing home about. Yes, we're using a whole stick and I already gave you my disclaimer about it being a less-than-angelic recipe, so I'll just pretend like I didn't feel your virtual eyes bug out.

    Butter melting on a large skillet.

    How to Make This Brown Butter Fettuccine Alfredo

    Start by melting down your butter in a large skillet over med-low heat. Finely chop a few cloves of garlic or use a small-tooth grater to do the work for you. My Microplanes are one of my favorite kitchen tools.

    Grating garlic on a white cutting board.

    Once your butter is all the way melted, toss the garlic in and continue to cook the butter, giving it a stir every few seconds. You'll notice that it will start to foam up and this is when you want to really start paying attention. As soon as the foam subsides, you'll start to see the butter solids start to brown. Continue to stir and cook until it's a nice golden brown color, but no longer. If cooked too long the butter will burn and you'll exchange that desired nuttiness with black ick, so watch closely.

    Cooking butter and garlic in a large black skillet.

    When the butter is browned, stir in some cream and bring to a simmer. You'll have fun making fun swirls with the butter as the cream is incorporated.

    Mixing browned butter and sour cream in a black skillet with a blue spatula.

    Let the cream and butter simmer until it's thickened up a bit to your liking and stir in some fresh parmesan cheese.

    Pouring grated Parmesan cheese into Alfredo sauce recipe.

    Stir until the cheese is melted and add in a pound of cooked fettuccine. If the sauce seems a bit thick, take some of the water the pasta was cooked in and swirl it into the sauce to break it up a bit.

    Stirring Brown Butter Fettuccine Alfredo ingredients together in a skillet with a blue spatula.

    More Cheese!

    Once all the pasta is coated in the sauce you're ready to top it with a bit more parmesan cheese, black pepper and to go at it with a fork. Or a pasta server. Or your fist.

    Scooping Homemade Fettuccine Alfredo with a wooden spoon out of a black skillet.

    Follow me on Pinterest

    I'm just being real, here. 🙂

    Interested in other delicious pasta recipes?

    • Better Than Costco Mac and Cheese
    • Rich and Hearty Homemade Spaghetti Sauce
    • Instant Pot Chicken Fettuccini Alfredo

    📖 Recipe

    Mixing from scratch fettuccine Alfredo noodles in a large skillet.
    Print Recipe
    4 from 1 vote

    Brown Butter Fettuccini Alfredo

    It's like regular alfredo sauce, but kicked up a notch by browning the butter for the best flavor!
    Prep Time5 minutes mins
    Cook Time15 minutes mins
    Total Time20 minutes mins
    Course: Main Course
    Cuisine: Italian
    Keyword: alfredo sauce with cream, easy alfredo sauce, nutty
    Servings: 6 Servings
    Calories: 800kcal
    Author: Heather Cheney

    Ingredients

    • ½ C salted butter
    • 3 cloves fresh garlic finely chopped or grated
    • 2 C Whipping Cream
    • ½- 1 C shredded or shaved fresh parmesan cheese
    • 1 lb fettuccini cooked with some of the cooking water reserved.

    Instructions

    • Melt butter over med-low heat in a large skillet and stir in garlic when fully melted.
    • Continue to cook the butter, stirring frequently. The butter will start to foam and when the foam subsides, look for the butter solids to start turning brown.
    • When the solids are a nice golden brown, stir in the cream and bring to a simmer for about 3-4 minutes or until the sauce has thickened up to your liking.
    • Stir in parmesan cheese, mixing to combine, followed by the pasta. If the sauce seems thick, thin it with some of the reserved cooking water from the pasta.
    • Serve with additional parmesan cheese and black pepper.

    Nutrition

    Serving: 1serving | Calories: 800kcal | Carbohydrates: 57g | Protein: 22g | Fat: 55g | Saturated Fat: 33g | Trans Fat: 1g | Cholesterol: 230mg | Sodium: 582mg | Potassium: 278mg | Fiber: 3g | Sugar: 2g | Vitamin A: 1881IU | Vitamin C: 1mg | Calcium: 381mg | Iron: 2mg

    Super Simple and Creamy Hummus

    By Heather LAST UPDATED April 12, 2018 · FIRST PUBLISHED October 12, 2013, 1 Comment

    Super Simple and Creamy Hummus - How do ya'll feel about seeing Christmas decorations in the stores in October? I kind of hate it. First off all, seeing as I have yet to dig out the Halloween decorations on October 13th, I'm clearly not going to be exploring my options in twinkle lights and yard ornaments yet. Plus I don't enjoy that in the space of 2 store aisles I can find both fake murder weapons figurines of baby Jesus. Please tell me I'm not the only one.

    What I am okay with is starting the holiday meal planning early. Food is such a big party of the holidays that I've found the sooner I plan out what I want to make the better, especially if I'm feeding a large crowd all by my lonesome. It just takes some of the stress off of an already crazy time that's full of activities and responsibilities.

    Super Simple and Creamy Hummus recipe in a small white bowl surrounded by sliced pita bread.


    In my family we are a bit unorthodox in that we hardly ever have a full on "traditional" Christmas meal. Over the years it's varied between everything from soup and sandwiches to international themes, but we always have finger foods and dips. I love it, but my hips have their own thoughts on the holidays in general and I'm guessing yours do too. Recipes like this hummus are the perfect complement to the holiday line-up because it's filling, creamy-dreamy-delicious, and not laden with butter like so many classic holiday dishes are.

    Rinsing fresh chickpeas in a teal strainer.

    How to Make This Super Simple and Creamy Hummus

    There are a few tricks to making a perfectly creamy hummus and the first is peeling the chickpeas. I know this seems like a completely tedious task and it totally is if you go through and peel them one by one-- but you don't have to!  Drain and rinse a can of chickpeas and pour into a large mixing bowl.

    Chickpeas submerged in water in a large yellow bowl.

    Fill the bowl with water (I've found cold water works better at loosening the skins for some reason) , scoop up small handfuls of beans with your hands still in the water and gently agitate them between your palms to loosen up the skins. Continue until you've given all the beans a good rub down and it's okay if some of the beans get broken up because we are just going to be pureeing them in a minute anyway.

    Peeling chickpeas in a large yellow bowl.

    5 Minute Process

    You'll see that once you're done the skins will float right on top of the beans and if you tilt the bowl and start to drain out the water, you'll able to skim them off pretty easily. This process usually only takes about 5 minutes and is totally worth how smooth your hummus turns out in the end.

    Pouring excess water out of Yellow bowl full of chickpeas .

    Garlic: Every time I make creamy hummus and just throw the cloves of garlic into food processor with the beans the garlic never gets chopped up as well as it should and I inevitably end up biting into a practically whole clove of garlic (how the lumps get past me spooning it into a bowl is still beyond me). So I started grating my garlic with a fine tooth grater into the food processor and have said goodbye to such a problem! You could also use roasted garlic to take away some of the bite of the raw garlic, but I actually really like it in creamy hummus.

    Grating roasted garlic over peeled chickpeas in a food processor.

    Once you've got your chickpeas, grated garlic, lemon juice and a little tahini in the food processor your ready to let it roll until it's broken down the beans and is a thick paste. Just in case you're not familiar, tahini is just a fancy word for sesame seed butter. I've seen it labeled both ways in the grocery store and is one in the same.


    Chickpeas, grated garlic, lemon juice and tahini mixing in a food processor.

    At this point turn on the food processor and stream in some good quality olive oil. This is one of those recipes that you'll be able to taste the olive oil in so make sure it's one you like. I'm using an extra virign from California Olive Ranch and really love it.

    California Olive Ranch Extra Virgin Olive Oil.

    We stream it in while the processor is going so that we actually form an emulsion with the oil and the other ingredients making it smoother than if we had just added it into the bowl during the first step.

    Pouring olive oil into food processor full of freshly made hummus.

    Once all the oil is in add some salt to taste and you're done! See how smooth this creamy hummus is?

    Simple Hummus recipe in a food processor.

    Serve with veggies, pita bread, crackers, or eat straight up with a spoon. I'm not judging.

    Homemade Creamy Hummus in a white bowl with a side of pita bread.

    So tell me, what's one of your family's favorite holiday recipes?

    📖 Recipe

    Easy Hummus recipe in a small white bowl with pita bread on the side.
    Print Recipe
    3.50 from 4 votes

    Super Simple and Creamy Hummus

    If you've ever wanted to make your own hummus, now is the time! Use this recipe for the creamiest, smoothest hummus!
    Prep Time30 minutes mins
    Cook Time0 minutes mins
    Total Time30 minutes mins
    Course: Appetizer
    Cuisine: Mediterranean
    Keyword: creamy, sabra copycat, smooth
    Servings: 8 servings
    Calories: 61kcal
    Author: Heather Cheney

    Ingredients

    • 1, 14.5 oz can chickpeas
    • 2 tablespoon fresh lemon juice
    • 1 tablespoon tahini sesame seed butter
    • 1 clove garlic finely grated.
    • ½ teaspoon kosher salt
    • ¼ olive oil + more for serving.

    Instructions

    • Drain and rinse chickpeas with water and place in a large bowl. Fill bowl with water and rub the chickpeas between your fingers to loosen the skins.
    • Tilt the bowl to the side to allow the skins be skimmed off the top. Drain beans and place in a food processor with lemon juice, grated garlic, and tahini. Process until a thick, lumpy paste is formed.
    • Using the spout on the top of the food processor, stream ¼ C olive oil into the beans with the motor running. Process until creamy and smooth.
    • Add salt, process once more, and serve.

    Nutrition

    Serving: 1serving | Calories: 61kcal | Carbohydrates: 8g | Protein: 3g | Fat: 2g | Saturated Fat: 1g | Sodium: 299mg | Potassium: 93mg | Fiber: 3g | Sugar: 1g | Vitamin A: 10IU | Vitamin C: 2mg | Calcium: 23mg | Iron: 1mg

    This is a sponsored conversation written by me on behalf of California Olive Ranch. The opinions and text are all mine.

    • « Previous Page
    • 1
    • …
    • 8
    • 9
    • 10
    • 11
    • 12
    • 13
    • Next Page »
    Headshot of Heather in an apron

    Hi, I'm Heather! Want to become a rockstar cook? I’m a former chef, caterer, and culinary arts school graduate that just wants to help you make some killer food! I truly believe that with a little know-how anyone can totally rock their kitchen. Stick around for ultimate recipes of your favorite foods, cooking tips, guides, and more!

    More about me →

    Popular Recipes

    • BBQ chicken cut on a cutting board with a bottle of bbq sauce
      The Best Super Moist Oven Baked BBQ Chicken
    • One Pan Sour Cream Chicken Enchilada Skillet
      One Pan Sour Cream Chicken Enchilada Skillet
    • Hawaiian Shoyu Chicken-- so flavorful you'll forget how easy it is to make! Filled with flavors of ginger, garlic and just a touch of red pepper.
      Hawaiian Shoyu Chicken
    • Sloppy Joe on a paper bag
      The Best Sloppy Joe Sauce
    • Coffee Cake In A Mug-- the perfect remedy for a sugar craving when you don't want to spend a lot of time or heat up the oven. #coffee #cake #microwave #mug
      Coffee Cake in a Cup
    • Baked Ricotta Chicken
      Baked Ricotta Chicken
    • Mom's Classic Meatloaf Recipe
    • Beef Teriyaki Stir Fry
    Email opt in image

    Cooking Method

    • Slow Cooker
    • Grilling

    Footer

    ↑ back to top

    About

    • Privacy Policy
    • Disclaimer

    Newsletter

    • Sign Up! for emails and updates

    Contact

    • About
    • Email
    • Work With Me

    As an Amazon Associate I earn from qualifying purchases. This site uses cookies and generates income via ads.

    Copyright © 2022 Heather Likes Food, LLC

    Rate This Recipe

    Your vote:


    A rating is required
    A name is required
    An email is required