• Active
  • Blog
  • Cart
  • Checkout
  • Cooking Crew Recipes
  • Cooking Crew!
  • Disclaimer
  • Library
  • Media Kit
  • My account
  • Nutrition and Food Safety Disclaimer
  • Opt Out of 5 Chef Secrets
  • Press
  • Privacy Policy and Copyright
  • Recipe Index
  • Refund and Returns Policy
  • RSS Email Subscription Confirmation
  • Shop
  • Subscribe
  • Ultimate Recipes for Becoming a Rockstar Cook!
  • Welcome to Heather Likes Food!
  • Work With Me
  • About Heather Cheney
  • Contact
menu icon
go to homepage
subscribe
search icon
Homepage link
  • Recipe Index
  • About
  • Contact
  • Shop
    • Facebook
    • Instagram
    • Pinterest
    • YouTube
  • ×
    Home / Recipes

    Brown Butter Zucchini Noodles with Crispy Garlic

    By Heather LAST UPDATED January 16, 2019 · FIRST PUBLISHED September 1, 2015, 2 Comments

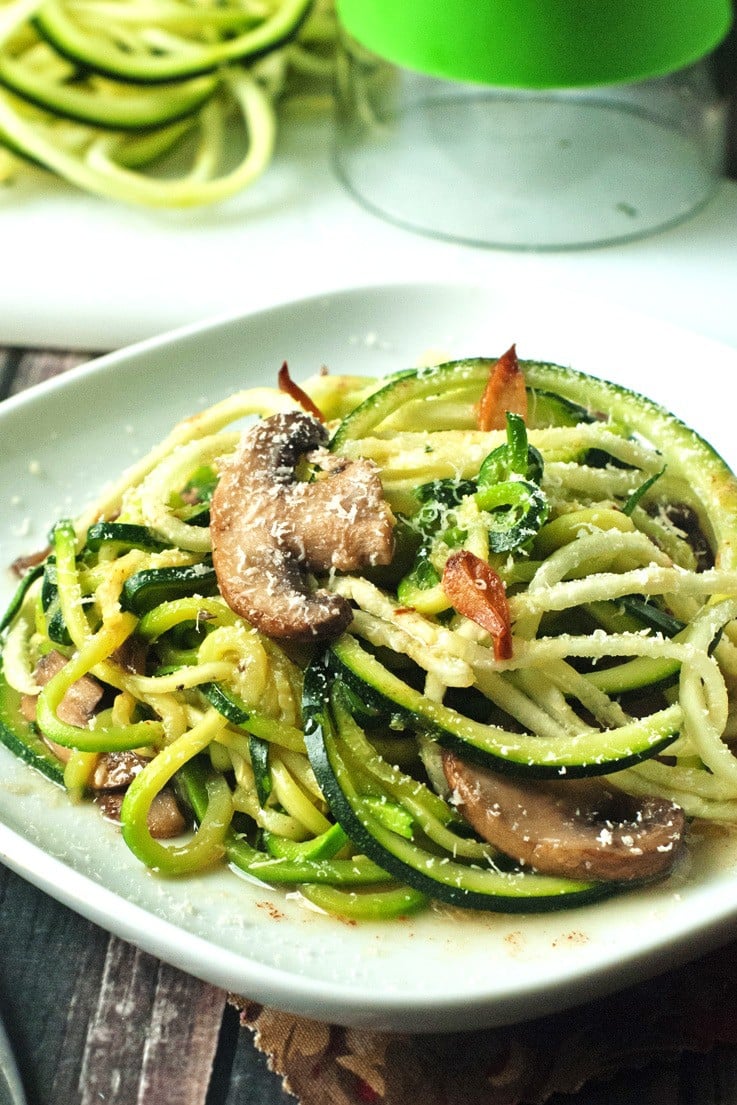
    Fast and flavorful, these zucchini noodles are a great addition to any meal or even make a nice, light meal by themselves. Brown Butter Zucchini Noodles with Garlic


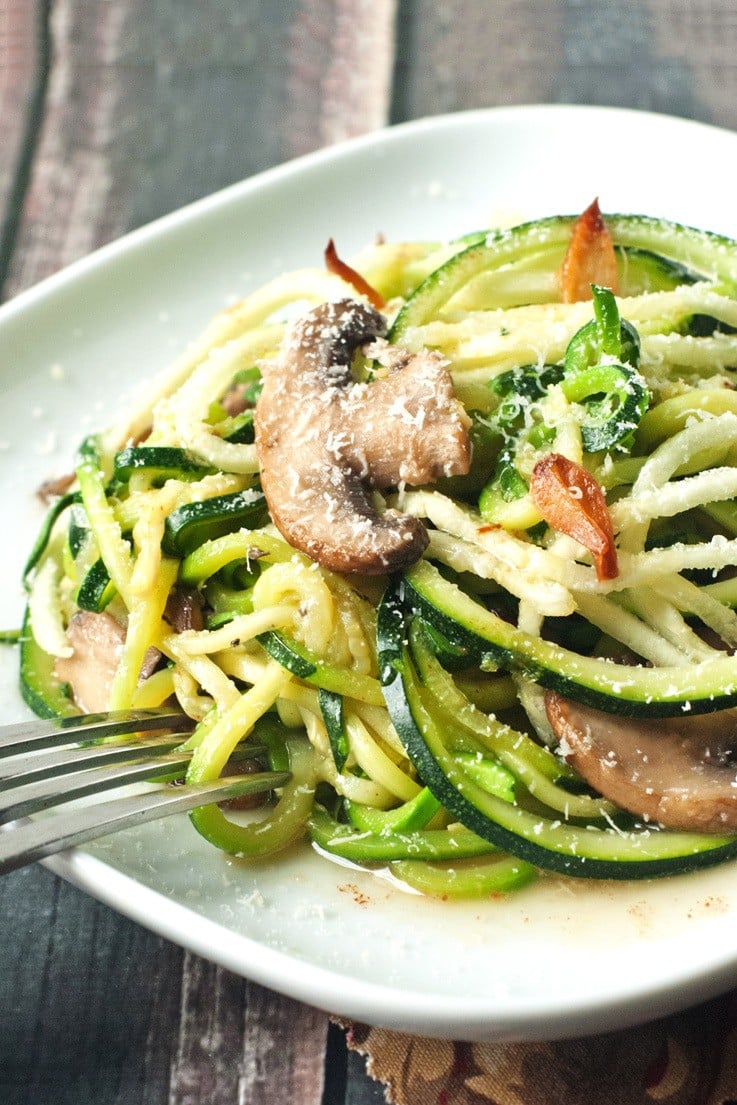
    You guys. Zucchini Noodles. Zoodles. I'm obsessed.

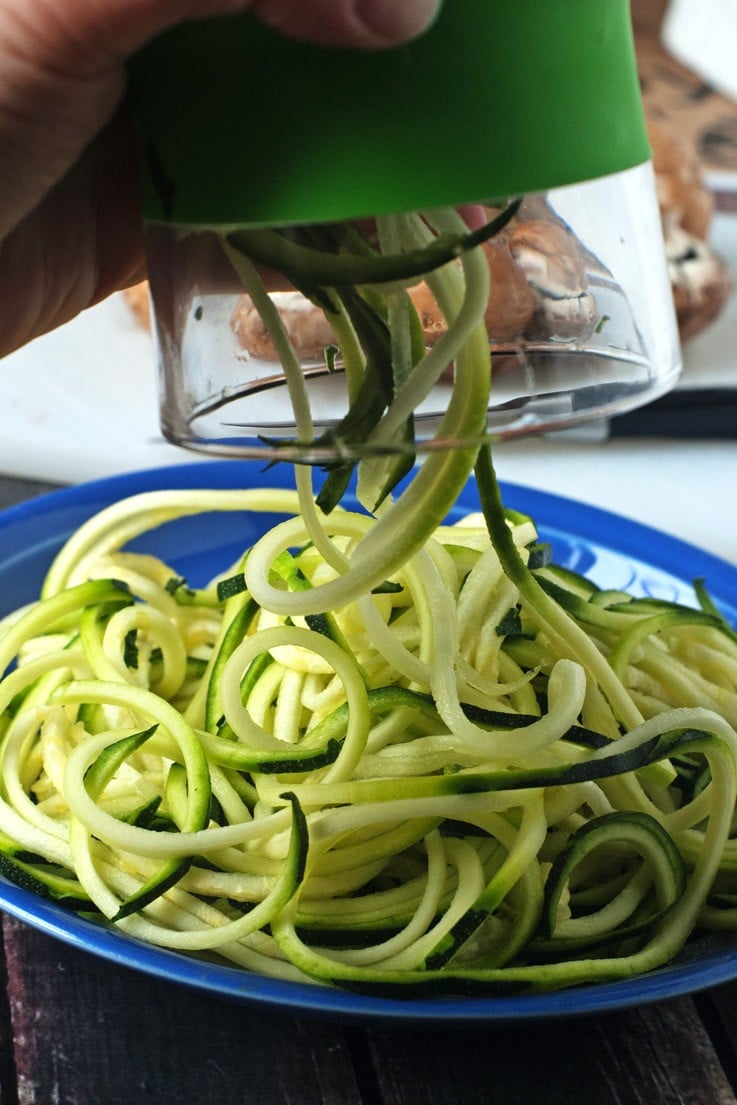
    Have you tried them yet? I know it's been hip to spiralize veggies for a while now, but I never had a spiralizer. Until now.

    If the saying "you are what you eat" was true, I'd be a one of those zucchinis in your garden that hid it's self under a leaf and grew to freakish proportions. #eatallthezoodles

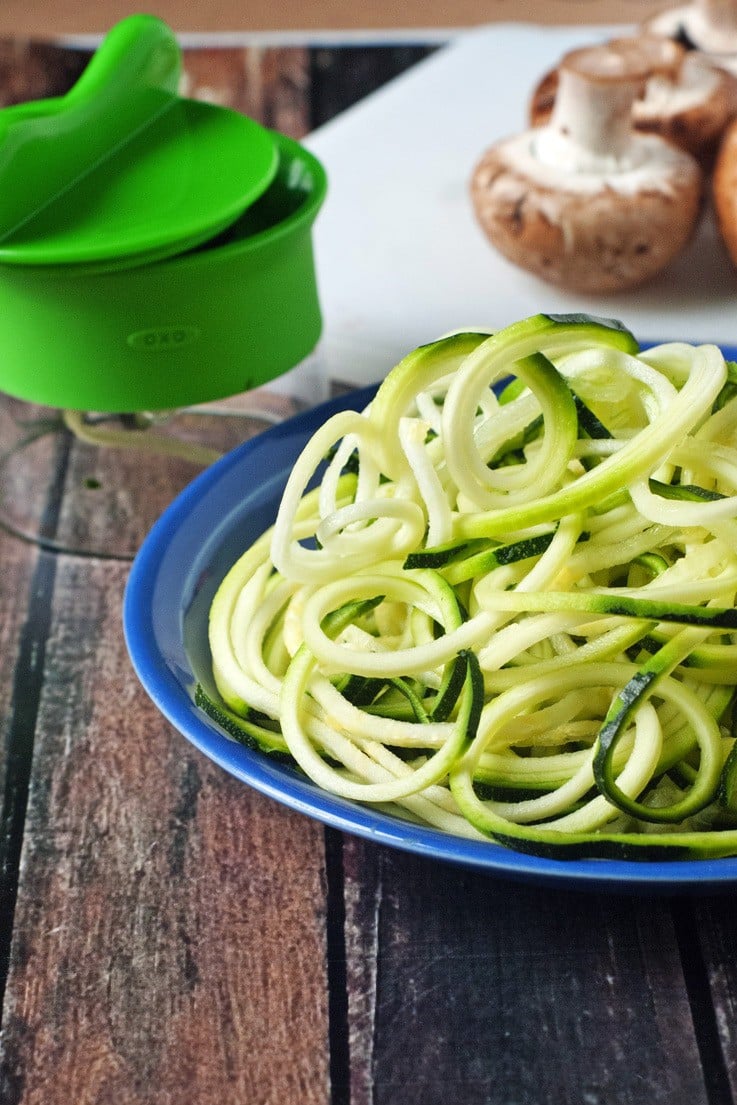
    To make all these zoodles I've gracefully shoved in my face lately, I used OXO's new Hand-Held Spiralizer. It's really easy to use and a much more affordable option than some other spiralizers out there.

    Brown Butter Zucchini Noodles with Garlic

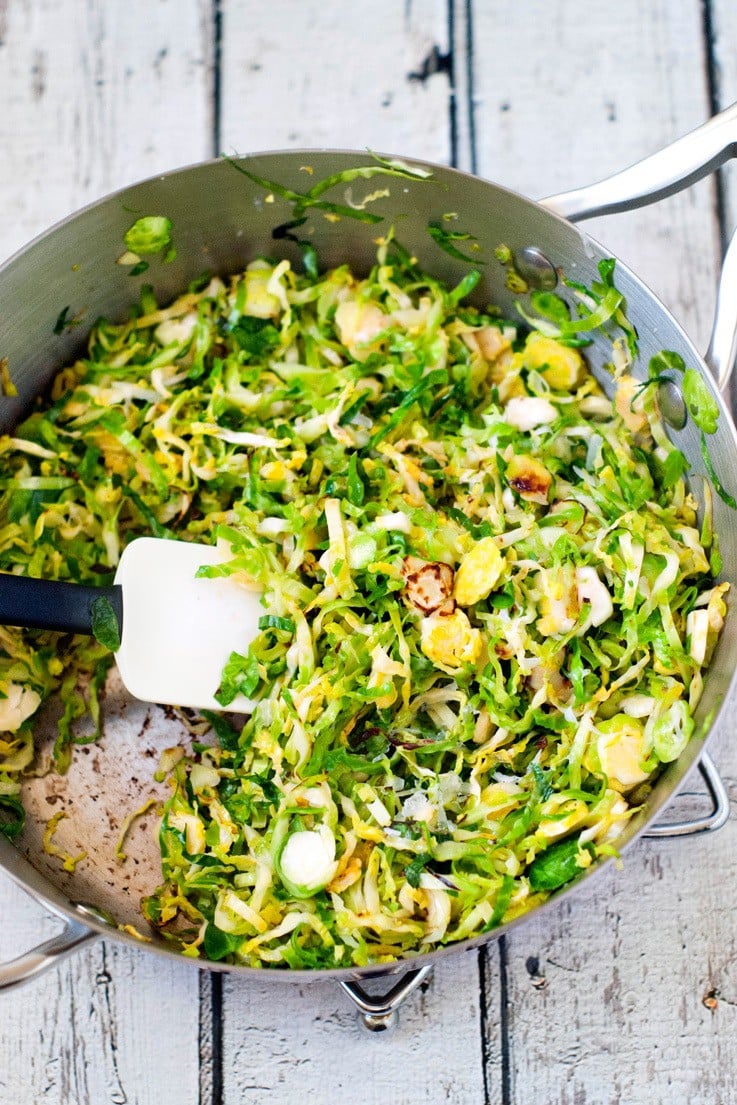
    Aren't they pretty? I'm kind of excited about all the different things I can put them in. You can spiralize any firm veggie and curly shoestring fries are getting made ASAP!

    Brown Butter Zucchini Noodles with Garlic

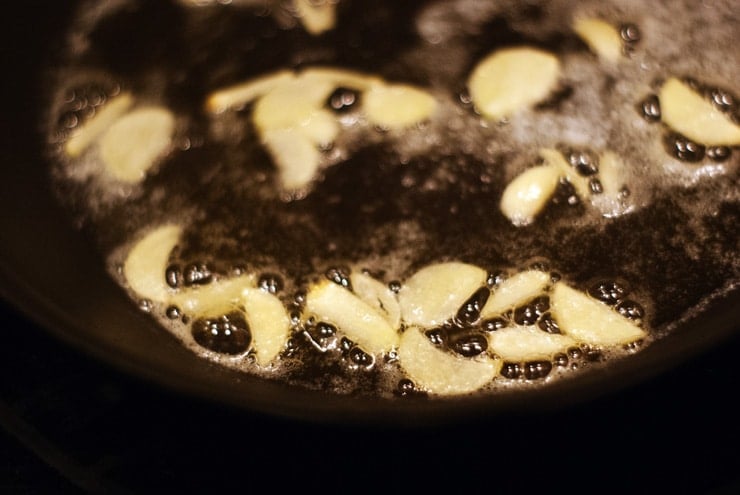
    To make this pasta, you start with a couple tablespoons of salted butter and a clove of garlic that is sliced thinly. We're going to brown the butter and fry the garlic at the same time.

    Brown Butter Zucchini Noodles with Garlic

    If you've never browned butter before, there's not a whole lot to it. You just have to know what to look for so it doesn't burn. As the butter cooks it will start to get really foamy and bubbly. Once this happens and you notice the foam starting to subside, keep a really close eye on it. You want the butter to just be golden brown and not dark at all so take it off the heat as soon it looks just barely browned.

    Brown Butter Zucchini Noodles with Garlic

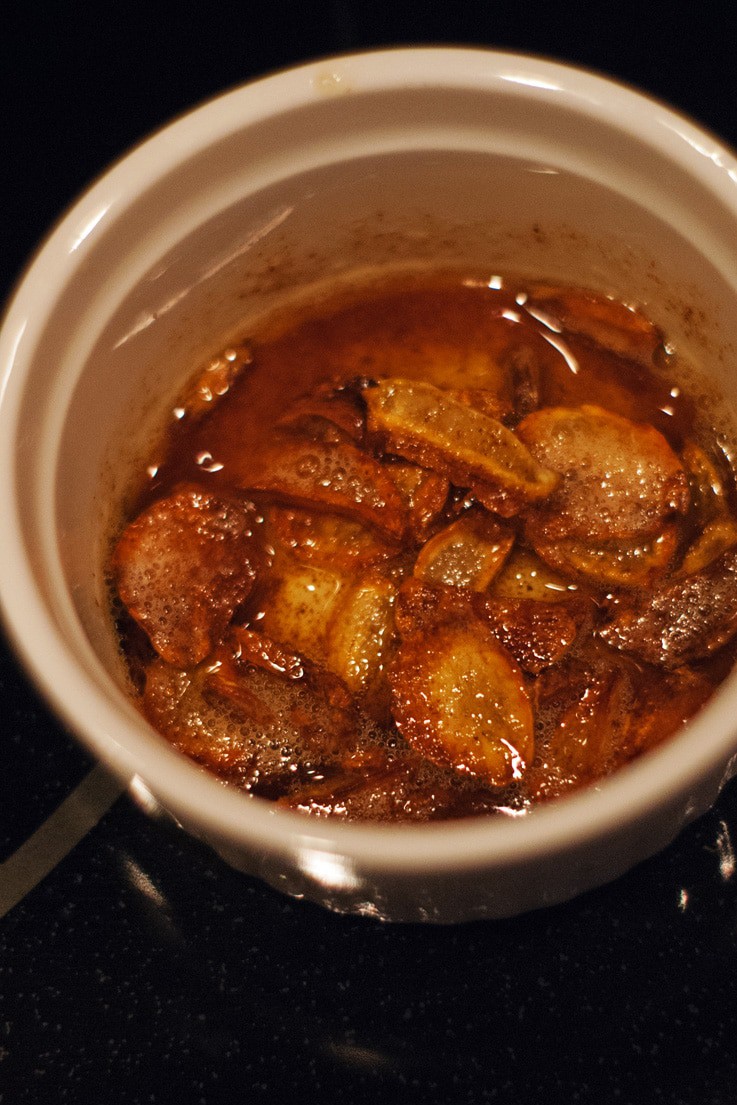
    Pour the butter and garlic into a small bowl and set aside.

    Brown Butter Zucchini Noodles with Garlic

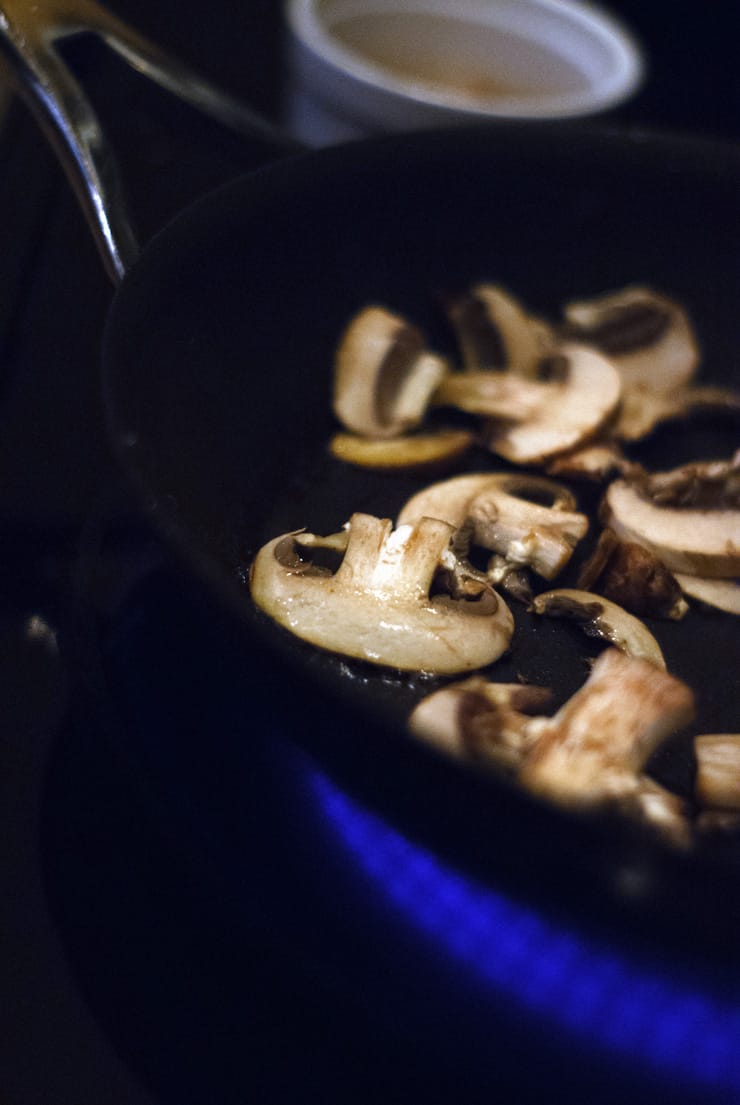
    There will still be a little bit of butter left in the pan that didn't pour off, so toss the mushrooms into the pan and cook until just tender.

    Brown Butter Zucchini Noodles with Garlic

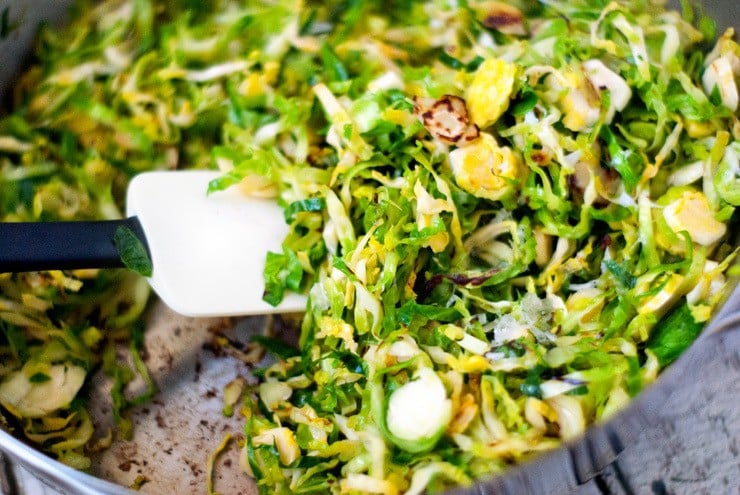
    Once the mushroom are tender, stir in the zucchini and cook for just a few minutes until they are hot and tender. Zucchini cooks really fast and with zoodles you want them to still have a little bite and hold their shape.

    Brown Butter Zucchini Noodles with Garlic

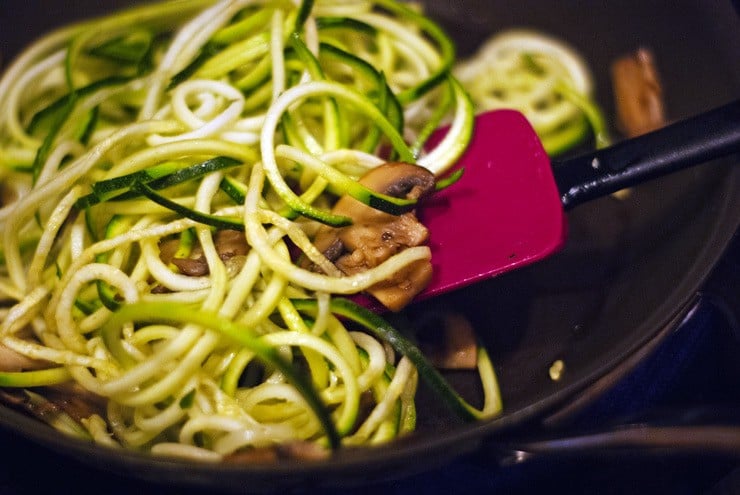
    When the zucchini is cooked to your liking, season it up with a little salt and pepper and pour that beautiful garlicky browned butter over it. Some people don't like the taste of crispy garlic, so if it's not your thing just pour the butter and leave the garlic in the bowl. The garlic flavor is infused in the butter so it will still have plenty of flavor.

    I like to add a little bit of parmesan cheese to the top too.


    Brown Butter Zucchini Noodles with Garlic

    📖 Recipe

    Brown Butter Zucchini Noodles with Garlic
    Print Recipe
    4 from 8 votes

    Brown Butter Zucchini Noodles with Garlic

    It only takes 15 minutes to have pan of hot, garlicky zucchini noodles ready to slurp down!
    Prep Time10 minutes mins
    Cook Time5 minutes mins
    Total Time15 minutes mins
    Course: Main Course
    Cuisine: Italian
    Keyword: veggie spiralizer, zoodles, zucchini pasta
    Servings: 2 servings
    Calories: 107kcal
    Author: Heather Cheney

    Ingredients

    • 1-2 whole zucchini
    • 2 tablespoons butter
    • 1 clove garlic sliced thinly
    • ½ cup sliced mushrooms
    • parmesan cheese
    • salt and pepper to taste

    Instructions

    • Use hand-help spiralizer to cut the zucchini.
    • Heat butter over medium heat and stir in garlic. Cook garlic, stirring for 3-4 minutes. The butter will become foamy and the garlic will brown and get crisp. Watch closely as the butter foams and then subsides as the butter will be browning at this point. When it's just lightly golden, pour the butter and garlic into a small bowl.
    • Return pan to heat and cook mushrooms in the bit of butter remaining in the pan until tender. Stir in zucchini and saute for 2 minutes or just until tender and hot. Remove from heat.
    • Pour browned butter and garlic over the noodles and toss. Season to taste with salt and pepper and parmesan cheese.

    Nutrition

    Serving: 1serving | Calories: 107kcal | Carbohydrates: 1g | Fat: 11g | Saturated Fat: 7g | Cholesterol: 30mg | Sodium: 101mg | Potassium: 76mg | Vitamin A: 350IU | Vitamin C: 1mg | Iron: 0.1mg


    Frozen Hot Chocolate

    By Heather LAST UPDATED July 17, 2019 · FIRST PUBLISHED July 29, 2015, 5 Comments

    This Frozen Hot Chocolate will keep you cool and sufficiently sweet this winter if you can't get to the original at Serendipity 3! Frozen Hot Chocolate
    As promised in the weekly newsletter (you can sign up for that here if you're not already), this is a super simple recipe perfect for the summer months that is always a big hit at my house. I've never been to Serendipity 3 in NYC and tried their famous frozen hot chocolate but I'm not sure I need to. My version is chocolatey and rich and only takes 3 ingredients that you likely have on hand.

    Frozen Hot Chocolate

    It's important that you use a good quality hot cocoa mix or you'll swap some of the richness with straight-up sweetness. You want the chocolate flavor to really stand out. This time I used Stephen's Milk Chocolate flavor and have tried it with the dark chocolate flavor as well.

    Frozen Hot Chocolate

    Milk, cocoa mix and ice all get thrown into the blender and are sent for a whirl.

    Frozen Hot Chocolate

    If your blender has single serve blender cups one recipe will fit perfectly in it. When the mixture is smooth and all the ice has broken down, it's ready. Depending on how big your sweet tooth is this recipe makes 1-2 servings. I always split it in half. Besides, things taste better when shared, especially when they are topped with whipped cream and chocolate syrup. Don't you DARE forget the chocolate syrup! You've been warned.

    📖 Recipe

    Frozen Hot Chocolate
    Print Recipe
    5 from 3 votes

    Frozen Hot Chocolate

    This Frozen Hot Chocolate will keep you cool and sufficiently sweet this winter if you can't get to the original at Serendipity 3! 
    Prep Time5 minutes mins
    Cook Time5 minutes mins
    Total Time10 minutes mins
    Course: Drinks
    Cuisine: American
    Keyword: blender drink, cold chocolate, serendipity 3
    Servings: 2
    Calories: 189kcal
    Author: Heather Cheney

    Ingredients

    • 8 ounces milk
    • ½ cup hot cocoa mix
    • 1 ½-2 cup ice
    • Whipped cream and chocolate syrup for garnish

    Instructions

    • Combine milk, cocoa mix and ice in blender and process until smooth and thick.
    • Pour into glasses and top with whipped cream and chocolate syrup to serve

    Nutrition

    Serving: 1serving | Calories: 189kcal | Carbohydrates: 27g | Protein: 4g | Fat: 8g | Saturated Fat: 5g | Cholesterol: 11mg | Sodium: 304mg | Potassium: 149mg | Fiber: 1g | Sugar: 23g | Vitamin A: 185IU | Calcium: 158mg | Iron: 0.5mg

    Caesar Pork Tenderloin Sandwiches

    By Heather LAST UPDATED March 21, 2022 · FIRST PUBLISHED July 27, 2015, 3 Comments

    Tender and juicy lemon-garlic pork tenderloin stars in this savory and filling sandwich. If you are a Caesar salad lover, this one’s for you

    Pork tenderloin on a ciabatta roll with lettuce and caesar dressing

    This is a sponsored post written by me on behalf of Hormel Foods, LLC.. All opinions are 100% mine.

    My kids will confirm that the phrase “go make a sandwich” comes out of my mouth more often than they’d prefer. In my defense, I hear “Mom, I’m hungry” much more than I’d care to as well. Sandwiches are easy, budget-friendly and I basically always have all the ingredients on hand for some form of one. But there is much more to the world of sandwiches than peanut butter and jelly and turkey and swiss.

    Take this Caesar pork tenderloin sandwich for example. It has all the components of a sandwich but blows other lesser sandwich-like beings out of the water with flavor! AND the amount of time it actually takes to make is what really has me sold on this. Let’s make it and I’ll show you how stinkin’ easy it is to throw together.

    For the meat, I’m using a Hormel ALWAYS TENDER® Lemon Garlic Pork Tenderloin. It’s pre-marinated and ready to just pop into the oven. Hormel Foods ALWAYS TENDER® line features pork tenderloins, pork loin filets & pork roasts in a variety of flavors. I like to keep one in my freezer for a quick and easy meal that I don't have to think about, look up a recipe, and wonder how it's going to turn out.

    Lemon garlic pork tenderlion on a cutting board

    You literally just have to cut open the package, put it in a baking dish or sheet, and put it in the oven.

    Caesar Pork Tenderloin Sandwiches

    The pork tenderloins take about 40-45 minutes to cook and when they come out they are juicy and ready for whatever you want to throw at them. In this case, I'm just slicing it up for sandwiches.

    Cooked Pork Tenderloin being sliced

    To finish off the sandwich, I used a caesar salad kit from the grocery store that includes chopped romaine, caesar dressing and croutons. You can set the croutons aside to munch on later. Slice ciabatta rolls in half, stack with the warm pork tenderloin slices and top with the romaine, a sprinkling of the parmesan cheese and a drizzle of the caesar dressing.

    Pork tenderloin sandwich on a white plate

    Consume immediately! 🙂 The meat is tender, juicy, and creates the perfect flavor combination with the salad fixings! Hope you'll try it!

    Other Sandwich Recipes You Might Like

    • Italian Beef Recipe with Pepperoncini 
    • Garlic Bread Grilled Cheese
    • Sloppy Joe Sauce
    • Easy Pulled BBQ Chicken Sandwiches
    • Banh Mi Sandwiches
    • Slow Cooker BBQ Beef Sandwiches
    • Easy French Dip
    • Pork Burger
    • Greek Turkey Burger Recipe
    • Doritos Burgers

    📖 Recipe

    Caesar Pork Tenderloin Sandwiches
    Print Recipe
    4.69 from 19 votes

    Caesar Pork Tenderloin Sandwiches

    Tender and juicy lemon-garlic pork tenderloin stars in this savory and filling sandwich. If you are a Caesar salad lover, this one’s for you!
    Prep Time10 minutes mins
    Cook Time50 minutes mins
    Total Time1 hour hr
    Course: Sandwich
    Cuisine: American
    Keyword: caesar salad kit, marinated pork tenderloin, pork sandwich on ciabatta
    Servings: 4 sandwiches
    Calories: 673kcal
    Author: Heather Cheney

    Ingredients

    • 1 Hormel Always Tender Pork Tenderloin lemon garlic flavor
    • 1 caesar salad kit
    • 4 ciabatta rolls

    Instructions

    • Bake pork tenderlion as directed on package. Let rest for 5 minutes after cooking and thinly slice.
    • Slice ciabatta rolls and top with the sliced pork, romaine, parmesan cheese, and caesar dressing.
    • Eat while warm.

    Nutrition

    Serving: 1sandwich | Calories: 673kcal | Carbohydrates: 26g | Protein: 98g | Fat: 16g | Saturated Fat: 5g | Cholesterol: 294mg | Sodium: 513mg | Potassium: 1782mg | Calcium: 27mg | Iron: 4.4mg

    Pizza Tortellini Bake

    By Heather LAST UPDATED March 25, 2021 · FIRST PUBLISHED July 24, 2015, Leave a Comment

    Cheese, pepperoni, and pasta? Yup, you can't really go wrong with this Pizza Tortellini Bake recipe! Pizza Tortellini Bake

    Happy Friday! I'm here today with a super simple recipe that even the pickiest of eaters will like. I mean, really, there's not a whole lot that can go wrong when you put pasta, cheese and your favorite pizza toppings together.

    But first, I wanted to point out a little feature here on the blog. If you scroll down to the bottom of the post you'll see a little row of icons for sharing. All of those icons are great for sharing posts from Heather Likes Food with your friends and family, but I want to talk specifically about the orange "Yum" icon.

    Pizza Tortellini Bake

    If you click on that yum, you'll be directed to a site called Yummly. This page explains really well what Yummly is all about, but to give you the jist, it's a great place to find and save recipes! When you click on the "Yum" at the bottom of posts here on HLF, that recipe will be saved to your own Yummly account and you'll be able to view it later. Think of it kind of as a Pinterest just for recipes. Also, the more a recipe is "Yum"-ed from HLF, the more likely it is to show up in the searches on Yummly and I know you want the world to know about this site, right? Riiiiight. You can see all the recipes that have already been pinned from HLF here on my page.

    Now, onto the pasta! Here are the players...
    Pizza Tortellini Bake

    You'll toss a package of frozen cheese tortellini with a couple of cups of your favorite pizza toppings in an 8x8" pan. I used pepperoni, bell pepper and mushrooms but basically anything will work here with the exception of pineapple. I can't be held responsible if you decide to try it, BTW.

    Pizza Tortellini Bake

    You'll then cover the whole shebang with 2 cups of your favorite tomato based pasta sauce and ½ C of water. You don't have to stir it as it will make it's way down as it cooks.

    Pizza Tortellini Bake

    Cover the dish with some shredded mozzarella and this part it totally optional, but I think it's fun to top it like you would a pizza with the same toppings you used inside.

    Pizza Tortellini Bake

    You'll then cover the dish with some foil (if it's really full, make sure to spray the bottom side of the foil with some non-stick cooking spray so the cheese doesn't stick) and put it in the oven.

    Pizza Tortellini Bake

    After about 20-25 minutes you see that the sauce inside is bubbling and you'll want to remove the foil. Continue cooking an additional 20 minutes or until the cheese is melted and browned the amount you'd like.

    More Pizza Inspired Recipes You Might Like

    • Supreme Pepperoni Pizza Dip
    • Out of The Box Easy Pizza Recipes
    • Slow Cooker Pizza Chicken

    📖 Recipe

    Pizza Tortellini Bake
    Print Recipe
    4.78 from 9 votes

    Pizza Tortellini Bake

    Cheese pepperoni and pasta... yup, you can't really go wrong with the recipe!
    Prep Time15 minutes mins
    Cook Time45 minutes mins
    Total Time1 hour hr
    Course: Main Course
    Cuisine: Italian
    Keyword: easy tortellini recipe, one pan pasta dinner, pasta with pizza toppings
    Servings: 6 servings
    Calories: 670kcal
    Author: Heather Cheney

    Ingredients

    • 1 ½ pounds frozen cheese filled tortellini
    • 2 cups favorite pizza toppings chopped + additional for decorating
    • 2 cups favorite tomato pasta sauce
    • ½ cup water
    • 2 cups shredded mozzarella cheese

    Instructions

    • In a greased 8x8" pan, toss frozen tortellini with pizza toppings. Pour pasta sauce and water over the top of the pasta, do not stir.
    • Sprinkle cheese and additional pizza toppings over the top if desired. Cover pan with foil
    • Bake at 375 degrees for 25 minutes. Uncover and bake an additional 15-20 minutes or until cheese is melted and browned.

    Nutrition

    Serving: 1serving | Calories: 670kcal | Carbohydrates: 54g | Protein: 35g | Fat: 34g | Saturated Fat: 13g | Cholesterol: 112mg | Sodium: 1818mg | Potassium: 403mg | Fiber: 5g | Sugar: 7g | Vitamin A: 605IU | Vitamin C: 6mg | Calcium: 368mg | Iron: 4.5mg

    Pizza Tortellini Bake

    Pizza Tortellini Bake

    B-52's Concert at The Oregon Zoo

    By Heather LAST UPDATED March 11, 2021 · FIRST PUBLISHED July 17, 2015, 2 Comments

    B-52's Concert at The Oregon Zoo

    A few weekends back the hubs and I had the chance to break away for a evening with some friends and rock out to the B-52’s at the Oregon Zoo. The B-52’s!! SO fun. I thought I'd share some pics of our night today. I don’t know if you’ve noticed but I’ve added page up above in the navigation bar call “Heather Likes Portland” and every now-and-again I’ll be posting about the places we’ve ate, visited, and played. I love living here and want the world to know just how kick-butt Portland is. This DOES NOT mean I’ll be cutting back on recipes at all so if following along in our adventures isn’t your gig, you’ll still have all the recipes you need.

    Every year the Oregon Zoo lines up a summer concert series and brings in some seriously fun acts throughout the summer. The stage is in the middle of the Zoo and and there’s lots of room to spread out a blanket and lounge about until the show starts.

    B-52's Concert at The Oregon Zoo

    Since I’m all about the food, we decided to grab a bite to eat before the show started and were actually very pleasantly surprised with how good our meal was from the Afri-café, the zoo’s small cafeteria. We split a burger topped with bacon, guacamole and mango salsa on a Brioche Bun and a basket of parmesan-herb fries.

    B-52's Concert at The Oregon Zoo

    The sauce that came with the fries was a black pepper aioli and was really good.

    B-52's Concert at The Oregon Zoo

    Most of the tickets are general admission and since we weren’t able to get there super early we ended up towards the back of the lawn but still feel like we had great seats. The back of the lawn really isn’t that far from the stage to begin with so it’s hard to have a bad seat.

    The opening act was a crazy band called The Fabulous Downey Brothers. They were entertaining but kind of crazy. I’m also not sure how their name came about because there was at least one girl in the band. Their costumes made it hard to tell but it definitely wasn’t just brothers. And then the B-52's came out and they are a hoot.

    B-52's Concert at The Oregon Zoo

    We found out through the evening that there are some BIG B-52’s fans. I hesitate posting this video but you can’t see his face so I think it’s safe. Sitting behind this guy absolutely made our night. I wish I would have gotten video of him doing the same dance but with lobster claws during "Rock Lobster" but my phone wasn't cooperating. The people watching we did there was just as fun, if not more fun, than the concert itself. It was quality, really.

    This girl and I never get to hang out so we needed to document the joyous occasion. Isn’t she the cutest?

    B-52's Concert at The Oregon Zoo

    There are many more concerts coming up this summer at the Zoo and if you’re in the area, I definitely recommend it. It’s such a fun, pretty venue and your concert ticket is good for admission to the zoo on the same day.

    Disclosure: I was given complementary tickets for this concert but was not obligated to post about my experience. All thoughts and opinions are my own. 🙂 

    Slow Cooker BBQ Ribs

    By Heather LAST UPDATED March 18, 2021 · FIRST PUBLISHED July 14, 2015, Leave a Comment

    With just a few minutes of prep-work these ribs are fall-off-the-bone tender at the end of the day. Slow Cooker BBQ Ribs


    The hubs and I are big thrift store and garage sale junkies. He might be a little more than I, but I definitely enjoy a good deal and the hunt for finding it! One of my favorite things to do is go to the cook book section and thumb through the books to find notes that the previous book's owners left on the recipes. If I find a book that has a lot of notes I usually take it home. There's something so fun to me about seeing how people altered or commented on old recipes before you could jump online and read a bajillion comments and alterations on any given recipe. I figure if I find a recipe that has comments written on it it's probably worth making!

    Recently, the hubs brought home a stack of handwritten recipes cards he found in his hunting (he knows the way to my heart). This recipe was included in the stack and was written on a simple piece of cut paper. I happened to have some ribs in the freezer at the time so I went to work and found out it was a definite keeper! They are SO good.

    Slow Cooker BBQ Ribs

    To add a bit of flavor and cook off some of the fat, you cook the ribs briefly in a super hot oven.

    Slow Cooker BBQ Ribs

    Once they are slightly browned you'll transfer them to the slow cooker.

    Slow Cooker BBQ Ribs

    The sauce is a simple combination of ketchup, steak sauce, and a few other ingredients. It's not overly sweet or tangy but melts in perfectly with the rich ribs.

    Slow Cooker BBQ Ribs

    You'll just stir the sauce together and pour over the ribs.

    Slow Cooker BBQ Ribs

    Cover the slow cooker and let it cook ALL DAY LONG on low. The recipe says it should take 6-8 hours, and mine took 8 before they were as tender as I wanted them. When they are done you'll be able to pull the meat from the bone easily and they will be tender and just melt. You can add more BBQ sauce once they are done cooking, but I didn't feel like they needed it at all.


    Slow Cooker BBQ Ribs


    📖 Recipe

    Slow Cooker BBQ Ribs
    Print Recipe
    4.17 from 6 votes

    Slow Cooker BBQ Ribs

    Cook them all day on low and open the slow cooker for fall-off-the-bone goodness!
    Prep Time20 minutes mins
    Cook Time6 hours hrs
    Total Time6 hours hrs 20 minutes mins
    Course: Main Course
    Cuisine: American
    Keyword: crock pot ribs, easy bbq ribs, pork spare ribs
    Servings: 4 servings
    Calories: 102kcal
    Author: Heather Cheney

    Ingredients

    • 1 whole rack St. Louis Style Pork Spare Ribs
    • salt and pepper
    • ½ cup Ketchup
    • 3 tablespoons brown sugar
    • ½ cup Steak Sauce A-1
    • 2 tablespoon apple cider vinegar
    • ½ teaspoon kosher salt
    • ½ teaspoon liquid smoke flavoring
    • 1 tablespoon dehydrated onion

    Instructions

    • Preheat the oven to 450 degrees
    • Cut ribs into 2-3 bone portions and lay on a lined baking sheet. Season with salt and pepper and bake for 10 minutes. Turn oven to broil and continue cooking the ribs for 5 minutes on each side until they are lightly browned.
    • Transfer ribs to the slow cooker.
    • Combine ketchup, brown sugar, steak sauce, vinegar, salt, smoke flavor, and onion and stir until smooth. Pour over ribs.
    • Cover slow cooker and cook on LOW for 6-8 hours or until the ribs are very tender and almost fall off the bone.

    Nutrition

    Serving: 1serving | Calories: 102kcal | Carbohydrates: 24g | Sodium: 1051mg | Potassium: 218mg | Sugar: 18g | Vitamin A: 240IU | Vitamin C: 4.2mg | Calcium: 21mg | Iron: 0.6mg

    Slow Cooker BBQ Ribs

    Super Fluffy Whole Wheat Pancakes

    By Heather LAST UPDATED March 18, 2021 · FIRST PUBLISHED July 8, 2015, 4 Comments

    Fluffy Whole Wheat Pancakes are really a thing! You don't have to choke down dense cakes anymore... it's all in the type of flour you use! Super Fluffy Whole Wheat Pancakes


    I'm all for eating healthy and such, but whole wheat baked goods just don't do it for me most days. Whole wheat bread has its place and is a pretty consistent staple in our house, especially if it's homemade. But muffins, quick breads, and cookies (oooh, don't get me started on whole wheat cookies) are typically dense and make me feel like I've eaten a brick 30 minutes later. I kinda feel like if I'm gonna eat a cookie, I'm gonna do it right. Ya know? None of this whole wheat non-sense. Oh but you guys. YOU GUYS! These pancakes have opened up a whole new world of whole wheat goodness to me. I don't think I have EVER enjoyed something made with whole wheat flour as much as I enjoy these pancakes. They are light and airy and somehow retain their tasty wheaty-ness. Super Fluffy Whole Wheat Pancakes 
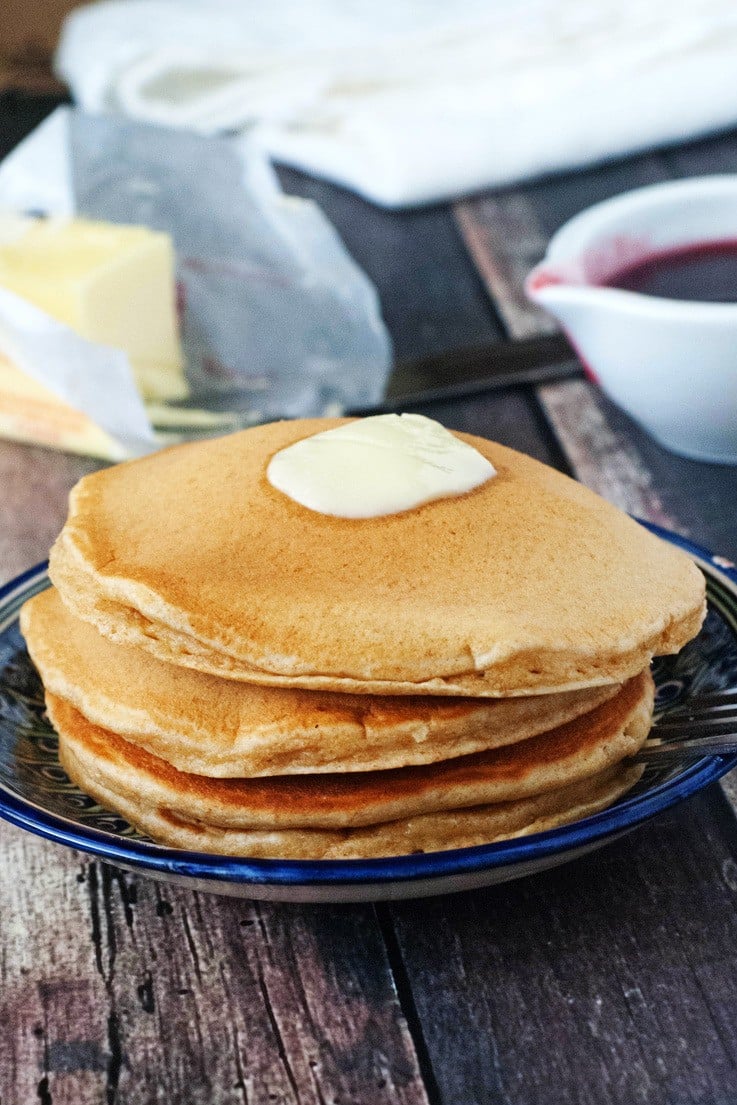
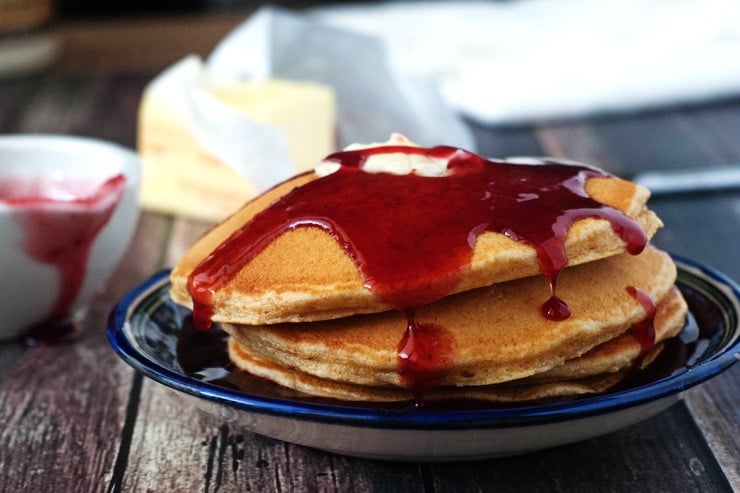
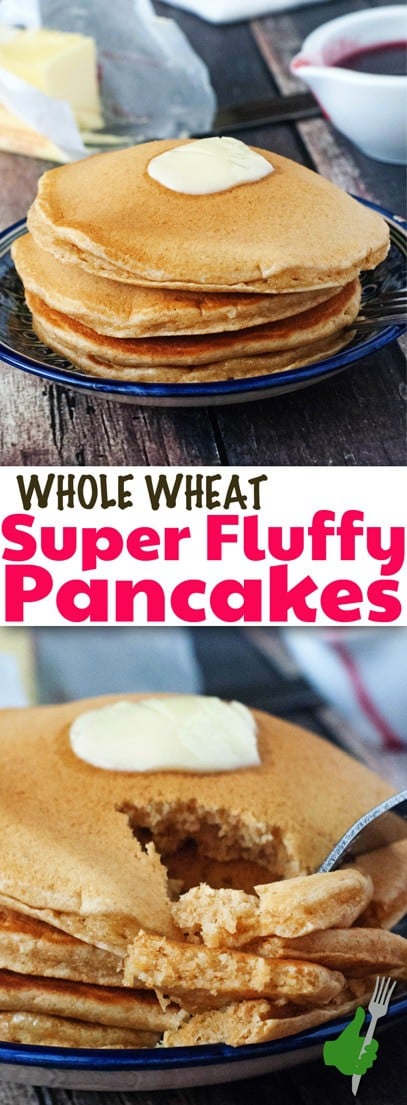
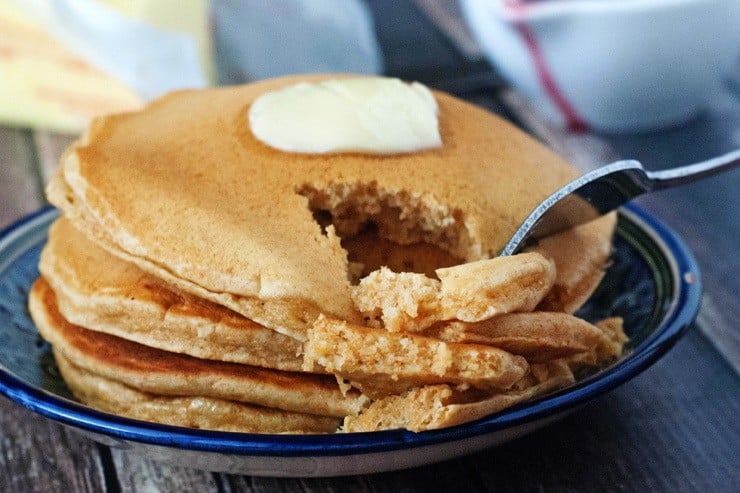
You see that crumb? You've never had whole wheat pancakes like this before. The trick is in the type of flour you use. I just bought my first bag of white whole wheat flour and it makes all the difference. I was curious if it was just a marketing ploy and if it was really whole wheat and not just white flour mixed with a little wheat to make it look healthy. But according to the Whole Grains Council, it's just as nutritious as the red wheat that's used for typical whole wheat flour. The white wheat is just milder in flavor and also a bit sweeter. Who knew? Super Fluffy Whole Wheat Pancakes

    I've seriously made these 3 times in the past week and a half and I hope you run to the kitchen and whip up a batch too!

    Note: The recipe calls for buttermilk but if you don't have any on hand measure out 1 ¼ cups of milk and stir in 1 teaspoon of lemon juice. Let it sit for a few minutes until it starts to curdle and then use it as you would the buttermilk. I get great results every time! 

    📖 Recipe

    Super Fluffy Whole Wheat Pancakes
    Print Recipe
    4.80 from 5 votes

    Super Fluffy Whole Wheat Pancakes

    Fluffy Whole Wheat Pancakes are really a thing! You don't have to choke down dense cakes anymore... it's all in the type of flour you use! 
    Prep Time10 minutes mins
    Cook Time20 minutes mins
    Total Time30 minutes mins
    Course: Breakfast
    Cuisine: American
    Keyword: fluffy pancakes, healthy breakfast, white whole wheat flour
    Servings: 10 4" pancakes
    Calories: 135kcal
    Author: Heather Cheney

    Ingredients

    • 1 ¼ cups WHITE Whole Wheat Flour
    • ¼ cup granulated sugar
    • 1 teaspoon baking powder heaping
    • 1 teaspoon baking soda
    • ¼ teaspoon kosher salt
    • 1 ¼ cups buttermilk
    • 1 whole egg
    • ¼ cups vegetable oil

    Instructions

    • In a medium sized bowl whisk together dry ingredients.
    • Whisk eggs, buttermilk and oil together in a separate bowl and then add into the dry ingredients. Whisk until mostly smooth.
    • Pour ¼ C portions of the batter onto a hot skillet or griddle and cook until golden on both sides. Serve with butter and syrup.

    Nutrition

    Serving: 1pancake | Calories: 135kcal | Carbohydrates: 17g | Protein: 2g | Fat: 6g | Saturated Fat: 5g | Cholesterol: 3mg | Sodium: 199mg | Potassium: 97mg | Fiber: 1g | Sugar: 6g | Vitamin A: 50IU | Calcium: 62mg | Iron: 0.4mg


    Super Fluffy Whole Wheat Pancakes

    Ruffles Krispy Treats

    By Heather LAST UPDATED July 23, 2019 · FIRST PUBLISHED July 6, 2015, 2 Comments

    These sweet and salty treats will blow. your. mind. That is all. Ruffles Krispy Treats


    I've been dipping my fries in my milkshakes for as long as I can remember. In high school I could get a Jr. Bacon Cheeseburger, a small fry and a Frosty for $3.00. Remember when you could do that? Fries + Frostys = LOVE and I'm sure if any single thing in my adolescence is going to give me diabetes, it's going to be the Frosty. #truth


    But Frostys and fries aren't the only sweet and salty combo I've binged on.  I'll admit these krispy treats are a little bit ridiculous with mixing two things that are not necessarily "wholesome"-- potato chips and marshmallows. But guys, in this case, two wrongs make something so, so right. The ruffles chips are nice and crispy and salty and make the gooey marshmallow taste so good.


    Ruffles Krispy Treats


    If you want a party in your mouth, these are going to do it.

    📖 Recipe

    Ruffles Krispy Treats
    Print Recipe
    4.38 from 40 votes

    Ruffles Krispy Treats

    These sweet and salty treats will blow. your. mind. That is all. 
    Prep Time20 minutes mins
    Cook Time0 minutes mins
    Total Time20 minutes mins
    Course: Dessert
    Cuisine: American
    Keyword: potato chip dessert, potato chip rice krispie treats, sweet and salty
    Servings: 12 squares
    Calories: 279kcal
    Author: Heather Cheney

    Ingredients

    • ¼ cup salted butter
    • 4 cups mini marshmallows
    • ½ teaspoon vanilla extract
    • 5 cups Ruffles Potato Chips lightly crushed

    Instructions

    • Combine butter and marshmallows in a mircrowave-safe bowl. Cook for 1-1½ minutes or until the butter and marshmallow are just melted, no longer.
    • Stir in vanilla extract and add potato chips, folding until chips are coated with the marshmallow.
    • Press into a greased 8x8" pan and let cool. Cut into 12 squares.

    Nutrition

    Serving: 1square | Calories: 279kcal | Carbohydrates: 31g | Protein: 2g | Fat: 16g | Saturated Fat: 3g | Cholesterol: 10mg | Sodium: 217mg | Potassium: 581mg | Fiber: 1g | Sugar: 9g | Vitamin A: 120IU | Vitamin C: 6.6mg | Calcium: 10mg | Iron: 0.6mg

    Ruffles Krispy Treats

    Cranberry Apple Granola Bites

    By Heather LAST UPDATED March 11, 2021 · FIRST PUBLISHED July 1, 2015, Leave a Comment

    Granola bites are the perfect grab and go snack to keep on hand this summer and into the school year! They are super easy to make and take only a handful of ingredients. The best part is they are totally customizable! Cranberry Apple Granola Bites

    This is a sponsored conversation on behalf of Jif and the Mom it Forward Blogger Network. All thoughts and opinions are, like always, my own.

    It's not quite soccer season yet here in Portland, but my four (almost five) year old is suuuuuper excited to be playing in the fall. She played her first season last fall and is a total rock star on the field. As in, she can dribble rings around her sweet sister (8 years) who clearly inherited her athletic abilities from me. <--- I never said that.

    Cranberry Apple Granola Bites

    As you well may know, there are many people on this green earth that have much more finesse on the soccer field than I or my amazing daughter do, and some of those people are part of the 2015 “Kick It” Tour, the world’s largest 3v3 soccer tournament. Jif To Go is excited to announce the launch of its new Halftime Heroes Photo Promotion as part of their sponsorship for the tournament and I'm going to give you the run-down here before we jump into the recipe today.

    Christie Rampone, U.S. Captain of The Women’s National Team and mother of two has teamed up with Jif and the "Kick it" Tour for the program to help raise $25,000 for the Boys and Girls Clubs of America. Until August 9, Jif is encouraging families to attend a Kick it Tournament (game schedule here) and share a picture of how they "get going" as part of the Half Time Heroes Promotion.

    To enter, families will be asked to take pictures with their Jif samples at the Jif tent and post a photo on their Twitter and Instagram pages using the hashtags #JifToGo and #PromoEntry. The best part is, the Boys and Girls Clubs of America will get a $1 donation from Jif for every entry using the hashtags, up to $25,000! It's pretty cool. Take a pic, hashtag, and know you contributed to the fun!

    BUT...

    Even if you can't make it to a tournament game to try samples and take pictures, you can still get set up with some sweet gear from Jif! I'll pick a winner from the comments on this post so keep reading to enter. 🙂

    Cranberry Apple Granola Bites

    I decided to share this recipe for granola bites along with the Jif post because they are a great thing to have on hand to grab and go when you're busy and need something filling. I actually love to dip them in peanut butter and the Jif To Go packs makes packing peanut butter super easy. I just throw some cranberry apple bites into a baggie, grab a few Jif To Go and I've got a snack ready to go in my purse that will keep bellies full much longer than fruit leather.

    Ready to make some Granola Bites? Let's do it.

    Oats, sliced almonds, sunflower seeds and wheat germ. Spread them on a baking sheet and bake for 15 minutes until they are nice and toasted.

    Cranberry Apple Granola Bites

    You can go crazy with mix-ins. I chose a simple combination for dried apples and cranberries for this batch.

    Cranberry Apple Granola Bites

    The glue that holds the bites together is a mix of honey and maple syrup, a little brown sugar, vanilla, and salt. My computer decided to eat the picture I had of this step, so let's all take a second to imagine what it might look like.

    When you pour it over the oats and fruit your mixture will look something like this and you'll want to eat it all.

    Cranberry Apple Granola Bites

    At this point you could just press it all into a 9x13" pan, bake and cut into bars, but I love turning them into "Bites" by baking them in my mini muffin tin. Make sure to grease your pan well and then use a cookie scoop to portion the mixture into the wells.

    Cranberry Apple Granola Bites

    You want them to be pretty compact so they'll hold together after baking so I press them in tightly with the back of the scooper and then again with my finger tips. If you lightly wet your fingers they won't stick to the granola.

    Cranberry Apple Granola Bites

    Bake in a low oven (300 degrees) for about 15 minutes. The edges of each bite will be golden. DO NOT try to remove them from the pan until they are completely cool or you'll end up with a crumbled mess. It will be a delicious mess but a mess nonetheless.

    Cranberry Apple Granola Bites

    Once they are cooled you can pop a knife into the side of each bite and they'll pop out pretty easily. Store in an airtight container for up to a week or in the freezer for a month.

    Cranberry Apple Granola Bites

    Giveaway!

    Jif is going to send out a fun goody bag to one of you lovely people. It will include a  JIF-branded sport bag, JIF-branded soccer ball, JIF-branded water bottle, and assortment of JIF To Go products. It adds up to $75 and all you have to do is share this post on your favorite social media account (Facebook, Twitter, Instagram, or Pinterest) and then come back here and leave a comment with a link to where you shared it. I've even made it super easy to share from this post! Just scroll over any of the pictures and you'll see a little box pop up in the upper right hand corner of the picture. Just click on the icon for where you want to share it and  you'll be guided to share it. Easy peasy.

    Other On-The-Go-Snacks You Might Dig

    • Easy Peanut Butter Protein Balls
    • Baked Mozzarella Pizza Sticks
    • Sugar-Free Banana Muffins
    • Hummus w/ Avocado and Black Beans

    Other Granola Recipes You Might Like

    • Pineapple Granola Parfaits
    • Coconut Oil Granola with Dried Berries

    📖 Recipe

    Cranberry Apple Granola Bites
    Print Recipe
    5 from 2 votes

    Cranberry Apple Granola Bites

    Granola bites are the perfect grab and go snack to keep on hand this summer and into the school year! They are super easy to make and take only a handful of ingredients. The best part is they are totally customizable! 
    Prep Time10 minutes mins
    Cook Time40 minutes mins
    Total Time50 minutes mins
    Course: Snack
    Cuisine: American
    Keyword: granola snack, healthy snack, homemade granola bar
    Servings: 36 bites
    Calories: 101kcal
    Author: Heather Cheney

    Ingredients

    • 2 ½ cups Rolled Oats
    • ½ cup raw sunflower seeds
    • 1 cup sliced almonds
    • ½ cup wheat germ
    • ¼ cup honey
    • ¼ cup maple syrup
    • ¼ cup dark brown sugar
    • 1 ounce butter
    • 2 teaspoon vanilla
    • ½ teaspoon kosher salt
    • 1 ½ cups dried fruit chopped

    Instructions

    • Preheat oven to 350 degrees
    • Spread oats, sunflower seeds, almonds, and wheat germ out on a baking sheet and bake for 15 minutes, stirring every 5 minutes. Remove from oven and pour into large mixing bowl.
    • In a small saucepan heat syrup, honey, brown sugar, butter, vanilla, and salt and stir until smooth and sugar is dissolved.
    • Immediately pour over the oat mixture and stir until combined. Scoop into greased mini muffin tin and press firmly into each well.
    • Reduce oven temperature to 300 and bake for 15 minutes or until the edges of the bites start to turn light golden. Remove from oven and let cool completely. Pop out the bites with a butter knife inserted in one side of each well and store in an airtight container for up to a week, in the freezer for 1 month.

    Nutrition

    Serving: 1bite | Calories: 101kcal | Carbohydrates: 15g | Protein: 2g | Fat: 3g | Cholesterol: 1mg | Sodium: 46mg | Potassium: 78mg | Fiber: 1g | Sugar: 10g | Vitamin A: 20IU | Calcium: 17mg | Iron: 0.6mg


    Italian Flat Bread Turkey Melts

    By Heather LAST UPDATED July 17, 2019 · FIRST PUBLISHED June 29, 2015, Leave a Comment

    These hearty sandwiches come together in just minutes but deliver a big hit of flavor! Perfect for weeknights when you don't have a lot of time but want something out of the ordinary. Italian Flat Bread Turkey Melts

    When I had my cake decorating business I did some trade out with a local B&B to use their licensed kitchens. Every afternoon they had little h'orderves trays they would set out in the lobby and it just so happened that I was usually in the kitchen when these trays would come back, half-eaten and need some well-deserved love. Who was I to deny them that love? The offerings would change from day to day but my favorite was the olive tapenade spread on little baguette slices with a bit of cheese.

    I'm a sucker for olives to begin with. Have I ever told you about my NEED for jalapeno stuffed olives while pregnant? It's true. But this olive tapenade was the perfect mix of a handful of varieties of olives with garlic and some herbs. It was salty and punchy and perfect with the cheese and bread. A few days ago I decided it had been too long since I had something like that and decided I needed some ASAP.

    Looking through my cupboards I scrambled to find a single can of black olives and retreated to my fridge knowing I'd find at least 2 other kinds of olives on the shelf. But somehow every last olive in my fridge was gone! I'm not really sure how that happened but I'm beginning to accept that I might have a slight olive problem.

    Being the ever-ready problem solver that I am, I decided to throw in some pepperoncinis and sun-dried tomatoes and call it good.

    Italian Flat Bread Turkey Melts

    And guess what? It was!

    So, so good.

    I spread the tapenade on some sandwich-sized pieces of flat bread-- I used the mini naan bread found at Costco-- just after spreading a bit of mayonnaise on the bread first.

    Italian Flat Bread Turkey Melts

    I topped one half with a few slices of smoked deli turkey and the other with a slice of smoked provolone cheese. The smoke flavor in both the meat and cheese really make this phenomenal.

    Italian Flat Bread Turkey Melts

    I closed it up and spread just a teaspoon of softened butter on the outside of the bread just like I was making a grilled cheese sandwich. I threw it in a hot pan and let the cheese melt with the tapenade and the bread get nice and crispy.

    Italian Flat Bread Turkey Melts

    If you cook it just right, the cheese will melt down perfectly and mix with the tapenade and mayo and create an awesome "sauce" that is pretty darn perfect with the turkey. The tapenade makes it super flavorful with a little kick of heat from the pepperoncini and a little bit a sweetness from the tomato. My whole family quickly wolfed theirs down and asked when I was going to make them again. A definite winner!

    📖 Recipe

    Italian Flat Bread Turkey Melts
    Print Recipe
    4.80 from 5 votes

    Italian Flat Bread Turkey Melts

    These hearty sandwiches come together in just minutes but deliver a big hit of flavor! Perfect for weeknight when you don't have a lot of time but want something out of the ordinary.
    Prep Time20 minutes mins
    Cook Time10 minutes mins
    Total Time30 minutes mins
    Course: Sandwich
    Cuisine: American
    Keyword: deli turkey sandwich, olive tapenade, panini
    Servings: 4 sandwiches
    Calories: 506kcal
    Author: Heather Cheney

    Ingredients

    • ½ cup black olives
    • ¼ cup sliced pepperoncini
    • 2 tablespoons sliced sun dried tomatoes
    • 1 pound Smoked Deli Turkey
    • ½ pound Smoked Provolone Cheese sliced
    • 3 tablespoon Mayonnaise
    • 4 Sandwich-sized flat bread rounds

    Instructions

    • Combine all ingredients for the tapenade in a food processor and pulse until finely chopped
    • Spread mayonnaise on each side of flat bread and top each half with a tablespoon of the tapenade. Layer turkey and a slice of provolone on each half and put together.
    • Melt 1 teaspoon of butter in a skillet over medium heat. Place sandwich in melted butter and cook until flat bread is golden brown and cheese is melted, adding more butter to the pan to cook the other side. Cut in half and enjoy

    Nutrition

    Serving: 1sandwich | Calories: 506kcal | Carbohydrates: 30g | Protein: 35g | Fat: 26g | Saturated Fat: 11g | Cholesterol: 79mg | Sodium: 2407mg | Potassium: 444mg | Fiber: 1g | Sugar: 3g | Vitamin A: 585IU | Vitamin C: 1mg | Calcium: 487mg | Iron: 2.4mg

    Italian Flat Bread Turkey Melts

    Italian Flat Bread Turkey Melts

    Smoky Slow Cooker Pulled Pork With Pineapple Slaw

    By Heather LAST UPDATED July 17, 2019 · FIRST PUBLISHED June 12, 2015, 4 Comments

    This Smoky Slow Cooked Pork is great served over rice, wrapped up in lettuce leaves or just eaten on its own. Top it with a sweet and crunchy pineapple slaw and it makes for a super flavorful meal that even my picky eaters gobble up!Smoky Slow Cooker Pulled Pork with Pineapple Slaw | heatherlikesfood.com


    Back when we were first married and had all the time in the world (we didn't really, we just didn't have kids yet) we bought an electric smoker at a garage sale. We were SO excited to smoke this and smoke that and had super illusions of grandeur about how much we were going to use it. As the story usually goes, it didn't get used nearly as much as we had planned. I think I remember smoking ONE batch of salmon in it and using it as a BBQ the other 4 or 5 times we pulled it out.

    We ended up moving and sold it to another chump that was SO excited to buy it at our garage sale. Maybe they actually used it and if they did I applaud them and secretly wish I could live next door and pretend that it was us that was filling up the air with smoky goodness instead of our good intentions.

    Smoky Slow Cooker Pulled Pork with Pineapple Slaw | heatherlikesfood.com

    I love smoked pork and this recipe is just smoky enough to curb the craving without having to spend hours feeding wood chips into a smoker. It's great on its own and creates a super flavorful juice that is great spooned over rice. You can also toss the meat with BBQ sauce for awesome sandwiches or you can eat it like it do and wrap it up in lettuce leaves with a pineapple slaw. The pineapple slaw is sweet, tangy and crunchy and offsets the richness of the meat quite well. Enjoy!!

    📖 Recipe

    Smoky Slow Cooker Pulled Pork with Pineapple Slaw | heatherlikesfood.com
    Print Recipe
    4.60 from 5 votes

    Smoky Slow Cooker Pulled Pork With Pineapple Slaw

    This Smoky Slow Cooked Pork is great served over rice, wrapped up in lettuce leaves or just eaten on it's own. Top it with a sweet and crunchy pineapple slaw and it's makes for a super flavorful meal that even my picky eaters gobble up!
    Prep Time20 minutes mins
    Cook Time8 hours hrs
    Total Time8 hours hrs 20 minutes mins
    Course: Main Course
    Cuisine: American
    Keyword: crock pot pork, pineapple salsa, pulled pork entree
    Servings: 12 servings
    Calories: 288kcal
    Author: Heather Cheney

    Ingredients

    • 6 pounds boneless pork shoulder roast trimmed of excess fat
    • 1 tablespoon kosher salt
    • 1 tablespoon chili powder
    • ½ teaspoon chipotle chili powder more if you like some heat
    • 2 teaspoons garlic powder
    • 1 tablespoon olive oil
    • 2 teaspoons liquid smoke
    • ¼ cup balsamic vinegar
    • 4 cups diced pineapple about 1 small-med pineapple
    • ¼ cup red onion finely chopped
    • ½ cup cilantro chopped
    • 3-4 cups shredded cabbage
    • ¼ teaspoon kosher salt
    • Juice of 1 lime
    • ¼ cup mayonnaise

    Instructions

    • Combine salt, chili powders and garlic powder in a small bowl and spread over the meat. Sear the roast in a hot skillet with the olive oil until golden brown on all sides. Transfer roast to the slow cooker.
    • Combine liquid smoke and balsamic vinegar in small bowl and pour over the roast. Cook on low for 7-8 hours or until its tender and easily shreds with a fork.
    • Once cooked, remove roast from the slow cooker and shred. Pour the juices created from cooking into a fat separator or large measuring cup and either pour or spoon off the fat that rises to the top. Return the shredded meat to the slow cooker and combine with the cooking juices. Cover and let cook an additional 5 minutes.
    • Combine all the ingredients for the slaw and season to taste. Serve the pork topped with the slaw on top of rice or wrapped up in lettuce leaves.

    Nutrition

    Serving: 1serving | Calories: 288kcal | Carbohydrates: 10g | Protein: 27g | Fat: 14g | Saturated Fat: 4g | Cholesterol: 94mg | Sodium: 235mg | Potassium: 594mg | Fiber: 1g | Sugar: 7g | Vitamin A: 325IU | Vitamin C: 34.2mg | Calcium: 37mg | Iron: 2.1mg

    Like what you see here? Make sure you are following Heather Likes Food for more recipes and ideas!

    Facebook | Pinterest | Instagram | Twitter | Google+ | Weekly Newsletter | Feedly | Bloglovin


    Smoky Slow Cooker Pulled Pork with Pineapple Slaw | heatherlikesfood.com

    Buffalo Ranch Chicken Tacos

    By Heather LAST UPDATED April 11, 2018 · FIRST PUBLISHED June 5, 2015, 36 Comments

    I've got chicken on my brain this morning and while this is a sponsored post for Foster Farms® Chicken , you won't want to miss this recipe. Promise. Buffalo Ranch Chicken Tacos | heatherlikesfood.com

    So, I like big tacos and I cannot lie.

    I'm pretty sure that I could live off tacos and tacos alone for the rest of time if I had to. I mean, I know I'd miss bread, and pasta, and pizza and a pretty large hand full of other things that I'm forgetting, but really tacos are where it's at.

    And these tacos, THESE tacos need to take a seat at your kitchen table soon. I've been on a buffalo chicken kick lately and when I got the idea to stuff it inside a taco, I knew it was meant to be.

    For my tacos I used Foster Farms® Simply Raised Chicken Breasts. Foster farms® is the West Coast's leading poultry producer and being a west coaster myself, it's the chicken I reach for first at the super market. They revealed new branding and a trio of fresh chicken product lines: Fresh and Natural (the only Foster Farms® you've seen at the store until now), and now two antibiotic free lines – Foster Farms Simply Raised, and Foster Farms Organic. I went for the Simply Raised because I like that it is antibiotic free, 100% natural and the chicken is given only vegetarian feed. The Simply Raised line is American Humane Certified and locally grown throughout CA, WA and OR! Their SimplyRaised line can be found in most major grocery stores now and the Organic is at Costco and select grocery stores.

    Buffalo Ranch Chicken Tacos: all the flavor of buffalo wings wrapped up in a tortillla!

    When I'm making a recipe that calls for pre-cooked chicken, I like to just throw some in the oven to bake. All you have to do is arrange your chicken breast in a single layer on a baking sheet, season with some salt and pepper, and put into a 375 degree oven for about 20 minutes or until cooked through. Cooking times will vary depending on how big your chicken breasts are but if the juices run clean when you cut into the meat, it's done.

    Once you have the chicken cooked, it's time to buffalo-ize it. You'll caramelize some onions, throw the chicken into the pan with some ranch seasonings and then smother the whole shebang with hot sauce, a little bit of butter, and some plain yogurt to give it a little bit of creaminess.

    Buffalo Ranch Chicken Tacos: all the flavor of buffalo wings wrapped up in a tortillla!

    You can adjust the amount of hot sauce you use to taste. I like to use about ⅓ C of sauce to ¼ C of yogurt.

    Buffalo Ranch Chicken Tacos | heatherlikesfood.com

    From here it's all about the toppings! We couldn't have a buffalo taco without some blue cheese, could we? And then, little shredded cabbage and fresh cilantro keep it nice and fresh tasting as well as take some of the edge off the chicken.

    They are all in all a pretty fantastic take on tacos, if you ask me.

    Buffalo Ranch Chicken Tacos | heatherlikesfood.com

    This is a sponsored post written by me on behalf of Foster Farms®.

    📖 Recipe

    Buffalo Ranch Chicken Tacos | heatherlikesfood.com
    Print Recipe
    4.94 from 197 votes

    Buffalo Ranch Chicken Tacos

    All the flavor of your favorite buffalo wings wrapped up in a tortilla and topped with crunchy cabbage and savory blue cheese! 
    Prep Time10 minutes mins
    Cook Time20 minutes mins
    Total Time30 minutes mins
    Course: Main Course
    Cuisine: American
    Keyword: easy buffalo sauce, easy taco recipe, rotisserie chicken recipe
    Servings: 8 tacos
    Calories: 140kcal
    Author: Heather Cheney

    Ingredients

    • 1.5 pounds Foster Farm's Simply Raised Boneless Skinless chicken breasts cooked and shredded
    • 1 tablespoon olive oil
    • 1 medium onion sliced
    • 1 tablespoon ranch dressing mix
    • 1 tablespoon butter
    • ¼-1/2 cup plain nonfat yogurt
    • ¼-1/2 cup hot sauce
    • Corn Tortillas Blue Cheese, Shredded Cabbage, Fresh Cilantro, Sour Cream, Guacamole

    Instructions

    • Heat olive oil in a skillet over medium heat and cook onions until tender and caramelized-- about 10 minutes. Add in chicken and ranch seasoning, stir and cook for 1 minute.
    • Stir in hot sauce, butter and yogurt. Use more hot sauce and less yogurt if you like it spicy and the opposite if you like it milder.
    • Heat the chicken thoroughly and spoon into warm corn tortillas. Top with blue cheese crumbles, shredded cabbage, cilantro, and sour cream to serve.

    Nutrition

    Serving: 1taco | Calories: 140kcal | Carbohydrates: 3g | Protein: 18g | Fat: 5g | Saturated Fat: 1g | Cholesterol: 58mg | Sodium: 456mg | Potassium: 365mg | Sugar: 1g | Vitamin A: 80IU | Vitamin C: 7.7mg | Calcium: 23mg | Iron: 0.4mg

    Buffalo Ranch Chicken Tacos | heatherlikesfood.com

    https://ec2-54-244-107-86.us-west-2.compute.amazonaws.com/tracker.php?cid=00DE0000000eHXcMAM&pixel=1E000000VnwjKIAR

    Super Crispy Oven Roasted Garlic Potatoes

    By Heather LAST UPDATED March 22, 2021 · FIRST PUBLISHED May 22, 2015, Leave a Comment

    These Super Crispy Oven Roasted Garlic Potatoes are what my dreams are made of. They are made quick and easy in the oven and take just a few minutes to throw together, making them a perfect quick side for dinner!These Super Crispy Oven Roasted Garlic Potatoes are what my dreams are made of. They are made quick and easy in the oven and take just a few minutes to throw together, making them a perfectly quick side for dinner!

    You guys, indulge me as I proclaim my love for potatoes today. I love them for their starchy goodness. I love them creamy mashed up with sour cream and butter. I love them baked and topped with broccoli and cheese sauce. I love them slow cooked in a creamy soup. And today, I love them roasted in butter and olive oil with little bits of baked garlic and a dark brown crispy crust.

    These Oven Roasted Garlic Potatoes are what dreams are made of.

    The best part is they only take about 5 minutes of hands-on time and off they go into the oven to bake for all the magical little oven fairies to do their magic on them.

    These Super Crispy Oven Roasted Garlic Potatoes are what my dreams are made of. They are made quick and easy in the oven and take just a few minutes to throw together, making them a perfect quick side for dinner!

    The trick is to preheat the oven WITH your skillet in there so it's nice and hot when the potatoes go in. And then, DON'T touch them! We want them to stay in the same place for the whole cooking time to give the side touching the bottom of the pan maximum amount of time to crisp up and brown.

    When choosing a skillet to cook these in you'll first want to make sure it's oven-proof, and second that it's nice and heavy. The heavier the bottom of the pan, the better it will retain heat which makes for a gorgeous crust. I used my enameled cast iron skillet for this and it worked beautifully. This is the one I have -->Click here to see it

    The best part of these for me is the garlic bits that bake up caramelized and crispy. SO good!

    These Super Crispy Oven Roasted Garlic Potatoes are what my dreams are made of. They are made quick and easy in the oven and take just a few minutes to throw together, making them a perfect quick side for dinner!

    More Potato Recipes You Might Like

    • Baked Sweet Potatoes
    • Steakhouse Potatoes
    • Grilled Sweet Potatoes
    • Slow Cooker Mashed Potatoes
    • Au Gratin Potato Recipe

    📖 Recipe

    These Super Crispy Oven Roasted Garlic Potatoes are what my dreams are made of. They are made quick and easy in the oven and take just a few minutes to throw together, making them a perfectly quick side for dinner!
    Print Recipe
    4.67 from 18 votes

    Super Crispy Oven Roasted Garlic Potatoes

    There's not much better than a big plate of crispy potatoes that are loaded with garlic flavor! These potatoes have about 5 minutes of hands-on prep time and make a big impression at the dinner table.
    Prep Time15 minutes mins
    Cook Time40 minutes mins
    Total Time55 minutes mins
    Course: Side Dish
    Cuisine: American
    Keyword: breakfast potatoes, crunchy potatoes, home fries
    Servings: 4 servings
    Calories: 245kcal
    Author: Heather Cheney

    Ingredients

    • 1 ½ pounds yukon gold potatoes
    • 3 cloves garlic minced
    • 3 tablespoons olive oil
    • 2 tablespoons salted butter
    • ⅛ teaspoon black pepper
    • ½ teaspoon kosher salt

    Instructions

    • Place 2 tablespoon of oil and butter in a large, heavy bottomed skillet. Place in cold oven and preheat oven to 400 degrees.
    • While the pan is heating up, cut potatoes into ⅛ths and toss with the remaining 1 tablespoon of oil, garlic, salt and pepper.
    • When the oven has come up to 400 degrees, carefully pour potatoes into the hot skillet, arranging into a single layer if possible. Cook for 30-40 minutes uncovered. Do not stir the potatoes as they cook. We want each piece to stay in one spot for as long as possible to form that nice cripsy crust. The potatoes are done when tender and deep golden brown on the side that was facing the pan.
    • Remove from oven and serve hot.

    Nutrition

    Serving: 1serving | Calories: 245kcal | Carbohydrates: 21g | Protein: 4g | Fat: 16g | Saturated Fat: 5g | Cholesterol: 15mg | Sodium: 358mg | Potassium: 711mg | Fiber: 4g | Vitamin A: 175IU | Vitamin C: 20.1mg | Calcium: 55mg | Iron: 5.6mg

    Rocky Road Rice Crispy Treats

    By Heather LAST UPDATED March 18, 2021 · FIRST PUBLISHED May 12, 2015, Leave a Comment

    Rocky Road RIce Cripsy Treats |heatherlikesfood.com

    I'm a HUGE fan of rice crispy treats and I usually shy away from the "dressed up" versions and stick to my tried and true basic recipe. (<--- omigosh, guys if you haven't tried these yet, do it! Best. Treats. Ever.) But I'm kind of a sucker for big chunks of marshmallow and when they are mixed in with chocolate, that's even better. AND it just so happens that Rocky Road ice cream is on at least one of my many top ten list, so it makes sense that I like these. A lot.

    I decided to skip out on the almonds this time around (I was out!) , but if you use them they make the whole experience a little more crunchy and, well, nutty. Obviously.

    They couldn't be any easier to throw together because to make them the perfect amount of fudgy, we're just going to use a box of instant pudding mix. Doing this gives them that rich chocolate flavor AND keeps them moist.

    Once the pudding is mixed into the marshmallows, the mixture can become kind of thick so we'll add in 2 tbsp of water to thin it out a bit. It's going to look like you totally ruined it, but just keep stirring and it will all come together-- promise!

    Rocky Road RIce Cripsy Treats |heatherlikesfood.com

    Who's ready for a square??

    How To Start a Food Blog |heatherlikesfood.com

    📖 Recipe

    How To Start a Food Blog |heatherlikesfood.com
    Print Recipe
    5 from 2 votes

    Rocky Road Rice Crispy Treats

    Oooey and Gooey like any good rice crispy treat should be but these ones are stuffed with extra marshmallows and a fudgy chocolate base.
    Prep Time10 minutes mins
    Cook Time5 minutes mins
    Total Time15 minutes mins
    Course: Dessert
    Cuisine: American
    Keyword: chocolate almond rice krispie treats, rice krispie treats with chocolate pudding, rocky road dessert
    Servings: 16 squares
    Calories: 137kcal
    Author: Heather Cheney

    Ingredients

    • 6 cups mini marshmallows divided
    • 4 tablespoons butter
    • 2 tablespoon hot water
    • 1 3.4oz box chocolate fudge instant pudding mix
    • 6 cup crisp rice cereal
    • ½-1 cup toasted almonds optional

    Instructions

    • Grease a 8"x8" glass baking dish and set aside.
    • In a microwaveable bowl, warm 4 cups marshmallows and butter in the microwave about 1½ minutes, stirring in 30 second intervals until the marshmallows are fully melted. Stir in pudding mix and water and mix until well combined.
    • Stir cereal, remaining 2 C of marshmallows and almonds into the marshmallow mixture, folding until all the cereal is coated.
    • Transfer into greased baking dish, pressing down lightly into pan until level. Refrigerate until chilled and slice into squares.

    Nutrition

    Serving: 1serving | Calories: 137kcal | Carbohydrates: 22g | Protein: 1g | Fat: 5g | Saturated Fat: 1g | Cholesterol: 7mg | Sodium: 41mg | Potassium: 39mg | Sugar: 11g | Vitamin A: 85IU | Calcium: 13mg | Iron: 0.4mg

    Taco Chicken Enchiladas

    By Heather LAST UPDATED June 19, 2020 · FIRST PUBLISHED May 5, 2015, 8 Comments

    Taco Chicken Enchiladas: Throw some chicken in the slow cooker with some taco seasoning, cook, shred, and roll up in corn tortillas. Top with enchilada sauce and monterrey jack cheese . Makes enchiladas everyone loves!

    I often get asked to put my own recipes to work and use them in new recipes so that you guys know how to use them. So today, I put together a recipe that uses my recipes for Homemade Taco Seasoning and Enchilada Sauce. These recipes are probably two of my favorites, like, ever. Once you try the taco seasoning I promise you'll never go back to a packet again and the enchilada sauce is unlike anything you can get out of a can. So good.

    Today's taco chicken enchilada recipe is one of those things that is so, so easy but gives big rewards in flavor.  You start with making some taco chicken in the slow cooker.

    Boneless Skinless Chicken Breast + Taco Seasoning + 4 hours = tender, shredded chicken for your enchiladas. Stupid simple.

    And then all you do is roll up the chicken with a little monterrey jack cheese in a corn tortilla, place in a baking dish, smother with enchilada sauce, more cheese, and you're done!

    Well, you DO have to bake it first but that takes 35 minutes tops.

    When they come out of the oven they are bubbly and melty and the tortillas are tender and saucy and all is right in the world.

    Taco Chicken Enchiladas: Throw some chicken in the slow cooker with some taco seasoning, cook, shred, and roll up in corn tortillas. Top with enchilada sauce and monterrey jack cheese . Makes enchiladas everyone loves!

    📖 Recipe

    Taco Chicken Enchiladas: Throw some chicken in the slow cooker with some taco seasoning, cook, shred, and roll up in corn tortillas. Top with enchilada sauce and monterrey jack cheese . Makes enchiladas everyone loves!
    Print Recipe
    4.46 from 22 votes

    Taco Chicken Enchiladas

    Easy slow cooker chicken wrapped up and smothered in enchilada sauce and cheese. It doesn't get any easier or better than this!
    Prep Time20 minutes mins
    Cook Time35 minutes mins
    Total Time55 minutes mins
    Course: Main Course
    Cuisine: Mexican
    Keyword: canned enchilada sauce, slow cooker chicken enchiladas, taco seasoning chicken
    Servings: 12 Enchiladas
    Calories: 109kcal
    Author: Heather Cheney

    Ingredients

    • 4 whole medium boneless skinless chicken breast halves
    • 3 tablespoons Taco Seasoning
    • 2 cups Enchilada Sauce
    • 12 corn tortillas
    • 1-2 cups Monterrey Jack Cheese shredded

    Instructions

    • Place chicken breasts in slow cooker and sprinkle 2 tablespoon of the taco seasoning over the top. Cook on low for 4 hours or until chicken is tender and shreds easily. Shred chicken and stir in the remaining taco seasoning and ¼ C of water. Return cover and cook an additional 10 minutes.
    • Spread ½ C of enchilada sauce into the bottom of a 9x13" pan.
    • Heat tortillas until pliable and place about ¼ C of the chicken in the middle of each tortilla with about 2 tablespoon of the cheese. Roll and arrange in the 9x13" pan. Repeat until all the chicken and tortillas are used.
    • Pour remaining enchilada sauce over the top of the enchiladas and top with remaining cheese. Cover pan with foil and bake @ 375 degrees for 20 minutes, remove foil and bake an additional 10-15 minutes or until enchilada sauce is bubbling and cheese is well melted.
    • Serve with sour cream, lettuce and tomato.

    Nutrition

    Serving: 1enchilada | Calories: 109kcal | Carbohydrates: 15g | Protein: 4g | Fat: 3g | Saturated Fat: 1g | Cholesterol: 8mg | Sodium: 459mg | Potassium: 55mg | Fiber: 2g | Sugar: 3g | Vitamin A: 400IU | Vitamin C: 1.1mg | Calcium: 91mg | Iron: 0.7mg

    Homemade Spice Mix Recipes + Printable

    By Heather LAST UPDATED July 17, 2019 · FIRST PUBLISHED April 28, 2015, 1 Comment

    Don't wait, make these homemade spice mix recipes NOW! They are so easy to make and taste better than that store-bought stuff. They are great for gifts, too! Homemade spice mix recipes for taco, ranch, brown gravy, garlic bread, and onion soup mix.

    These homemade spice mix recipes are game-changers!

    I've never been able to stomach paying over a dollar for a teeny tiny little packet of spices just so I can make homemade ranch dressing. Especially when I know I likely have all the ingredients in my pantry already! It's craziness.

    So I decided to figure out recipes for all of my go-to spice mixes so I could have a mason jar of each one of them ready to go in my pantry. Plus, if being convenient and inexpensive isn't enough, these mixes just taste better than anything you can get in the store. There's nothing in the mixes that you can't pronounce and you have the power to omit ingredients if you'd like!

    What Homemade Spice Mixes can you make?

    Today I'm sharing my recipes for Taco (it's the absolute best taco seasoning you'll try, promise!), Ranch Dressing, French Onion Soup, Brown Gravy, and Garlic Bread.  I picked these (with the exception of the garlic bread) because they are commonly called for in many recipes and they seem to be the ones I reach for most often at the grocery store. I threw the Garlic Bread seasoning into the mix because, garlic bread. Who doesn't like to be able to have a loaf of hot garlic bread ready in under 5 minutes? It's also something that has 101 other uses and once you have a shaker of it in your fridge you'll find all sorts of things to use it in.

    Instead of adding a recipe card below for each seasoning mix like I usually do, I put all of them onto a single printable sheet for easy reference. Each recipe is listed and includes the standard preparation and/or measurement equivalent for use in lieu of a packet. ---> Download and Print Spice Mix Printable Here. <---

    5 Homemade Spice Mixes: Ranch, Taco, Brown Gravy, French Onion, Garlic Bread


    Fresh Chimmichurri Sauce

    By Heather LAST UPDATED March 18, 2021 · FIRST PUBLISHED April 17, 2015, Leave a Comment

    This sauce is awesome on steaks and chicken. Used as a marinade or for dipping, it makes everything taste fresh, bright and like it just came from the garden. A must make!

    Well good Friday to ya! It's not actually Good Friday, but it is a good day so I think that counts. The sun is shining, we're headed to the beach tomorrow and I have a big bowl of this chimmichuri waiting for me in the fridge.

    LIFE IS GOOOOOOD.

    Ever had chimmichurri? It's a sauce that basically makes everything you put it on start a dance party in your mouth. EVERYONE WILL BE INVITED and want to SHAKE IT!  It involves parsley and cilantro and garlic (lots of it!) some olive oil and a little vinegar and lemon juice to make it nice and zingy.

    In Argentina (where it originates from) it's most typically served with steak but great on so many meats, veggies, and even used as a salad dressing. It tastes fresh and bright and you'll basically want to put it on everything. I like to make a batch and use half of it as a marinade for grilled chicken or steak and reserve the other half to use as a sauce.

    It's a super versatile thing and really can be tweaked to your liking. The proportions used in the recipe below suit my tastes but feel free to play with it until it's perfect for YOU.

    This sauce is awesome on steaks and chicken. Used as a marinade or for dipping, it makes everything taste fresh, bright and like it just came from the garden. A must make!

    📖 Recipe

    Print Recipe
    4.50 from 2 votes

    Fresh Chimmichurri Sauce

    If you've never had chimichurri before, today is the day to make this and smother it on everything you can! 
    Prep Time10 minutes mins
    Cook Time0 minutes mins
    Total Time10 minutes mins
    Course: Condiment
    Cuisine: Argentinian
    Keyword: chimmichurri verde, herb sauce for meats, steak sauce
    Servings: 8 serving
    Calories: 185kcal
    Author: Heather Cheney

    Ingredients

    • 1 bunch flat leaf parsley
    • 1 cup fresh cilantro
    • 6 cloves garlic minced
    • ¾ cups extra virgin olive oil
    • ¼ cup red wine vinegar
    • 1 tablespoon fresh lemon juice
    • ½ teaspoon ground cumin
    • ½ teaspoon kosher salt
    • ½ teaspoon crushed red pepper flakes

    Instructions

    • Combine all ingredients in a blender and blend until smooth. Separate into two parts and use half for marinading and half as a sauce after cooking. Or just use as a sauce for many different things.

    Nutrition

    Serving: 1serving | Calories: 185kcal | Carbohydrates: 1g | Fat: 20g | Saturated Fat: 2g | Sodium: 147mg | Potassium: 19mg | Vitamin A: 145IU | Vitamin C: 2.1mg | Calcium: 5mg | Iron: 0.3mg

    Slow Cooker Cumin Roasted Pork

    By Heather LAST UPDATED March 18, 2021 · FIRST PUBLISHED April 10, 2015, 1 Comment

    Slow Cooker Cumin Roasted Port-- this stuff is amazing. Cooked all day in a hearty sauce, it's perfect for topping rice, eating on a salad, or just by itself. So good!

    So I've done it, I've officially gone off the deep end. I'm doing Whole 30. Never, ever, EVER in my life would I have thought that I would purposely refrain from eating 2 major food groups (grains and dairy) and shun sugar for a full month. But alas, I'm on the train to crazy town and I don't hate it... yet.

    I'm only on day 10 and but I'm ⅓ of way done and I think I'm going to stick it out this time! Woot woot!  I am missing cheese and if someone rubbed a baguette under my nose right now I might punch them in the face. But I've got this.

    Obviously.

    Today's recipe is a great, easy way to get a little more protein into your life. It's a full flavored pork roast rubbed with cumin and left to simmer in a tomato-y sauce all day. The meat ends up tender, shredded and perfect for topping rice, a salad or just on its own.

    We'll start with a pork sirloin roast, seasoned with salt, pepper and cumin and browned until golden brown on the stovetop. From there you'll plop it into the slow cooker and cover it with a sliced onion.

    Slow Cooker Cumin Roasted Port-- this stuff is amazing. Cooked all day in a hearty sauce, it's perfect for topping rice, eating on a salad, or just by itself. So good!

    In the same pan that the roast was browned in, simmer a can of italian diced tomatoes with a cup of your favorite salsa. You'll then toss in a little more cumin and give it a stir.

    Slow Cooker Cumin Roasted Port-- this stuff is amazing. Cooked all day in a hearty sauce, it's perfect for topping rice, eating on a salad, or just by itself. So good!

    Pour the sauce over the roast, cover the slow cooker and walk away until its tender and juicy and makes your house smell amazing.

    Slow Cooker Cumin Roasted Port-- this stuff is amazing. Cooked all day in a hearty sauce, it's perfect for topping rice, eating on a salad, or just by itself. So good!

    Once it's cooked you can leave the sauce as is, but you'll take it to a whole new level if you remove the roast and pour the sauce into a pan to reduce and thicken. The flavors intensify and really bring the dish to life.

    Slow Cooker Cumin Roasted Port-- this stuff is amazing. Cooked all day in a hearty sauce, it's perfect for topping rice, eating on a salad, or just by itself. So good!

    On a side note, if you're interested in doing some sort of a diet change but aren't ready to jump full into a Whole 30, the Beef Council (I know this post is all about pork and is totally not sponsored) is hosting a 30 day protein challenge. The challenge just encourages you to up your protein intake and they have a step by step plan that might be a good spring board for change. Check it out here.

    Have a great weekend!

    📖 Recipe

    Print Recipe
    5 from 2 votes

    Slow Cooker Cumin Roasted Pork

    Slow Cooker Cumin Roasted Port-- this stuff is amazing. Cooked all day in a hearty sauce, it's perfect for topping rice, eating on a salad, or just by itself.
    Prep Time20 minutes mins
    Cook Time6 hours hrs
    Total Time6 hours hrs 20 minutes mins
    Course: Main Course
    Cuisine: American
    Keyword: crock pot pork, cumin pork sauce, pork roast
    Servings: 6 Servings
    Calories: 243kcal
    Author: Heather Cheney

    Ingredients

    • 2 pounds pork sirloin roast
    • kosher salt, pepper, and cumin
    • 2-3 tablespoons oil l I used coconut
    • 14.5 ounces Italian Seasoned Diced Tomatoes
    • 1 cup favorite prepared salsa
    • 1 tablespoon ground cumin
    • 1 whole yellow onion sliced

    Instructions

    • Heat oil in a large skillet over high heat. Season roast generously with salt, pepper, and cumin on all sides. Place roast in hot skillet and sear until golden brown on all sides. Place roast in slow cooker.
    • In the same pan used to sear the meat, cook tomatoes and salsa over medium heat, scraping the bottom of the pan to get all the browned bits off of the bottom of the pan. Bring to a simmer and stir in the cumin. Remove from heat.
    • Sprinkle the sliced onions over the roast in the slow cooker and pour the sauce into pot. Cover and let cook for 7-8 hours on low or 4-6 on high. Roast is done when its tender and shreds easily with a fork.

    Nutrition

    Serving: 1serving | Calories: 243kcal | Carbohydrates: 7g | Protein: 35g | Fat: 7g | Saturated Fat: 1g | Cholesterol: 93mg | Sodium: 479mg | Potassium: 882mg | Fiber: 1g | Sugar: 4g | Vitamin A: 290IU | Vitamin C: 8.6mg | Calcium: 46mg | Iron: 2.1mg

    Steakhouse Baked Potatoes

    By Heather LAST UPDATED March 22, 2021 · FIRST PUBLISHED April 7, 2015, 4 Comments

    Baked Potatoes just like you get at the fancy steakhouses! Super simple and so, so easy!

    Back before I went to cooking school, I was working a job as a server for the university catering service. On one uneventful afternoon, I walked into the kitchen to find one of the chefs elbow deep in a giant metal bowl full of oil covered baking potatoes. I was confused. I'd seen potatoes be tossed in oil once they were cut up, but whole potatoes? He then poured in a whole bunch of salt and pepper and continued to toss them around until they were all shiny and crusted with seasoning. I finally ended up asking him what the heck he was doing and he told me we has getting ready for a steak dinner we were catering later that night. He explained that the oil kept the potatoes moist while the salt and pepper made them look pretty and taste good. Made sense.

    Not long after this conversation was had I was taken on a date to Outback Steakhouse. And, lo and behold, they had they same salt and pepper crusted baked potatoes! And they were good. Really good.

    Fast forward like 13 years, this still the only way I like to eat my baked potatoes. They turn out so fluffy and moist and the skin is slightly crisp and seasoned and just perfect.

    Now, a lot about how well a baked potato turns out has to do with the actual potato itself. You can't bake a red potato and expect it taste like a steakhouse potato, because it's not. Each variety of potato has a different moisture content and for these baked potatoes we want one that is dry and mealy-- the Russet! They are pretty big and can be found at all grocery stores. My store calls them "Baking Potatoes" instead of Russets but if they're big and look like your stereotypical potato, that's it.

    Baked Potatoes just like you get at the fancy steakhouses! Super simple and so, so easy!

    Wash your potato really well and then dry it really well too so that you can brush a layer of oil over the entire thing. The chef from my story dumped all of the potatoes into a bowl and tossed them with the oil and seasoning but since you're likely not making 30+ potatoes at once, this method uses less dishes. 🙂

    Baked Potatoes just like you get at the fancy steakhouses! Super simple and so, so easy!

    The kind of salt you use matters too. Kosher salt is a large flake which means you'll be able to see it well on the potato as well as really feel the texture and crunch of it when eating.

    Baked Potatoes just like you get at the fancy steakhouses! Super simple and so, so easy!

    Sprinkle some kosher salt and pepper on the top half of each oil covered potato. You can do the underside if you wanted to, but it's not necessary.

    Baked Potatoes just like you get at the fancy steakhouses! Super simple and so, so easy!

    From here all you do is pop them into a 375 degree oven for about an hour. Based on the size of the potato and your oven the time will vary. The potato is done when you can easily pierce it with a fork .

    Baked Potatoes just like you get at the fancy steakhouses! Super simple and so, so easy!

    Isn't it pretty? Now all you have to do is smother the thing in butter and sour cream for the absolute perfect baked potato. Easy huh?

    More Potato Recipes You Might Like

    • Baked Sweet Potatoes
    • Au Gratin Potato Recipe
    • Grilled Sweet Potatoes
    • Slow Cooker Mashed Potatoes
    • Oven Roasted Potatoes

    📖 Recipe

    Baked Potatoes just like you get at the fancy steakhouses! Super simple and so, so easy!
    Print Recipe
    4.56 from 9 votes

    Steak House Baked Potatoes

    Do you ever crave a good, fluffy baked potato like you get a expensive steakhouses? Now you can make them at home! They are super simple, easy and will impress
    Prep Time10 minutes mins
    Cook Time1 hour hr
    Total Time1 hour hr 10 minutes mins
    Course: Side Dish
    Cuisine: American
    Keyword: baked potatoes no foil, ruth's chris, salt crusted potatoes
    Servings: 6 potatoes
    Calories: 1218kcal
    Author: Heather Cheney

    Ingredients

    • 6 Russet Baker Potatoes
    • ¼ cup Vegetable Oil of Choice- I used olive
    • kosher salt
    • black pepper

    Instructions

    • Wash and dry each potato. Brush a layer of oil over the entire surface of each potato. Sprinkle salt and pepper over the top portion of each potato. Bake at 375 degrees for about an hour or until it pierces easily with a fork.

    Nutrition

    Serving: 1potato | Calories: 1218kcal | Carbohydrates: 158g | Protein: 32g | Fat: 55g | Saturated Fat: 7g | Sodium: 128mg | Potassium: 5278mg | Fiber: 31g | Vitamin C: 145.7mg | Calcium: 383mg | Iron: 41.7mg

    Creamy Cilantro Lime Dressing {Cafe Rio CopyCat}

    By Heather LAST UPDATED July 17, 2019 · FIRST PUBLISHED March 31, 2015, 1 Comment

    Creamy Cilantro Lime Dressing, just Like Cafe Rio! There are very few things I'd pour over my cereal, but this dressing is so good you'll want to put it on EVERYTHING!

    There are very few things in my fridge that I would pour on my cereal besides milk and this dressing is so good I might consider it.

    I'm kidding, that would be gross.

    All joking aside though, this is my ALL TIME FAVORITE dressing like, EVER. It was love at first bite some 13 years ago when I had my first Cafe Rio Salad and I've been smitten ever since. It's creamy, tangy, kicky, fresh and tastes good on just about everything. I will say that if you have an aversion to cilantro you should stay far, far away but if you're looking at a recipe for Cilantro Lime Dressing I'm going to guess that's not an issue for you.

    Creamy Cilantro Lime Dressing, just Like Cafe Rio! There are very few things I'd pour over my cereal, but this dressing is so good you'll want to put it on EVERYTHING!

    Top taco salads and nachos with it, dip quesadillas and taquitos in it or just drizzle over your favorite veggies and you've got something pretty darn good!

    Other Cilantro Ranch Recipes You Might Like

    Cilantro Lime Ranch Layered Salad

    Crockpot Chicken Ranch Tacos


    📖 Recipe

    Creamy Cilantro Lime Dressing, just Like Cafe Rio! There are very few things I'd pour over my cereal, but this dressing is so good you'll want to put it on EVERYTHING!
    Print Recipe
    4.50 from 2 votes

    Creamy Cilantro Lime Dressing {Cafe Rio CopyCat}

    This Cilantro ranch dressing is perfect for drizzling over taco salads, nachos, or just dunking veggies in. It's easy to make and has so much flavor! 
    Prep Time10 minutes mins
    Cook Time0 minutes mins
    Total Time10 minutes mins
    Course: Condiment
    Cuisine: American
    Keyword: copycat recipe, salad dressing, utah recipes
    Servings: 2 cups dressing
    Calories: 854kcal
    Author: Heather Cheney

    Ingredients

    • 1 ounce package Ranch Dressing Mix
    • 1 cup mayonnaise
    • ½ cup milk
    • 1 clove garlic
    • ¼ cup green salsa
    • Juice of 1 fresh lime
    • ½ cup fresh cilantro washed with tough stems removed
    • a few dashes Tobasco sauce until it reaches your desired heat

    Instructions

    • Combine all ingredients in a blender and process until smooth. Store in a covered container in the fridge for up to 2 weeks.

    Nutrition

    Serving: 1serving | Calories: 854kcal | Carbohydrates: 13g | Protein: 3g | Fat: 86g | Saturated Fat: 14g | Cholesterol: 53mg | Sodium: 2005mg | Potassium: 181mg | Sugar: 6g | Vitamin A: 620IU | Vitamin C: 2.6mg | Calcium: 78mg | Iron: 0.2mg

    Shaved Brussels Sprout Saute

    By Heather LAST UPDATED March 22, 2021 · FIRST PUBLISHED March 17, 2015, 25 Comments

    Don't like brussel sprouts? Think again! This saute will make a brussel believer out of you! Thinly slice the sprouts, saute in a little olive oil and finish with some lemon juice and parmesan cheese! They are so good you won't ever say you don't like brussel sprouts again!

    Happy St. Patrick's day! I figured I needed to do my blogging due diligence and at least post something green today. These might not be green velvet cupcakes topped with rainbows and gold coins that I hand sculpted out of white chocolate and hand-painted with leprechaun tears, but they're good. Plus, if you're looking for something like that you're at the wrong blog.

    Raise your hand if you've, at least once in your life, sworn to never eat brussels sprouts. I figure there will be a few sprout haters here and that's okay. Because if you're willing to give these shaved brussels sprouts a try, I bet you'll change your mind. No promises, but it's worth a shot, right?

    The difference comes from cutting the brussels sprouts into super-thin strips so you're not biting into a big hunk of bitter vegetable. We're then going to saute them in a little olive oil and salt and pepper until they are just slightly charred which adds a boatload of flavor. To get the sprouts cut thinly, I use this OXO Good Grips Hand-Held Mandoline Slicer that's inexpensive and works great. Any type of mandolin slicer will work as will an old fashioned knife, it will just take a bit of time.

    But we're not done yet! After they are cooked we'll squeeze some fresh lemon juice over the top to brighten them up a tad and stir in a handful of fresh parmesan cheese. They are tender and crisp and full of flavor! The natural bitterness of the sprouts is subdued by keeping the pieces small and caramelizing them just a bit and the lemon and cheese just bring it all home. So good!

    Don't like brussel sprouts? Think again! This saute will make a brussel believer out of you! Thinly slice the sprouts, saute in a little olive oil and finish with some lemon juice and parmesan cheese! They are so good you won't ever say you don't like brussel sprouts again!

    Have I convinced you to try these yet?

    Other Vegetable Recipes You Might Like

    Brown Butter Green Bean Amandine

    Garlic Balsamic Roasted Brussels Spouts

    Green Bean Casserole Redeux {Thanksgiving Blitz #5}

    Grilled Vegetable Salad

    Homemade Creamed Corn

    Or Check out all my Vegetable Side Dish Recipes Here

    📖 Recipe

    Don't like brussel sprouts? Think again! This saute will make a brussel believer out of you! Thinly slice the sprouts, saute in a little olive oil and finish with some lemon juice and parmesan cheese! They are so good you won't ever say you don't like brussel sprouts again!
    Print Recipe
    4.45 from 20 votes

    Shaved Brussels Sprout Saute

    Don't like brussels sprouts? Think again! This saute will make a brussel believer out of you! Thinly slice the sprouts, saute in a little olive oil and finish with some lemon juice and parmesan cheese! They are so good you won't ever say you don't like brussel sprouts again!
    Prep Time20 minutes mins
    Cook Time15 minutes mins
    Total Time35 minutes mins
    Course: Side Dish
    Cuisine: American
    Keyword: best brussels sprouts recipe, brussel sprouts, pan fried
    Servings: 4 servings
    Calories: 137kcal
    Author: Heather Cheney

    Ingredients

    • 1 pound brussel sprouts washed and thinly sliced
    • 2 tablespoon olive oil
    • ¼ teaspoon kosher salt
    • ⅛ teaspoon black pepper
    • 1- 2 tablespoon fresh lemon juice
    • ¼ cup fresh grated parmesan cheese.

    Instructions

    • Heat olive oil in a large skillet until screaming hot, but not yet smoking.
    • Add brussel sprouts to the pan, stirring every so often to cook evenly. Add salt and pepper and continue to cook until tender and some of the sprouts are slightly charred or darkly caramelized around the edges. Remove from heat.
    • Stir in lemon juice to taste and parmesan cheese. Serve immediately.

    Nutrition

    Serving: 1serving | Calories: 137kcal | Carbohydrates: 11g | Protein: 6g | Fat: 8g | Saturated Fat: 2g | Cholesterol: 4mg | Sodium: 274mg | Potassium: 452mg | Fiber: 4g | Sugar: 2g | Vitamin A: 905IU | Vitamin C: 100.7mg | Calcium: 122mg | Iron: 1.6mg

    Big Chewy Chocolate Chip Cookies

    By Heather LAST UPDATED July 17, 2019 · FIRST PUBLISHED March 10, 2015, Leave a Comment

    These big, fat, chewy chocolate chip cookies are my absolute favorite recipe for chocolate chip cookies. They take a little patience but are definitely worth it!Big Chewy Chocolate Chip Cookies just like you get at the bakery. Crisp around the edges, soft in the middle and filled with chocolate, these cookies are spectacular-- espcially with a big glass of milk! The secret is in letting the dough sit in the fridge overnight to let the flavor develop and become rich and buttery. Find more excellent recipes at Heather Likes Food .com! The one thing I was craving during these last 8 weeks of doing my weight-loss challenge was chewy chocolate chip cookies. I don't know why I've been so fixated on them, but I haven't been able to get them out of my head. So when my 8 weeks ended last Saturday, I quickly took up residence in my kitchen and whipped out a batch of these big, fat, chewy chocolate chip cookies.

    Big Chewy Chocolate Chip Cookies just like you get at the bakery. Crisp around the edges, soft in the middle and filled with chocolate, these cookies are spectacular-- espcially with a big glass of milk! The secret is in letting the dough sit in the fridge overnight to let the flavor develop and become rich and buttery. Find more excellent recipes at Heather Likes Food .com!

    This recipe is kind of a cocktail of a few recipes and I love the way the cookies turn out every time. I think they are most like the big cookies you find in bakery cases. They are chewy/soft in the middle and have a nice crisp outside that is rich and buttery.

    The secret to the richness lies in letting the dough sit overnight in the fridge to develop flavor. You can definitely bake them off right away but they will be thinner and not as deeply flavored. I know it's hard to wait, but it's so worth it!

    Big Chewy Chocolate Chip Cookies just like you get at the bakery. Crisp around the edges, soft in the middle and filled with chocolate, these cookies are spectacular-- espcially with a big glass of milk! The secret is in letting the dough sit in the fridge overnight to let the flavor develop and become rich and buttery. Find more excellent recipes at Heather Likes Food .com!

    Another thing that sets these chewy chocolate chip cookies apart is that I use two different kinds of chocolate chips to give it a little extra flavor boost. One half milk chocolate chips and one half mini semi-sweet chips are the perfect combination. I love having the big chunks of milk chocolate mixed with the tiny little semi-sweet bits throughout the whole cookie.

    Big Chewy Chocolate Chip Cookies just like you get at the bakery. Crisp around the edges, soft in the middle and filled with chocolate, these cookies are spectacular-- espcially with a big glass of milk! The secret is in letting the dough sit in the fridge overnight to let the flavor develop and become rich and buttery. Find more excellent recipes at Heather Likes Food .com!

    I Hope you'll try them!

    If you love chocolate chip cookies like I do, you'll love this Chocolate Chunk Pizookie Recipe, too!

    📖 Recipe

    Big Chewy Chocolate Chip Cookies just like you get at the bakery. Crisp around the edges, soft in the middle and filled with chocolate, these cookies are spectacular-- espcially with a big glass of milk! The secret is in letting the dough sit in the fridge overnight to let the flavor develop and become rich and buttery. Find more excellent recipes at Heather Likes Food .com!
    Print Recipe
    4.84 from 6 votes

    Big Chewy Chocolate Chip Cookies

    These big, fat chewy chocolate chip cookies are my absolute favorite recipe for chocolate chip cookies. They take a little bit of patience but are definitely worth it!
    Prep Time20 minutes mins
    Cook Time20 minutes mins
    Total Time8 hours hrs 40 minutes mins
    Course: Dessert
    Cuisine: American
    Keyword: bakery style cookies, best chocolate chip cookies, overnight cookie dough
    Servings: 24 big cookies
    Calories: 312kcal
    Author: Heather Cheney

    Ingredients

    • 3 ½ cup all-purpose flour
    • 1 teaspoon baking powder
    • 1 teaspoon baking soda
    • 1 teaspoon kosher salt
    • 1 cup salted butter softened
    • 2 cup brown sugar
    • 6 tablespoon white sugar
    • 2 whole eggs
    • 4 teaspoon vanilla extract
    • 1 cup milk chocolate chips
    • 1 cup mini semi sweet chocolate chips

    Instructions

    • Whisk together flour, baking powder, baking soda, and salt in a medium sized bowl. Set aside.
    • In a separate bowl, cream butter with the sugars until smooth. Add each egg individually, beating between each addition, then add vanilla.
    • Gradually add in flour mixture, mixing until just combined and no dry spots remain-- the dough will be stiff. Stir in chocolate chips.
    • Using a cookie scoop, portion dough into 2 tablespoon balls on a lined baking sheet and gently flatten. Cover with plastic wrap and refrigerate portioned dough overnight or for at least 8 hours.
    • Remove dough from fridge and bake in batches of 8 cookies on lined baking sheets at 300 degrees for 17-20 minutes or until the cookies are just golden around the edges.
    • Let cookies cool on baking sheet for at least 10 minutes before transferring as they continue to cook outside of the oven.
    • Store in an airtight container to keep soft and fresh.

    Nutrition

    Serving: 1cookie | Calories: 312kcal | Carbohydrates: 45g | Protein: 2g | Fat: 13g | Saturated Fat: 8g | Cholesterol: 22mg | Sodium: 221mg | Potassium: 118mg | Fiber: 1g | Sugar: 29g | Vitamin A: 260IU | Vitamin C: 0.1mg | Calcium: 42mg | Iron: 1.7mg

    Cauliflower Chowder

    By Heather LAST UPDATED March 22, 2021 · FIRST PUBLISHED February 27, 2015, 7 Comments

    This Cauliflower Chowder has all the richness of it's naughtier counterpart, potato chowder, without all the calories! It's low carb, creamy, rich, deliciousness. Cauliflower Chowder | heatherlikesfood.com

    Not to toot my own horn or anything, but doesn't this cauliflower chowder picture make you want to jump into the bowl and wallow in its goodness? I mean, I think I'm a pretty decent photographer of my food, but come on! That crispy bacon is calling to me.

    Heaaaatttthhhher. EAT ME.

    Eat. MEEEEEEEEE.

    I'll stop. But really, I love this soup. Er.. chowder. Maybe it's souper chowder? <--- see what i did there?  Hardy har.

    Have I mentioned my baby doesn't let me sleep at night?

    So I'm a big fan of cheesy potato soup and my recipe is one of my favorite, warming comfort foods. It has cream, and cheese, and potatoes and everything rich lovely in this world, but it's not so friendly on the derriere. So, I decided to take that recipe and try to make a lighter and possibly just as tasty version of that soup as I could. I needed it to be filling. I needed it to be rich and creamy. And I needed to taste much more naughty than it was.

    It turns out that it was all of those things and it rocked!

    So if you're in need of all those things I mentioned above and you can't afford the calories of my original recipe, try this. I don't think you'll be disappointed!  Plus you can totally justify topping it with bacon because the soup is packed with veggies and basically cancels it out. Basically.

    Cauliflower Chowder | heatherlikesfood.com

    Want more easy soup recipes?

    • Instant Pot Lentil Soup
    • Roasted Tomato, Corn and Zucchini Soup
    • Loaded Vegetable Diet Soup
    • Southwestern Corn and Potato Chowder

    📖 Recipe

    Cauliflower Chowder | heatherlikesfood.com
    Print Recipe
    4.88 from 94 votes

    Cauliflower Chowder

    This Cauliflower Chowder has all the richness of it's naughtier counterpart, potato chowder, without all the calories! It's low carb, creamy, rich, deliciousness. 
    Prep Time10 minutes mins
    Cook Time30 minutes mins
    Total Time40 minutes mins
    Course: Soup
    Cuisine: American
    Keyword: blender soup, creamy cauliflower, low carb soup
    Servings: 6 servings
    Calories: 98kcal
    Author: Heather Cheney

    Ingredients

    • 2 tablespoons salted butter
    • 2 cloves garlic minced
    • 1 whole medium onion chopped
    • 1 cup celery chopped
    • 1 cup carrots chopped
    • 1 whole medium head cauliflower roughly chopped
    • ½ teaspoon smoked paprika
    • ¼ teaspoon dried dill weed
    • ¼ teaspoon black pepper
    • ½ teaspoon kosher salt
    • ¼ cup all purpose flour
    • 4 cups chicken broth
    • 1 cup 2% or greater milk
    • cooked bacon and fresh chopped parsley for garnish

    Instructions

    • In a large soup pot, melt butter and saute the garlic, onion, celery, and carrots until just tender and onions are translucent and starting to caramelize.
    • Add cauliflower to the pan and cook stirring, until heated- about 2-3 minutes. Add paprika, dill, salt, pepper and flour to the veggies and cook while stirring for an additional 1 minute.
    • Slowly whisk in chicken and broth and milk and bring to a simmer. Continue stirring until slightly thickened and then cook at a gentle simmer for 15 minutes or until the cauliflower to very tender.
    • Transfer half of the soup into the blender, blend until smooth, and stir into the remaining soup-- this will thicken the soup and make it creamy. Serve immediately garnished with cooked bacon and fresh parsley.

    Nutrition

    Serving: 1serving | Calories: 98kcal | Carbohydrates: 9g | Protein: 2g | Fat: 5g | Saturated Fat: 3g | Cholesterol: 14mg | Sodium: 846mg | Potassium: 291mg | Fiber: 1g | Sugar: 3g | Vitamin A: 3905IU | Vitamin C: 13mg | Calcium: 71mg | Iron: 0.7mg

    Skillet Steak Fajita Salad with Avocado Cream Dressing

    By Heather LAST UPDATED March 18, 2021 · FIRST PUBLISHED February 24, 2015, 1 Comment

    You'll want to keep these Skillet Steak Fajita Salads on your radar for a quick, easy and healthy meal to whip up in no time!

     Skillet Steak Fajita Salad in Red Bowl with fork

    It's spring, the sun is shining (most of the time) and I'm so ready for warmer weather, so I'm making salad. Skillet Steak Fajita Salads, to be exact. I'm not going to count my eggs and get excited too quickly about the warm weather because, let's be honest, I live in Portland. But I'm getting restless. Do you watch Portlandia? This clip kind of sums it up in the most exaggerated way.

    Annnnywayy.

    **I was compensated by the BEEF COUNCIL for creating this recipe and sharing this post with you today. All thoughts and opinions are my own. **

    The sun means summer, and summer means salads and I have these Skillet Steak Fajita Salads on my radar to make all summer long. Last week I worked with the Beef Council to create a  healthy entertaining recipe using beef and then competed with 3 other bloggers in a recipe challenge. This salad was my creation and takes all the flavors of fajitas and turns them into a healthy, and filling salad.

    In addition to creating a recipe, I was able to sit in on a Webinar put on by the Beef Council and learned some pretty awesome things for when you're trying to figure out what meat to buy. So before I jump into the recipes, let's talk about what to look for when shopping for beef.

    Color of the Beef

    Did you know that the cherry red color of beef is caused by its exposure to oxygen? Most frequently, meat is sold in Styrofoam trays wrapped with plastic wrap and that packaging allows oxygen in and out and keeps the meat red. But as the meat has prolonged exposure to oxygen it actually loses that cherry red color and turns brown. So if you see a cut that is on a styrofoam tray that isn't bright red, it's likely not as fresh as those that are. It doesn't mean it's bad, just that you will need to make sure you get it cooked soon after purchasing so it doesn't spoil. Also, have you ever noticed that meat sold in vacuum packed packaging always looks a darker red/purple color? The darker color does NOT mean that the meat isn't fresh, just that it doesn't have oxygen getting to it causing it to turn red. Kind of crazy.

    Grade of the Beef

    Have you ever seen little stickers on packages of meat that say Prime, Choice, Or Select? These stickers indicate what grade the beef is. These grades basically indicate, to the best of their knowledge, how pleasant your eating experience will be. Prime is the highest grade followed by Choice and then Select. Choice and Select are probably what you'll see most of at your typical grocery stores as Prime is pretty hard to find outside of restaurants and specialty stores.

    But how are these grades determined?

    One word-- Marbling! You know those small veins of fat that you see in cuts of meat? That's marbling or intramuscular fat. This marbling keeps the meat moist while cooking and provides excellent flavor.

    Lots of marbling = delicious so the grades are determined on how much or little that particular beef has throughout its cuts. Make sense?

    Cut of The Beef

    As you probably know, each cut of beef has its preparation that makes it shine! Some cuts are tough right off the bat and turn to butter after cooking for a long period of time and others are tender and juicy after just a quick turn on the grill. It's important to get the right cut of beef for the right recipe and the beef council has made it super easy to figure out what you need with their Interactive Butcher Counter. It's super easy to use and will lead you to just what you're looking for!

    Screen Shot 02-24-15 at 10.53 AM

    Okay! Let's make this salad! I used Tri Tip steak with a quick marinade for the meat and quickly cooked it stir-fry style in a skillet along with some peppers and onions.

    Skillet Steak Fajita Salads in red bowl with fork and lime

    I then layered the cooked veggies and meat on top of crisp lettuce, grape tomatoes and a sprinkling of feta cheese for some zing. The dressing is an avocado-based dressing so it's creamy without being loaded with calories. All the ingredients for the dressing are just thrown into the blender until smooth and then drizzled over the salad.

    Yay for Skillet Steak Fajita Salads!

    Skillet Steak Fajita Salad in red bowl with slice of lime

    There's some serious yum that radiates from this salad.

    📖 Recipe

    Skillet Steak Fajita Salads | heatherlikesfood.com
    Print Recipe
    5 from 3 votes

    Skillet Steak Fajita Salads with Avocado Cream Dressing

    Skillet Steak Fajita Salads -- veggies, steak and a whole lot of salad. YUM! You can have dinner on the table in about half an hour with this recipe. 
    Prep Time10 minutes mins
    Cook Time20 minutes mins
    Total Time30 minutes mins
    Course: Salad
    Cuisine: Mexican
    Keyword: avocado salad dressing, dinner salad, tri tip salad
    Servings: 4 Servings
    Calories: 588kcal
    Author: Heather Cheney

    Ingredients

    • 2 pounds tri tip cut into bite-sized strips
    • ¼ cup fresh lime juice
    • 2 tablespoons soy sauce
    • 2 cloves garlic minced
    • ¾ teaspoons kosher salt
    • ¼ teaspoons black pepper
    • 1 whole green bell pepper cut into strips
    • 1 wholw red bell pepper cut into strips
    • ½ whole large sweet white onion cut into strips
    • 2 tablespoons extra virgin olive oil
    • 1 whole large head Romaine lettuce washed and roughly chopped
    • ½ cup grape tomatoes cut in half
    • ¼ cup feta cheese
    • Tortilla chips for garnish
    • 1 whole medium ripe avocado
    • ¼ cup fresh cilantro
    • 1 tablespoon fresh lime juice
    • 1 tablespoon white wine vinegar
    • ¼ cup milk
    • ¼ cup extra virgin olive oil
    • ¼ teaspoon kosher salt
    • Hot Sauce to taste

    Instructions

    • Place steak in a medium-sized bowl and toss with lime juice, soy sauce, garlic, ½ teaspoon kosher salt, and black pepper. Set aside and let marinade for 15 minutes.
    • Combine all dressing ingredients in a blender and blend until smooth. Season to taste.
    • Heat 1 tablespoon of olive oil in a skillet over medium-high heat and stir fry peppers and onions, seasoning with the remaining ¼ teaspoon of salt. Cook until just tender and the onions start to caramelize- about 4 minutes. Transfer to a bowl and set aside.
    • Heat remaining 1 tablespoon of oil in the same skillet, add steak and stir fry for 2 minutes for medium or until it reaches your desired done-ness. Remove from heat.
    • Assemble salads with a base of romaine lettuce and top with the steak, vegetables, halved grape tomatoes, feta cheese, and drizzle with the dressing. Garnish with tortilla chips and additional lime wedges if desired.

    Nutrition

    Serving: 1salad | Calories: 588kcal | Carbohydrates: 4g | Protein: 49g | Fat: 40g | Saturated Fat: 10g | Cholesterol: 157mg | Sodium: 1318mg | Potassium: 829mg | Sugar: 2g | Vitamin A: 310IU | Vitamin C: 9.2mg | Calcium: 121mg | Iron: 3.8mg

    • « Previous Page
    • 1
    • …
    • 6
    • 7
    • 8
    • 9
    • 10
    • …
    • 13
    • Next Page »
    Headshot of Heather in an apron

    Hi, I'm Heather! Want to become a rockstar cook? I’m a former chef, caterer, and culinary arts school graduate that just wants to help you make some killer food! I truly believe that with a little know-how anyone can totally rock their kitchen. Stick around for ultimate recipes of your favorite foods, cooking tips, guides, and more!

    More about me →

    Popular Recipes

    • BBQ chicken cut on a cutting board with a bottle of bbq sauce
      The Best Super Moist Oven Baked BBQ Chicken
    • One Pan Sour Cream Chicken Enchilada Skillet
      One Pan Sour Cream Chicken Enchilada Skillet
    • Hawaiian Shoyu Chicken-- so flavorful you'll forget how easy it is to make! Filled with flavors of ginger, garlic and just a touch of red pepper.
      Hawaiian Shoyu Chicken
    • Sloppy Joe on a paper bag
      The Best Sloppy Joe Sauce
    • Coffee Cake In A Mug-- the perfect remedy for a sugar craving when you don't want to spend a lot of time or heat up the oven. #coffee #cake #microwave #mug
      Coffee Cake in a Cup
    • Baked Ricotta Chicken
      Baked Ricotta Chicken
    • Mom's Classic Meatloaf Recipe
    • Beef Teriyaki Stir Fry
    Email opt in image

    Cooking Method

    • Slow Cooker
    • Grilling

    Footer

    ↑ back to top

    About

    • Privacy Policy
    • Disclaimer

    Newsletter

    • Sign Up! for emails and updates

    Contact

    • About
    • Email
    • Work With Me

    As an Amazon Associate I earn from qualifying purchases. This site uses cookies and generates income via ads.

    Copyright © 2022 Heather Likes Food, LLC

    Rate This Recipe

    Your vote:


    A rating is required
    A name is required
    An email is required