• Active
  • Blog
  • Cart
  • Checkout
  • Cooking Crew Recipes
  • Cooking Crew!
  • Disclaimer
  • Library
  • Media Kit
  • My account
  • Nutrition and Food Safety Disclaimer
  • Opt Out of 5 Chef Secrets
  • Press
  • Privacy Policy and Copyright
  • Recipe Index
  • Refund and Returns Policy
  • RSS Email Subscription Confirmation
  • Shop
  • Subscribe
  • Ultimate Recipes for Becoming a Rockstar Cook!
  • Welcome to Heather Likes Food!
  • Work With Me
  • About Heather Cheney
  • Contact
menu icon
go to homepage
subscribe
search icon
Homepage link
  • Recipe Index
  • About
  • Contact
  • Shop
    • Facebook
    • Instagram
    • Pinterest
    • YouTube
  • ×
    Home / Recipes

    Raspberry Oreo Fluff

    By Heather LAST UPDATED March 1, 2021 · FIRST PUBLISHED February 1, 2017, 1 Comment

    Is this Raspberry Oreo Fluff a salad? Is it a dessert? Let's just keep our bases covered and call it both. Because in a perfect world salads and desserts should be synonymous don't you think?  Raspberry Oreo Fluff! Is it a salad? Is it a dessert? Let's just keep our bases covered and call this both. Because in a perfect world salads and desserts should be synonymous don't you think?

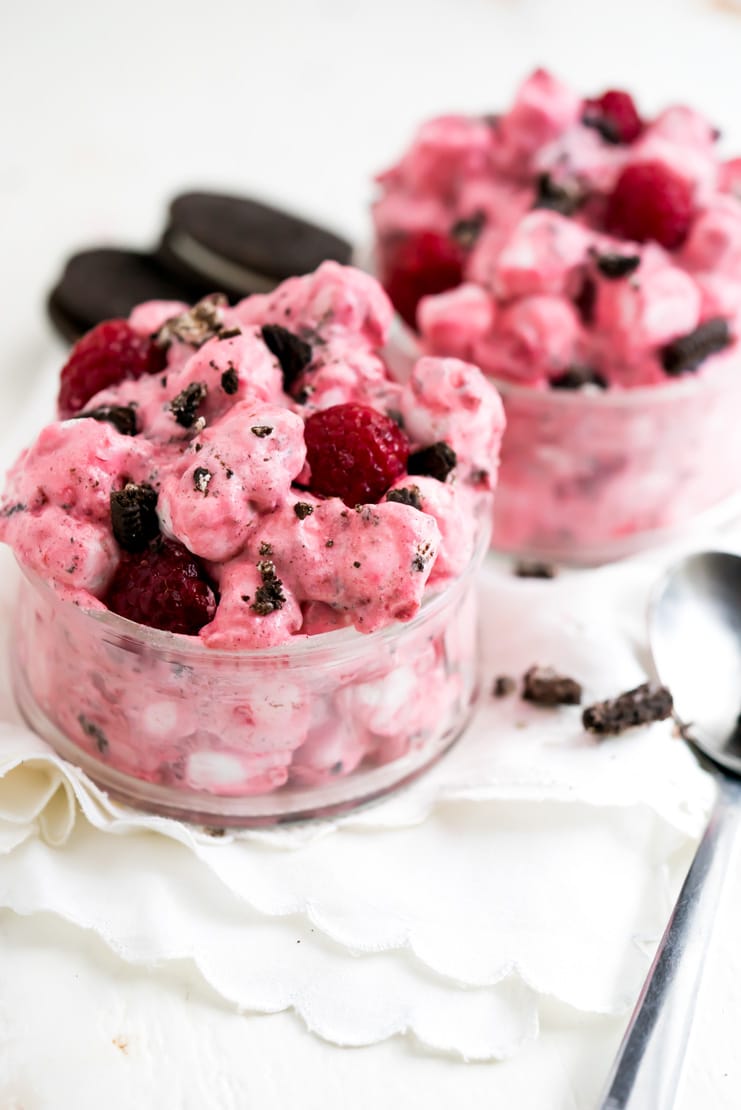
    Are you ready for this Raspberry Oreo Fluff? I've always loved my recipe for Cranberry Fluff Salad and it's become a holiday staple in our house. Well, that is until this last round of holidays when we bought the ingredients for it not once, but twice with hopes to make it for Thanksgiving and then again on Christmas. Both times we over estimated our ability to cook every.single.thing.we.want. and had to pass it by.

    [otw_shortcode_info_box border_style="bordered"]Be Sure to Sign Up For My Email! New Recipes Delivered Straight to You! [/otw_shortcode_info_box]

    It wasn't until I was going through my pantry last week when I realized I still had two big bags of marshmallows waiting for their inclusion in Cranberry fluff and realized I needed to help these marshmallows meet their fate. Except, it turns out that fresh cranberries are ridiculously hard to find in late January. Who knew?

    Raspberry Oreo Fluff! Is it a salad? Is it a dessert? Let's just keep our bases covered and call this both. Because in a perfect world salads and desserts should be synonymous don't you think?

    So, I decided raspberries needed to take center stage in place of the cranberries and that Oreos needed to find their way into the recipe too. Because, you know, Oreos.

    Raspberry Oreo Fluff! Is it a salad? Is it a dessert? Let's just keep our bases covered and call this both. Because in a perfect world salads and desserts should be synonymous don't you think?

    Pin This Recipe For Later

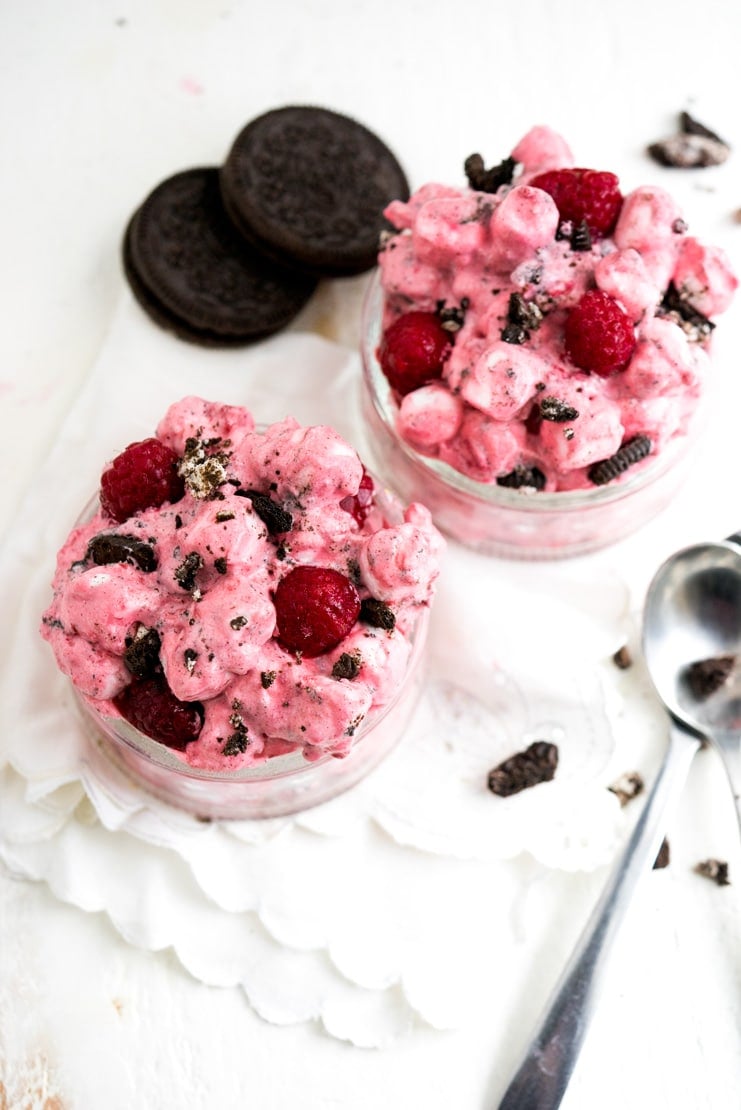
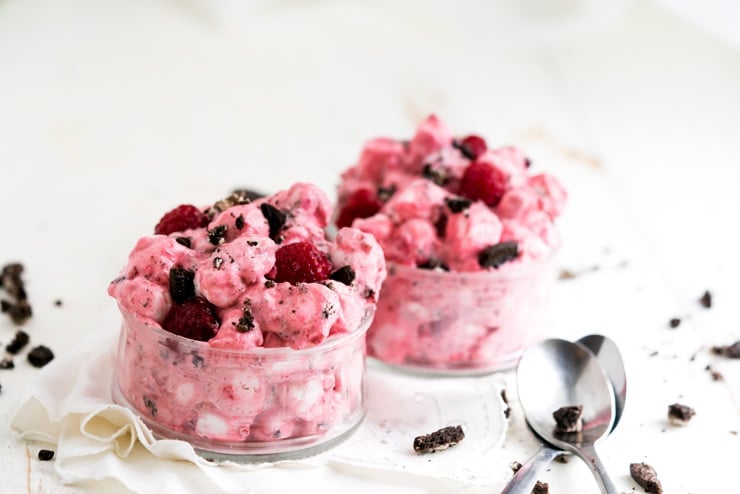
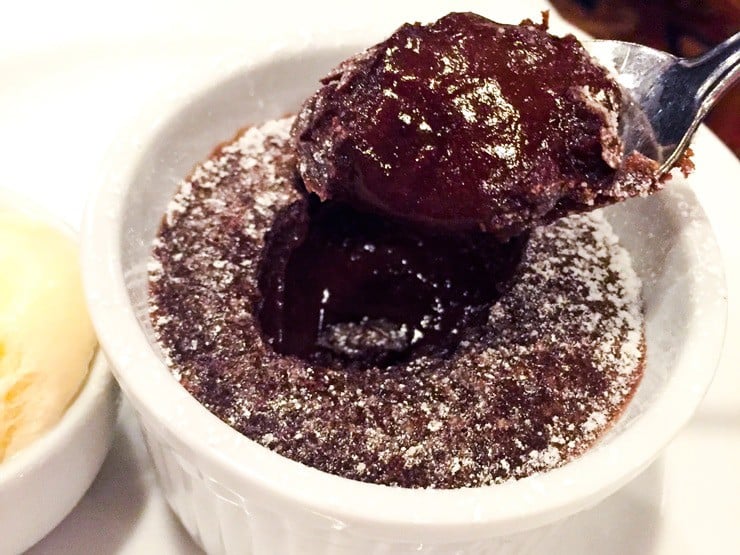
    Once I had this Raspberry Oreo Fluff all put together I realized what a pretty little fun treat this makes for Valentines Day! It's fruity, slightly tart, definitely fluffy and has hints of chocolate throughout.

    [otw_shortcode_info_box border_style="bordered" rounded_corners="rounded-10" background_pattern_url="https://heatherlikesfood.com/wp-content/uploads/2017/01/black-linen.png"]Be Sure to Sign Up For My Email  so you'll never miss a tasty morsel! [/otw_shortcode_info_box]

    📖 Recipe

    Raspberry Oreo Fluff Salad-- perfectly sweet and tart!
    Print Recipe
    4.82 from 11 votes

    Raspberry Oreo Fluff

    Is it a salad? Is it a dessert? Let's just keep our bases covered and call this Raspberry Oreo Fluff both. Because in a perfect world salads and desserts should be synonymous don't you think?
    Prep Time5 minutes mins
    Cook Time5 minutes mins
    Total Time10 minutes mins
    Course: Dessert
    Cuisine: American
    Keyword: dessert salad, oreo cookie recipe, thanksgiving side
    Servings: 10 servings
    Calories: 272kcal
    Author: Heather Cheney

    Ingredients

    • 12 ounces frozen raspberries thawed
    • 3 tablespoons sugar
    • 8 ounces container Cool Whip I used fat free or 2 cups cream whipped with 3 tablespoon sugar
    • 16 ounces bag mini marshmallows
    • 1 cup fresh raspberries
    • 10 Oreos chopped

    Instructions

    • Stir frozen, thawed raspberries with sugar until most of the shape of the raspberries dissappear. If needed you can microwave them slightly to soften. If raspberries are warm, place in fridge until chilled.
    • Stir ½ of the Cool whip into the raspberries until well combined and then gently fold the remaining cool whip into the raspberries.
    • Fold marshmallows, fresh raspberries, and Oreos into the raspberry mixture and mix until just combined.
    • Cover and refrigerate for at least 1 hour before serving to allow the marshmallows and Oreos to soften a bit.

    Nutrition

    Serving: 1serving | Calories: 272kcal | Carbohydrates: 60g | Protein: 2g | Fat: 3g | Saturated Fat: 1g | Cholesterol: 3mg | Sodium: 108mg | Potassium: 119mg | Fiber: 3g | Sugar: 40g | Vitamin A: 50IU | Vitamin C: 12mg | Calcium: 40mg | Iron: 1.5mg

    Sour Cream Chicken Enchiladas

    By Heather LAST UPDATED July 17, 2019 · FIRST PUBLISHED January 20, 2017, 8 Comments

    These Sour Cream Chicken Enchiladas are saucy, creamy, and the perfect way to use up that left-over shredded chicken! My recipe uses no cream soups and is just about as easy to make!  Sour Cream Chicken Enchiladas on a blue plate

    Sour Cream Chicken Enchiladas

    I'm sure most everybody has tried some variation of this recipe at least once, but I'm not sure that the ones you tried were as good as these! I grew up eating my Mom's version which I LOVE, but her recipe, like many, uses cream of chicken soup as a base for the sauce.

    Now I'm not proclaiming to be the picture-child of healthy eating, but sometimes I prefer to not have all my food come out of a can, just sayin'. Soo this is a revved-up version of a classic recipe that probably was found on the back of a Campbell's can at some point in history.

    Want to make green chile sour cream chicken enchiladas but don't want to go through the work of rolling up tortillas? I've got you. Try this Sour Cream Chicken Enchilada Skillet-- all the flavor without all the work! Or try this Easy Beef Enchilada Skillet or this Chicken Black Bean Enchilada Skillet-- same concept, different flavors.

    How to Make Sour Cream Chicken Enchiladas with Corn Tortillas

    Don't let the fact that the sauce is made from real ingredients scare you! Real food=Scary? Hmmm. Shouldn't it be the other way around?

    Anyway, it's simple and you can do it!  You're basically making your own cream of chicken soup.

    1. You'll start with a basic roux (Roux is fancy speak for equal parts fat and flour) and let it cook for a minute and then stir in some chicken broth.
    2. That's it, well kind of. You'll have to read the recipe to find out the rest!

    How to Cook Shredded Chicken for the Enchiladas

    The recipe calls for  2 cups cooked, shredded chicken breast. I always roast my chicken breasts in the oven when I need cooked chicken for a recipe as opposed to boiling, microwaving (don't eveeeeeeer do this-please?), or pan frying.

    Why? Because it's easy, almost mess-free ( I loathe cleaning boiled chicken pans) and makes the chicken moist and flavorful. Always season your chicken with salt and pepper before you put it into a recipe, it makes all the difference!

    Just preheat your oven to 375 degrees Fahrenheit and place boneless, skinless chicken breasts on a rimmed baking sheet. Season with salt and pepper, drizzle with olive oil and bake for 25-30 minutes or until cooked through. Chicken breast is done when an instant-read thermometer reads 165 degrees.

    Tips for Making the BEST Sour Cream Chicken Enchiladas

    • Season your chicken! There's nothing worse than biting into a saucy bite of enchilada to have the fillig be totally tasteless! Avert this possibility by seasoning your chicken well with salt and pepper before shredding and rolling into enchiladas.
    • Add more spice (if you like it spicy)-- as written, the recipe makes a very mild, creamy sauce. If you like your sour cream chicken enchiladas to have a little more pizzazz season accordingly with more chipotle chile powder, the addition of spicier green chiles or even the use of canned diced jalapenos.
    • Warm those tortillas! Corn tortillas don't like to bend without breaking unless they are very warm. I like to warm my tortillas in the microwave, wrapped in a dish towel. It usually takes about 60 seconds for a stack of 12 tortillas to get warm. I then leave them in the towel, taking one tortilla out at a time to keep them warm.
    Green Chile Sour Cream Chicken Enchiladas in glass casserole dish

    📖 Recipe

    Southwestern Potato and Corn Chowder | heatherlikesfood.com
    Print Recipe
    4.72 from 7 votes

    Sour Cream Chicken Enchiladas

    These Sour Cream Chicken Enchiladas are saucy, creamy, and the perfect way to use up that left-over shredded chicken! My recipe uses no cream soups and is just about as easy to make!  
    Prep Time25 minutes mins
    Cook Time25 minutes mins
    Total Time50 minutes mins
    Course: Main Course
    Cuisine: Mexican
    Keyword: Sour Cream Chicken Enchiladas
    Servings: 12 enchiladas
    Calories: 228kcal
    Author: Heather Cheney

    Ingredients

    • 12 corn tortillas
    • 2 cups chicken breast cooked and shredded
    • 2 cups Monterrey jack cheese grated
    • 3 tablespoons flour
    • 3 tablespoons butter
    • 2 cups chicken broth
    • 1 cup sour cream
    • 4 ounces canned diced green chiles
    • ⅛ teaspoon Chipotle Chili Powder -optional NOT the same as regular chili powder Adding this gives the sauce a little kick and a bit of smoky flavor
    • ½ teaspoon dried oregano

    Instructions

    • Preheat oven to 350° Fahrenheit
    • Combine the shredded chicken and 1 cup of Monterrey jack cheese in a small mixing bowl.
    • In a medium saucepan melt butter over medium heat and add flour. Stir to combine and let cook, stirring for 1 minute. Add in broth and whisk until it comes to a boil, is smooth and thickened. Remove from heat. Stir in sour cream, green chiles, chipotle chili powder and oregano.
    • In a 9×13" pan, spread about ½-¾ of a cup of the sauce across the bottom of the pan. 
    • Warm the corn tortillas in the microwave until they are pliable and don’t crack when rolled. 
    • Working one at a time, put a portion of the chicken and cheese mixture into the center of the tortilla and roll. Place in the pan and repeat until all the chicken and tortillas are gone. 
    • Pour the remainder of the sauce over the top of the enchiladas making sure that all edges are covered.
    •  Top with the remaining 1 cup of cheese and bake for 25 minutes or until the sauce is bubbly and then under the broiler for 1-3 minutes to brown the cheese and make it look delicious!

    Nutrition

    Serving: 1enchilada | Calories: 228kcal | Carbohydrates: 14g | Protein: 12g | Fat: 13g | Saturated Fat: 7g | Cholesterol: 50mg | Sodium: 362mg | Potassium: 225mg | Fiber: 1g | Vitamin A: 370IU | Vitamin C: 6.4mg | Calcium: 192mg | Iron: 0.9mg

    Bruschetta Chicken Bake

    By Heather LAST UPDATED April 9, 2018 · FIRST PUBLISHED January 19, 2017, Leave a Comment

    This Bruschetta Chicken Bake is a quick and easy weeknight meal that you can throw together in no time... even if you have no motivation to cook. Just do it!Bruschetta Chicken Bake in a ceramic dish

    Bruschetta Chicken Bake

    This is one of those meals that's easily put together even when you're in an all- I-want- to-do is-sit- on-my-rear-and-stuff-my-face-with-popcorn- and-watch-"Parenthood"  sort of mood.

    I have proof! See that picture up there? Yes,  I cooked even though that was the exact description of my feelings last night.  A saint? Maybe. The best mom/wife in the world? Of course.

    Motivated by the fact that the chicken in the fridge was going to go bad if I didn't use it? Definitely.

    Like I said, this is super easy to assemble and it's likely that you already have most of the ingredients on-hand.  Cut up some chicken, grate some cheese, stir some stuffing mix, bake and you're done. A salad pairs nicely with this chicken bruschetta bake and it definitely got the approval of the kiddos. Enjoy!

    Want more Easy Chicken Dinner Recipes?

    • Skillet Honey Dijon Chicken Thighs
    • Sheet Pan Pesto Chicken and Veggies
    • Quick and Easy Teriyaki Chicken Big Bowl

    📖 Recipe

    Print Recipe
    5 from 2 votes

    Bruschetta Chicken Bake

    This Bruschetta Chicken Bake is a quick and easy weeknight meal that you can throw together in no time... even if you have no motivation to cook. Just do it!
    Prep Time10 minutes mins
    Cook Time30 minutes mins
    Total Time40 minutes mins
    Course: Main Course
    Cuisine: American
    Keyword: chicken breast, easy dinner, stove top stuffing
    Servings: 4 servings
    Calories: 1392kcal
    Author: Heather Cheney

    Ingredients

    • 14.5 ounces petite diced tomatoes
    • 1 package Stove-Top stuffing mix I used savory herb, but I imagine chicken would taste good too
    • ½ cup water
    • 2 cloves garlic minced
    • 2 large chicken breast halves
    • 1 teaspoon dried basil
    • 1 cup mozzarella cheese shredded
    • 2 ounces provolone shredded or cut into little rectangles if you have slices
    • ½ cup Parmesan Cheese shredded

    Instructions

    • Preheat oven to 400°
    • Cut the chicken breast into bite-sized pieces and place in a greased 9×13 pan. Sprinkle with salt, pepper and basil, and top with the mozzarella and provolone cheeses. In a separate bowl combine the dry stuffing mix with the water, UN-DRAINED can of tomatoes, and garlic. Mix well and pour on top of the chicken. Sprinkle the parmesan cheese on top of the stuffing mix and bake for 30 minutes or until the top is browned and chicken is cooked through.

    Nutrition

    Serving: 1serving | Calories: 1392kcal | Carbohydrates: 38g | Protein: 160g | Fat: 66g | Saturated Fat: 35g | Cholesterol: 450mg | Sodium: 3088mg | Potassium: 3086mg | Fiber: 8g | Sugar: 20g | Vitamin A: 2665IU | Vitamin C: 45.1mg | Calcium: 1782mg | Iron: 9.1mg

    Sourdough Breakfast Rolls

    By Heather LAST UPDATED March 22, 2021 · FIRST PUBLISHED January 13, 2017, 7 Comments

    These sourdough breakfast rolls are stuffed with eggs, cheese, and sausage and are the perfect make-ahead breakfast! Sausage and Egg Stuffed Sourdough Savory Breakfast Rolls

    These sourdough savory breakfast rolls make a great a great grab-n-go breakfast and also fare well at the dinner table.  I served them with sautéed asparagus the other night and it was a hit! They reheat beautifully in the microwave and you can even freeze them! If you're interested in other make-ahead breakfast recipes, this Sausage, Egg and Potato Breakfast Bake is always a hit as is my Blueberry Muffin French Toast Souffle!

    How to Make Breakfast Rolls

    I used sourdough rolls because they are denser than most regular dinner rolls which makes them good for soaking up the egg. Regular rolls will work just fine if they have a crusty outside that the egg won't seep out of as easily.Sourdough Rolls for Breakfast Rolls

    1. You'll need to hollow out them babies and make room for the breakfast roll filling. Be careful not to cut the tops to low or cut through the bottom or the filling will leak out.  After cutting circles out with a paring knife I had to use my finger to pick out some of the bread. They should look like cute little bread bowls when you're done. Sourdough rolls hollowed out to fill with egg for breakfast bread rolls

    2. Brown your sausage and drain off any fat. Let it cool a little bit before adding into the egg.

    crumbled sausage for breakfast rolls

    3. Mix your eggs and cream until well blended.

    Eggs and cream in a bowl for breakfast rolls

    4. Add in your cheese, onion, salt, pepper, and sausage.

    Egg mixture to go into savory breakfast rolls

    5. I used my large cookie scoop to measure the egg mix into the breakfast rolls.  I can never have enough scoops of different sizes in my kitchen, I use them ALL the time! And having so many different sizes makes me feel important.

    cookie scoop for breakfast rolls

    filled sourdough breakfast rolls

    6. Cover them up and let sit in the fridge for at least an hour so the rolls have time to soak up the egg. You could even make them overnight breakfast rolls and bake in the morning.  However you do it, you've got yourself some little bites of eggy, sausagey breakfast roll heaven in the end.

    Cooked and cut sourdough breakfast rollTips for Making the BEST Breakfast Rolls

    • Choose a Sturdy Roll-- Sourdough rolls work great for these because they are crusty and sturdy and hold their shape well. If you can find another roll that has those same qualities, use it!
    • Don't Overfill-- Do your best to not spill the egg mixture out of the breakfast bread rolls. A little bit of spillage won't be a bit deal, but your clean up will be much easier if you try to keep the bulk of it inside the roll.
    • Reheat Gently-- These rolls reheat really well, just make sure to do so gently in the microwave. Both eggs and bread reheat quickly in the microwave so heat in 10-second intervals until as hot as you'd like it.

    📖 Recipe

    Sausage and Egg Stuffed Sourdough Breakfast Rolls | heatherlikesfood.com
    Print Recipe
    5 from 4 votes

    Sourdough Breakfast Rolls

    These sourdough breakfast rolls are stuffed with eggs, cheese, and sausage and are the perfect make-ahead breakfast! 
    Prep Time25 minutes mins
    Cook Time25 minutes mins
    Total Time50 minutes mins
    Course: Breakfast
    Cuisine: American
    Keyword: Breakfast Rolls
    Servings: 12 rolls
    Calories: 203kcal
    Author: Heather Cheney

    Ingredients

    • 12 sourdough dinner rolls
    • 6 whole large eggs
    • ⅓ cup + 1 tablespoon heavy whipping cream
    • 6 ounces pork breakfast sausage
    • ½ cup sharp cheddar cheese grated
    • 2 green onions chopped
    • ¼ teaspoon kosher salt
    • a few grinds black pepper

    Instructions

    • Cut a small, deep circle in the tops of the rolls being careful not to pierce the bottom. Remove the cut circle and any more needed bread with your fingers until the roll looks like a mini bread bowl. 
    • Brown the sausage until slightly crisp and drain off any fat. Set aside until lightly cooled. 
    • Combine the eggs and heavy cream, whisking until well combined and smooth. Add the cheese, onion, salt, pepper, and sausage. 
    • With a measuring spoon or cookie scoop, evenly distribute the egg mixture between the cut rolls until it is all used. 
    • Cover the rolls with plastic wrap and refrigerate for at least an hour, up to overnight. 
    • Remove from fridge and bake in a preheated oven at 350° for 20-25 minutes or until a knife inserted into the middle of the roll comes out clean and the egg is set.

    Nutrition

    Serving: 1roll | Calories: 203kcal | Carbohydrates: 20g | Protein: 7g | Fat: 10g | Saturated Fat: 4g | Cholesterol: 26mg | Sodium: 396mg | Potassium: 99mg | Fiber: 1g | Vitamin A: 175IU | Vitamin C: 0.5mg | Calcium: 117mg | Iron: 1.7mg

    Baked Cheese Ball Dip and Grocery Shopping at Midnight

    By Heather LAST UPDATED September 12, 2019 · FIRST PUBLISHED December 19, 2016, Leave a Comment

    If you're a fan of the ever-so-famous cheese ball, you're not going to want to miss this baked cheese ball dip! It's just like your favorite cheese ball, all warmed up and ready for dunking your favorite bread or cracker. If you're a fan of the ever-so-famous cheese ball, you're not going to want to miss this baked cheese ball dip! It's just like your favorite cheese ball, all warmed up and ready for dunking your favorite bread or cracker. Also, I went grocery shopping in my pajamas and didn't get out of the car! Say what?! AD #groceryhero

    When I first got married, grocery shopping was fun and exciting. I loved leisurely roaming the aisles on my days off of work and school while meticulously planning our nightly dinners. I'd do my hair and put on something besides leggings. I'd push the cart and look longingly into the child seat imagining myself with my own happy baby to coo and caw at while I filled my cart with organic greens, greek yogurt, and lentils. I'd stop by the deli counter for a soft serve ice cream cone (you read that right) and legitimately ENJOY my time away. It was a break, a vacation really.

    Fast forward 12 years and 3 kids later, grocery shopping is a less than savory experience. I'm lucky if I can get out of there without opening a yet-to-be-purchased bag of goldfish/teddy Grahams/granola bars or a tantrum where the 2 yr old is mad because I'm BUYING chocolate chips and the cart isn't a swimming pool. Some days I'm pretty sure that donating a kidney might be easier.

    Sure, there are those sacred times that I get to go shopping without the kids, but even still, those trips are more akin to running a marathon with the hopes that I'll get to do something I actually enjoy afterwards-- like eating Chic-Fil-A by myself in my car-- before the kids are my responsibility again.

    This is a sponsored conversation written by me on behalf of the new Walmart Grocery Pick-up Service. All thoughts and opinions are my own

    So, when Walmart asked if I'd like to try their new Grocery Pick-Up Service I was aaaallllll over it. Shop at home and have the groceries brought out to my car for me?!?  Heck. to. the. YES.

    If you're a fan of the ever-so-famous cheese ball, you're not going to want to miss this baked cheese ball dip! It's just like your favorite cheese ball, all warmed up and ready for dunking your favorite bread or cracker. Also, I went grocery shopping in my pajamas and didn't get out of the car! Say what?! AD #groceryhero

    So, one glorious night last week I jumped online to https://walmart.com/grocery and started adding the groceries I needed to my cart. There's a $30 order minimum but this service is 100% free. I filled up my cart, checked out with my debit card, and scheduled a time to go pick up my groceries. If you order early enough there are usually same-day slots or you can schedule your pick-up up to 2 weeks out. In my case, I ordered late at night and was able to pick up the next morning.

    I received a call that my order was ready the next morning and headed for Walmart. Once there I followed the signs to the pick-up area, parked in a numbered parking space, and called the posted number letting them know I was there.

    If you're a fan of the ever-so-famous cheese ball, you're not going to want to miss this baked cheese ball dip! It's just like your favorite cheese ball, all warmed up and ready for dunking your favorite bread or cracker. Also, I went grocery shopping in my pajamas and didn't get out of the car! Say what?! AD #groceryhero

    And then within a few minutes, like some miracle descending from the side doors of the store, an angel dressed in blue wheeled a cart full of the groceries I had purchased the night before to my car and put them in my trunk.

    IT. WAS. AMAZING.

    I gave her a quick signature saying that I had received my groceries and that was it. So easy.

    A few if the items I ordered were out of stock so they offered replacements or refunded the money. The produce was fresh and everything was there!

    If you're a fan of the ever-so-famous cheese ball, you're not going to want to miss this baked cheese ball dip! It's just like your favorite cheese ball, all warmed up and ready for dunking your favorite bread or cracker. Also, I went grocery shopping in my pajamas and didn't get out of the car! Say what?! AD #groceryhero

    The 10 year old thought it was pretty cool, too.

    If you're a fan of the ever-so-famous cheese ball, you're not going to want to miss this baked cheese ball dip! It's just like your favorite cheese ball, all warmed up and ready for dunking your favorite bread or cracker. Also, I went grocery shopping in my pajamas and didn't get out of the car! Say what?! AD #groceryhero

    We were in and out of there in under 10 minutes and headed home to make this baked cheese ball dip and you should do the same!

    Head to https://walmart.com/grocery  and try it out! They're even offering $10 off your first order right now with the code "REALEASY".

    And then once you're home with your groceries, here's a little video for the step-by-step of this super scrumptious baked cheese ball dip.

    If you're a fan of the ever-so-famous cheese ball, you're not going to want to miss this baked cheese ball dip! It's just like your favorite cheese ball, all warmed up and ready for dunking your favorite bread or cracker. Also, I went grocery shopping in my pajamas and didn't get out of the car! Say what?! AD #groceryhero

    📖 Recipe

    Print Recipe
    No ratings yet

    Baked Cheese Ball Dip

    If you're a fan of the ever-so-famous cheese ball, you're not going to want to miss this dip! It's just like your favorite cheese ball, all warmed up and ready for dunking your favorite bread or cracker.
    Prep Time10 minutes mins
    Cook Time20 minutes mins
    Total Time30 minutes mins
    Course: Appetizer
    Cuisine: American
    Keyword: cheeseball recipe, holiday recipe, thanksgiving reicpe
    Servings: 6 servings
    Calories: 430kcal
    Author: Heather Cheney

    Ingredients

    • 16 ounces cream cheese softened
    • ½ red bell pepper roughly chopped
    • ¼ cup sliced pepperoncini drained
    • 1 teaspoon Worcestershire sauce
    • ½ teaspoon garlic salt
    • 1 ¼ cup cheddar cheese grated
    • ½ cup pepperjack cheese grated
    • ⅓ cup pecans chopped

    Instructions

    • Preheat oven to 400 degrees
    • Blend cream cheese in food processor or blender until smooth. Add red bell pepper, pepperoncini, Worcestershire sauce, and garlic salt. Blend until smooth.
    • Add ¾ C cheddar and all of the pepper jack to the cheese mixture and blend to smooth.
    • Spread mixture evenly into a small baking dish and top with remaining cheddar cheese and pecans. Bake for 20 minutes until bubbly and melted. Serve with crackers, bread or veggies.

    Nutrition

    Serving: 1serving | Calories: 430kcal | Carbohydrates: 5g | Protein: 13g | Fat: 40g | Saturated Fat: 21g | Cholesterol: 116mg | Sodium: 649mg | Potassium: 186mg | Sugar: 3g | Vitamin A: 1635IU | Vitamin C: 12.6mg | Calcium: 318mg | Iron: 0.8mg

    Triple Berry Coconut Oil Granola

    By Heather LAST UPDATED March 22, 2021 · FIRST PUBLISHED December 6, 2016, Leave a Comment

    This sweet, salty, crunchy, and chewy coconut oil granola is the perfect breakfast to keep you going strong through the holidays. It's filled with big flakes of unsweetened coconut flakes, oats, whole wheat flour, chia seeds, almonds and studded with sweet dried berries. This sweet, salty, crunchy, and chewy coconut oil granola is the perfect breakfast to keep you going strong through the holidays. It's filled with big flakes of unsweetened coconut flakes, oats, whole wheat flour, chia seeds, almonds and studded with sweet dried berries. #GracelandHoliday AD

    I've recently become obsessed with yogurt and granola breakfasts. I didn't always love granola and I didn't always love yogurt but the planets shifted (or something) and now I can't get enough! But here's the deal-- GOOD granola (not the kind with puffed rice and lots of fillers) is expensive. Like, kind of ridiculously expensive. How they can charge 5 dollars for a 12 oz bag of oats and nuts is beyond me. I mean really.

    *This post is sponsored by Graceland Fruit and their fabulous dried berries, all thoughts and opinions are my own!*

    So, I set out to make my own. I knew I wanted to use coconut oil and had my other list of ingredients that I knew I wanted in it-- one of those being these gorgeous dried berries from Graceland Fruit.  These dried berries are unlike any I've tried before. They are so soft, flavorful, and dare I say, juicy?  (left to right: Blueberries, Cranberries, Dark Sweet Cherries)

    This sweet, salty, crunchy, and chewy coconut oil granola is the perfect breakfast to keep you going strong through the holidays. It's filled with big flakes of unsweetened coconut flakes, oats, whole wheat flour, chia seeds, almonds and studded with sweet dried berries. #GracelandHoliday AD

    Especially their dried cranberries. THEY ARE WHOLE! Have you ever had a whole dried cranberry? I love tart things and these cranberries are my new crack. Not even kidding. I think I downed a whole bag in under 2 days.

    This sweet, salty, crunchy, and chewy coconut oil granola is the perfect breakfast to keep you going strong through the holidays. It's filled with big flakes of unsweetened coconut flakes, oats, whole wheat flour, chia seeds, almonds and studded with sweet dried berries. #GracelandHoliday AD

    Besides the berries, the thing that really makes this granola recipe special, in my opinion, is the addition of white whole wheat flour. It almost makes a "batter" with the coconut oil, honey, and maple syrup and makes it extra crunchy and flavorful.

    It would make a perfect gift spooned into mason jars tied with twine, too! When we're bombarded with fudge and baked goods during the holidays, I think a gift of coconut oil granola just might be a breath of fresh air.

    This sweet, salty, crunchy, and chewy coconut oil granola is the perfect breakfast to keep you going strong through the holidays. It's filled with big flakes of unsweetened coconut flakes, oats, whole wheat flour, chia seeds, almonds and studded with sweet dried berries. #GracelandHoliday AD

    ***Recipe note-- I don't like my coconut oil granola super sweet so the recipe written only uses 2 tablespoon each of honey and maple syrup. If you like yours sweeter, feel free to up those amounts. The only difference will be the amount granola clusters you get: the more honey or syrup you use = the stickier the mixture = the more baked clusters you'll have! Not a bad thing in my opinion...

    📖 Recipe

    This sweet, salty, crunchy, and chewy coconut oil granola is the perfect breakfast to keep you going strong through the holidays. It's filled with big flakes of unsweetened coconut, oat, whole wheat flour, chia seeds and almonds.
    Print Recipe
    5 from 2 votes

    Triple Berry Coconut Oil Granola

    This sweet, salty, crunchy, and chewy coconut oil granola is the perfect breakfast to keep you going strong through the holidays. It's filled with big flakes of unsweetened coconut flakes, oats, whole wheat flour, chia seeds, almonds and studded with sweet dried berries. 
    Prep Time15 minutes mins
    Cook Time1 hour hr
    Total Time1 hour hr 15 minutes mins
    Course: Breakfast
    Cuisine: American
    Keyword: dried berries, healthy breakfast, homemade granola bar
    Servings: 12 servings
    Calories: 319kcal
    Author: Heather Cheney

    Ingredients

    • 3 cups rolled oats
    • 1 cups sliced almonds
    • 1 cups unsweetened flaked coconut
    • ½ cups White Whole Wheat Flour
    • ¼ cups chia seeds
    • ½ teaspoon salt
    • 1 teaspoon cinnamon
    • ¾ cup coconut oil melted
    • 2 tablespoon honey
    • 2 tablespoon real maple syrup
    • ⅓ cup each Graceland dried Cranberries, blueberries, and cherries.

    Instructions

    • Preheat oven to 250 degrees.
    • Mix the oats, almonds, coconut, flour, chia seeds, salt and cinnamon together in a large bowl.
    • Whisk the coconut oil, honey, and maple syrup together and pour over the dry ingredients, mixing until moistened.
    • Spread the mixture onto a baking sheet in a thin layer (use two pans if needed).
    • Bake for one hour, stirring every 20 minutes. During the last 20 minutes of baking, stir in the dried berries. Remove from oven and let sit, undisturbed, as it cools to help it form clusters. Store in a covered container for up to a month-- I use an old oatmeal canister.

    Nutrition

    Serving: 1serving | Calories: 319kcal | Carbohydrates: 30g | Protein: 7g | Fat: 21g | Saturated Fat: 13g | Sodium: 102mg | Potassium: 277mg | Fiber: 7g | Sugar: 5g | Vitamin A: 15IU | Vitamin C: 0.2mg | Calcium: 72mg | Iron: 2.5mg


    Melting Croissant French Toast

    By Heather LAST UPDATED July 17, 2019 · FIRST PUBLISHED November 30, 2016, 17 Comments

    This isn't your regular french toast! The croissants bring this breakfast favorite to a whole new level. This croissant french toast is creamy, buttery, and practically melts in your mouth.This isn't your regular french toast! The croissants bring this breakfast favorite to a whole new level! It's creamy, and buttery, and practically melt in your mouth. Pair it with a SmithfieldBaconBar and you've got one festive breakfast for the holidays!

    One of my favorite things about Christmas time is having the excuse to make fun breakfasts. I'm not usually a breakfast-maker because, well, waking up is hard. But when the kids are out of school, it's cold outside, and I have no place better to be than my cozy and warm kitchen, I breakfast and I breakfast hard.

    This is a sponsored post written on behalf of Smithfield

    This croissant french toast recipe is no more difficult to make than regular french toast but definitely has that "wow" factor. The buttery croissants somehow turn the egg and milk and cinnamon into a magic little pillows of love that dance merrily on your your tongue. You pair it with some bacon and you've got a pretty killer breakfast that is perfect for when you have company over.

    This isn't your regular french toast! The croissants bring this breakfast favorite to a whole new level! It's creamy, and buttery, and practically melt in your mouth. Pair it with a SmithfieldBaconBar and you've got one festive breakfast for the holidays!

    One way of kicking this breakfast up a few more notches is by creating a "Bacon Bar" to serve along side your croissant french toast! Smithfield has put together an entire website devoted to helping you create your very own Bacon Bar with recipes, printables and decor ideas.

    The Smithfield Bacon Bar gives you delicious bacon recipes to make with all the the Smithfield bacon varieties, like Peppered Brown Sugar, Sea Salt Caramel, and Caramelized Bourbon Bacon, paired with warm flakey biscuits, sweet jams, and more.

    Visit Smithfield.com/baconbar to see all of this awesomeness!

    This isn't your regular french toast! The croissants bring this breakfast favorite to a whole new level! It's creamy, and buttery, and practically melt in your mouth. Pair it with a SmithfieldBaconBar and you've got one festive breakfast for the holidays!

    I decided to go simple and pair the croissant french toast with Smithfield's "Hometown Original" bacon. They have 10 different varieties to choose from though and I haven't found one that I don't like. 😉 I especially like their cherrywood smoked bacon. SO good.

    There's just something about bacon in jars that makes me happy...

    You know what else makes me happy? FREE BACON!

    This isn't your regular french toast! The croissants bring this breakfast favorite to a whole new level! It's creamy, and buttery, and practically melt in your mouth. Pair it with a SmithfieldBaconBar and you've got one festive breakfast for the holidays!

    GIVEAWAY!

    So, do you want to win FREE BACON for a year? Thought so!

    To enter to win, visit Smithfield.com/BaconBar and check out the different recipes. Come back here and leave a comment letting me know what recipe you're most excited to try out.

    I'll randomly select one comment on December 7th to win a coupon book worth over $400 for BACON!

    This isn't your regular french toast! The croissants bring this breakfast favorite to a whole new level! It's creamy, and buttery, and practically melt in your mouth. Pair it with a SmithfieldBaconBar and you've got one festive breakfast for the holidays!

    This post was sponsored by Smithfield, all thoughts and opinions are my own.

    This isn't your regular french toast! The croissants bring this breakfast favorite to a whole new level! It's creamy, and buttery, and practically melt in your mouth. Pair it with a SmithfieldBaconBar and you've got one festive breakfast for the holidays!

    📖 Recipe

    This isn't your regular french toast! The croissants bring this breakfast favorite to a whole new level! It's creamy, and buttery, and practically melt in your mouth. Pair it with a SmithfieldBaconBar and you've got one festive breakfast for the holidays!
    Print Recipe
    4.58 from 7 votes

    Melting Croissant French Toast

    This isn't your regular french toast! The croissants bring this breakfast favorite to a whole new level. This croissant french toast is creamy, buttery, and practically melts in your mouth.
    Prep Time10 minutes mins
    Cook Time20 minutes mins
    Total Time30 minutes mins
    Course: Breakfast
    Cuisine: French
    Keyword: croissants instead of bread, day-old croissants, ultimate french toast
    Servings: 8 pieces
    Calories: 130kcal
    Author: Heather Cheney

    Ingredients

    • 4 1-day old croissants cut in half
    • 4 whole eggs
    • ¼ cup half and half
    • ½ teaspoon ground cinnamon
    • 2 teaspoon sugar
    • 1 pinch of salt
    • 1 splash of vanilla
    • butter

    Instructions

    • Heat a non-stick skillet over medium-low heat.
    • Combine eggs, half and half, cinnamon, sugar, salt and vanilla in a shallow bowl. Beat well until smooth.
    • Dip each croissant half in the egg batter, front and back and place on a plate.
    • Melt butter in the skillet and place dipped croissants in pan. Cook between medium and low heat until golden brown. Flip and repeat with the other side.
    • Serve with butter, syrup, and BACON! ?

    Nutrition

    Serving: 1piece | Calories: 130kcal | Carbohydrates: 14g | Protein: 2g | Fat: 6g | Saturated Fat: 3g | Cholesterol: 23mg | Sodium: 136mg | Potassium: 43mg | Sugar: 4g | Vitamin A: 240IU | Calcium: 18mg | Iron: 0.6mg

    Rich and Hearty Homemade Spaghetti Sauce

    By Heather LAST UPDATED March 1, 2021 · FIRST PUBLISHED November 10, 2016, 8 Comments

    Move that jarred stuff to the side and feast your food-loving eyes on this beaut. Homemade Spaghetti sauce is where it's at, folks. It takes a little bit of work, but it's WELL worth it in the end!  vHomemade Spaghetti Sauce

    This homemade spaghetti sauce recipe was originally posted in 2013 and I'm bringing it back to front of the blog with a brand new video! Woot woot!

    But first, let's get real for a minute.

    I've been at this blogging thing for a while now and quite frankly, I've been getting increasingly bored. Maybe you've picked up on it over the past few months as my posts are been few and far between and little gems like this post have surfaced. (BTW, make that recipe.) I've really struggled this year to find my stride here and muster up the motivation to create, photograph, and share recipes. It wasn't hard before-- It was fun. It was exciting, even. But now, not so much.

    Homemade Spaghetti Sauce

    Maybe it's because it's turned into a full-blown job. I didn't intend for this blog to ultimately make it possible for my husband to attend grad school and not have to work when I started this. It's absolutely incredible that this is what it's become and I feel so, so blessed that it did. I also feel like that fact alone should fuel my enthusiasm, but it doesn't.

    I've loved blogging. I really have, and honestly I still do. I love the freedom it gives me. I love the people I've met because of it. I love the things that I've learned. But I need a change. Not a shut-the-blog-down-change. I'd equate that to telling one of my children I'm not interested in being their mother anymore-- It's too sad to even entertain the idea. But a change, nonetheless.

    Enter YouTube.

    After many frustrating talks with the hubs about where I should go with the blog and what I should do next, we kept coming back to video. I never thought I'd jump on the YouTube wagon. I feel much more comfortable behind a keyboard and a screen than I do in front of a camera, vulnerable and performing.

    But you know what? It's kind of awesome. As I set up the shoot and my 10 year old played the role of "production assistant" and gave me the thumbs up or down and made me completely loose my train of thought while I was talking on camera, I realized how much fun I was having and that I needed to do it more.

    So yes, I'm only one video in and yes, it was a poop-ton of work-- like 10 times the amount of work a blog post takes! But I'm having fun and that excitement I had when I first started Heather Likes Food is coming back! yay.

    Looooooong story short, a lot of my energy is going to be focused on video now. I'll still be making a blog post for every video I make, but fully dedicated blog posts will be hit or miss for at least the next little while.

    I hope you'll come with me on this fun little adventure I'm going on and subscribe to my channel on YouTube. It's a little bit scary to put myself out there this way, but what's the worst that can happen? ... don't answer that. Ha!Homemade Spaghetti Sauce

    📖 Recipe

    Print Recipe
    4.72 from 14 votes

    Homemade Spaghetti Sauce

    Move that jarred stuff to the side and feast your food-loving eyes on this beaut. Homemade Spaghetti sauce is where it's at, folks. It takes a little bit of work, but it's WELL worth it in the end!  
    Prep Time10 minutes mins
    Cook Time1 hour hr 10 minutes mins
    Total Time1 hour hr 20 minutes mins
    Course: Main Course
    Cuisine: Italian
    Keyword: from scratch spaghetti sauce, no seasoning packet, sauce with sausage and hamburger
    Servings: 12 servings
    Calories: 360kcal
    Author: Heather Cheney

    Ingredients

    • 3 tablespoons olive oil
    • 2 cups onion chopped and divided
    • 1 red pepper coarsely chopped
    • 1 pound ground beef
    • 1 pound italian sausage
    • 5 cloves garlic finely chopped
    • 12 ounces tomato paste
    • 2 teaspoons kosher salt
    • 1 teaspoons black pepper
    • 3 teaspoons dried oregano
    • 3 teaspoons dried basil
    • 1 ½ teaspoons dried thyme
    • 1 pinch red pepper flakes
    • 28 ounces Italian-style stewed tomatoes
    • 28 ounces crushed tomatoes
    • 8 ouncecs fresh mushrooms sliced
    • 2 cups beef broth
    • ¼ cup brown sugar
    • 2 bay leaves
    • 2 tablespoons balsamic vinegar

    Instructions

    • Heat olive oil over medium high heat. Add ½ of the onions and saute until translucent and slightly browned. Add garlic and stir constantly for 1 minute. Add beef and sausage and cook until no red remains. Drain excess fat off of the cooked meat and return to the pan
    • Place the remaining onions and red pepper in a blender or food processor and blend until mostly smooth. Add mixture to the garlic, onions and beef and stir to combine, cooking for another minute. Add tomato paste and spices and cook for 1 minute, stirring until combined. Add tomatoes, beef broth, sugar and mushrooms. Stir until combined and add the bay leaves and balsamic vinegar.
    • Bring to a boil and then reduce to low and simmer for 1 hour up to 3-4. The longer it simmers, the more flavorful it will get. The sauce will seem watery at first, but as it simmers it will thicken.

    Nutrition

    Serving: 1serving | Calories: 360kcal | Carbohydrates: 23g | Protein: 15g | Fat: 23g | Saturated Fat: 7g | Cholesterol: 55mg | Sodium: 1299mg | Potassium: 924mg | Fiber: 4g | Sugar: 15g | Vitamin A: 1010IU | Vitamin C: 33.3mg | Calcium: 99mg | Iron: 4.6mg

    The Best 11 Things I Ate On My Carnival Cruise

    By Heather LAST UPDATED March 22, 2021 · FIRST PUBLISHED October 18, 2016, 2 Comments

    Here are the top 11 best things that I ate on my Carnival Cruise. You don't want to miss these on your next cruise!!and this at the end

    Going on a Carnival Cruise? Today I'm dishing on the top 11 things I ate on my carnival cruise this summer. I really shouldn't be writing this while hungry....

    Here are the top 11 best things that I ate on my Carnival Cruise. You don't want to miss these on your next cruise!!

    My sweet hubby gladly played the part of my "light bounce" all week on the ship while I took photos of the food we ate.  We'll just say that ship lighting isn't exactly ideal --especially at dinner time-- so keep that in mind as you scroll through the pictures. 

    It's been a few months, but I wanted to jump on and share with you some of the incredible things we ate while on our Carnival Cruise this last summer. We had such a blast on our cruise and we can't wait to sail again. I'm especially feeling like I want to run away and live life as an ocean drifter as I look through these pictures with the rain pounding outside my house.

    Take me away!

    If you've never been on a cruise you should know that there's A LOT of food. At any given time during the day or night you can just sit down for a meal, whether you're hungry or not. It's crazy, it's fun, and I kind of wanted to be rolled down the ramp alla Violet Beauregarde once we docked.

    Here are the top 11 best things that I ate on my Carnival Cruise. You don't want to miss these on your next cruise!!

    Nevertheless, it was worth it.

    So here, in no particular order, are my top picks from our Carnival Cruise.

    1. Cereal Crusted French Toast

    This is served in the dining room during breakfast and brunch and is so fun. I opted for the Frosted Flake version with Fruit Loops being an alternate option.

    Here are the top 11 best things that I ate on my Carnival Cruise. You don't want to miss these on your next cruise!!

    2. Chocolate Melting Cake

    It's like ooey-gooey molten crack. It's chocolatey and rich and served EVERY. SINGLE. NIGHT. at dinner. GET IT.

    Here are the top 11 best things that I ate on my Carnival Cruise. You don't want to miss these on your next cruise!!

    3. Popovers

    These scrumptious viddles about banished everything else I wanted to eat for Sunday Brunch from my belly because I couldn't stop eating them. Do you see how flaky, light and buttery these are?!

    Here are the top 11 best things that I ate on my Carnival Cruise. You don't want to miss these on your next cruise!!

    4. Fried Shrimp

    Admittedly, I'm not a huge shrimp person. *shocker* But, this shrimp was worth eating. Every crunchy, tender, juicy, flavorful bite.

    Here are the top 11 best things that I ate on my Carnival Cruise. You don't want to miss these on your next cruise!!

    5. Spinach and Sausage Pastries

    These were one of my absolute favorite finds on the ship. They were only served twice on the breakfast line in the casual dining hall and were kind of tucked behind some of the more "traditional" breakfast food. But, if you can find them you won't be sorry. They have the best spinach and sausage stuffing and the pastry it's wrapped up in is so flaky and buttery.

    Here are the top 11 best things that I ate on my Carnival Cruise. You don't want to miss these on your next cruise!!

    6. Strawberry Bisque

    This strawberry bisque is served at dinner as an appetizer but I could have had a bowl or 3 for dessert and been completely happy. It's a creamy and cool "soup" with hints of lime and mint, topped with finely diced strawberries.

    Here are the top 11 best things that I ate on my Carnival Cruise. You don't want to miss these on your next cruise!!

    7. Guys Burger Joint

    You can basically order anything from the burger bar and be happy. The burger below has a patty of bacon, yes BACON, nestled on top of the beef. I can't complain about a burger that gives me a bite of crispy bacon with EVERY bite. Can you?

    Here are the top 11 best things that I ate on my Carnival Cruise. You don't want to miss these on your next cruise!!

    8. Loaded French Fries

    This is technically not on the ship's "menu" but you can put it together at Guy's Burger Joint really easily. Once you get your burger, order some fries and ask really nicely if you can have some onion rings. The main dining hall serves regular onion rings, but Guy's has special spicy amazing ones that are supposed to go on the burgers. If the counter workers are feeling generous they might give you couple-- I only got resistance one time. Once you have your fries and onion rings take them over to the burger topping bar and load them up with peppers, caramelized onions, sautéed mushrooms, and sauces. You can even skip over to the taco topping bars and use the shredded cheeses and salsas there.  Best. Thing. Ever.

    Here are the top 11 best things that I ate on my Carnival Cruise. You don't want to miss these on your next cruise!!

    9. Beet Carpaccio Salad

    This beet salad blew me away. I'm already a huge fan of beets as it is, but this salad was spectacular. Thinly sliced beets, grapefruit, radish, arugula, blue cheese, capers, horseradish, shaved bread slices and a tangy aioli dressing. Not sure if it's something that will stay on the dinner menu long- term, but worth looking for!

    Here are the top 11 best things that I ate on my Carnival Cruise. You don't want to miss these on your next cruise!!

    10. Warm Apricot Date Cake with Vanilla Sauce

    The picture doesn't do this cake any justice whatsoever. It is a warm, lightly spiced cake with bits of apricot and date and when you pour the warm vanilla sauce over the top, it. is. to. die. for.

    Here are the top 11 best things that I ate on my Carnival Cruise. You don't want to miss these on your next cruise!!

    11. Pizza Pirate

    I really hate finishing this round up of delicious food with a picture of my foot, but I didn't get any other pictures of the pizza! I'm a pizza girl for life and there was just something about the pizza from Pizza Pirate that I loved. It could have been that it allowed me to wallow in my misery while I nursed my foot. But it's more likely that it's just good pizza.

    Carnival Inspiration Cruise

    Carnival hosted my husband and I on this cruise in exchange for this honest post. All thoughts and comments are my own! 

    Read more about our trip here...

    Why Getting Hurt On My Carnival Cruise Was The Best Thing Ever

    Carnival Inspiration Cruise

    What To Do In Ensenada Mexico

    What To Do In Ensenada Mexico


    Screaming Ghost Donuts

    By Heather LAST UPDATED November 5, 2019 · FIRST PUBLISHED October 12, 2016, 2 Comments

    These Screaming Ghost Donuts are the perfect easy dessert for a creepy party this halloween! They are so easy to make using refrigerated biscuit dough and are always a hit!

    Pin this to your Halloween Treat Board

    These Screaming Ghost Donuts are the perfect easy dessert for a creepy party this halloween! They are so easy to make using refrigerated biscuit dough and are always a hit!

    Aren't these fun? I'm so excited to share them with you today!

    They aren't rocket science. I mean, it's refrigerated biscuit dough after all. But I just think they're so. stinkin'. cute for a halloween party.

    I imagine these piled high on a big black platter with clouds of powdered sugar pushing over the platter's edge onto the table cloth. The powdery mess almost making them more spooky.

    I've been having a little bit of fun with video lately. I'm a great big newb when it comes to video editing so it takes me a ridiculously long time to make even a 30 second clip, but it's so fun when it's done.

    And just like a picture is worth a thousand words, a video is worth... a million? I dunno. Here's how to make them, nonetheless.

    The printable recipe is below as well. Enjoy, friends!
    [brid autoplay="true" video="484761" player="19763" title="Screaming Ghost Donuts" duration="46" description="Screaming Ghost Donuts" uploaddate="2019-10-30 15:19:49" thumbnailurl="https://cdn.brid.tv/live/partners/15101/thumb/484761_t_1572449018.png"]
    These Screaming Ghost Donuts are the perfect easy dessert for a creepy party this halloween! They are so easy to make using refrigerated biscuit dough and are always a hit!

    Pin This To Your Halloween Treat Board

    📖 Recipe

    These Screaming Ghost Donuts are the perfect easy dessert for a creepy party this halloween! They are so easy to make using refrigerated biscuit dough and are always a hit!
    Print Recipe
    4.92 from 12 votes

    Screaming Ghost Donuts

    These Screaming Ghost Donuts are the perfect easy dessert for a creepy party this halloween! They are so easy to make using refrigerated biscuit dough and are always a hit!
    Prep Time10 minutes mins
    Cook Time20 minutes mins
    Total Time30 minutes mins
    Course: Dessert
    Cuisine: American
    Keyword: easy donuts, halloween recipe, pillsbury biscuit dough
    Servings: 10 donuts
    Calories: 9kcal
    Author: Heather Cheney

    Ingredients

    • 1 tube refrigerated biscuit dough
    • oil for frying-- I use peanut
    • powdered sugar

    Instructions

    • Heat oil over medium heat to 350-375 degrees.
    • Roll each piece of dough into an oblong shape and cut 2 eyes and a mouth with small round cutters--I used the back ends of frosting tips.
    • Carefully lower each "ghost face" into the oil and fry until golden on each side.
    • Remove from oil and drain on paper or a rack. Once mostly cool, dust donuts with a liberal amount of powdered sugar

    Nutrition

    Serving: 1donut | Calories: 9kcal | Carbohydrates: 1g | Sodium: 25mg | Potassium: 6mg | Calcium: 1mg | Iron: 0.1mg
    These Screaming Ghost Donuts are the perfect easy dessert for a creepy party this halloween! They are so easy to make using refrigerated biscuit dough and are always a hit!

    Roasted Broccoli of Insanity

    By Heather LAST UPDATED March 22, 2021 · FIRST PUBLISHED September 28, 2016, 1 Comment

    Ready for the most incredible roasted broccoli and easiest dinner of your life? This broccoli lives up to its name and the chicken is so easy to make! Dinner will be done in under an hour with very little prep and you'll have many happy tummies around your dinner table, promise!  **Post Sponsored by Barber Foods**Ready for the most incredible roasted broccoli and easiest dinner of your life? This broccoli lives up to it's name and the chicken is so easy to make! Dinner will be done in under an hour with very little prep and you'll have many happy tummies around your dinner table! ** Post Sponsored by Barber Foods

    I know y'all are going to think I'm crazy for making a big deal about this broccoli, but you just wait.

    You'll see.

    One night you'll be rummaging through your vegetable drawer and find some forgotten broccoli. You'll remember this post and think "I guess I'll make that broccoli Heather raved about." Only you'll really just start making it because you have a big bag of broccoli that's on its way out and you don't want to be a wasteful person.

    You don't REALLY want to eat broccoli tonight.

    I mean, who really likes broccoli, right?

    Ready for the most incredible roasted broccoli and easiest dinner of your life? This broccoli lives up to it's name and the chicken is so easy to make! Dinner will be done in under an hour with very little prep and you'll have many happy tummies around your dinner table! ** Post Sponsored by Barber Foods

    You'll go through the steps and pop the pan of tiny green trees into the oven, unprepared for what awaits.

    Maybe you'll make something to go along with the broccoli. Because, really, it's BROC-OH-LEE.

    You can't eat just broccoli.
    Ready for the most incredible roasted broccoli and easiest dinner of your life? This broccoli lives up to it's name and the chicken is so easy to make! Dinner will be done in under an hour with very little prep and you'll have many happy tummies around your dinner table! ** Post Sponsored by Barber Foods

    But you're tired and hungry really don't feel like cooking. You already got conned into making roasted broccoli, after all.

    You'll head for the freezer.

    You'll find a little box (or two) of neatly wrapped stuffed raw chicken breasts. Ah-ha! Exactly what you were in the mood for, AND they don't take any work!

    You'll pull the broccoli out of the oven and the chicken will swiftly takes its place on the hot metal rack. The broccoli still crackling and sizzling on the hot baking sheet. You'll reach for the lemon as directed in the recipe, give it a gentle squeeze and guide it over the vegetable.

    Ready for the most incredible roasted broccoli and easiest dinner of your life? This broccoli lives up to it's name and the chicken is so easy to make! Dinner will be done in under an hour with very little prep and you'll have many happy tummies around your dinner table! ** Post Sponsored by Barber Foods

    You'll sprinkle parmesan over the top and realize you now have to wait for the chicken to cook...

    Ready for the most incredible roasted broccoli and easiest dinner of your life? This broccoli lives up to it's name and the chicken is so easy to make! Dinner will be done in under an hour with very little prep and you'll have many happy tummies around your dinner table! ** Post Sponsored by Barber Foods

    ...Alright, I'm done with the dramatics.

    But, if you're anything like me, the moral of the story is: THERE WILL BE NO BROCCOLI LEFT WHEN THE CHICKEN IS FINISHED COOKING.

    That is all.

    Now, for this stuffed chicken from Barber Foods! You guys, these things are good. Like, really good.

    I don't make a lot of frozen meals, but these chicken breasts are one frozen food that my whole family enjoys. And I enjoy that I don't have to do any prep for them! We like #BarberNight.

    They're found in the freezer section, and at my local Fred Meyer are tucked in between the frozen burgers and fish.

    Ready for the most incredible roasted broccoli and easiest dinner of your life? This broccoli lives up to it's name and the chicken is so easy to make! Dinner will be done in under an hour with very little prep and you'll have many happy tummies around your dinner table! ** Post Sponsored by Barber Foods

    If only all my kids could be this enthusiastic about grocery shopping...

    Ready for the most incredible roasted broccoli and easiest dinner of your life? This broccoli lives up to it's name and the chicken is so easy to make! Dinner will be done in under an hour with very little prep and you'll have many happy tummies around your dinner table! ** Post Sponsored by Barber Foods

    I love that the chicken breasts come raw and are crispy and juicy once cooked in the oven and don't taste super processed like your "typical" frozen entrees.

    Here is the Chicken Corden Bleu... (ham and cheese have my heart forever)

    Ready for the most incredible roasted broccoli and easiest dinner of your life? This broccoli lives up to it's name and the chicken is so easy to make! Dinner will be done in under an hour with very little prep and you'll have many happy tummies around your dinner table! ** Post Sponsored by Barber Foods

    ...and the broccoli and cheese stuffed variety. The crust is crisp, the chicken is tender and the fillings are super flavorful.

    Ready for the most incredible roasted broccoli and easiest dinner of your life? This broccoli lives up to it's name and the chicken is so easy to make! Dinner will be done in under an hour with very little prep and you'll have many happy tummies around your dinner table! ** Post Sponsored by Barber Foods

    So, if you're having an it's-4-o'clock-and-I-have-no-clue-what-we're-having-for-dinner-panic-attack, or a rummaging-through-the-vegetable-drawer-and-need-something-eat-besides-broccoli-night, these are your saving grace, guys. Just know that if you make the broccoli along side these, you're going to have to exercise some serious self-control until it's time time eat.

    You can do it!

    To find Barber Foods Stuffed Chicken Breasts in a store near you, use this locator.

    Ready for the most incredible roasted broccoli and easiest dinner of your life? This broccoli lives up to it's name and the chicken is so easy to make! Dinner will be done in under an hour with very little prep and you'll have many happy tummies around your dinner table! ** Post Sponsored by Barber Foods

    Click Here to Pin it to Your Quick Dinner Ideas Board

    📖 Recipe

    Ready for the most incredible roasted broccoli and easiest dinner of your life? This broccoli lives up to it's name and the chicken is so easy to make! Dinner will be done in under an hour with very little prep and you'll have many happy tummies around your dinner table! ** Post Sponsored by Barber Foods
    Print Recipe
    4.75 from 4 votes

    Roasted Broccoli of Insanity

    Ready for the most incredible roasted broccoli of your life? This broccoli lives up to it's name and is so easy to make!
    Prep Time10 minutes mins
    Cook Time45 minutes mins
    Total Time55 minutes mins
    Course: Side Dish
    Cuisine: American
    Keyword: crispy broccoli, fresh broccoli recipe, lemon parmesan broccoli
    Servings: 4 servings
    Calories: 263kcal
    Author: Heather Cheney

    Ingredients

    • 3-4 lbs fresh broccoli florettes
    • ¼ C olive oil
    • 1 teaspoon kosher salt
    • ¼ teaspoon black pepper
    • ½ lemon juiced, about 2 tbsp
    • ¼ C parmesan cheese finely grated

    Instructions

    • Preheat oven to 425 degrees.
    • Spread broccoli onto a rimmed baking sheet and drizzle with olive oil. Season with salt and pepper and toss until broccoli is evenly coated with oil.
    • Roast broccoli until it is crisp-tender and the ends start to brown-- about 45 minutes--  I like mine on the crispy side.
    • Remove from oven, squeeze lemon juice over the broccoli and top with parmesan cheese.
    • Serve hot.

    Nutrition

    Serving: 1serving | Calories: 263kcal | Carbohydrates: 24g | Protein: 11g | Fat: 16g | Saturated Fat: 3g | Cholesterol: 4mg | Sodium: 794mg | Potassium: 1093mg | Fiber: 9g | Sugar: 6g | Vitamin A: 2170IU | Vitamin C: 310.6mg | Calcium: 237mg | Iron: 2.7mg

    The Best Cheesy Garlic Bread

    By Heather LAST UPDATED November 5, 2019 · FIRST PUBLISHED September 21, 2016, Leave a Comment

    This is the best Cheesy Garlic Bread evurrrr.  You might shirk at one of the ingredients, but just give it a go! Buttery, tangy, garlicky, and so, so cheesy. THE BEST! The Best Cheesy Garlic Bread! You might shirk at one of the ingredients, but believe me, you're going to want to try this one! Buttery, tangy, garlicky, and so, so cheesy. THE BEST!

    Give me "G"

    "G!"

    Give me an "A"

    "A!"

    Give me an "R"

    R!"

    Give me an.... alright, you get the idea. I'm all about the garlic and there are somedays that I just want to shout my love for it from the rooftops!

    GAAAAAARRRRRRLLLIIIICCCCC, I LOOOOOOVVVEEEE YOOOOOUUUU!

    Too much?

    The Best Cheesy Garlic Bread! You might shirk at one of the ingredients, but believe me, you're going to want to try this one! Buttery, tangy, garlicky, and so, so cheesy. THE BEST!

    Well, if you fall somewhere on the garlic-loving spectrum and enjoy a piece (or 9) of garlic bread with your spaghetti, or soup, or bowl of ice cream (I won't judge), this recipe is for you.

    If you like cheese, this recipe is for you.

    If you like to eat uber delicious things and let yourself splurge on carb-ridden dairy bombs every once in a while, this recipe is definitely for you.

    The Best Cheesy Garlic Bread! You might shirk at one of the ingredients, but believe me, you're going to want to try this one! Buttery, tangy, garlicky, and so, so cheesy. THE BEST!

    And so, here is the recipe. It's not-so-shockingly similar to my Ultimate Garlic Bread recipe. But this one has cheese and it makes me happy. You could even up the ante and use roasted garlic in this recipe!
    [brid autoplay="true" video="484761" player="19763" title="Screaming Ghost Donuts" duration="46" description="Screaming Ghost Donuts" uploaddate="2019-10-30 15:19:49" thumbnailurl="https://cdn.brid.tv/live/partners/15101/thumb/484761_t_1572449018.png"]
    It's simple, it's easy, and yes, it has mayonnaise in it.

    Just go with it.

    Live a little, eat some mayonnaise. <-- new motto? I think yes.


    📖 Recipe

    The Best Cheesy Garlic Bread! You might shirk at one of the ingredients, but believe me, you're going to want to try this one! Buttery, tangy, garlicky, and so, so cheesy. THE BEST!
    Print Recipe
    4.75 from 27 votes

    Cheesy Garlic Bread

    The Best Cheesy Garlic Bread! You might shirk at one of the ingredients, but believe me, you're going to want to try this one! Buttery, tangy, garlicky, and so, so cheesy. THE BEST!
    Prep Time10 minutes mins
    Cook Time10 minutes mins
    Total Time20 minutes mins
    Course: Bread
    Cuisine: Italian
    Keyword: broiled garlic bread, garlic bread with mayonnaise, homemade garlic butter
    Servings: 16 pieces
    Calories: 115kcal
    Author: Heather Cheney

    Ingredients

    • ⅓ cup softened butter
    • ⅓ cup mayonnaise
    • ¼ cup parmesan cheese shredded
    • 3-4 cloves garlic minced
    • 1 whole loaf french bread cut lengthwise in half.
    • 2 cup mozzarella cheese shredded.
    • 2 teaspoon Italian seasoning

    Instructions

    • Preheat oven to 375.
    • Combine butter with mayonnaise, parmesan cheese, and garlic.
    • Lay bread on a baking sheet and spread butter mixture evenly over each half.
    • Top each half of the bread with mozzarella and Italian seasoning.
    • Bake for 10 minutes, then turn oven to broil and continue to cook until edges are golden and cheese is starting to brown.

    Nutrition

    Serving: 1slice | Calories: 115kcal | Protein: 3g | Fat: 10g | Saturated Fat: 5g | Cholesterol: 24mg | Sodium: 176mg | Potassium: 16mg | Vitamin A: 230IU | Vitamin C: 0.2mg | Calcium: 95mg | Iron: 0.2mg

    What To Do In Ensenada Mexico

    By Heather LAST UPDATED March 22, 2021 · FIRST PUBLISHED September 15, 2016, Leave a Comment

    Ever wonder what to do in Ensenada Mexico? I've got you covered! We had the best day there! 

    What To Do In Ensenada Mexico

    As part of our Carnival Cruise in July, we spent a day in Ensenada Mexico. This was the day after I fell and sprained my ankle on the cruel, cruel beach of Catalina Island. You can read more about what happened here. I was so nervous starting out the day because I really didn't know what was going to happen. We had a snorkeling trip booked but I was still limping quite a bit and wasn't sure I'd be able to even walk down the rocky beach, let alone swim and use flippers.

    What To Do In Ensenada Mexico

    We decided to go anyway and I'm SO glad we did.

    What To Do In Ensenada Mexico
    View from the van as we climbed a dirt road to the cove.

    We booked our snorkeling trip with a company called Baja Blue Diver. They aren't listed an on-shore excursion through Carnival but after doing some digging on Trip Advisor and reading the reviews, we went with them.

    BEST. DECISION. EVER.

    I'm not getting paid to promote them and they didn't give us a complimentary trip for this blog post. We paid for our trip like anybody else and I'd pay it over and over again!

    The day we went snorkeling with Diego, the owner of Baja Blue Diver, was our favorite day of our entire trip. We still grin thinking about it. It blew us away that out of the 2000 people on that cruise ship, we were the ONLY ones that got the pleasure of going snorkeling with them!

    Diego and his buddy Jorge picked us up close to the Cruise terminal and took us on a drive through Ensenada, into the country, and up many bumpy dirt roads to get to where we were snorkeling: Arbolitos Cove.

    What To Do In Ensenada Mexico
    First time in a wet suit for me! So hard to get on!

    These pictures really don't do the cove justice. The water was so clear and warm and we had it all to ourselves!

    It took me a few minutes to get down on the rocky beach with my hurt ankle but as soon as I got into the water it felt fine! I was so relieved that I'd be able to snorkel!

    Diego and Jorge were the greatest teachers and really let us take our time and explore. They are both excellent divers (Diego was a rescue diver when The Walking Dead was filmed there) and they know their sea life.  I'm a big wuss when it comes to water sports even when I'm not hurt, and I felt calm and safe the entire time. We were out in the water for about 2 ½ hours and it just flew by. So fun!

    What To Do In Ensenada Mexico

    LUNCH TIME!

    As part of our trip they took us to have the best fish tacos known to man. No joke.

    What To Do In Ensenada Mexico

    Fish Tacos Lupita sits on the side of the road and is an open air stand. The fish and shrimp is fried right at the counter! The fish is actually Mako shark and is so tender and flavorful!

    What To Do In Ensenada Mexico

    All of the sauces, salsas and veggies are right there too.

    What To Do In Ensenada Mexico

    They applauded us for being Americans that knew how to each fish tacos the right way. 🙂 Apparently they've taken many people here that eat the tacos plain. Who does that?

    What To Do In Ensenada Mexico

    What To Do In Ensenada Mexico

    Thanks so much to Diego and Jorge for making our trip memorable. They were kind, hospitable, funny and we had the best time. If you're ever wondering what to do in Ensenada Mexico and want to try out snorkeling or scuba diving, I can't recommend Baja Blue Diver enough!

    Sheet Pan Pesto Chicken and Veggies

    By Heather LAST UPDATED March 22, 2021 · FIRST PUBLISHED September 13, 2016, Leave a Comment

    Sheet Pan Pesto Chicken and Veggies-- it only takes one pan for this sheet pan supper! Chicken breasts, mini potatoes and bell peppers are topped with basil pesto and baked! So good and so, so easy! No dishes and No mess!

    You only need one pan for this sheet pan pesto chicken supper! Chicken breasts, mini potatoes and bell peppers are topped with basil pesto and baked! So good and so, so easy! No dishes and No mess! Sheet Pan Pesto Chicken and Veggies-- it only takes one pan for this sheet pan supper! Chicken breasts, mini potatoes and bell peppers are topped with basil pesto and baked! So good and so, so easy! No dishes and No mess!

    How many times have you thought to yourself, "Self, I'd really like to make dinner tonight, but I don't want to have to clean all the dishes afterwards?".

    For me, that's EVERY. SINGLE. NIGHT.

    If I were ever handed a magic lamp and a genie appeared and granted me a wish, you know what I would wish for? Well, besides retiring at 32, moving to paradise with my family and being independently wealthy where we spend our money traveling and helping those who need it...

    I'd wish that I would never have to wash another dish again. I HATE doing dishes.

    LOVE TO COOK.

    HATE DISHES.

    Wouldn't it be nice to have fun cooking all day and then just snap your fingers to clean the kitchen?

    Sheet Pan Pesto Chicken and Veggies-- it only takes one pan for this sheet pan supper! Chicken breasts, mini potatoes and bell peppers are topped with basil pesto and baked! So good and so, so easy! No dishes and No mess!

    Well, this recipe does take a few dishes, but not as many as normal recipes do.

    Sheet Pan Pesto Chicken and Veggies-- it only takes one pan for this sheet pan supper! Chicken breasts, mini potatoes and bell peppers are topped with basil pesto and baked! So good and so, so easy! No dishes and No mess!

    Sheet Pan Pesto Chicken and Veggies-- it only takes one pan for this sheet pan supper! Chicken breasts, mini potatoes and bell peppers are topped with basil pesto and baked! So good and so, so easy! No dishes and No mess!

    Sheet Pan Pesto Chicken and Veggies-- it only takes one pan for this sheet pan supper! Chicken breasts, mini potatoes and bell peppers are topped with basil pesto and baked! So good and so, so easy! No dishes and No mess!

    Sheet Pan Pesto Chicken and Veggies-- it only takes one pan for this sheet pan supper! Chicken breasts, mini potatoes and bell peppers are topped with basil pesto and baked! So good and so, so easy! No dishes and No mess!

    Sheet Pan Pesto Chicken and Veggies-- it only takes one pan for this sheet pan supper! Chicken breasts, mini potatoes and bell peppers are topped with basil pesto and baked! So good and so, so easy! No dishes and No mess!

    This sheet pan pesto chicken is a family favorite and while it does take an hour to cook, the total hands-on prep is under 10 minutes! 1 pan dirtied and only takes 10 minutes to put together? You can't beat that!

    📖 Recipe

    Sheet Pan Pesto Chicken and Veggies-- it only takes one pan for this sheet pan supper! Chicken breasts, mini potatoes and bell peppers are topped with basil pesto and baked! So good and so, so easy! No dishes and No mess!
    Print Recipe
    4.80 from 5 votes

    Sheet Pan Pesto Chicken and Veggies

    You only need one pan for this sheet pan supper! Chicken breasts, mini potatoes and bell peppers are topped with basil pesto and baked! So good and so, so easy! No dishes and No mess!
    Prep Time10 minutes mins
    Cook Time50 minutes mins
    Total Time1 hour hr
    Course: Main Course
    Cuisine: American
    Keyword: jarred pesto recipe, one pan meal
    Servings: 4 servings
    Calories: 351kcal
    Author: Heather Cheney

    Ingredients

    • 4 whole boneless skinless chicken breast halves
    • salt and pepper
    • 8 ounces prepared basil pesto
    • 1.5 pounds mini potatoes
    • 1 whole green bell pepper sliced
    • 1 whole red bell pepper sliced
    • ¼ teaspoon salt

    Instructions

    • Preheat oven to 400 degrees.
    • Spray sheet pan with cooking spray and arrange chicken breasts on pan. Season well with salt and pepper.
    • Spoon 1.5 tablespoons of pesto over each chicken breast and spread evenly.
    • Place potatoes and peppers in a large bowl and toss with remaining pesto and salt.
    • Arrange potatoes and peppers around the chicken. Bake for 35-50 minutes or until the chicken is cooked through and potatoes are tender. -- my chicken breasts were thin-cut so they cooked in about 35 minutes.

    Nutrition

    Serving: 1serving | Calories: 351kcal | Carbohydrates: 34g | Protein: 6g | Fat: 21g | Saturated Fat: 3g | Cholesterol: 5mg | Sodium: 686mg | Potassium: 716mg | Fiber: 4g | Sugar: 3g | Vitamin A: 1145IU | Vitamin C: 33.8mg | Calcium: 112mg | Iron: 1.7mg

    Want some other ONE PAN MEALS?

    One Pan Sour Cream Chicken Enchilada Skillet

    One Pan Sour Cream Chicken Enchilada Skillet

    One Pan Crack Bean Burritos

    One Pan Crack Bean Burritos

    Frozen Ravioli Lasagna Skillet In One Pan

    One Pan Frozen Ravioli Lasagna


    Why Getting Hurt on My First Carnival Cruise Was the Best Thing Ever

    By Heather LAST UPDATED July 17, 2019 · FIRST PUBLISHED August 10, 2016, Leave a Comment

    Why Getting Hurt On my Cruise Was the Best Thing Ever

    Carnival Inspiration Cruise

    Convo with the hubs:

    Hey, my mom said she'd watch the kids for us so we can go on vacation. Where do you want to go?

    Um, doesn't matter. No kids is enough of a vacation.

    Ooookay. Well, I'm going somewhere. You should come with me.

    Let's see where we can fly for the cheapest, book a flight and figure it out.

    And that's what we did! Where that single conversation landed us was so perfect and definitely just what we needed. Even if there were times that I didn't agree.

    We've been married for 12 years and it's been a VERY long time since we left the kids for more than a date night, so to say we were excited to get away for four nights is a slight understatement. We adore our kids, but if you're a parent I know you get it.

    Carnival Inspiration Cruise
    Our first night just before heading into the hot tub.

    We ended up taking a Carnival Cruise out of Long Beach California aboard the Carnival Inspiration.

    Carnival Inspiration Cruise

    We had never been on a cruise before and didn't know at all what to expect, except that we were free to play and dance and sit in the hot tub and eat pizza whenever we wanted.We knew if that's all the cruise was, we would be happy campers. Yes, we're seriously easy to please.

    Carnival Inspiration Cruise

    At the first night's show we volunteered to jump on stage and play a game. It turned out that we were "crowned" VIPs and had reserved front row seats to every show and got a back stage tour. Our plastic trophy will forever sit atop our mantle as a reminder. Ha! Nope.

    Carnival Inspiration Cruise
    Breakfast on the deck meant staring wars with the seagulls. They were ruthless.
    Carnival Inspiration Cruise
    This was basically me the whole trip and Ammon felt the need to document. Because, food blogger.

    Our first port of call was Catalina Island. We had planned on just wandering around and playing on the beach while there and didn't book anything beforehand. It's such a cute and colorful place.

    Carnival Inspiration Cruise

    Carnival Inspiration Cruise

    "Pier" Pressure

    Once were on the island and saw all the parasailing boats on the water we caved and booked ourselves a spot on a boat. We still had a few hours to kill though, and what do you do when you've basically had non-stop food in front of your face for the last 16 hours while on the boat? Eat more of it!

    Duh.

    Also, this is not the kind of "Eating It" I referenced in my post title. Keep reading!

    I'm going to be doing a full post on all our food favorites from the ship here soon, so stay tuned. 🙂

    Carnival Inspiration Cruise
    Incredible Chocolate, Coconut and Pistachio Ice Cream from Scoops Homemade Ice Cream. It was so creamy and full of flavor. The best part though, was definitely the waffle bowl.

    Carnival Inspiration Cruise

    This guy was a definitely highlight from the island. His name is Django and if he needed a new home I would have scooped him up and taken him in a heartbeat even if it meant smuggling him into my stateroom. He belongs to the owner of Island Toy Shop  and is quite the rock star on their Facebook Page. Such a sweetie.

    Carnival Inspiration Cruise

    We headed back to the pier, jumped on a boat for parasailing, and It. Was. So. Fun.

    Carnival Inspiration Cruise

    It was totally different than we thought it would be, though. It was smooth and much calmer than we had imagined. Regardless of how scared I look in the next picture.

    Carnival Inspiration Cruise

    Carnival Inspiration Cruise

    Carnival Inspiration Cruise

    They only get you wet if you want to so we asked for our toes to be dipped. It wasn't an exact science though. 😉 So fun.

    Carnival Inspiration Cruise

    Eating It

    After parasailing we had some time to spare before heading back on the boat so we thought we'd go swimming. I headed into the restroom to get changed and Ammon went straight to the beach and jumped in.

    Little did he know I would soon be coming down the stairs to the beach, take my last step onto the sand, roll my ankle and royally wipe out for all to witness.

    Carnival Inspiration Cruise

    I sat there on the rocky sand waiting for someone around me to at least say something to me, or even offer to help me up, but it was crickets.

    It's possible that my super white thunder thighs acted as a sort of kindness repellent, but I don't think so.

    I had successfully split my big toe and scraped the entire length of my shin on my left leg. My right ankle immediately swelled up with a giant knot looking sort of thing on the top of my foot and I suddenly got flashbacks of being 9 months pregnant.

    Convinced I had broken it, I quickly looked for Ammon in the water and eventually got his attention to come rescue me.

    Getting me back to the boat was more of an adventure for Ammon than it was for me, I'm sure. I just kind of sat there in shock knowing my vacation was ruined and I'd be confined to a chair on the boat while he was snorkeling and dancing and eating dinner with Hugh Jackman and Amy Poehler.

    I couldn't walk back to the tender boat so he found a wheel chair rental, got me to the boat, ran the rental back, and somehow made it on the boat before it took off for the cruise ship.

    Carnival Inspiration Cruise
    The pizza on this ship was crazy delicious

    Ammon spent that evening wheeling me around, watching me hobble, being my ice pack re-filler, bandaging up my cuts, listening to me complain, helping me in and out of the hot tub (because I was sure it was therapy for my ankle), and making me feel beautiful during fancy dinner that night even though I felt 3 times my age. Turns out when you're married to someone for 12 years they kind of like you no matter what.

    All was not lost for the fun I'd have on the cruise and I'll share day 3 and 4 here soon. But I think we (maybe just I) needed this experience whether I wanted it or not.

    Ammon is in grad school right now and is really busy. I'm really busy with the kids and work. We don't often have opportunities to really rely 100% on one another in our day to day lives.

    I didn't need this because I needed to lose all faith in humanity as I sat bleeding (barely) on the beach with no concern from others. But, because I had to rely fully on Ammon to help me. To remind me that he's my person. And I'll be forever grateful for that.

    Hugh and Amy ended up calling but Ammon declined their invitation to make eyes at me from across the hot tub.  He also didn't say a word when I requested a stop at the pizza place on the way to our stateroom.

    True Love.

    Carnival graciously hosted us aboard the Inspiration in exchange for my honest experiences here on the blog. All thoughts and opinions here are my own! 

    Quick and Easy Terriyaki Chicken Big Bowl

    By Heather LAST UPDATED March 22, 2021 · FIRST PUBLISHED July 21, 2016, 2 Comments

    There's so much yum happening in this teriyaki chicken big bowl. Sticky, sweet chicken, hot broth, veggies and tender slurp-able noodles. So good and easy!Teriyaki Chicken Big Bowl

    There's so much yum happening in this teriyaki chicken big bowl. The combination of sticky, sweet chicken, hot broth, veggies and tender, slurp-able noodles is almost too much to handle. Good thing it's easy to make!Teriyaki Chicken Big Bowl

    I'm having a day.

    It's not a day of great significance or anything.

    Just a day.

    A day where I sit and stare at this little blog of mine until I go cross-eyed, trying to figure out where I want this to go. I've been at this for the past 5 years. FIVE years.

    Making recipes. Taking pictures. Writing blog posts. Repeat.

    And don't get me wrong, I love it. I really do. But the monotony of it is kind of creeping in on me.

    Teriyaki Chicken Big Bowl

    I'm no where near the "power bloggers" in stats or number of posts or brands that are waiting with baited breath to work with me.  But I'm not "small" either. I have a recipe that's been pinned 570,000 times. That's something. I'm going on a cruise next week with my husband because of this blog. That's something.

    I have you guys.

    You're devoted to trying my recipes. Emailing me questions. Letting me know you're there.

    Thank you for that!

    Teriyaki Chicken Big Bowl

    Maybe it's the summer lull that is getting to me. Maybe I'm a little burned out. Maybe I'm just going crazy because my 2 oldest kids have been gone this week at their grandparent's house and it's been eerily quiet here.

    Maybe.

    Teriyaki Chicken Big Bowl

    I don't know, but I need to figure it out. Can you help me? Ha!

    Teriyaki Chicken Big Bowl

    Pin it for Later

    Asking for help when I'm not really sure what I need help with is kind of a funny thing. But maybe you'll know.

    Probably not though, and that's okay.

    I'll figure it out.

    Maybe on my cruise next week I'll have an epiphany while laying on the warm Mexican beach.

    Ok. Who am I kidding, I'll be sleeping.

    But, if you want a really killer dinner that I haven't talked about AT ALL in this post for it, you need to try this teriyaki chicken big bowl! It's quick and easy to put together and my whole family loves it.

    So, until I figure it out. Let's go eat some ramen!

    📖 Recipe

    Teriyaki Chicken Big Bowl
    Print Recipe
    3.50 from 2 votes

    Teriyaki Chicken Big Bowl

    There's so much yum happening in this big pot. The combination of sticky, sweet chicken, hot broth, veggies and tender, slurp-able noodles is almost too much to handle. Good thing it's easy to make!
    Prep Time10 minutes mins
    Cook Time15 minutes mins
    Total Time25 minutes mins
    Course: Main Course
    Cuisine: Japanese
    Keyword: broiled chicken thighs, ramen noodles, teriyaki chicken thighs
    Servings: 4 servings
    Calories: 283kcal
    Author: Heather Cheney

    Ingredients

    • 6 whole boneless skinless chicken thighs
    • 8 ounce bottle teriyaki glaze and marinade
    • 2 tablespoons canola oil
    • 8 ounces white mushrooms sliced
    • 2 whole medium carrots julienned
    • 2 cloves garlic minced
    • ½ teaspoon salt
    • 6 cup chicken broth
    • 1 teaspoon Sriracha hot sauce or to taste
    • 2 teaspoon soy sauce
    • 1 whole medium zucchini cut into quarters then sliced
    • 6 ounces ramen noodles, throw away seasoning packet
    • 4 whole green onions sliced for garnish

    Instructions

    • Preheat oven to broil.
    • Arrange chicken thighs on a lined baking sheet and season well with salt and pepper. Cook chicken 5 inches under the broiler for 5 minutes. Open oven, slide chicken out and flip each piece over. Brush with teriyaki sauce and return to the oven for 3 minutes. Flip chicken once more, brush with sauce and return to oven for 3 more minutes or until cooked through and the sauce is bubbly and charred. Set aside.
    • In a large stock pot, heat oil over medium high heat and saute mushrooms with the carrot, garlic and salt until tender-- about 5 minutes. Pour chicken broth into pot followed by the Sriracha, soy sauce. Season to taste with the soy and Sriracha. Bring to a boil.
    • Add zucchini and ramen to the broth and cook 10 minutes or until the noodles and zucchini are tender. Remove from heat.
    • Slice cooked chicken and serve on top hot ramen and broth. Garnish with green onions if desired.

    Nutrition

    Serving: 1serving | Calories: 283kcal | Carbohydrates: 31g | Protein: 8g | Fat: 14g | Saturated Fat: 3g | Cholesterol: 1mg | Sodium: 2645mg | Potassium: 538mg | Fiber: 1g | Sugar: 1g | Vitamin A: 85IU | Vitamin C: 27.1mg | Calcium: 36mg | Iron: 2.8mg

    Easy Microwave Caramel Popcorn

    By Heather LAST UPDATED July 17, 2019 · FIRST PUBLISHED June 21, 2016, Leave a Comment

    Sweet microwave caramel popcorn--This is my absolute favorite way to make it! Easy Microwave Caramel Corn that cooks in 5 minutes!

    This microwave caramel popcorn recipe was originally published in June of 2010 and we still make it on the regular at my house! We love that it comes together quickly and my kiddos have a blast shaking the bag and dancing around the kitchen while doing so! It's the perfect dessert to get the whole family to help make!

    6/13/2010: This pregnancy has turned me into a  junk food junkie. It's bad. I'm usually not super tempted by candy and sweets. Ice cream and pie are my two normal weaknesses,  but this baby has turned me into a weakling for anything remotely sweet and/or just plain bad for me.  Little stinker!

    Easy Microwave Caramel Corn that cooks in 5 minutes!

    Anywho, the up-side to my dilemma is that I have an arguably legit excuse to make all the sweet things that are usually thwarted by pie and ice cream.

    I have 3 recipes for caramel popcorn that I love, but this microwave caramel popcorn one is by far the simplest and is fail-proof.  The result is a lightly coated popcorn that isn't too sweet, is crunchy, and won't stick in your teeth!  Nuts and dried fruit can easily be added in, and I'm seriously considering drizzling my next batch with some melted chocolate (think almonds, dried cranberries, and white chocolate). Any way you make it,  it's going to be good. Also, this is a great recipe to make with kids because they love to shake, shake, shake the bag!

    Easy Microwave Caramel Corn that cooks in 5 minutes!

    📖 Recipe

    Microwave Caramel Popcorn
    Print Recipe
    4.67 from 3 votes

    Microwave Caramel Popcorn

    Sweet microwave caramel popcorn--This is my absolute favorite way to make it! 
    Prep Time5 minutes mins
    Cook Time5 minutes mins
    Total Time10 minutes mins
    Course: Snack
    Cuisine: American
    Keyword: crunchy caramel corn, microwave caramel sauce, microwave dessert
    Servings: 6 servings
    Calories: 3409kcal
    Author: Heather Cheney

    Ingredients

    • 5 quarts popped popcorn- about 1 cup un-popped kernels
    • ½ cup Karo Syrup
    • 1 cup brown sugar
    • ½ cup butter
    • ½ teaspoon salt
    • ½ teaspoon baking soda
    • 1 teaspoon vanilla extract

    Instructions

    • Place your popped popcorn in a large brown paper grocery bag and set aside
    • In a medium-sized sauce pan combine butter, sugar, salt and Karo Syrup and bring to a boil. Boil for 2 minutes and remove from the heat. Stir in the vanilla and baking soda, stirring constantly. At this point, the addition of the baking soda will cause the caramel to bubble, lighten in color, and increase in volume so don’t worry and think that you messed up.
    • Immediately pour the caramel over the popcorn in the paper bag, fold over the top of the bag, and shake the bag vigorously for 30 seconds or so. Now, put the bag in the microwave and let it cook for 1 minute. Once finished, take it out and shake for another 30 seconds. Repeat putting it in the microwave and shaking 2 more times for a total of 3 minutes in the microwave. After the final shake, pour the popcorn out onto a baking sheet and allow to cool and become crunchy.

    Nutrition

    Serving: 1serving | Calories: 3409kcal | Carbohydrates: 672g | Protein: 102g | Fat: 51g | Saturated Fat: 14g | Cholesterol: 40mg | Sodium: 511mg | Potassium: 2643mg | Fiber: 114g | Sugar: 64g | Vitamin A: 2020IU | Calcium: 94mg | Iron: 25.4mg

    Impossibly Cheesy Homemade Mac and Cheese

    By Heather LAST UPDATED March 22, 2021 · FIRST PUBLISHED June 10, 2016, 3 Comments

    Warning: this Homemade Mac and Cheese is not a health food. Eat at your own, cheesy, creamy, delicious risk. You won't be sorry. Homemade Mac and Cheese


    I'm just gonna be frank here. This Mac and cheese is definitely not for the faint of heart. Is it impossibly cheesy, creamy, dreamy, and everything else you want a mac and cheese to be? YES. Definitely YES! Will it help you fit into your teeny tiny bikini this summer? NO. You're getting a big fat cheesy thumbs down on that one.

    Some things in life are just meant to be enjoyed as they were created. Sure, I could have some version of homemade mac and cheese with low fat milk, thickened with flour and added a little bit of cheese in, but is that REALLY mac and cheese? Immagonna say no.

    So before I start getting hate comments on how I'm slowly killing my family by letting them eat this, just look at this picture...

    Homemade Mac and Cheese

    You want to eat it, don't you?

    How about this one...

    Homemade Mac and Cheese

    Do you really want to live a life where you don't get to eat something this cheesy and incredible at least once? Twice? Three times?

    Here's the scoop on this mac. It's dang good. Like really good. Like you're going to want to lick your bowl clean when it's gone good. It's really easy too and is all made on the stovetop in just a few minutes!  Just follow the directions below and you'll be slurpin' done some noodles before you know it!

    Enjoy, friends!

    📖 Recipe

    Homemade Mac and Cheese
    Print Recipe
    4.25 from 4 votes

    Impossibly Cheesy Homemade Mac and Cheese

    Warning: this Homemade Mac and Cheese is not a health food. Eat at your own, cheesey, creamy, delicious risk. You won't be sorry.
    Prep Time15 minutes mins
    Cook Time10 minutes mins
    Total Time25 minutes mins
    Course: Side Dish
    Cuisine: American
    Keyword: indulgent mac and cheese, macaroni and cheese with cream
    Servings: 4 servings
    Calories: 613kcal
    Author: Heather Cheney

    Ingredients

    • 1 cup whipping cream
    • 1 cup + ¼ C sharp cheddar grated
    • 1 cup + ¼ C mozzarella cheese grated
    • ¼ teaspoon salt
    • ¼ teaspoon yellow mustard
    • pepper to taste
    • 8 ounces elbow macaroni

    Instructions

    • Cook macaroni according to package directions, drain and set aside.
    • In a medium-sized sauce pan, heat cream to a simmer and reduce heat to low. Stir 1 C of each cheese into the cream followed by the mustard and salt, stirring until cheese is fully melted. Remove from the heat and let rest for 2-3 minutes. You'll notice that the sauce will be thick and almost rubbery. This is the proteins in the cheese tightening up so just give it a rest for a few minutes to loosen things up and it will become creamy again.
    • After resting, season to taste with pepper and stir in cooked macaroni and remaining ¼ C of each cheese. Adding the cheese at the end will give it that little extra "cheese pull" with each bite and makes it so much fun to eat!

    Nutrition

    Serving: 1serving | Calories: 613kcal | Carbohydrates: 44g | Protein: 21g | Fat: 38g | Saturated Fat: 23g | Cholesterol: 133mg | Sodium: 525mg | Potassium: 220mg | Fiber: 1g | Sugar: 2g | Vitamin A: 1345IU | Vitamin C: 0.3mg | Calcium: 396mg | Iron: 1mg
    Homemade Mac and Cheeseand this at the end

    Easy Italian Baked Tilapia

    By Heather LAST UPDATED July 17, 2019 · FIRST PUBLISHED June 7, 2016, Leave a Comment

    Do you love fish but have some fish haters in the house? You might want to try this Italian Baked Tilapia recipe. It's fish, but not fishy tasting and it couldn't be any easier to put together. It had even my PICKIEST eater cleaning her plate! Italian Baked Tilapia

    I haven't always been a fish person. In fact, I never had a "real" piece of fish (fish sticks don't count) until I was in my 20's. Crazy, I know. My mom was raised on meat and potatoes and while my dad would clean and cook the fish that we caught the few times we went fishing, those small rainbow trout fillets were not on my radar when I knew there were burgers grilling over the fire.

    But, I've been cured!  When I started culinary school and the head chef told us on our first day that we needed to tell him right then if there was anything we wouldn't eat, I held my tongue. I knew it was my chance to try new things even if they were scary, I didn't speak up, and I held my peace with every bite of alligator, sweet breads, sealife, and the like.

    Italian Baked Tilapia

    This fish isn't rocket science. It isn't fussy and you won't find it on fancy restaurant menus but it's just what I need on a busy night when I'm tired of chicken or grilled cheese sandwiches, or soup, or, let's be honest, cereal. It take 4 ingredients-- fish, Italian dressing, olives, and tomatoes.

    It might not sound like much, but the combination of the baked and tender fish with flavor of the Italian dressing, charred tomatoes, and olives pretty much makes for a fun dance party in your mouth.

    Italian Baked Tilapia


    So, if you have a few in your household that need a little "curing" like I did by way of exposure therapy, this may be a good way to introduce them to fish. It's so flavorful, not fishy, and definitely needs to be on your MAKE NOW list!

    Italian Baked Tilapia

    📖 Recipe

    Italian Baked Tilapia
    Print Recipe
    5 from 6 votes

    Easy Italian Baked Tilapia

    Do you love fish but have some fish haters in the house? You might want to try this Italian Baked Tilapia recipe. It's fish, but not fishy tasting and it couldn't be any easier to put together. It had even my PICKIEST eater cleaning her plate!
    Prep Time10 minutes mins
    Cook Time10 minutes mins
    Total Time20 minutes mins
    Course: Main Course
    Cuisine: Italian
    Keyword: broiled tilapia, easy fish recipe, italian dresing recipe
    Servings: 4 servings
    Calories: 51kcal
    Author: Heather Cheney

    Ingredients

    • 4 whole tilapia fillets 6-8 ounces each
    • ¼ cup Italian Dressing I used Olive Garden's
    • ¼ cup sliced kalamata olives
    • ½ cup grape tomatoes halved
    • salt and pepper

    Instructions

    • Preheat oven to broil.
    • Spray a 9x13" baking pan with cooking spray and lay the fish across the bottom. Sprinkle each fillet with salt and pepper and pour the Italian dressing evenly over the fish followed by the tomatoes and olives.
    • Place fish under the broiler and cook for 8-10 minutes or until fish flakes easily in the center when turned with a fork and tomatoes are charred.

    Nutrition

    Serving: 1serving | Calories: 51kcal | Carbohydrates: 2g | Fat: 4g | Sodium: 278mg | Potassium: 56mg | Sugar: 2g | Vitamin A: 190IU | Vitamin C: 2.6mg | Calcium: 4mg | Iron: 0.1mg

    Easy Black Forrest Cake

    By Heather LAST UPDATED March 22, 2021 · FIRST PUBLISHED June 3, 2016, 6 Comments

    This easy black Forrest cake only takes 5 ingredients but I was really hoping I could make it with 2. I was all set to go and then I realized I needed to add more ingredients to make it killer. The result? Totally divine, not too sweet, and easy enough to throw together at the last minute!Easy Black Forrest Cake3


    2 ingredients. I was convinced I could make some version of this  easy black forrest cake with just 2 ingredients. People make apple spice cakes or pineapple angel cakes with just 2 ingredients so why couldn't I? I bet you've seen those cakes where stir together a can of apple pie filling and a spice cake mix pop it in the oven and you have cake (or something like unto it), right? So my original plan for this cake was to do just that-- 1 box of chocolate cake mix + 1 can of cherry pie filling = cake, or something like unto it. But I wasn't convinced.

    You see, I had never actually made one of those "magic" cakes before. And even though I'd seen a handful of videos on Facebook demonstrating how it's done, I didn't know how magical it would turn out and I wanted MAGIC to happen!

    And it did, in the form of my (almost) 2 year old.

    Easy Black Forrest Cake

    My 2 year old is kind of good at making messes. In the span of the last few months he's found his way into/onto many a cup boad, "supposedly" closed bathroom doors, fridges, pantries, sinks, and counters. He's smeared not-so-cheap night cream all over my bathroom counter, painted my bathtub with foundation, made a slip-n-slide of tapioca pearls on our kitchen floor, and has simultaneously bathed in a full gallon of milk and bag of brown sugar while standing on my dining room table. That one was sticky. But this same two year old made magic happen when I was about to experiment with this cake.

    He opened the fridge, pulled out an egg and while he was preparing this hopeless egg to meet it's maker, I was able to snatch it out of his grasp. It was then that I realized it was eggs! I needed eggs!

    Okay, so this might sound dramatic and kind of funny coming from somebody that writes recipes for a living, but the truth is that I was so caught up in making a "magic recipe" that I totally disregarded basic baking principles. So, I decided to throw my hopes for a magic cake out the window and just make it goooood.

    Easy Black Forrest Cake

    It turns out that I was still able to make it with minimal ingredients and keep it simple! The result is a SUPER moist cake using chocolate cake mix, a can of cherry pie filling and 3 eggs. Mix it up, pour it in the pan and bake! For the topping I used some sweetened whipping cream, jarred hot fudge and fresh cherries. It's such an easy cake to make without having it scream out that it's a cake mix. The cherries add a subtle sweet and sour flair and the whipped cream makes it light and creamy! So good, and so worth brining to the next potluck you attend!

    Easy Black Forrest Cake

    📖 Recipe

    Easy Black Forrest Cake
    Print Recipe
    3.67 from 3 votes

    Easy Black Forrest Cake

    This easy black forrest cake only takes 5 ingredients but I was really hoping I could make it with 2. I was all set to go and then I realized I needed to add more ingredients to make it killer. The result? Totally divine, not too sweet, and easy enough to throw together at the last minute!
    Prep Time10 minutes mins
    Cook Time35 minutes mins
    Total Time45 minutes mins
    Course: Dessert
    Cuisine: American
    Keyword: canned cherry pie filling, chocolate cake mix, easy dessert
    Servings: 16 servings
    Calories: 250kcal
    Author: Heather Cheney

    Ingredients

    • 15 ounces chocolate cake mix
    • 21 ounces cherry pie filling 1 can
    • 3 whole eggs
    • 2 cup whipping cream
    • 3 tablespoons sugar
    • hot fudge and cherries for garnish

    Instructions

    • Preheat oven to 350 degrees and spray a 9x13" pan with cooking spray.
    • Combine cake mix with cherries and eggs. Whisk together until no dry spot remain and most of the lumps (cake mix not cherries) are gone.
    • Pour into prepared pan, level, and bake for 30-35 minutes or until a toothpick inserted into the middle comes out clean or it springs back when you press the middle. Let cake cool completely.
    • Pour whipping cream into a bowl or electric mixer and whip until thickened and stiff peaks form.
    • Spread whipped cream over cooled cake and garnish with hot fudge sauce, more whipped cream and fresh cherries if desired.

    Nutrition

    Serving: 1serving | Calories: 250kcal | Carbohydrates: 36g | Protein: 2g | Fat: 11g | Saturated Fat: 6g | Cholesterol: 41mg | Sodium: 158mg | Potassium: 61mg | Sugar: 15g | Vitamin A: 515IU | Vitamin C: 1.5mg | Calcium: 38mg | Iron: 1.2mg

    One Pan Crack Bean Burritos

    By Heather LAST UPDATED March 22, 2021 · FIRST PUBLISHED May 24, 2016, 8 Comments

    If you're looking for a quick and easy meal, this is it! These One Pan Crack Bean Burritos are so creamy and flavorful that you won't be able to stop eating them!One Pan Crack Bean Burritos

    This recipe isn't exactly earth shattering in its complexity but it's pretty dang good.  The best part about it is how stinkin' simple it is! See those 5 ingredients in the pan below? That's all you need! You can also play with the flavors a little bit here and still get amazing results. Not a bean fan? Use cooked, shredded chicken instead! Want it a little spicier? Use the "regular" or "Spicy" varieties of Rotel. Want to ditch the whole burrito plan and ladle it over tortilla chips and cheese? You've got some killer nachos!

    One Pan Crack Bean Burritos4

    All you have to do is drain the beans and throw them into the skillet with the rest of of the ingredients-- taco seasoning, Rotel, and cream cheese. Heat, stirring until the cream cheese is melted and it's done! We eat ours wrapped up in tortillas topped with tomatoes, avocado, cilantro and sour cream.

    One Pan Crack Bean Burritos

    Note: I use the "mild" variety of Rotel because regular is too spicy for my kid's tastes so if you need things a little milder, you've been warned.

    So easy, delicious and the perfect thing to make when you have limited time and big, empty bellies to fill!

    Other Mexican Inspired Recipes You Might Like

    • Chile Colorado
    • Oven Pork Carnitas
    • Chipotle Guacamole
    • Baked Tacos
    • Easy Mexican Rice Recipe
    • Pozole Verde

    📖 Recipe

    One Pan Crack Bean Burritos
    Print Recipe
    4.58 from 152 votes

    One Pan Crack Bean Burritos

    If you're looking for a quick and easy meal, this is it! These One Pan Crack Bean Burritos are so creamy and flavorful that you won't be able to stop eating them!
    Prep Time10 minutes mins
    Cook Time10 minutes mins
    Total Time20 minutes mins
    Course: Main Course
    Cuisine: American
    Keyword: One pan dinner, quick weeknight dinner, vegetarian friendly
    Servings: 6 servings
    Calories: 332kcal
    Author: Heather Cheney

    Ingredients

    • 15 ounces black beans drained
    • 15 ounces pinto beans drained
    • 1 packet taco seasoning or ¼ cup
    • 8 ounces cream cheese
    • 10 ounces Rotel tomatoes or diced tomatoes with green chiles

    Instructions

    • Combine beans, seasoning, cream cheese and tomatoes in a large skillet. Heat over medium, stirring until cheese is melted and mixture is bubbling.
    • Remove from heat and spoon into tortillas with desired toppings.

    Nutrition

    Serving: 1serving | Calories: 332kcal | Carbohydrates: 38g | Protein: 15g | Fat: 13g | Saturated Fat: 7g | Cholesterol: 41mg | Sodium: 140mg | Potassium: 701mg | Fiber: 13g | Sugar: 2g | Vitamin A: 580IU | Vitamin C: 5mg | Calcium: 103mg | Iron: 3.6mg
    One Pan Crack Bean Burritos

    Sticky Sweet Chili Chicken

    By Heather LAST UPDATED March 22, 2021 · FIRST PUBLISHED May 20, 2016, 8 Comments

    Sweet and sticky, this sweet chili chicken is finger-lickin' good and only needs a few ingredients! Perfect served over rice with some veggies for a quick and easy dinner!Sticky Sweet Chili Chicken

    Are you guys ready for this chicken? I don't know if you are. It's so stinkin' easy but gives you the sweetest, stickiest, slightly spicy, charred chicken you can imagine.

    You'll start with some chicken thighs because the dark meat can hold up with all of the abuse we're going to put it through. 🙂 The thighs stay nice and moist and if we tried to get a char on chicken breast like this, we'd end up with dried out meat which is never good. Just season up each side with a little kosher salt.

    Sticky Sweet Chili Chicken

    And then you'll spread a layer of sweet chili sauce over each thigh. If you're not family with sweet chili sauce, I show a picture of it and where to find it in this post. After the sauce it gets a little drizzle of olive oil.

    Sticky Sweet Chili Chicken

    From here it goes straight into the oven for about 15-20 minutes and will look something like this. And now, this is where it gets FUN! Each thigh gets a little bit more sauce and then gets sprinkled with brown sugar a little bit more salt.

    Sticky Sweet Chili Chicken

    Turn the oven on to BROIL and place your oven rack just a few inches from the element. Slide the chicken into the oven and get ready to watch it bubble and char and get irresistibly sticky. It should only take 3 minutes or so, so watch it closely. Things can go downhill pretty quickly under the broiler if not watched like a hawk! Once it gets to charred to the point that you like, take it out.

    Sticky Sweet Chili Chicken

    If you used parchment paper to line your baking sheet it will start to burn and that's okay. I've yet to start a fire and I put it under the broiler all the time.

    Sticky Sweet Chili Chicken

    Doesn't this look good?!

    Sticky Sweet Chili Chicken

    The sweet chili chicken is moist and the sweet sticky sauce and bits on the baking sheet are just too yummy. If you try it out, let me know!

    Sticky Sweet Chili Chicken

    Other Chicken Recipes You Might Like

    • Chicken lo mein recipe
    • Pesto Parmesan Chicken
    • Easy Chicken Cacciatore
    • Smothered Chicken Breast
    • Honey Dijon Chicken Thighs
    • garlic chicken thighs
    • Ranch Chicken Marinade
    • Simple Grilled Chicken Recipe
    • Chicken Keto Soup
    • Wingers Sticky Fingers
    • Barbecue Chicken
    • Oven Fried Chicken Breast
    • Chicken Ricotta
    • Chicken Curry with Coconut Milk

    📖 Recipe

    Sticky Sweet Chili Chicken
    Print Recipe
    4.78 from 9 votes

    Sticky Sweet Chili Chicken

    Sweet and sticky, this chicken is finger-lickin' good and only needs a few ingredients! Perfect served over rice with some veggies for a quick and easy dinner!
    Prep Time10 minutes mins
    Cook Time20 minutes mins
    Total Time30 minutes mins
    Course: Main Course
    Cuisine: Thai
    Keyword: baked chicken thighs, Mae Ploy, sweet chili sauce
    Servings: 4 servings
    Calories: 464kcal
    Author: Heather Cheney

    Ingredients

    • 2 pounds boneless skinless chicken thighs
    • ½ teaspoon salt
    • ⅓- ½ cup sweet red chili sauce
    • 2 tablespoons olive oil
    • 2 tablespoons brown sugar
    • ¼ teaspoon salt

    Instructions

    • Preheat oven to 450 degrees.
    • Place chicken thighs on a lined baking sheet and season with salt on both sides.
    • Brush a layer of chili sauce over each piece of chicken and drizzle with olive oil.
    • Place chicken in oven and bake for 15-20 minutes or until chicken is just cooked through.
    • Remove chicken from oven and brush with another layer of sauce and sprinkle a teaspoon of brown sugar over the top of each thigh followed by another sprinkling of salt.
    • Turn oven onto BROIL
    • Return chicken to the oven and broil for 3-5 minutes or until the tops of the chicken are caramelized and starting to char. Make sure to watch carefully as it can go quickly.
    • Remove chicken from oven and serve hot.

    Nutrition

    Serving: 1serving | Calories: 464kcal | Carbohydrates: 32g | Protein: 44g | Fat: 16g | Saturated Fat: 3g | Cholesterol: 215mg | Sodium: 1170mg | Potassium: 555mg | Sugar: 31g | Vitamin A: 55IU | Calcium: 25mg | Iron: 1.8mg

    Best Healthy Chocolate Chip Banana Bread

    By Heather LAST UPDATED July 23, 2019 · FIRST PUBLISHED May 10, 2016, 2 Comments

    You guys, this Chocolate Chip Banana Bread is so moist and sweet, I so don't miss the butter or the sugar or white flour. It's actually healthy and it's AMAZING! You've got to try it!Healthy Chocolate Chip Banana Bread

    I've made this recipe more times than I'd like to admit over the past few months. And really, I don't know why I wouldn't want to admit it. It's not like I'm eating the whole loaf by myself or anything because my kids definitely wouldn't let that happen. And besides, eating this bread is basically like eating a salad. It's got coconut oil (salad dressing), bananas (vegetables), whole wheat flour (croutons), and a handful of other not-so-bad-for-you ingredients. It's sweetened with a little bit of real maple syrup and those mini chocolate chips? Well, we'll just call those the sunflower seeds on our salad.

    Healthy Chocolate Chip Banana Bread

    But before you run to your kitchen and make this, which I hope you do, let's talk about flour for a minute. This recipe uses WHITE Whole Wheat flour and using it will make all the difference. It's a milder whole wheat flour and I talk about it in this post for Super Fluffy Whole Wheat Pancakes if you're interested in learning more. For the record, those pancakes are pretty killer too!

    If you try this Chocolate Chip Banana Bread, let me know what you think!

    📖 Recipe

    Healthy Chocolate Chip Banana Bread
    Print Recipe
    5 from 7 votes

    Best Healthy Chocolate Chip Banana Bread

    You guys, this banana bread is so moist and sweet, I so don't miss the butter or the sugar or white flour. It's actually healthy and it's AMAZING! You've got to try it!
    Prep Time20 minutes mins
    Cook Time55 minutes mins
    Total Time1 hour hr 15 minutes mins
    Course: Bread
    Cuisine: American
    Keyword: healthy banana bread, mini chocolate chips, white whole wheat flour
    Servings: 8 servomgs
    Calories: 309kcal
    Author: Heather Cheney

    Ingredients

    • ⅓ cup coconut oil melted
    • ⅓ cup real maple syrup
    • 2 eggs room temperature
    • 1 cup mashed ripe bananas about 2 large, 3 small
    • ¼ cup milk room temperature
    • 1 teaspoon vanilla extract
    • 1 teaspoon baking soda
    • ½ teaspoon salt
    • 1 ¾ cups WHITE whole wheat flour
    • ½ cups mini semi sweet chocolate chips

    Instructions

    • Preaheat oven to 325 degrees and greast a 9x5" loaf pan.
    • Whisk the coconut oil with the maple syrup, eggs, mashed bananas and milk. If the eggs and milk aren't room temperature they'll make the coconut oil harden and you'll have a lumpy batter that won't mix as well. I just run the eggs under some hot water for a minute and toss the milk into the microwave for a few seconds before putting them into the batter.
    • Sprinkle the baking soda and salt over the top of the wet ingredients and stir the flour in just until no dry spots remain. The more you mix it, the less tender it will be!
    • Gently fold the chocolate chips into the batter and pour into your greased loaf pan.
    • Bake 55-60 minutes or until a toothpick inserted into the middle comes out clean. Allow bread to cook in the loaf pan for about 10 minutes and then transfer to a wire rack to cool completely. Alternately, you can cut it while piping hot and enjoy some super messy, chocolatey banana bliss! Your call. ?

    Nutrition

    Serving: 1serving | Calories: 309kcal | Carbohydrates: 35g | Protein: 6g | Fat: 16g | Saturated Fat: 11g | Cholesterol: 42mg | Sodium: 303mg | Potassium: 168mg | Fiber: 3g | Sugar: 13g | Vitamin A: 80IU | Calcium: 56mg | Iron: 1.7mg


    Healthy Chocolate Chip Banana Bread

    Chicken Black Bean Enchilada Skillet

    By Heather LAST UPDATED March 22, 2021 · FIRST PUBLISHED May 2, 2016, 1 Comment

    Simple, zippy, and quick! This one pan chicken and black bean enchilada skillet will appease even the pickiest of eaters with ALL. THAT. CHEESE. Chicken Black Bean Enchilada Skillet

    You might wonder if I make anything besides enchilada skillets anymore because I think this makes the 3rd variation on the site. I've got this one and this one and now this chicken and black bean one. And if you were to ask me if I make anything else, the answer to that question would be yes, I do make dinners that are, in fact, not enchilada skillets. But the fact is that I'm a hot mess when dinnertime comes around 97.8% of the time. I usually don't have dinner planned out and I'm usually scrambling to figure out what to make.

    Enter the enchilada skillet.

    Chicken Black Bean Enchilada Skillet

    Chicken Black Bean Enchilada Skillet

    This version uses chicken, black beans, canned enchilada sauce and Rotel tomatoes (canned tomatoes w/ green chiles) doesn't need any extra spices or seasoning and gets cooked in one pan. It's quick, easy, and goes over like gang busters in my house.

    Chicken Black Bean Enchilada Skillet

    Now, I would usually use a Monterrey or Colby jack cheese to top my enchiladas but I decided to use mozzarella this time because that's all I had and I'm SO GLAD I DID! The mozzarella was mild enough to let the flavors of the chiles and enchilada sauce shine through and gave you that super satisfying stretchy cheese-pull with every serving.

    Chicken Black Bean Enchilada Skillet

    When I tell people that I'm a food blogger that often say things like "Oh, your family must eat really well!" or "You must have everything planned out really well so that you have a different dinner everynight!". And then I just laugh.

    I love that our dinnertimes aren't always (or never) super shiny and perfect. Like I said, I usually don't have my act together and dinner is oftentimes just thrown together without much thought. In fact, that's what this recipe is a result of. It just so happens that it turned out really good and my husband was home so I could take a few minutes to photograph it without my 2 yr old throwing his books and toys at my photo set-up and into the food.

    Chicken Black Bean Enchilada Skillet

    Dinner time usually means paper plates for us because I HATE washing dishes. It also means that one or more of my kids have minimal clothing on.

    Chicken Black Bean Enchilada Skillet

    It means full stalks of kale as a "salad" where you eat around the woody center.

    Chicken Black Bean Enchilada Skillet

    It means double fisting watermelon and sticky cheeks and bellies and tables and floors after dinner because who can deny him another piece?

    Chicken Black Bean Enchilada Skillet

    Dinnertime means we have full bellies and are home safe and sound from our busy days and that's all that matters.

    📖 Recipe

    Chicken Black Bean Enchilada Skillet
    Print Recipe
    5 from 3 votes

    Chicken Black Bean Enchilada Skillet

    Simple, zippy, and quick! This one pan meal will appease even the pickiest of eaters with ALL. THAT. CHEESE!
    Prep Time10 minutes mins
    Cook Time25 minutes mins
    Total Time35 minutes mins
    Course: Main Course
    Cuisine: Mexican
    Keyword: easy dinner, Enchiladas, One pot
    Servings: 4 servings
    Calories: 309kcal
    Author: Heather Cheney

    Ingredients

    • 10 ounces Rotel Tomatoes with Green Chiles I used the MILD variety
    • 10 ounces enchilada sauce
    • 14.5 ounces black beans drained
    • 3 whole boneless skinless chicken breast halves
    • salt and pepper
    • 12 whole corn tortillas cut into bite-sized squares
    • 1 ½ cup mozzarella or jack cheese shredded
    • 2 whole green onions chopped

    Instructions

    • In a large skillet combine rotel tomatoes with enchilada sauce and black beans. Bring to a simmer over medium heat.
    • Season chicken with salt and pepper and place into the skillet with the sauce. Bring to a simmer, cover, reduce heat to low and cook about 15 minutes or until chicken is cooked through.
    • Preheat broiler on HIGH.
    • Remove chicken from the pan and shred or cut into bite-sized pieces. Stir chicken and tortilla pieces into the sauce and bring to a simmer. Reduce heat to low, cover and cook for 5 minutes.
    • Sprinkle cheese over the top of the enchilada mixture and place under the broiler for 3-4 minutes or until the cheese is melted and starting brown.

    Nutrition

    Serving: 1serving | Calories: 309kcal | Carbohydrates: 35g | Protein: 20g | Fat: 10g | Saturated Fat: 5g | Cholesterol: 33mg | Sodium: 888mg | Potassium: 529mg | Fiber: 11g | Sugar: 6g | Vitamin A: 840IU | Vitamin C: 8mg | Calcium: 262mg | Iron: 3.5mg
    3.4.3177


    Chicken Black Bean Enchilada Skillet

    • « Previous Page
    • 1
    • …
    • 4
    • 5
    • 6
    • 7
    • 8
    • …
    • 13
    • Next Page »
    Headshot of Heather in an apron

    Hi, I'm Heather! Want to become a rockstar cook? I’m a former chef, caterer, and culinary arts school graduate that just wants to help you make some killer food! I truly believe that with a little know-how anyone can totally rock their kitchen. Stick around for ultimate recipes of your favorite foods, cooking tips, guides, and more!

    More about me →

    Popular Recipes

    • BBQ chicken cut on a cutting board with a bottle of bbq sauce
      The Best Super Moist Oven Baked BBQ Chicken
    • One Pan Sour Cream Chicken Enchilada Skillet
      One Pan Sour Cream Chicken Enchilada Skillet
    • Hawaiian Shoyu Chicken-- so flavorful you'll forget how easy it is to make! Filled with flavors of ginger, garlic and just a touch of red pepper.
      Hawaiian Shoyu Chicken
    • Sloppy Joe on a paper bag
      The Best Sloppy Joe Sauce
    • Coffee Cake In A Mug-- the perfect remedy for a sugar craving when you don't want to spend a lot of time or heat up the oven. #coffee #cake #microwave #mug
      Coffee Cake in a Cup
    • Baked Ricotta Chicken
      Baked Ricotta Chicken
    • Mom's Classic Meatloaf Recipe
    • Beef Teriyaki Stir Fry
    Email opt in image

    Cooking Method

    • Slow Cooker
    • Grilling

    Footer

    ↑ back to top

    About

    • Privacy Policy
    • Disclaimer

    Newsletter

    • Sign Up! for emails and updates

    Contact

    • About
    • Email
    • Work With Me

    As an Amazon Associate I earn from qualifying purchases. This site uses cookies and generates income via ads.

    Copyright © 2022 Heather Likes Food, LLC

    Rate This Recipe

    Your vote:


    A rating is required
    A name is required
    An email is required