• Active
  • Blog
  • Cart
  • Checkout
  • Cooking Crew Recipes
  • Cooking Crew!
  • Disclaimer
  • Library
  • Media Kit
  • My account
  • Nutrition and Food Safety Disclaimer
  • Opt Out of 5 Chef Secrets
  • Press
  • Privacy Policy and Copyright
  • Recipe Index
  • Refund and Returns Policy
  • RSS Email Subscription Confirmation
  • Shop
  • Subscribe
  • Ultimate Recipes for Becoming a Rockstar Cook!
  • Welcome to Heather Likes Food!
  • Work With Me
  • About Heather Cheney
  • Contact
menu icon
go to homepage
subscribe
search icon
Homepage link
  • Recipe Index
  • About
  • Contact
  • Shop
    • Facebook
    • Instagram
    • Pinterest
    • YouTube
  • ×
    Home / Recipes

    Perfect Baked Sweet Potatoes

    By Heather LAST UPDATED March 22, 2021 · FIRST PUBLISHED April 5, 2016, 6 Comments

    Creamy and tender, these perfectly baked sweet potatoes are everything you want your potato to be. It's all the in the "secret step"!Baked Sweet Potatoes

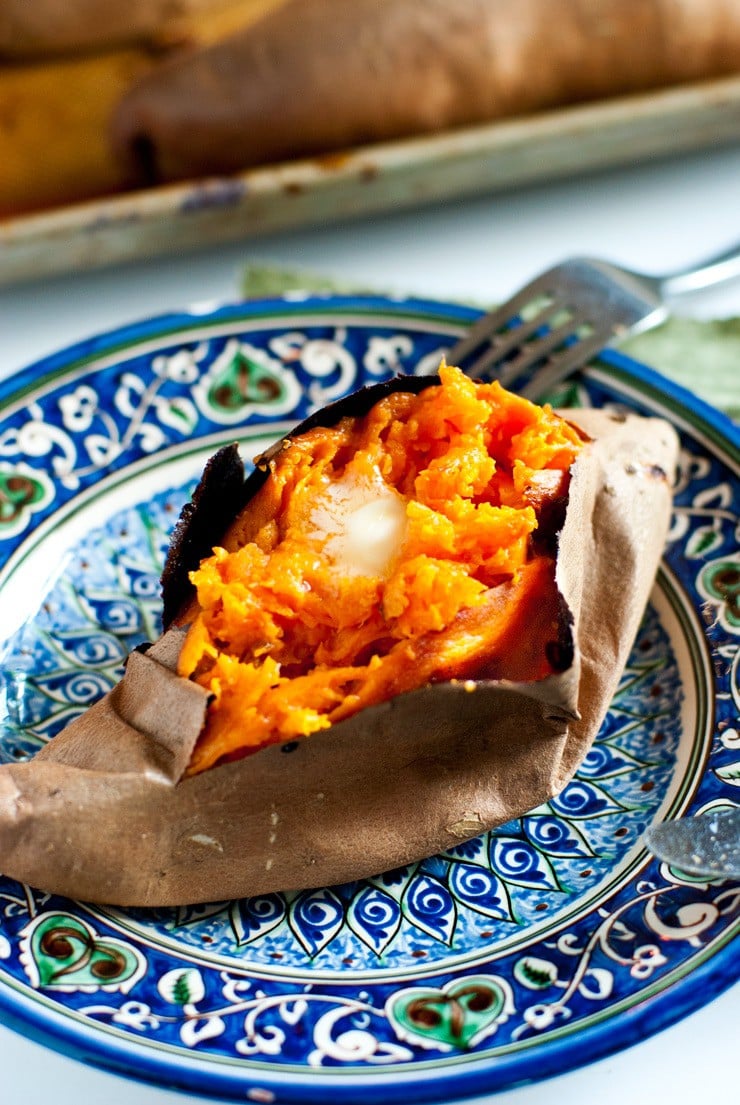
    Sweet potatoes, do you love them? I know there are plenty of haters out there but I'm sure that most of you are fans, am I right? If so, you're going to love this method for baking the perfectly baked sweet potatoes.

    THE TRICK TO PERFECTLY BAKED SWEET POTATOES

    When it comes to sweet potatoes, baking them is definitely the way to go. If you've ever tried to microwave one, you know you're better off taking the extra time to put them in the oven as they just aren't that good. But when they are baked right, they turn into little satchels of creamy, sweet heaven.

    There's a lot of debate at which is the RIGHT way to bake them, but, for obvious reasons,  I think my method is the best so that's what I'm going to show you today. It's a little unconventional and takes a bit of planning ahead, but I think it's totally worth it.

    My method is two steps: Brine and then roast at HIGH heat.

    THE BRINE FOR BAKED SWEET POTATOES

    The process of brining is typically used for meats because it makes meat moister by hydrating the cells of its muscle tissue before cooking and consists of soaking your food in a super salt saturated solution. Doing this with the sweet potatoes not only makes the finished potato super creamy, it adds just a bit of flavor to the baked potato that you can't get just from salting it after cooking.

    For my potato solution I used 1 C of Kosher salt and 8 C warm water. I let the potatoes soak for 8 hours this time but I've soaked them as little as 2 hours and have still had good results. Since the potatoes float, I just flip them when I walk into the kitchen or think about it so they are soaked evenly. You could also weight them down with a bowl or plate if you wanted.

    Baked Sweet Potatoes

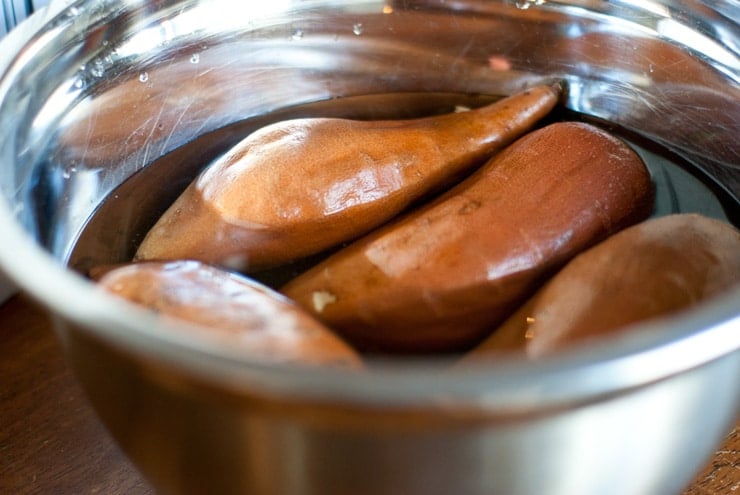
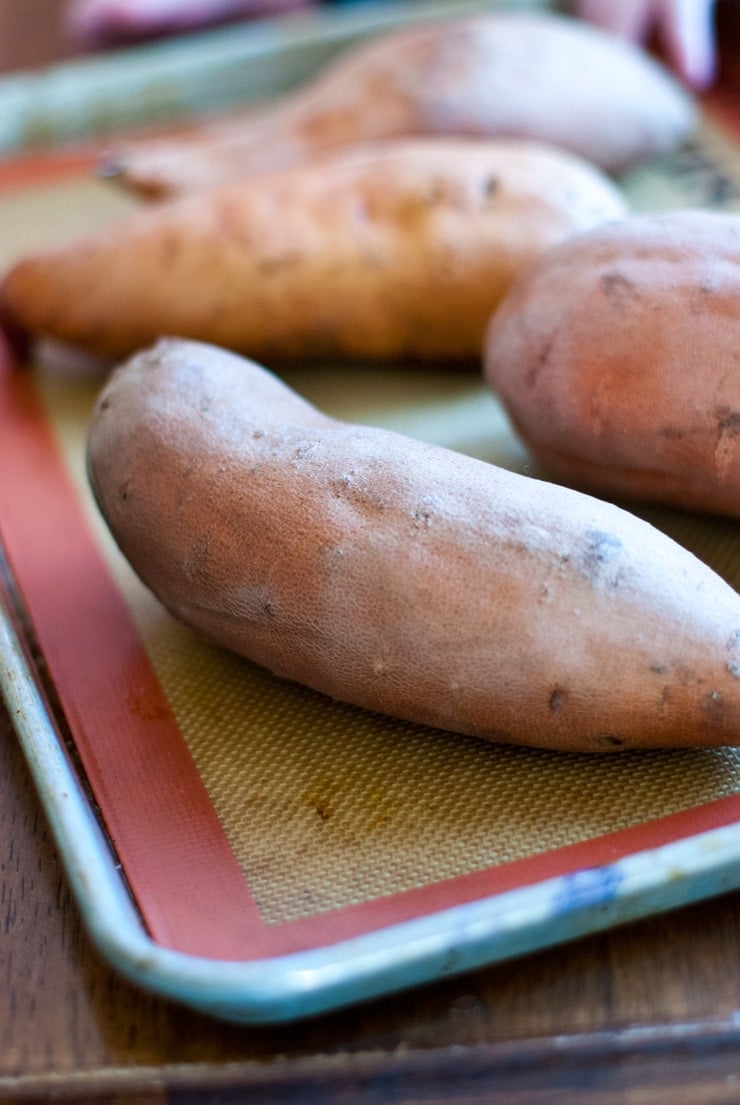
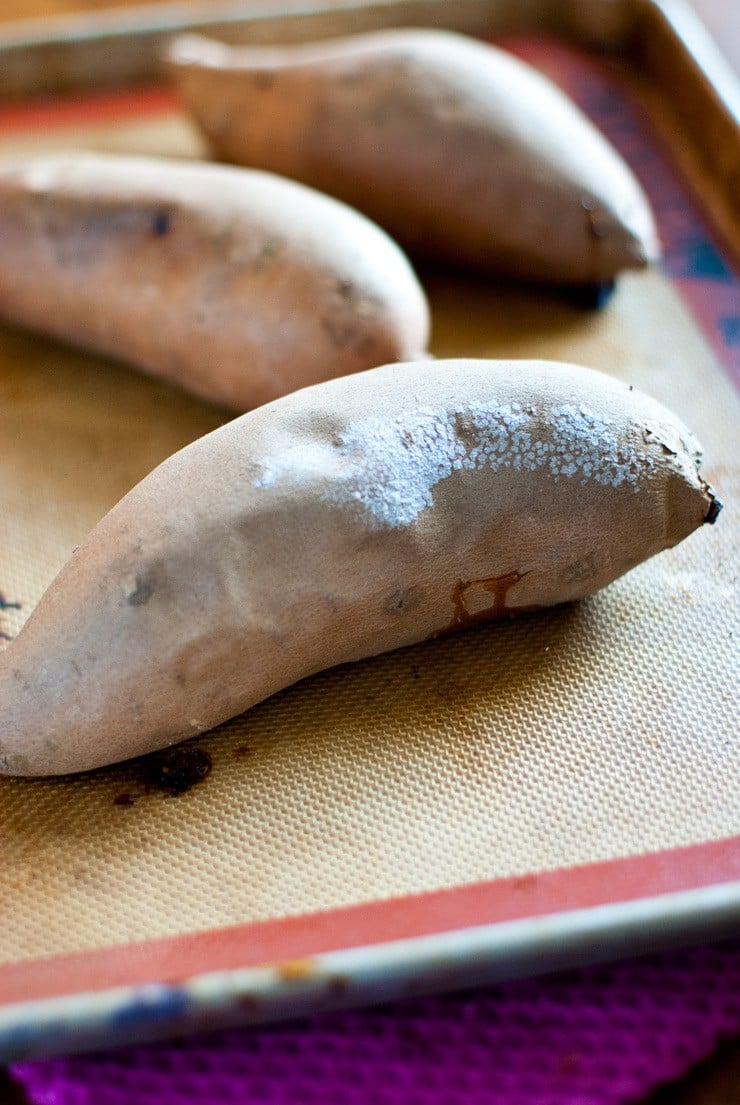
    Once they've had a good, long soak you'll want to dry them really well before placing on a baking sheet.

    Baked Sweet Potatoes

    HOW TO COOK PERFECTLY BAKED SWEET POTATOES

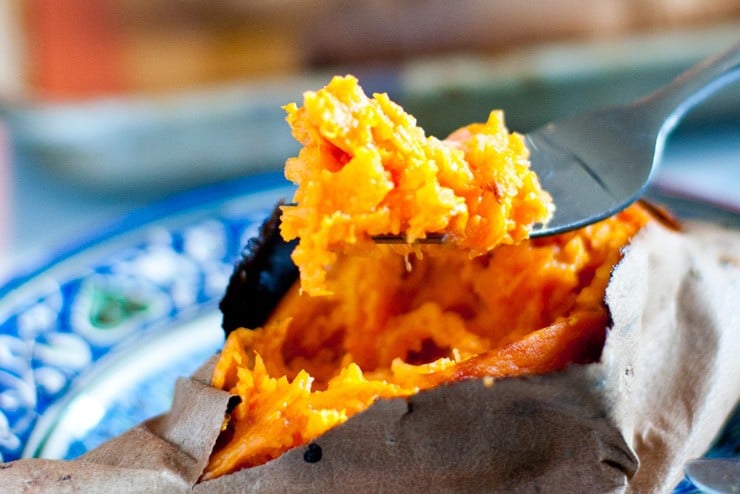
    I roast my potatoes at 450 degrees for about 45 minutes. Bigger potatoes might take a few minutes more but you'll know it's done if you can pierce a fork through the middle without any resistance. The high heat makes them cook quickly and prevents them from "steaming" themselves with the residual moisture left on the skin from the brine. It also makes the skin slightly crisp which makes separating the skin from the meat super easy as you're eating. I'm not a big fan of eating the skin, but for what it's worth, it's well seasoned from the brine and doesn't taste awful. I just don't like the texture.

    Baked Sweet Potatoes

    From here, you have a perfectly creamy and tender sweet potato for topping however you wish! Truthfully, my favorite way is straight-up with a little butter and pepper. I'm boring, I know, but I'd love to hear how you like to top yours!

    Baked Sweet Potatoes

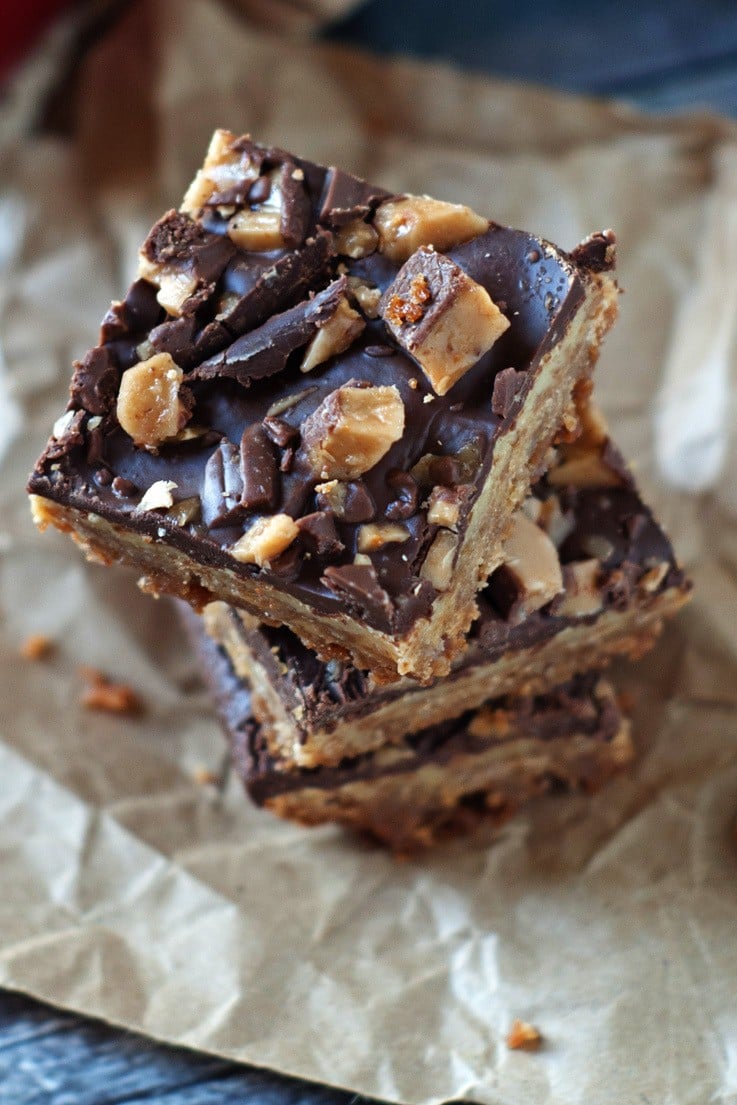
    More Potato Recipes You Might Like

    • Au Gratin Potato Recipe
    • Steakhouse Potatoes
    • Grilled Sweet Potatoes
    • Slow Cooker Mashed Potatoes
    • Oven Roasted Potatoes

    📖 Recipe

    Baked Sweet Potatoes
    Print Recipe
    4.60 from 10 votes

    Perfect Baked Sweet Potatoes

    Creamy and tender, these perfectly baked sweet potatoes are everything you want your potato to be. It's all the in the "secret step"!
    Prep Time10 minutes mins
    Cook Time55 minutes mins
    Soaking Time8 hours hrs
    Total Time9 hours hrs 5 minutes mins
    Course: Side Dish
    Cuisine: American
    Keyword: brined sweet potatoes, fluffy sweet potatoes, how to bake sweet potatoes
    Servings: 4 baked sweet potatoes
    Calories: 300kcal
    Author: Heather Cheney

    Ingredients

    • 4 whole sweet potatoes washed
    • 1 cup kosher salt
    • 8 cup warm water

    Instructions

    • Combine water with salt in a large bowl and stir until most of the salt is dissolved. Place sweet potatoes in water and let soak for 2-8 hours.
    • Preheat oven to 450 degrees
    • Remove potatoes from brine and dry well with paper towels. Place on a baking sheet and bake for 45-55 minutes, or until a fork inserted in the middle goes in without resistance.
    • Remove from oven and serve hot!

    Nutrition

    Serving: 1potato | Calories: 300kcal | Sodium: 28293mg | Vitamin A: 140IU | Calcium: 18mg | Iron: 0.2mg

    Frozen Ravioli Lasagna in One Pan!

    By Heather LAST UPDATED April 9, 2018 · FIRST PUBLISHED March 18, 2016, Leave a Comment

    This One Pan Frozen Ravioli Lasagna only takes 5 ingredients and puts a cheesy, comforting dinner on the table in under 30 minutes!One Pan Frozen Ravioli Lasagna
    one pan Frozen Ravioli Lasagna

    I'm really getting a kick out of all these one pan dinners! Not only are they super quick and simple, my kitchen has never been cleaner! Well, that might be a lie but it's not dirty because of making dinner. It's because I have children that insist on being "independent" and "resourceful" and "a cook like mommy". I'm not sure there's a 2 hour stretch in my days where peanut butter isn't smeared somewhere in my house because she wanted to "make a sandwich".  Haha.

    So, this recipe!

    ONE PAN FROZEN RAVIOLI LASAGNA

    This is stupid simple, folks. You'll need a bag of frozen cheese filled ravioli and a jar of your favorite premade pasta sauce. I'm a SUPER fan of Mezzetta pasta sauces (this is totally not sponsored). I'm like a super crazy fan. They are so good, fresh tasting, not loaded with sugar  and totally worth the extra few dollars I spend to get them vs. another brand. Don't buy them on Amazon though because it's ridiculously expensive there for some reason. I can get a jar for about $5 at my local store, sometimes cheaper if on sale.

    One Pan Frozen Ravioli Lasagna

    You'll also need a pound of Italian sausage. Pork, turkey or chicken, just use what you like. I like to use sausage instead of plain ground meat because it means I don't have to add any extra seasonings since it's already so seasoned.

    One Pan Frozen Ravioli Lasagna

    One Pan Frozen Ravioli Lasagna

    Brown the sausage and stir the sauce and pasta into the pan with a little beef broth.

    One Pan Frozen Ravioli Lasagna

    One Pan Frozen Ravioli Lasagna

    One Pan Frozen Ravioli Lasagna

    Let the ravioli cook, top with cheese...

    One Pan Frozen Ravioli Lasagna

    And enjoy! It's super flavorful and gives the illusion of lasagna without all the work!

    One Pan Frozen Ravioli Lasagna

    One Pan Frozen Ravioli Lasagana

    One Pan Frozen Ravioli Lasgana

    One Pan Frozen Ravioli Lasagna

    📖 Recipe

    One Pan Frozen Ravioli Lasagna
    Print Recipe
    4.59 from 12 votes

    Frozen Ravioli Lasagna in One Pan!

    This One Pan Frozen Ravioli Lasagna only takes 5 ingredients and puts a cheesy, comforting dinner on the table in under 30 minutes!
    Prep Time10 minutes mins
    Cook Time25 minutes mins
    Total Time35 minutes mins
    Course: Main Course
    Cuisine: Italian
    Keyword: frozen ravioli, One pan dinner
    Servings: 4 servings
    Calories: 1171kcal
    Author: Heather Cheney

    Ingredients

    • 1 pound Italian Sausage
    • 24 ounces frozen cheese filled ravioli
    • 24 ounces Favorite Pasta Sauce
    • 1 cup beef broth
    • 2 cup mozzarella cheese grated

    Instructions

    • In a large skillet, brown and crumble Italian Sausage until cooked through and starting to brown. Drain excess fat from pan and return skillet to the heat.
    • Pour ravioli, pasta sauce, and beef broth into the pan and stir into the sausage until well combined. Bring to a boil, reduce heat to low and and simmer uncovered for 15 minutes or until ravioli is tender.
    • Sprinkle cheese over the pan, cover and continue to cook an additional 5 minutes or until cheese is melted.

    Nutrition

    Serving: 1serving | Calories: 1171kcal | Carbohydrates: 81g | Protein: 56g | Fat: 68g | Saturated Fat: 26g | Cholesterol: 222mg | Sodium: 3344mg | Potassium: 924mg | Fiber: 7g | Sugar: 11g | Vitamin A: 1115IU | Vitamin C: 14.2mg | Calcium: 363mg | Iron: 21.2mg

    Hot Fudge Cake in A Cup

    By Heather LAST UPDATED July 23, 2019 · FIRST PUBLISHED March 8, 2016, 2 Comments

    It takes just a few minutes to have this hot, gooey hot fudge cake in a cup in your hands and ready to scarf down. With a scoop of ice cream on top, you've got a pretty killer dessert that took just a coffee mug and a few minutes! 

    2 Minute Hot Fudge Mug Cake

    2 Minute Hot Fudge Mug Cake

    So,  I've got a little bit of a crush on hot fudge and subsequently, this hot fudge cake in a cup. And it's kind of weird because I'm not really that much of a chocolate person. I mean, I like chocolate cake and pie and ice cream, but those death-by-quadruple-chocolate-bypass-desserts are bit too much for me. Even chocolate bars are too much sometimes. But oooh baby, give me some hot fudge on a bowl of vanilla ice cream with roasted almonds and I'll be your BFF for eternity.

    The other night we made a few of these Coffee Cakes in a Cup for dessert and it reminded me how much fun it is to just make small little portions of desserts.  I love that it's just enough to eat at once and I'm not being tempted by it 2 or 3 days later when it's still sitting on my counter. So, later that night I was scrolling through Pinterest and saw a post for Hot Fudge Cake baked in an 8x8 pan and I knew that I needed to figure out a way to make it a chocolate coffee mug cake.
    2 Minute Hot Fudge Mug Cake

    ENTER-- HOT FUDGE CAKE IN A CUP

    The result is a tender, chocolate coffee mug cake that is swirled with gooey "hot fudge". In truth, it's actually more the consistency of pudding but I'll just call it hot fudge. You'll notice that the recipe calls for self-rising flour and if you don't have that on hand, you're not out of luck. Just add an ⅛ of a teaspoon of baking powder and a pinch of salt to the batter. I do like to use the self-rising though because it makes it just that much easier. Hope you enjoy!

    If you're not feeling chocolate today, try out this Pumpkin Coffee Cake in Mug Recipe!

    📖 Recipe

    2 Minute Hot Fudge Mug Cake
    Print Recipe
    4.59 from 12 votes

    Hot Fudge Cake in a Cup

    It takes just a few minutes to have this hot, gooey hot fudge mug cake in your hands and ready to scarf down. With a scoop of ice cream on top, you've got a pretty killer dessert that took no time at all!
    Prep Time5 minutes mins
    Cook Time1 minute min
    Total Time6 minutes mins
    Course: Dessert
    Cuisine: American
    Keyword: microwave dessert, microwave lava cake, mug cake
    Servings: 1 mug cake
    Calories: 290kcal
    Author: Heather Cheney

    Ingredients

    • ¾ tablespoon butter
    • 2 tablespoon sugar divided
    • few drops of vanilla
    • 2 ½ tablespoon self-rising flour
    • 2 teaspoon cocoa powder divided
    • 1 tablespoon milk
    • 1 tablespoon brown sugar
    • 3 tablespoon hot water

    Instructions

    • Place butter in mug and melt in the microwave-- about 15 seconds
    • Stir 1 tablespoon sugar into the butter followed by the vanilla, flour, 1½ teaspoon of the cocoa powder and milk. Stir until no dry spots remain and smooth into the bottom of the mug.
    • Sprinkle remaining 1 tablespoon of sugar, ½ teaspoon cocoa powder, and brown sugar over the batter. Pour hot water (hot tap water is fine) over the top of the contents in the mug.
    • Set microwave to cook at 50% power and cook for 1½ minutes, checking every 30 seconds to see how it's cooking. All microwaves cook differently so keep a close eye on it. It's done when the middle looks cakey. The "hot fudge' portion of the cake will be both on the top and bottom of the mug and will have the consistency of pudding when done. Serve hot!

    Nutrition

    Serving: 1mug | Calories: 290kcal | Carbohydrates: 50g | Protein: 3g | Fat: 9g | Saturated Fat: 5g | Cholesterol: 24mg | Sodium: 85mg | Fiber: 1g | Sugar: 36g | Vitamin A: 265IU | Calcium: 17mg | Iron: 0.3mg

    2 Minute Hot Fudge Mug Cake


    One Pan Spinach Artichoke Chicken and Rice

    By Heather LAST UPDATED March 22, 2021 · FIRST PUBLISHED February 23, 2016, Leave a Comment

    If you like the ever-so-delicious spinach artichoke dip, you're going to LOVE this. One Pan Spinach Artichoke Chicken and Rice has all the flavor of the dip wrapped up in a filling dinner and made in a single pan! One Pan Spinach Artichoke Chicken and Rice

    I'm totally off the topic of food today, but I need to have a musical theater geek out moment.  Have you heard of the Broadway show, Hamilton? I just discovered it a few weeks ago and I'm slightly obsessed. It follows the story of Alexander Hamilton and the music is pretty incredible with a hip-hop vibe. I guess it opened in NY last August and while I'm bummed I didn't listen to it until now, I'm really itching to get to a show now! Who's going with me?

    Alright, back to food. What did you think of last week's one pan meal? Pretty incredible, right? Well hopefully you like today's just as much. It has all the flavors of the ever-so-popular spinach artichoke dip but is wrapped up with chicken and rice to make a filling dinner.

    Like any good one pan dinner, it only takes ONE Pan! Imagine that :). You just brown the chicken, stir in the rest of the ingredients and cover and cook until the rice is tender. Just before serving you stir in the fresh baby spinach and a few dashes of hot sauce, if you'd like, and serve.

    One Pan Spinach Artichoke Chicken and Rice

    Easy, peasy, and super duper delicious.

    One Pan Spinach Artichoke Chicken and Rice

    📖 Recipe

    One Pan Spinach Artichoke Chicken and Rice
    Print Recipe
    4.67 from 3 votes

    One Pan Spinach Artichoke Chicken and Rice

    If you like the ever-so-delicious spinach artichoke dip, you're going to LOVE this One Pan Spinach Artichoke Chicken and Rice. All the flavor of the dip wrapped up in a filling dinner and made in a single pan!
    Prep Time10 minutes mins
    Cook Time30 minutes mins
    Total Time40 minutes mins
    Course: Main Course
    Cuisine: American
    Keyword: alfredo sauce with cream, One pan dinner, spinach artichoke dip
    Servings: 6 servings
    Calories: 444kcal
    Author: Heather Cheney

    Ingredients

    • 2 tablespoon olive oil
    • 4 boneless skinless chicken breast halves cut into bite-sized pieces
    • ¼ teasppon salt
    • 14 ounce artichoke hearts in water, quartered and drained
    • 1 cup long grain rice
    • 2 cups chicken broth
    • 14.5 ounce jar prepared alfredo sauce
    • a few dashes favorite hot sauce
    • 4 cups fresh baby spinach

    Instructions

    • Heat olive oil in a large skillet over medium high heat. Place chicken in the skillet, season with salt and cook, stirring chicken until lightly browned-- about 4 minutes.
    • Stir artichoke hearts, rice, chicken broth and alfredo sauce into the chicken, bring to a simmer, cover and reduce heat to low. Cook for 15 minutes or until rice is tender.
    • Remove pan from the heat and stir fresh spinach and hot sauce (if desired) into the rice. Cover pan and allow to rest for 5 minutes before serving.

    Nutrition

    Serving: 1serving | Calories: 444kcal | Carbohydrates: 31g | Protein: 21g | Fat: 24g | Saturated Fat: 7g | Cholesterol: 93mg | Sodium: 1119mg | Potassium: 488mg | Fiber: 2g | Sugar: 1g | Vitamin A: 2560IU | Vitamin C: 25.9mg | Calcium: 50mg | Iron: 1.7mg

    One Pan Spinach Artichoke Chicken and Rice

    One Pan Smothered Chicken Skillet

    By Heather LAST UPDATED March 22, 2021 · FIRST PUBLISHED February 12, 2016, 2 Comments

    This flavorful chicken and creamy pasta all cooked up in one simple pan is sure to be a family favorite!  One Pan Smothered Chicken Skillet

    Last week I made a pretty fun announcement to my email subscribers: 2016 is the year of the One Skillet Supper! 

    I decided that this year I'm going to focus on bringing you recipes for one pot meals. My goal is to help you get dinner on the table in the quickest, tastiest, and most efficient way possible and I don't want to leave you with a kitchen full of dishes once everybody has full bellies! So, today's recipe is my first installment on this journey. Never fear, I'll likely still share recipes that I try and love (you can't take a girl away from her cookies!!) but for the most part you can expect to see some pretty amazing one pan meals for the next while.

    If you'd like to be on my email list and are not, just click the link below to sign up! I share announcements, give updates, share giveaways and much more with my email subscribers.  I'd love to have you join! Be An Email Subscriber!


    One Pan Smothered Chicken Skillet

    This recipe started about 5 years ago when I posted this gem of a recipe for smothered chicken. It was one the first few recipes I posted on this little blog of mine! A little while later that recipe turned into a recipe for smothered chicken casserole which just happens to be one of the most visited recipes on the site! The recipe itself is suuuuuppppper good but it uses too many dishes, TOO MANY DISHES!

    So, I decided to give it a makeover. Going along with our theme for the year, this version uses just ONE pan and still brings the big punch of flavor the original recipe did. I reduced the amount of cream used as well so it's a little less indulgent but still feels pretty naughty which is always kind of fun.

    One Pan Smothered Chicken Skillet

    If you give this One Pan Smothered Chicken Skillet a go and I'd love to hear what you think. Don't forget to subscribe to my email list if you aren't already-- some good things are coming there! 🙂

    Subscribe to emails

    📖 Recipe

    Print Recipe
    5 from 2 votes

    One Pan Smothered Chicken Skillet

    This flavorful chicken and creamy pasta all cooked up in one simple pan is sure to be a family favorite!  
    Prep Time10 minutes mins
    Cook Time30 minutes mins
    Total Time40 minutes mins
    Course: Main Course
    Cuisine: American
    Keyword: angel hair pasta recipe, caesar dressing chicken, One pan dinner
    Servings: 4 Servings
    Calories: 878kcal
    Author: Heather Cheney

    Ingredients

    • 4 boneless skinless chicken breasts halves
    • ½ cup caesar salad dressing
    • 4 slices bacon
    • 8 ounces sliced fresh mushrooms
    • 1 whole small onion diced
    • 2 tablespoon All Purpose Flour
    • 1 teaspoon salt
    • ¼ teaspoon black pepper
    • 4 cups chicken broth
    • ½ pound angel hair pasta
    • 2 tablespoons lemon juice
    • ½ cup cream
    • 1 cup gruyere cheese grated
    • 1 whole tomato diced
    • ¼ cup parsley chopped

    Instructions

    • Place chicken breasts and caesar dressing in a large ziplock bag and allow to marinade for at least 4 hours up to overnight.
    • In a large skillet, cook bacon until browned and crisp. Remove bacon from the pan and place on paper towels to drain.
    • Leaving the bacon grease in the pan, heat over medium-high heat and cook the chicken breasts for about 2 minutes per side or until they get some color on them. They do not have to be cooked through, just browned. Remove chicken from pan and set aside.
    • Pour off all but 2 tablespoon of the bacon grease from the pan, return to the heat and cook the onions and mushrooms until tender and caramelized-- about 3-5 minutes.
    • Sprinkle flour over the mushrooms and onions and stir until combined. Slowly pour the chicken broth into the pan, stirring constantly until no lumps remain. Stir in the salt and pepper and break the pasta in half, placing it in the pan. Arrange the chicken on top of the pasta, bring the pan to a boil, cover and reduce heat to low. Cook for 6-8 minutes or until the pasta is tender and chicken is cooked through.
    • Remove chicken from pan once again and add the cream, lemon juice, cheese, tomato and parsley to the pasta. Stir to combine and place the chicken on top of the pasta to serve

    Nutrition

    Serving: 1serving | Calories: 878kcal | Carbohydrates: 52g | Protein: 48g | Fat: 52g | Saturated Fat: 19g | Cholesterol: 175mg | Sodium: 2206mg | Potassium: 1134mg | Fiber: 3g | Sugar: 5g | Vitamin A: 1480IU | Vitamin C: 33.1mg | Calcium: 408mg | Iron: 2.9mg
    3.4.3177


    One Pan Smothered Chicken Skillet


    Chocolate Covered Strawberry Candy Bars

    By Heather LAST UPDATED July 17, 2019 · FIRST PUBLISHED February 2, 2016, 1 Comment

    These Chocolate Covered Strawberry Candy Bars are portable and the perfect way to deliver chocolate and strawberries to your lover! Use your favorite chocolate bars as the base and top with juicy strawberries and any toppings you'd like. Chocolate Covered Strawberry Candy Bars- a perfect gift for Valentine's Day

    If you're looking for the perfect, yummy gift to give to your valentine this year, your search is over! These chocolate covered strawberry candy bars are so easy to make and so fun to personalize to specific tastes. I'm just going skip any senseless rambling that I usually do in my posts and head straight to the recipe today because it's pretty fun. You'll get plenty from me at a later date I'm sure.

    Chocolate Covered Strawberry Candy Bars- a perfect gift for Valentine's Day

    Not much is needed for this-- just chocolate and strawberries! You'll need your favorite jumbo-sized candy bar for the base.

    Chocolate Covered Strawberry Candy Bars- a perfect gift for Valentine's Day

    I decided to flip the chocolate bar over and put the strawberries on the flat ugly side because it's going to be covered up anyway and will give the strawberries something smooth to adhere to.

    I tried to find some smaller-ish strawberries for this and cut the green tops off so that they were all about the same height.

    Chocolate Covered Strawberry Candy Bars- a perfect gift for Valentine's Day

    You may want to arrange the strawberries on the bar before you dip them in chocolate to see how they'll all fit on the bar.

    Chocolate Covered Strawberry Candy Bars- a perfect gift for Valentine's Day

    For the chocolate, I used dark chocolate candy coating. You can find candy coating in just about any grocery store and most craft stores carry a good variety too. You can definitely just melt down some chocolate chips but you may have to add a little bit of shortening to make it thin enough and it won't have the nice, shiny luster that this has because the chocolate won't be tempered. Tempering is a whole other beast that I'm not ready to jump into on this post. 🙂

    Once you know where you want your strawberries to go, dip the ends of each berry and place them on the bar.

    Chocolate Covered Strawberry Candy Bars- a perfect gift for Valentine's Day

    Chocolate Covered Strawberry Candy Bars- a perfect gift for Valentine's Day

    What should I put on my chocolate covered strawberry candy bar??

    Once you have all the berries on there, it's time to decorate! You can really go all out here if you want, but I kept it simple. I just poured some of the melted chocolate into a squeeze bottle and drizzled it over the top, but here are some other fun ideas in addition to the chocolate (so they will stick).

    • A white chocolate drizzle
    • Crushed nuts
    • Toasted coconut
    • Caramel Drizzle (might get messy if too runny)
    • Sprinkles
    • M&Ms
    • Crushed Oreo cookies or graham crackers

    Chocolate Covered Strawberry Candy Bars- a perfect gift for Valentine's Day

    From here it just needs to be wrapped up. I had some cellophane bags left over from a party that worked perfect and I bet the dollar store has some cute ones, too!

    Chocolate Covered Strawberry Candy Bars- a perfect gift for Valentine's Day

    📖 Recipe

    Chocolate Covered Strawberry Candy Bars
    Print Recipe
    4 from 1 vote

    Chocolate Covered Strawberry Candy Bars

    These chocolate covered strawberry candy bars are the perfect way to deliver chocolate and strawberries to your lover! Use your favorite chocolate bars as the base and top with juicy strawberries and any toppings you'd like.
    Prep Time10 minutes mins
    Cook Time0 minutes mins
    Total Time10 minutes mins
    Course: Dessert
    Cuisine: American
    Keyword: chocolate strawberry gift, homemade chocolate bar, valentines day gift
    Servings: 1 Bar
    Calories: 1842kcal
    Author: Heather Cheney

    Ingredients

    • 1 jumbo-sized chocolate bar
    • 15-20 fresh strawberries
    • 1 C Chocolate candy melts-- I used dark chocolate melts

    Instructions

    • Cut tops off of strawberries, making them all about the same height.
    • Arrange on the flat bottom side of the chocolate bar to make sure they fit and set aside.
    • Melt chocolate melts in the microwave, stirring every 15 seconds until smooth and melted.
    • Dip flat ends of strawberries in the chocolate and carefully place on the chocolate bar. Repeat with each strawberry until bar is covered.
    • Place remaining melted chocolate in a squeeze bottle and decorate strawberries as desired. If you don't have a squeeze bottle, a fork or spoon work well for drizzling.
    • Allow chocolate to set, wrap and deliver.

    Nutrition

    Serving: 1bar | Calories: 1842kcal | Carbohydrates: 267g | Protein: 27g | Fat: 83g | Saturated Fat: 44g | Cholesterol: 11mg | Sodium: 44mg | Potassium: 4468mg | Fiber: 59g | Sugar: 174g | Vitamin A: 345IU | Vitamin C: 1270.1mg | Calcium: 471mg | Iron: 22.9mg

    Zesty Philly Steak and Cheese Tacos

    By Heather LAST UPDATED March 22, 2021 · FIRST PUBLISHED January 29, 2016, 2 Comments

    All the flavors of a philly steak and cheese kicked up a notch with green chiles and an enchilada cream sauce. Wrap it up in a tortilla and you have an awesome dinner ready to go on the table in under 30 minutes!

    **This is a sponsored conversation written by me on behalf of Albertsons. The opinions and text are all mine!**

    Zesty Philly Steak and Cheese Tacos

    The big game day is right around the corner and today I've got a taco recipe that not only will blow your little socks off, it will make them completely dissolve into thin air. IT'S. THAT. GOOD. And it's totally perfect for whipping up while the game is roaring in the other room because it barely takes any time at all to make.

    I teamed up with Albertsons to make these Zesty Philly Steak and Cheese Tacos so I headed over there to check out their selection of Old El Paso™ items. The taco boats caught my eye right away and I decided to take those home with me.

    Zesty Philly Steak and Cheese Tacos

    Enchilada sauce and a can of diced green chiles also got to tag along for the ride. They are what bring this taco recipe to life!

    Zesty Philly Steak and Cheese Tacos

    First up, you'll need some sliced green peppers and onions to make these tacos totally cheese steak-y.

    Zesty Philly Steak and Cheese Tacos

    Feel free to use whatever beef you'd like, but when I'm in a time crunch and even when I'm not, I like to use good ol' deli roast beef for my cheese steaks. The perk here is that there is virtually no prep work and it only needs to be heated up. The quality of the beef really makes a difference here so I wouldn't skimp when buying. You can ask the deli counter to slice the meat a little thicker than you might like for sandwiches and try to find one that isn't full of salt and preservatives-- it will taste better!

    Zesty Philly Steak and Cheese Tacos

    Once you have everything prepped all that's needed is a quick go in the skillet for the veggies and then again for the meat and chiles.

    Aren't the taco boats so cute? They made eating these tacos a snap for my kiddos because they hold everything in!

    Zesty Philly Steak and Cheese Tacos

    Mmmm....

    Zesty Philly Steak and Cheese Tacos

    The real star of these tacos is the enchilada cream sauce. It's just a quick combo of sour cream, Old El Paso Red Enchilada Sauce and a squeeeeeeze of fresh lime juice.

    Zesty Philly Steak and Cheese Tacos

    Put the tacos together with a little bit of sauce and top with some grated Monterrey jack cheese. They are so creamy and full of flavor! My oldest daughter that's nine would take a bite and say something like, "how can these be so good?" and then take another bite and mumble, "yeah, I like these" as she went in for another bite. It went on for most of dinner. 🙂 Hope you enjoy them as much as we did!

    Zesty Philly Steak and Cheese Tacos

    📖 Recipe

    Zesty Philly Steak and Cheese Tacos
    Print Recipe
    5 from 3 votes

    Zesty Philly Steak and Cheese Tacos

    All the flavors of a philly steak and cheese kicked up a notch with green chiles and an enchilada cream sauce. Wrap it up in a tortilla and you have an awesome dinner ready to go on the table in under 30 minutes!
    Prep Time10 minutes mins
    Cook Time20 minutes mins
    Total Time30 minutes mins
    Course: Main Course
    Cuisine: Mexican
    Keyword: easy taco recipe, quick, soft taco cups
    Servings: 6 Taco Boats
    Calories: 346kcal
    Author: Heather Cheney

    Ingredients

    • 1 Tablespoon Vegetable Oil
    • 1 green bell pepper sliced
    • 1 medium onion sliced
    • ½ teaspoon kosher salt
    • 4.5 ounces Old El Paso Diced Green Chiles
    • 1 pound high-quality, sliced deli roast beef cut into ¼" strips
    • ¼ cup sour cream
    • ¼ cup Old El Paso Red Enchilada Sauce
    • ½ lime juiced
    • 1 package Old El Paso Soft Tortilla Taco Boats
    • ¾ cups Monterrey Jack Cheese shredded

    Instructions

    • Heat vegetable oil over medium-high heat in a large skillet. Add peppers, onions and salt to the pan and cook, stirring frequently, until tender and starting to brown. Remove veggies from the pan, place in a bowl and set aside.
    • Combine sour cream and enchilada sauce with lime juice in a small bowl and set aside.
    • Heat pan once again over medium heat and pour chiles into the pan. Cook for one minute, stirring, and add roast beef. Continue to stir and cook for an additional 2-3 minutes or until beef is heated through. Stir veggies into the meat and remove from heat.
    • Spoon meat mixture into taco boats, top with shredded Monterrey jack cheese and drizzle with the enchilada cream sauce.

    Nutrition

    Serving: 1serving | Calories: 346kcal | Carbohydrates: 30g | Protein: 24g | Fat: 14g | Saturated Fat: 7g | Cholesterol: 60mg | Sodium: 1897mg | Potassium: 370mg | Fiber: 2g | Sugar: 5g | Vitamin A: 310IU | Vitamin C: 55.7mg | Calcium: 386mg | Iron: 3.5mg
    Zesty Philly Steak and Cheese Tacos

    This is a sponsored conversation written by me on behalf of Albertsons. The opinions and text are all mine.

    One Pan Breakfast Burrito Bake

    By Heather LAST UPDATED July 17, 2019 · FIRST PUBLISHED January 22, 2016, 2 Comments

    Zesty breakfast burritos don't have to dirty every pan in the cupboard to be a reality! With a little bit of trickery you can have burritos ready to eat while only dirtying one pan! One Pan Breakfast Burrito Bake

    I lurrrve breakfast burritos.

    There's this little mexican restaurant right around the corner from my house that makes THE BEST breakfast burritos. Not only do they taste really good, they are huge and cheap! Win-win-win! However, many cheap burritos turn into a not-so-cheap habit if you're not careful so I've had to resort to making them at home.

    But here's the problem-- breakfast burritos have a lot of different elements to them which means lots of dishes.

    No bueno.

    So I came up with a way that reduced that mess into a single pan, didn't keep me standing over the stovetop monitoring it all and still left me with an amount of filling that is enough to feed my entire family BIG burritos. Let's get started!

    First up: the meat. You can use any breakfast meat you'd like for this recipe. Just get it cooked up the way you'd like in a large skillet and set aside when you're done. I used regular breakfast sausage so I put it on some paper towels to drain off the excess fat.
    One Pan Breakfast Burrito Bake

    Depending on the type of meat you're cooking you'll probably end up with some amount of fat in the bottom of your skillet. Pour off all but a tablespoon or two and if you need to add a little in because your meat was lean, pour in a little bit of oil at this point. Put the skillet back on the heat and get the fat nice and hot.

    For potatoes, I like to use O'Brien style frozen potatoes because they have onions and peppers in them and that just ups the flavor a little bit for burritos.

    Pour your potatoes into the hot fat and cook for 1 minute without stirring. Sprinkle ½ teaspoon salt over the top of the potatoes and transfer the skillet into a 450 degree oven for about 20-25 minutes or until the potatoes are cooked through and the bottoms are a little browned.

    One Pan Breakfast Burrito Bake

    While the potatoes are cooking you'll mix up your eggs. I like to use water when I'm making scrambled eggs because the eggs don't brown as quickly as they do when using milk due to the milk solids, etc. But use what you like.

    Eggs, water, a can of chopped green chiles, and a little bit of salt are all you need.

    One Pan Breakfast Burrito Bake

    Once the potatoes are done, slide the oven rack out and pour the eggs right over the potatoes. DON'T STIR. Just slide the pan back into the oven and let cook for 10 minutes.

    One Pan Breakfast Burrito Bake

    After 10 minutes you'll give the eggs and potatoes a stir and continue to cook an additional 3-8 minutes or until the eggs are cooked to your liking.

    Take the skillet out of the oven and stir your meat back into the pan. The eggs and potatoes will be hot enough to warm the meat back up.

    One Pan Breakfast Burrito Bake

    All that's left to do is to make your burritos! Warm tortillas, salsa, cheese, and whatever else your little heart desires.

    One Pan Breakfast Burrito Bake

    📖 Recipe

    One Pan Breakfast Burrito Bake
    Print Recipe
    5 from 3 votes

    One Pan Breakfast Burrito Bake

    Zesty breakfast burritos don't have to dirty every pan in the cupboard to be a reality! With a little bit of trickery you can have burritos ready to eat while only dirtying one pan!
    Prep Time10 minutes mins
    Cook Time45 minutes mins
    Total Time55 minutes mins
    Course: Breakfast
    Cuisine: American
    Keyword: easy breakfast, green chile eggs, one pan meal
    Servings: 6 burritos
    Calories: 425kcal
    Author: Heather Cheney

    Ingredients

    • 1 pound breakfast sausage
    • 28 ounces frozen O'Brian Potatoes with Onions and Peppers
    • ½ teaspoon kosher salt
    • 8 eggs
    • 4 ounces diced green chiles
    • ½ teaspoon kosher salt
    • ½ cup water
    • cheese
    • tortillas
    • salsa

    Instructions

    • Preheat oven to 450 Degrees
    • In a large skillet, brown and crumble sausage until fully cooked. Remove from pan and set aside on paper towels to drain off excess fat.
    • Return skillet to the stove top and heat up any remaining drippings from the sausage. Pour potatoes into the pan, season with ½ teaspoon salt, let cook for 1 minute and transfer into the oven. Bake for 20-25 minutes (uncovered) or until potatoes are tender and browned on the bottom.
    • While potatoes are cooking, beat eggs well with green chiles, ½ teaspoon salt and water.
    • When potatoes are cooked, open the oven, slide the skillet out on the rack, and pour eggs over the potatoes. Cook for 10 minutes.
    • After 10 minutes stir the eggs and potatoes well and continue to cook for an additional 3-8 minutes or until the eggs are cooked to your liking. Remove from oven.
    • Return sausage to the skillet and stir to combine and heat sausage.
    • Spoon mixture into warm tortillas, top with cheese and enjoy!

    Nutrition

    Serving: 1burrito | Calories: 425kcal | Carbohydrates: 24g | Protein: 21g | Fat: 26g | Saturated Fat: 8g | Cholesterol: 272mg | Sodium: 983mg | Potassium: 681mg | Fiber: 2g | Vitamin A: 395IU | Vitamin C: 13.1mg | Calcium: 59mg | Iron: 3.3mg

    One Pan Breakfast Burrito Bake

    White Queso Blanco Dip

    By Heather LAST UPDATED February 15, 2019 · FIRST PUBLISHED December 15, 2015, 2 Comments

    Queso Blanco Nacho Cheese is creamy deliciousness for your chips that goes down to your hips. But let's not dwell on the hip thing...Queso Blanco Dip

    *This Queso Blanco post was originally published in May of 2012 but I'm bringing it back to life with a few new, updated pictures. I sadly don't have the same wallpaper, orange countertops or turquoise stove anymore, so I left those up for your viewing pleasure. Enjoy!*

    Sadly, my spanish speaking abilities go as far as visiting google translate and hitting enter despite my two years of studying it in high school. I remember really liking the word sweater. Suéter-- it just rolls off your tongue so easily. My college roommate (with whom I also took spanish with in HS) and I always thought we sounded really authentic when we said "?Donde Esta Mi Sueter?" or inserted any other clothing or food item we knew. Pantalones is a good one. Oh and nachos. you can't go wrong with nachos.

    Speaking of nachos, have you ever had Queso Blanco at a restaurant? It's crazy good. It's also crazy easy to make.

    Let's Make Queso Blanco!

    The players: {If you're confused about the arrows pointing to nothing, that's my clever way of saying that I'm a ditz and forgot to put them in the picture}

    You'll need to seed and vein your jalepeno if you don't want it to be too spicy. I like to use a spoon to scrape the insides out. Just make sure that if you end up touching the seeds that you don't rub your eyes or touch your face. Because oooh mama, it burns. Trust me on this one.

    Pin This Recipe To Your Dip Board!

    Give your jalepeno and onion a good chop chop. They don't have to be super minced, just not super chunky.

    Heat a tablespoon of oil up in a medium sized sauce pan and add the onions and jalepeno. Cook until they are soft and starting to caramelize a bit.

    Pin This Recipe To Your Dip Board!

    You'll need some cheese. Cheese, oh glorious cheese. 2 kinds here: White American and Monterrey Jack.

    Add the cheese to the pepper and onion and stir away. It takes a few minutes but it will melt. Promise.

    Once its smooth and melted resist from putting your face directly into the pan and eating it all because it gets better. "How?" you ask... cilantro and tomatoes, that's how.

    Hello dreamboat. Have any room for me?

    Pin This Recipe To Your Dip Board!

    Don't mind if I do... note that the hand pictured below is that of my 5 yr. old. She has great hands for, you know, a 5 year old, but  I thought I'd let you know just in case you decided to judge me by my hands. Haters. 

    Queso Blanco Dip

    Pin This Recipe To Your Dip Board!

    Want More Crazy Delicious Dip Recipes?

    • Hot and Cheesy Bacon Dip
    • Baked Cheese Ball Dip 
    • Coconut Lime Cream Cheese Fruit Dip
    • Supreme Pepperoni Pizza Dip

    📖 Recipe

    Queso Blanco Dip
    Print Recipe
    5 from 4 votes

    Queso Blanco Dip

    Queso Blanco-- White, cheesy, creamy deliciousness for your chips that goes down to your hips. Let's not think about the hip thing though...
    Prep Time10 minutes mins
    Cook Time10 minutes mins
    Total Time20 minutes mins
    Course: Appetizer
    Cuisine: Mexican
    Keyword: Homemade queso, Nacho cheese, White American Cheese
    Servings: 8 servings
    Calories: 405kcal
    Author: Heather Cheney

    Ingredients

    • 1 pound White American Cheese shredded (you can find this at most grocery store deli counters)
    • 8 ounces Monterrey Jack Cheese shredded
    • 1 Jalepeno seeded and minced
    • ½ cup chopped red onion
    • 1 tablespoon canola or vegetable oil
    • ¼ cup fresh cilantro chopped
    • 1 whole fresh tomato seeded and diced
    • 1 ½- 2 cup milk

    Instructions

    • Heat oil over medium high heat and cook jalepeno and onion until tender and starting to caramelize.
    • Reduce heat to medium low and stir in grated cheeses and ½ C milk
    • Continue to stir until smooth adding milk until the desired consistency is reached.
    • Stir in chopped tomatoes and cilantro.
    • Serve hot with chips or tortillas. Reheats well over medium heat or in the microwave, stirring frequently.

    Nutrition

    Serving: 1serving | Calories: 405kcal | Carbohydrates: 9g | Protein: 20g | Fat: 31g | Saturated Fat: 19g | Cholesterol: 92mg | Sodium: 1147mg | Potassium: 307mg | Sugar: 7g | Vitamin A: 1170IU | Vitamin C: 6.1mg | Calcium: 929mg | Iron: 0.6mg

    4 Ingredient Truffle Fudge

    By Heather LAST UPDATED July 23, 2019 · FIRST PUBLISHED December 11, 2015, 2 Comments

    This Four Ingredient Truffle Fudge is a simple, versatile fudge that is creamy and just about the easiest thing you can make this holiday season! 4 Ingredient Truffle Fudge

    Welcome to your new favorite fudge recipe this Christmas-- Truffle Fudge!

    It's Christmas baking season, and I'm usually up to my eyeballs in flour and butter at this point in the month, but I decided to simplify this year. I'm not baking cookies or treats for the kid's teachers (Hello Bath and Body hand soap gifts!), I'm not making goodie plates for neighbors, I'm not sending candy across the US, and coincidentally, I'm not going to gain 15 pounds this holiday season! Winning!

    But, it IS fudge season after all, and I wouldn't feel right about going another year without sharing my shortcut version of fudge. I love this recipe because it's stupid easy and you can customize it however you like. Want to sub truffles for peanut butter cups? No problem. Even caramel-y cookies or other candies work well as mix-ins.

    4 Ingredient Truffle Fudge

    I love using Lindt White Peppermint Truffles because peppermint obviously pairs well with chocolate, but also because the finished fudge looks fun and different. The only truffles I wouldn't recommend using are the caramel filled. Cutting a caramel filled truffle in half is one delicious, sticky mess.

    4 Ingredient Truffle Fudge

    I put together a quick little video to show how to throw this fudge together and I hope you like it!

    📖 Recipe

    4 Ingredient Truffle Fudge
    Print Recipe
    No ratings yet

    4 Ingredient Truffle Fudge

    A simple, versatile fudge that is creamy and just about the easiest thing you can make this holiday season!
    Prep Time5 minutes mins
    Cook Time5 minutes mins
    Total Time10 minutes mins
    Course: Dessert
    Cuisine: American
    Keyword: lindor chocolate, peppermint bark fudge, sweetened condensed milk fudge
    Servings: 12 servings
    Calories: 363kcal
    Author: Heather Cheney

    Ingredients

    • 6 ounces semi-sweet chocolate
    • 6 ounces milk chocolate
    • 14 ounces sweetened condensed milk
    • 8.5 ounces Lindt White Peppermint Truffles

    Instructions

    • Grease an 8x8" baking pan.
    • Cut eat truffle in half and lay most of the truffles cut side down in a grid pattern in the baking dish. Roughly chop remaining truffles and set aside.
    • In a microwave safe bowl combine chocolate and sweetened condensed milk. Microwave for 30 seconds, stir, and continue to microwave and stir in 15 second intervals until the chocolate is completely melted.
    • Carefully scoop/pour the chocolate mixture over the truffles. Smooth the top with a spatula and tap the pan on the countertop a few times to make sure the chocolate gets in between the truffles. Sprinkle the chopped truffles over the top.
    • Refrigerate pan for 2 hours and cut into bite-sized pieces.

    Nutrition

    Serving: 1serving | Calories: 363kcal | Carbohydrates: 45g | Protein: 5g | Fat: 19g | Saturated Fat: 11g | Cholesterol: 14mg | Sodium: 61mg | Potassium: 244mg | Fiber: 1g | Sugar: 41g | Vitamin A: 145IU | Vitamin C: 1.5mg | Calcium: 147mg | Iron: 1.5mg


    Peppermint Patty Stuffed Chocolate Cookies

    By Heather LAST UPDATED July 23, 2019 · FIRST PUBLISHED December 1, 2015, Leave a Comment

    These Peppermint Patty Stuffed Chocolate Cookies won't last long this holiday season! Who doesn't love a rich chocolate cookie stuffed with a cool peppermint patty? Perfect for dunking in a cold glass of milk or hot cup of cocoa.Peppermint Patty Stuffed Chocolate Cookies


    Have you emerged from your turkey coma yet? We're a good 5 days past turkey day so I hope you've been able to make a full recovery by now. Today I'm sharing a pretty stellar cookie recipe that will be the talk of your goodie plates this year. These Peppermint Patty Stuffed Chocolate Cookies are pretty simple to put together and have a pretty big wow factor when bitten into. They are chocolatey and soft and carry a cool layer of peppermint in the middle. So good!

    Let's make them! The chocolate cookie dough is pretty straightforward and the directions are in the recipe so I'm skipping ahead. You'll want to find small peppermint patties to stuff the cookies with. These are what I used and I found mine in the bulk candy section at WINCO. To assemble you'll scoop your dough out into 2 tablespoon portions. I used my cookie scoop to make it easy but a tablespoon works too. Roll your dough into a ball if you didn't use a scoop and gently flatten into a disk. Place a patty in the middle of each disk.
    Peppermint Patty Stuffed Chocolate Cookies

    Bring the dough up and around the patty, enclosing it completely and smoothing out the sides and top. Once you do you a couple you'll get the hang of it and it goes pretty quickly.

    Peppermint Patty Stuffed Chocolate Cookies

    Place the cookies 2" apart on a lined baking sheet. These are what I use to bake all my cookies on. They are the best and nothing sticks to them! They'll bake for about 10-12 minutes but make sure not to over-cook them. The key to keeping these soft is to bake them just until they are barely done. When the 10 minute mark comes, take a look at them and see if the top is still shiny or doughy looking. If it isn't, take them out of the oven but if they are watch them closely until that doughy look just goes away and take them out of the oven as soon as they look done.

    Peppermint Patty Stuffed Chocolate Cookies

    Let the Peppermint Patty Stuffed Chocolate Cookies cool completely and give them a good dusting of powdered sugar if you want. Powdered sugar makes everything look prettier, I think.  Another thing I like about these cookies is that they freeze beautifully and taste fresh-baked when defrosted. So get them baked now, throw them into the freezer and pull them out just before your holiday guests get into town in a few weeks (<--what?!?).

    Peppermint Patty Stuffed Chocolate CookiesPeppermint Patty Stuffed Chocolate Cookies

    📖 Recipe

    Peppermint Patty Stuffed Chocolate Cookies
    Print Recipe
    3.80 from 5 votes

    Peppermint Patty Stuffed Chocolate Cookies

    These Peppermint Patty stuffed chocolate cookies won't last long this holiday season! Who doesn't love a rich chocolate cookie stuffed with a cool peppermint patty? Perfect for dunking in a cold glass of milk or hot cup of cocoa.
    Prep Time20 minutes mins
    Cook Time12 minutes mins
    Total Time32 minutes mins
    Course: Dessert
    Cuisine: American
    Keyword: holiday cookies, stuffed cookies, york cookies
    Servings: 36 cookies
    Calories: 135kcal
    Author: Heather Cheney

    Ingredients

    • 1 cup salted butter softened
    • 1 cup sugar
    • 1 cup brown sugar
    • 2 whole eggs
    • 2 teaspoon vanilla extract
    • 3 cups all purpose flour
    • ½ cup cocoa
    • 1 teaspoon baking soda
    • ½ teaspoon kosher salt
    • 36 whole small peppermint patties
    • powdered sugar for dusting

    Instructions

    • Preheat oven to 350 degrees.
    • In a stand mixer, beat butter with sugars until light and smooth. Add eggs and vanilla and mix until smooth.
    • In a separate bowl, whisk flour, cocoa, baking soda, and salt until combined. Slowly add into the butter mixture, beating until just combined and no dry spots remain.
    • Scoop dough into portions of 2 tablespoon each. Roll into a ball if needed and flatten gently. Place an unwrapped peppermint patty in them middle of each flattened mound of dough. Bring the dough around the peppermint patty until it completely covers the patty, smoothing the tops and edges.
    • Place cookies on a lined baking sheet, 2 inches apart.
    • Bake for 10-12 minutes or until the cookie is just barely set on top. The trick to keeping these cookies soft is to no over-bake them. A set cookie will not look shiny or doughy on top in the very middle.
    • Remove cookies from the oven and cool completely. Dust with powdered sugar if desired.

    Nutrition

    Serving: 1cookie | Calories: 135kcal | Carbohydrates: 21g | Protein: 1g | Fat: 5g | Saturated Fat: 3g | Cholesterol: 13mg | Sodium: 110mg | Potassium: 40mg | Sugar: 12g | Vitamin A: 160IU | Calcium: 10mg | Iron: 0.7mg

    Easy Orange Sticky Buns

    By Heather LAST UPDATED September 4, 2019 · FIRST PUBLISHED November 24, 2015,

    If you're in the mood for a buttery, tender roll swirled and topped with a tangy orange glaze these orange sticky buns are for you! 4 ingredients, 20 minutes, and a platter full of sticky and sweet rolls that will keep you licking your fingers!Easy Orange Sticky Buns


    In my family Thanksgiving and Christmas are pretty food centric holidays. Surprise, surprise! I bet you never would have guessed... Ha! We usually start our holiday with a nice breakfast, skip lunch and hold out for our fun dinners. Our breakfasts usually vary based on what we're in the mood for, but one thing is always on our table-- Orange Rolls. And I'm not talking about homemade rolls here. We pop open a can (or 3) of Pillsbury® Orange Sweet Rolls and wait with bated breath as they bake. There's something about that tangy orange icing that is just too good and I really can't remember a holiday where we haven't made them. It might seem like a silly tradition, but it's ours and we love it.

    Since these orange rolls are such a holiday staple for us, I thought it would be fun to try to reinvent them. I didn't want it to take a lot of time or leave me with a sink full of dishes, so I headed to the refrigerated dough section at Walmart and settled on other Pillsbury® Crescent® rolls for the base and just 3 other ingredients-- orange marmalade, orange juice concentrate, and brown sugar. Using Pillsbury® Crescent® rolls kept them simple and easy and the result turned out so buttery, tender, sticky, and tangy, just like I wanted them to be!

    Easy Orange Sticky Buns

    To make them you just roll out the can of Crescent® roll dough, leaving it in one big rectangle. You might be tempted to try to pinch all the seams together but it's not really necessary. You'll then spread the top of the dough with ¼ C of orange marmalade.

    Easy Orange Sticky Buns

    Starting with the widest edge of the rectangle, gently roll it up like you would when making cinnamon rolls and set aside.

    Easy Orange Sticky Buns

    Generously coat 8 wells of a muffin tin with non-stick spray and place 1 teaspoon each of brown sugar and frozen orange juice concentrate in the bottom of each well. Don't be tempted to use orange juice. Just don't. It might seem weird to use straight up concentrate but that's what gives these rolls so much orange flavor and helps with the sticky factor.

    Easy Orange Sticky Buns

    Cut the rolled up dough into 8 even rounds using a serrated knife and place each piece into one of the wells in the muffin tin. If they look uneven or like they are going to fall over, it's okay they will bake up just fine.

    Easy Orange Sticky Buns

    Bake for about 15-17 minutes at 375 degrees or until golden brown. Once they come out of the oven immediately run a knife around the edge and turn the rolls out onto a platter by inverting the pan. If you wait too long the orange sauce will have a chance to cool and it will be harder to get them out of the pan.

    Easy Orange Sticky Buns

    Do you have a favorite holiday tradition? Even if it's a little bit silly, I'd love to hear it. These are the things that make the holidays so special! #warmtraditions

    Easy Orange Sticky Buns

    📖 Recipe

    Easy Orange Sticky Buns
    Print Recipe
    4.50 from 10 votes

    Easy Orange Sticky Buns

    If you're in the mood for a buttery, tender roll swirled and topped with a tangy orange glaze these orange sticky buns are for you! 4 ingredients, 20 minutes, and a platter full of sticky and sweet rolls that will keep you licking your fingers!
    Prep Time10 minutes mins
    Cook Time17 minutes mins
    Total Time27 minutes mins
    Course: Dessert
    Cuisine: American
    Keyword: crescent roll recipe, orange roll recipe, pillsbury
    Servings: 8 rolls
    Calories: 149kcal
    Author: Heather Cheney

    Ingredients

    • 1 can Pillsbury® Crescents®
    • ¼ cup orange marmalade
    • 3 tablespoons brown sugar
    • 3 tablespoons orange juice concentrate

    Instructions

    • Preheat oven to 375 degrees.
    • Unroll dough into a large rectangle. There's no need to pinch the seams together.
    • Spread orange marmalade evenly over the dough. Starting with the widest edge of the dough, roll up like a cinnamon roll into one log.
    • Generously coat 8 wells of a muffin tin with non-stick cooking spray. Place 1 teaspoon each of orange juice concentrate and brown sugar into the bottom of each well.
    • Cut the log into 8 even portions and place on top of the orange juice and brown sugar.
    • Bake for 15-17 minutes or until golden brown.
    • Immediately run a knife around the edge of each roll and invert onto a platter. Rolls are best served warm.

    Nutrition

    Serving: 1roll | Calories: 149kcal | Carbohydrates: 24g | Protein: 1g | Fat: 6g | Saturated Fat: 2g | Sodium: 228mg | Potassium: 43mg | Sugar: 15g | Vitamin A: 20IU | Vitamin C: 8.2mg | Calcium: 9mg | Iron: 0.4mg


    Orange Sticky Buns

    This is a sponsored conversation written by me on behalf of Pillsbury. The opinions and text are all mine.

    Sausage and Cheese Appetizer Bites

    By Heather LAST UPDATED July 17, 2019 · FIRST PUBLISHED November 11, 2015, Leave a Comment

    These sausage and cheese appetizer bites literally take 5 minutes to put together, 15 to bake and 30 seconds to devour. Rich, cheesy, and ridiculously addicting. Sausage and Cheese Appetizer Bites

    You guys, make these Sausage and Cheese Appetizer Bites, NOW!

    Holy fudgesicles. Thanksgiving is almost officially 2 weeks away and I'm hosting. HOSTING. I'm acting like it's a really big deal for me, but it's not. I actually really like it and I'm excited to have both mine and the hubs parents coming to share it with us. I've started on the menu but it's going to be pretty simple so I'm not too worried about it. How about you, are you hosting this year? Have you started planning? If not, I have some excellent news. I've teamed up with a big group of bloggers and we're all sharing a Thanksgiving recipe this week. If you search #blogsgivingdinner in our good friend Google,  you'll be able to find all the posts and get started on that planning.

    I thought I'd share this recipe for Sausage and Cheese Bites as my contribution to #blogsgivingdinner because it's the perfect little appetizer before the big meal. Not only are they tasty, they are so simple to throw together and they can even be made up ahead of time and baked just before you're ready to serve them. This is one of those super quirky recipes that has been floating around for a long time. If I hadn't tried these at a party I never would have even thought twice about making them because, I'll be honest, the ingredients sound weird. But they are SO good. Like little bready, sausage-y, meatballs. And the sauce pushes them over the edge.

    And they take 3 ingredients, 5 if you include making the sauce which you MUST make.

    Let's Make Sausage and Cheese Appetizer Bites!

    You'll start with some sausage. Regular breakfast sausage works great, but HOT breakfast sausage is awesome too if you like a little kick.

    Sausage and Cheese Appetizer Bites

    To the sausage you'll add some dry bisquick and sharp cheddar.

    Sausage and Cheese Appetizer Bites

    You'll start mixing it by hand but you'll soon learn it's much more efficient to just use your hands. This stuff gets stiff.

    Sausage and Cheese Appetizer Bites

    I use a cookie scoop to portion them out into perfect little balls and then roll them smooth with my hands.

    Sausage and Cheese Appetizer Bites

    Lay them out on a lined baking sheet and bake @ 400 degrees for about 15 minutes or until they are golden brown. They are best when they are hot out of the oven so wait until you're ready to eat to throw them in. If you're making them up ahead of time just roll them into balls, cover with plastic wrap and put in the fridge until ready to bake.

    Sausage and Cheese Appetizer Bites

    For the sauce, THIS SAUCE, you need two ingredients: Orange marmalade, and chili sauce. And by chili sauce I mean the kind you find in the ketchup aisle, NOT the Asian foods section. The sauce totally takes the bites from good to amazing. It's a spin on the popular grape jelly and chili sauce meatball sauce recipe and is the perfect compliment to these little bites. It's sweet and a little bit bitter from the orange rind and the chili sauce just rounds it out.

    📖 Recipe

    Sausage Cheese Appetizer Bites-- a quick and easy snack!
    Print Recipe
    4.42 from 12 votes

    Sausage and Cheese Appetizer Bites

    These sausage and cheese appetizer bites literally take 5 minutes to put together, 15 to bake and 30 seconds to devour. Rich, cheesy, and ridiculously addicting.
    Prep Time10 minutes mins
    Cook Time15 minutes mins
    Total Time25 minutes mins
    Course: Appetizer
    Cuisine: American
    Keyword: bisquick sausage balls, easy appetizer
    Servings: 24 bites
    Calories: 90kcal
    Author: Heather Cheney

    Ingredients

    • 1 ½ cups Bisquick Baking Mix
    • ½ pounds raw breakfast sausage hot or regular.
    • 1 cups sharp cheddar grated
    • ¼ cups orange marmalade
    • ¼ cups chili sauce

    Instructions

    • Preheat oven to 400 degrees.
    • Combine raw sausage and Bisquick and cheese, using hands or a stand mixer to combine. The mixture will be very stiff.
    • Scoop into 2" balls and roll. Place on a lined baking sheet and bake for 15 minutes or until golden brown.
    • Combine the orange marmalade and chili sauce in a small bowl and microwave until warm. Serve with the hot sausage and cheese bites.

    Nutrition

    Serving: 1ball | Calories: 90kcal | Carbohydrates: 7g | Protein: 3g | Fat: 5g | Saturated Fat: 2g | Cholesterol: 11mg | Sodium: 224mg | Potassium: 50mg | Sugar: 3g | Vitamin A: 75IU | Vitamin C: 0.7mg | Calcium: 50mg | Iron: 0.4mg

    One Pan Cheeseburger Macaroni

    By Heather LAST UPDATED July 17, 2019 · FIRST PUBLISHED November 4, 2015, 4 Comments

    Forget the box and make this easy one pan dish with ingredients you likely already have on hand. It is so flavorful, creamy, and there are never any leftovers at my house. This is the ultimate in easy fall comfort food!One Pan Cheeseburger Macaroni


    Ever since bingeing on Pasta Roni when I first left home to go to school, I haven't been able to bring myself to buy another box of pasta, hamburger helper, or the like. Why I ate so much of it is still beyond me. I used to throw some frozen broccoli into the water with the pasta and call that good for dinner. Fun times. I do, however, LOVE myself a quick one pan meal!  This recipe for One Pan Cheeseburger Macaroni uses fresh, real ingredients and is done in just about the same amount of time that it's boxed counterpart is and tastes approximately 2,100 times better. One Pan Cheeseburger Macaroni 
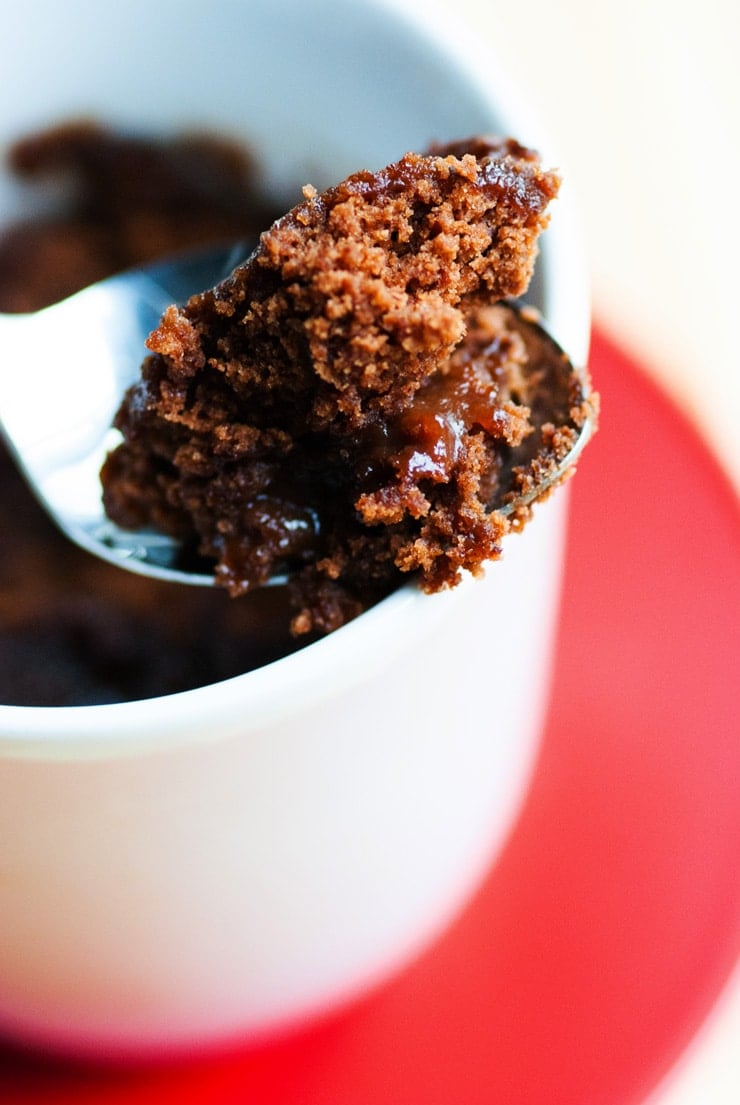
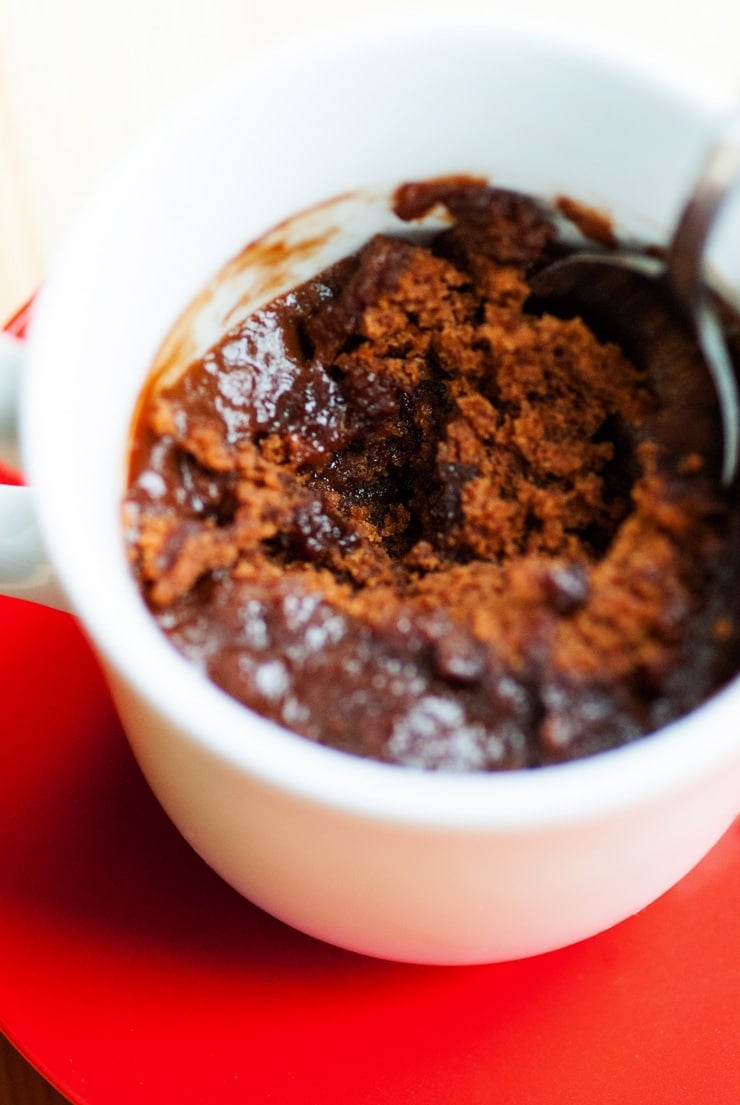
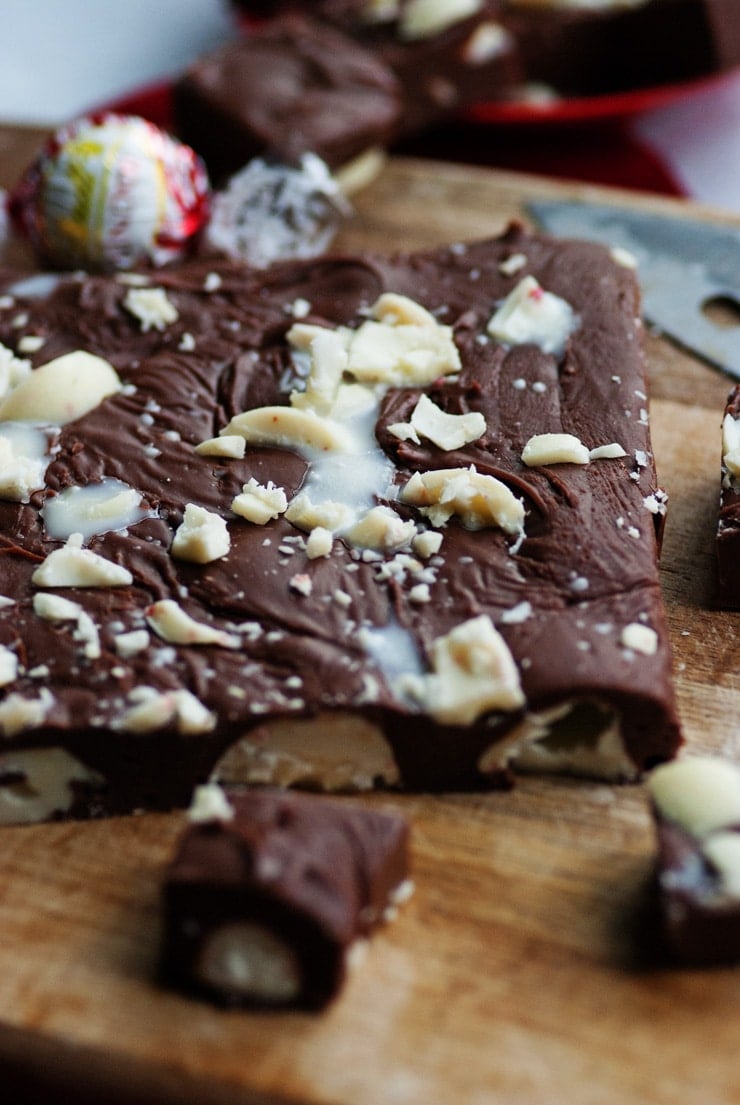
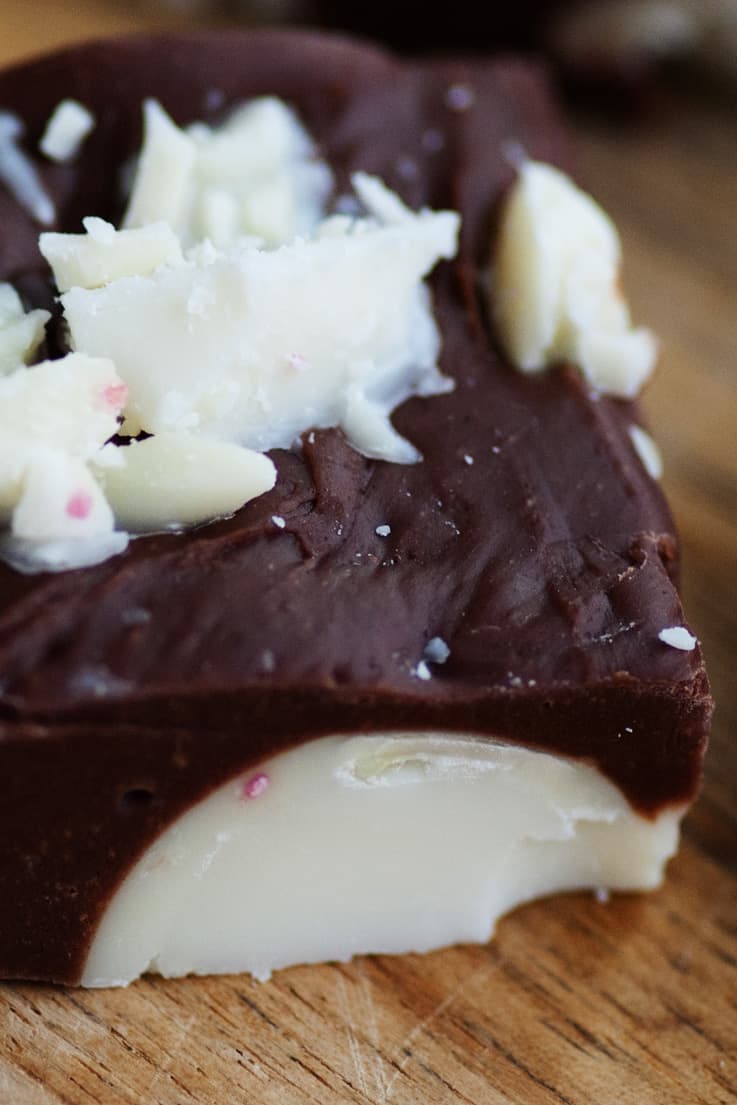
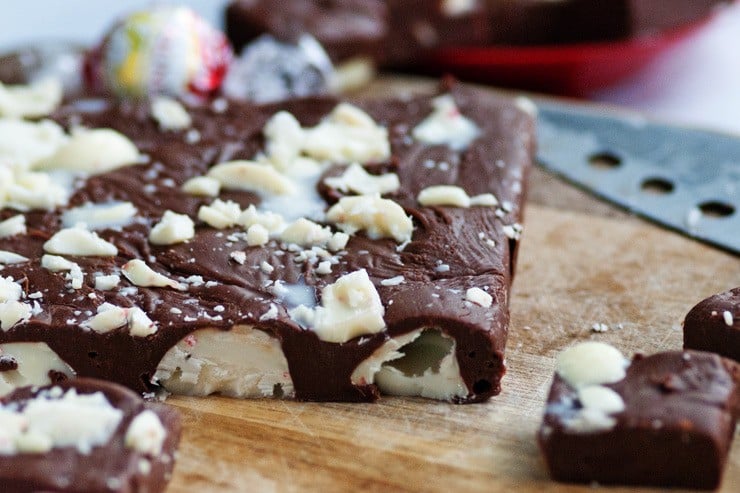
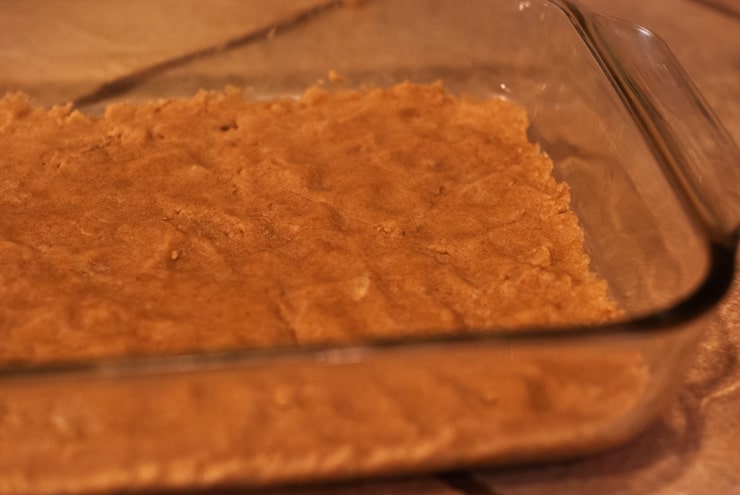
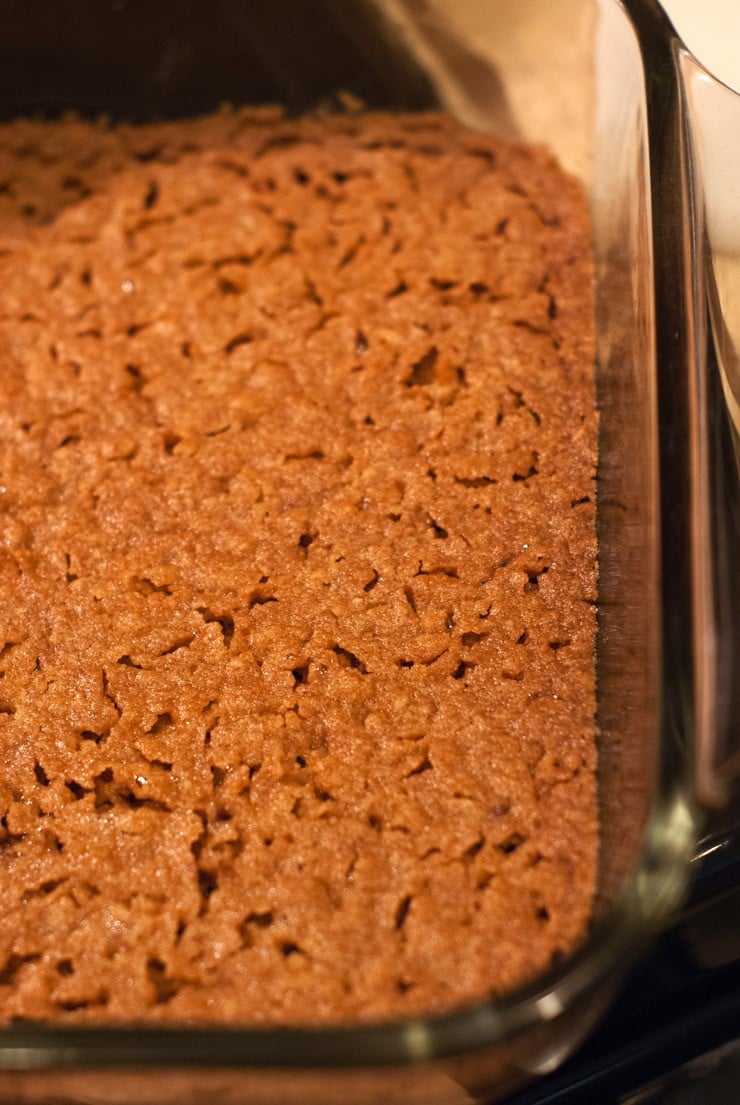
You just brown, stir, boil, stir a little bit more, and it's done! Hope you'll try it.

    📖 Recipe

    One Pan Cheeseburger Macaroni
    Print Recipe
    4.50 from 4 votes

    One Pan Cheeseburger Macaroni

    Forget the box and make this easy one pan dish with ingredients you likely already have on hand. It is so flavorful, creamy, and there are never any leftovers at my house. This is the ultimate in easy fall comfort food!
    Prep Time10 minutes mins
    Cook Time25 minutes mins
    Total Time35 minutes mins
    Course: Main Course
    Cuisine: American
    Keyword: cheeseburger helper, hamburger helper, One pan dinner
    Servings: 4 servings
    Calories: 726kcal
    Author: Heather Cheney

    Ingredients

    • 1 pound lean ground beef
    • 1 whole medium onion chopped
    • 1 teaspoons kosher salt
    • 1 teaspoon chili powder
    • ¼ teaspoon dried dill weed
    • ½ teaspoon sugar
    • ¼ teaspoon garlic powder
    • 1 ½ cup milk
    • 2 teaspoon corn starch
    • 15 ounces chicken broth
    • 15 ounces diced tomatoes UNDRAINED
    • ½ pound elbow macaroni
    • 2 cups cheddar cheese grated
    • ¼ cups fresh parsley chopped

    Instructions

    • In a large skillet brown the beef and onion over medium heat until no longer pink and the onion is soft. Drain off excess fat and return to the stove.
    • Stir salt, chili powder, dill, sugar and garlic powder into the beef and continue to cook over medium heat.
    • In a small bowl combine milk with the corn starch, stirring until fully dissolved.
    • Pour the tomatoes and chicken broth into the pan followed by the milk, stirring until well combined. Add macaroni to the pan, bring to a boil, reduce heat to a simmer and cover. Cook for 11-15 minutes or until the macaroni is tender. Remove from the heat.
    • Stir in cheese and parsley, stirring until combined. Serve hot.

    Nutrition

    Serving: 1serving | Calories: 726kcal | Carbohydrates: 54g | Protein: 48g | Fat: 34g | Saturated Fat: 18g | Cholesterol: 142mg | Sodium: 1460mg | Potassium: 982mg | Fiber: 3g | Sugar: 9g | Vitamin A: 1305IU | Vitamin C: 22.3mg | Calcium: 581mg | Iron: 5.2mg


    One Pan Cheeseburger Macaroni


    Sizzler Cheese Toast Copycat

    By Heather LAST UPDATED July 17, 2019 · FIRST PUBLISHED October 20, 2015, 4 Comments

    No more longing for those slices of butter and cheese goodness-- make them at home in just a few minutes! Perfect for dunking in a big bowl of soup this fall and winter!Sizzler Cheese Toast Copycat

    I'm all for a big handful of crackers in my soup, but there's just nothing quite like dunked bread. Especially when the bread is cheesy and buttery and tastes like it came from Sizzler. Remember Sizzler? Do they even still exist? It's been many moons since I've visited the magical land where onions rings, nachos, salads, and cheap steaks are plentiful and abundant but I haven't forgotten about their cheese toast and I'm going to share my quick recipe for making it today.

    *This is a sponsored post written by me on behalf of Campbell Soup Company. All opinions are 100% mine.

    But first, cheese toast goes perfectly with soup and I had a chance to try @Campbell's new Slow Kettle Style Andouille Sausage Jambalaya Soup a few weeks back. This is one of Campbell’s new products and I'm not sure I've had a prepared soup that had so much flavor before. It had a bit of a bite and would definitely curb my craving for Jambalaya if I were to get the itch.

    Sizzler Cheese Toast Copycat

    The tagline for this Slow Kettle Style line of soups is "Patience, not Preservatives" and not only is it clever, the flavors of real ingredients really shine through.

    Sizzler Cheese Toast Copycat

    But this bowl of soup is looking pretty lonely, so let us now make some cheese bread for dunking. To recreate Sizzler's cheese toast you need 2 ingredients-- butter and cheese. Whowoulddathunk?

    Sizzler Cheese Toast Copycat

    Mix that butter and cheese together and spread onto one slice of thick sliced bread. I think texas toast type bread makes it taste the most similar but any type of bread will work.

    Sizzler Cheese Toast Copycat

    And then you just put the bread butter side down on a non-stick skillet and cook over medium-low heat until the cheese is golden brown and the bread is heated through.

    Sizzler Cheese Toast Copycat

    A super simple side that goes great with a bowl of soup like one of Campbell's Slow Kettle Soups or whip one up on your own.

    📖 Recipe

    Sizzler Cheese Toast Copycat
    Print Recipe
    5 from 2 votes

    Sizzler Cheese Toast Copycat

    No more longing for those slices of butter and cheese goodness-- make them at home in just a few minutes! Perfect for dunking in a big bowl of soup this fall and winter!
    Prep Time5 minutes mins
    Cook Time5 minutes mins
    Total Time10 minutes mins
    Course: Bread
    Cuisine: American
    Keyword: bread for soup, copycat, sizzler restaurant
    Servings: 4 slices
    Calories: 264kcal
    Author: Heather Cheney

    Ingredients

    • ¼ C softened salted butter
    • ¼ C grated Italian Cheese blend parmesan, mozzarella, asiago, etc.
    • 4 slices thick sliced bread like texas toast

    Instructions

    • Combine butter and cheese in a small bowl.
    • Spread on one side of the bread and cook buttered side down in a non-stick skillet over medium-low heat. Cook until cheese is golden and transfer to a plate. Cut and serve.

    Nutrition

    Serving: 1slice | Calories: 264kcal | Carbohydrates: 17g | Protein: 4g | Fat: 20g | Saturated Fat: 9g | Cholesterol: 31mg | Sodium: 324mg | Fiber: 1g | Sugar: 2g | Vitamin A: 355IU | Calcium: 17mg | Iron: 6mg


    Sizzler Cheese Toast Copycat

    Creamy Tomato Soup with Cheddar Bay Dumplings

    By Heather LAST UPDATED March 21, 2022 · FIRST PUBLISHED October 13, 2015, 5 Comments

    What's better than a bowl of creamy tomato soup on a cool fall day? Um... how about a bowl of tomato soup topped with cheesy garlic dumplings?! It's the ultimate comfort food and a cinch to throw together to boot!

    Pot with tomato soup and cheese dumplings in it

    Well I think I can finally say we're moved into our new house. Sure, there are a few stray boxes here and there, but I'm feeling pretty settled. Most of the remaining boxes are things like decorations and my hubby's 2,783 books.

    He likes books.

    Me, I'm more concerned with curtains at the present. Have you ever had to buy curtains? Most. painful. experience. ever. I've spent WAAAAY too many late-night internet shopping sessions killing myself over which ones to get. Are they the right length? Width? Color? Pattern? Will my book-loving hubs hate them? Not to mention I'm cheap. Like ridiculously cheap. And the curtains are spendy. How can a single piece of fabric be so expensive?

    I'm obviously having some very real first-world problems and I'm kind of grossing myself out so I'll stop. How about some soup? Are you guys ready for this recipe? I'm kind of in love with this whole idea. I grew up with my mom making dumplings out of Bisquick so I've got a special place in my heart for this kind of soup to begin with. But putting cheesy garlic dumplings on top of tomato soup wasn't something I had ever thought of until a few weeks ago.

    There I was, making tomato soup and about to scoop the biscuits onto the baking tray to make actual biscuits and in an instant of sheer genius, I plopped that dough into the soup instead of the oven. Boom.

    Onions and flour cooking in a pot

    To start the soup you'll saute some onion in a little bit of butter until they are soft and then stir in some flour.

    Some chicken broth and canned tomatoes get stirred into the mix, thickened and then seasoned.

    tomato soup simmering in a pot

    This step is optional but I like a smooth tomato soup so I puree it. Just make sure you don't overfill the blender or you'll end up with a big mess on your hands. And face... and ceiling. Better yet, just use an immersion blender if you have one. Blending hot liquids can be tricky business.

    tomato soup in a blender

    For the dumplings, I'm using a package of Red Lobster's Cheddar Bay Biscuit Mix. I buy mine in a big box at Costco but I've seen it in smaller portions at most grocery stores. Just one 11-12 oz box will be enough for one pot of soup.

    cheddar bay biscuit mix

    Mix the dough just like it says on the box.

    biscuit dough being mixed in a red bowl

    And drop spoonfuls of the dough into your simmering pureed (or not) soup until all the dough has been used.

    dumplings being cooked in tomato soup

    Cover the pot and let simmer until the dumplings are fluffy and set.

    Close up of Creamy Tomato Soup with Cheddar Bay Dumplings

    And for the best part.... mix together a little butter with the garlic seasoning packet included in the mix and brush over the tops of the dumplings. The seasoned butter will soak into the dumplings and also drip down into the soup giving it awesome flavor.

    a ladle with tomato soup and dumplings on it

    The finished soup is creamy and perfect with a piece of dumpling in each bite. Enjoy!

    📖 Recipe

    Creamy Tomato Soup with Cheddar Bay Dumplings
    Print Recipe
    4.49 from 52 votes

    Creamy Tomato Soup with Cheddar Bay Dumplings

    What's better than a bowl of creamy tomato soup on a cool fall day? Um... how about a bowl of tomato soup topped with cheesy garlic dumplings?! It's the ultimate comfort food and a cinch to throw together to boot!
    Prep Time10 minutes mins
    Cook Time50 minutes mins
    Total Time1 hour hr
    Course: Soup
    Cuisine: American
    Keyword: dumplings from biscuit mix, homemade tomato soup, red lobster biscuit mix
    Servings: 6 servings
    Calories: 353kcal
    Author: Heather Cheney

    Ingredients

    • 2 tablespoons butter
    • 1 sweet white onion chopped
    • 3 tablespoons flour
    • 3 cups chicken broth
    • 43.5 ounces diced tomatoes undrained
    • 1 teaspoons sugar
    • ¾ teaspoons kosher salt
    • ¼ teaspoons black pepper
    • 11 ounce package cheddar bay biscuit mix
    • 2 tablespoons butter

    Instructions

    • In a large pot, melt butter over medium heat. Stir in onion and cook until translucent. Add in flour and cook, stirring constantly for 1 minute.
    • While stirring, slowly pour in chicken broth and canned tomatoes. Stir until smooth, bring to a boil and reduce heat to a simmer. Season with sugar, salt and black pepper.
    • If a smooth soup is desired, divide the soup into two portions and puree until smooth in a blender. Return soup to pot and bring back up to a simmer.
    • Prepare biscuit mix as directed on package and drop spoonfuls of the biscuit batter into the simmering soup until all the batter is used. Cover pot and cook for 15-20 minute or until the dumplings are no longer doughy. Remove from heat.
    • Prepare the butter sauce using only 2 tablespoon of butter and the seasoning packet and brush over the tops of the dumplings in the pot and serve.

    Nutrition

    Serving: 6servings | Calories: 353kcal | Carbohydrates: 46g | Protein: 6g | Fat: 16g | Saturated Fat: 6g | Cholesterol: 21mg | Sodium: 1471mg | Potassium: 591mg | Fiber: 3g | Sugar: 12g | Vitamin A: 475IU | Vitamin C: 28.9mg | Calcium: 168mg | Iron: 3.9mg

    Homemade Hawaiian Haystacks

    By Heather LAST UPDATED July 17, 2019 · FIRST PUBLISHED October 6, 2015, 2 Comments

    These Homemade Hawaiian haystacks with chicken gravy made from scratch are one of my very favorite meals. It may look like a jumbled mess of ingredients but they are so tasty and easy to put together.Homemade Hawaiian Haystacks

    Homemade Hawaiian Haystacks

    Who's had Hawaiian haystacks before? Do you love them? Hate them?

    They were a staple in our house while growing up and are still one of my favorite meals. It's kind of a wacky combination of ingredients but they really do go well together... unless you don't think they do. In which case, I invite you to go make some chocolate chip cookies while I finish out this post.

    A typical Hawaiian Haystacks recipe uses condensed cream of chicken soup for the gravy base but I like it better when I make my own so that's the recipe I'm going to share today.

    How to Make Hawaiian Haystack Sauce From Scratch

    My chicken gravy recipe just uses just a few ingredients like chicken broth, milk, flour, butter, and a bit of sour cream. You'll see that I add a little bit of turmeric to the gravy. It's a totally optional ingredient, but I add it because it gives the gravy a nice color and subtle flavor that works really well with all the toppings. I wouldn't run out and buy a whole jar just for the recipe but if you have it on hand I would definitely add it in.

    Homemade Hawaiian Haystacks

    Hawaiian Haystack Toppings and Base

    Sometimes I use white rice, other times I use brown. It just kind of depends on my mood and what I think my kids will eat that particular night. As for toppings, it's up to you! Some of my favorites include Diced Bell Peppers, black olives, fresh tomato, diced celery, toasted cashews and coconut, pineapple and crunchy Chinese noodles. The pineapple and Chinese noodles are definitely the best part!

    Homemade Hawaiian Haystacks

    Want more Easy Chicken Dinner Recipe?

    • Homemade Creamy Chicken Noodle Soup
    • Hawaiian Shoyu Chicken
    • Instant Pot Chicken Fettuccini Alfredo

    Tools/Ingredients Used in Making Homemade Hawaiian Haystacks

    • Better Than Boullion: I use a lot of chicken/beef/vegetable broth in my recipes because it adds such nice flavor but I don’t love keeping cans or cartons of it in my pantry. For this reason (and more) I use this broth base anytime I call for broth in my recipes. It only takes 1 teaspoon of base to make 1 cup of flavorful broth and can be stored for quite a while in the refrigerator.
    • OXO Handheld Slicer: I love this little tool because it slices small amounts of veggies quickly and easily and I don’t have to dirty a cutting board– I just slice right over the pot or plate! I especially love it for carrots and celery.

    📖 Recipe

    Print Recipe
    4.60 from 10 votes

    Hawaiian Haystacks

    These Homemade Hawaiian haystacks with chicken gravy made from scratch are one of my very favorite meals. It may look like a jumbled mess of ingredients but they are so tasty and easy to put together.
    Prep Time10 minutes mins
    Cook Time20 minutes mins
    Total Time30 minutes mins
    Course: Main Course
    Cuisine: American
    Keyword: cream of chicken soup, rice dinner, toppings
    Servings: 6 servings
    Calories: 231kcal
    Author: Heather Cheney

    Ingredients

    • ¼ cup butter
    • ¼ cup onion chopped
    • 6 tablespoons all purpose flour
    • 3 ½ cups chicken broth
    • 1 cup milk
    • ⅛ teaspoon black pepper
    • ½ teaspoon kosher salt
    • ⅛ teaspoon tumeric
    • 3 boneless skinless chicken breast halves cooked and shredded or cubed
    • ½ cup Sour Cream

    Toppings:

    • black olives
    • pineapple tidbits
    • diced celery
    • diced tomatoes
    • grated cheese
    • cashews
    • shredded coconut
    • green onions
    • crunchy Chinese noodles
    • diced bell pepper

    Instructions

    • In a large saucepan melt butter over medium heat, stir in onion and cook until translucent. Add flour, stirring and cooking for 1 minute.
    • Slowly pour in broth and milk, whisking while pouring. Continue to whisk until smooth, thickened and boiling. Remove from heat.
    • Stir in pepper, salt, tumeric and cooked chicken. Stir in sour cream. Serve gravy over rice with desired toppings.

    Nutrition

    Serving: 1serving | Calories: 231kcal | Carbohydrates: 9g | Protein: 15g | Fat: 14g | Saturated Fat: 8g | Cholesterol: 70mg | Sodium: 861mg | Potassium: 417mg | Sugar: 2g | Vitamin A: 440IU | Vitamin C: 11mg | Calcium: 80mg | Iron: 0.9mg

    Homemade Hawaiian Haystacks

    Easy Baked Rice Pilaf

    By Heather LAST UPDATED March 1, 2019 · FIRST PUBLISHED October 2, 2015, 3 Comments

    This is a sponsored post written by me on behalf of Campbell’s Soup Company. All opinions are 100% mine. Toast, stir, cover and bake! Show-stopping side dishes don't get much easier than this flavorful rice pilaf. Easy Baked Rice Pilaf


    If you've been following my posts here on HLF for even a moderate amount of time, you've probably noticed that broths are something that use a lot of in my cooking. They aren't just something I reserve for making soups or gravies or for soothing sore throats. I stir broths into sauces, casseroles and vegetables, and today we're making a killer rice pilaf with it.

    I love making rice with broth because it ups the flavor ante by approximately 410%. Of course I can't prove that, but it does make a world of difference. And, I can't prove the difference it makes until you try it... so let's make it!

    To start off you're going to toast the rice in a little bit of butter on the stove top. Toasting the rice gives the pilaf a great nutty flavor and helps the grains of rice stay singular after cooking giving it a nice texture. In addition to rice, you'll add in a little bit of broken up angel hair pasta. The pasta just gives it some color, a splash of texture and gives the pilaf a little extra pizzazz.

    Easy Baked Rice Pilaf

    When toasting the rice and pasta you'll notice that the pasta will brown faster than the rice and that's okay. If the pasta it golden brown and some of the rice is a little browned, it's good to go. Transfer the rice into a 9x13" pan and top with the mushrooms, onion, salt and pepper.

    Easy Baked Rice Pilaf

    For this recipe I swapped all the water that would usually be used to make rice with Swanson® Chicken Broth. Swanson® just came out with a new unsalted variety of broth and it's great because it means that you get to take control of the seasoning. Salt content varies between brands of broth and it's nice to be able to know it won't be a salt bomb when whatever you're cooking is done.

    Easy Baked Rice Pilaf

    Measuring is easy here because we're using the whole 32 oz carton! Just pour it all in.

    Easy Baked Rice Pilaf

    Give it a stir and cover tightly with foil.

    Easy Baked Rice Pilaf

    Pop it in the oven and don't even look at it until 60 minutes has gone by. But once it has, it will be ready! You'll notice that all of the mushrooms will have risen to the top, so just use a fork to fluff up the rice and stir them back into the rice.

    Taaaa-daa! Fluffy, flavorful, nutty, rice that is great served with just about anything. One of my favorite ways to serve this is to stir in some sliced almonds and dried cranberries after it comes out of the oven. So. stinking. good. But it's pretty darn good on it's own too.

    Easy Baked Rice Pilaf


    📖 Recipe

    Print Recipe
    5 from 3 votes

    Easy Baked Rice Pilaf

    Toast, stir, cover and bake! Show-stopping side dishes don't get much easier than this flavorful rice pilaf.
    Prep Time10 minutes mins
    Cook Time1 hour hr
    Total Time1 hour hr 10 minutes mins
    Course: Side Dish
    Cuisine: American
    Keyword: chicken and mushroom rice, rice a roni, rice with pasta pieces
    Servings: 6 servings
    Calories: 291kcal
    Author: Heather Cheney

    Ingredients

    • 2 tablespoon butter
    • 2 cups long grain rice
    • 1 bunch of angel hair pasta about the diameter of a dime, broken into ½-1" pieces
    • 4 ounces canned sliced mushrooms drained and roughly chopped or broken
    • 32 ounces Swanson Unsalted Chicken Broth
    • 1 teaspoon dried onion flakes
    • 1 teaspoon kosher salt or more to taste
    • ½ teaspoon black pepper
    • parsley for garnish optional

    Instructions

    • Preheat oven to 350 degrees.
    • In a large skillet, melt butter over medium heat and stir in rice and pasta. Cook, stirring constantly, until the rice and pasta start to turn golden brown- about 5-7 minutes.
    • Transfer rice into a 9x13" pan and combine with mushrooms, broth, onion flakes, salt and pepper. Taste the broth to make sure it is seasoned to your liking, adding more salt if needed.
    • Cover pan tightly with foil and bake for 60 minutes.
    • Remove from oven, take off foil and fluff the rice with a fork, incorporating all the mushrooms back into the rice that rose to the top.

    Nutrition

    Serving: 1serving | Calories: 291kcal | Carbohydrates: 52g | Protein: 7g | Fat: 5g | Saturated Fat: 2g | Cholesterol: 10mg | Sodium: 549mg | Potassium: 238mg | Fiber: 1g | Sugar: 1g | Vitamin A: 115IU | Vitamin C: 0.6mg | Calcium: 28mg | Iron: 1mg


    Easy Baked Rice Pilaf

    Stuffed Lasagna Shells

    By Heather LAST UPDATED July 17, 2019 · FIRST PUBLISHED September 22, 2015, 4 Comments

    All the flavor of a hot and bubbly lasagna stuffed inside pasta shells and baked to melty, saucy perfection. Switch up dinner time with this fun twist on a classic.Stuffed Lasagna Shells

    Lasagna makes me swoon. I have a feeling I'm not the only one.

    Lasagna makes your heart go pitter-patter too, doesn't it?

    Welp, this recipe takes all that wonky love I have for those cheesy layers of meat and goodness and mixes it all up and serves it in cute little pasta shells. Can you get on board with this?

    I sure can... and I did. Like 3 different times in the past week. #leftoversareglorious

    To get started, you'll brown 1.25 pounds of ground turkey with some onion and seasonings. You can use ground beef or Italian sausage or turkey italian sausage if you'd like. Actually you'll probably want to start cooking the pasta shells at this point too, but I don't have a picture of that.

    Stuffed Lasagna Shells

    We're keeping things super simple for this recipe and are using jarred pasta sauce. And YOU GUYS! Have you tried this sauce by Mezzetta? I've been buying their sauces for the past 6 months or so and I am absolutely in love. I started buying them when I did Whole 30 because they don't have added sugar but I haven't stopped. They are so flavorful and great for quick meals. My mom came to visit over the summer and I got her hooked too. Totally not sponsored, just thought I'd share.

    Stuffed Lasagna Shells

    You'll stir in ½ of the jar of sauce, 2 cups of ricotta cheese, and some parmesan cheese into the meat.

    Stuffed Lasagna Shells

    Heeello creamy deliciousness!

    Stuffed Lasagna Shells

    This next step is totally optional, but I think it's the easiest way to fill the shells. I fill a gallon sized ziplock bag with about ½ of the meat mixture and turn it into pastry bag to fill the shells with.

    Stuffed Lasagna Shells

    It might just be the cake decorator in me, but I think it's so much easier than trying to use a spoon to fill them.

    Stuffed Lasagna Shells

    As you fill the shells you can nestle them into the pan pretty snuggly. I usually have enough filling to fill an entire 9x13" pan and maybe a few extra that I bake in a small dish.

    Stuffed Lasagna Shells

    Spread the remaining pasta sauce across the tops of the shells and top with grated mozzarella.

    Stuffed Lasagna Shells

    Cover that bad boy up with some foil and let it bake for 30-40 minutes or until the cheese is really melted and bubbly. It's kind of like a treasure hunt figuring out where to take the first scoop. I always want to make sure I'm getting a whole shell but sometimes it's a little tricky to figure out where they are under all that cheese!

    Good luck. Stuffed Lasagna Shells

    📖 Recipe

    Stuffed Lasagna Shells
    Print Recipe
    3.78 from 9 votes

    Stuffed Lasagna Shells

    All the flavor of a hot and bubbly lasagna stuffed inside pasta shells and baked to melty, saucy perfection. Switch up dinner time with this fun twist on a classic.
    Prep Time30 minutes mins
    Cook Time40 minutes mins
    Total Time1 hour hr 10 minutes mins
    Course: Main Course
    Cuisine: Italian
    Keyword: baked pasta dish, cheese stuffed shells, lasagna in pasta shells
    Servings: 6 servings
    Calories: 398kcal
    Author: Heather Cheney

    Ingredients

    • 16 ounce box jumbo pasta shells
    • 1.25 pounds ground turkey
    • ½ medium onion
    • 1 tablespoon Italian Seasoning
    • 1 tablespoon garlic powder
    • ½ tablespoon kosher salt
    • 1 jar favorite pasta sauce
    • 1 pint ricotta cheese
    • ½ cup parmesan cheese grated
    • 2 cup mozzarella cheese grated

    Instructions

    • Preheat oven to 350 degrees
    • Cook pasta shells according to package directions, drain and set aside.
    • In a large skillet, brown turkey with onion until turkey is cooked through and onion is tender. Stir in salt, italian seasoning and garlic powder and cook for 1 minute. Stir in ½ of the sauce, ricotta cheese, and parmesan cheese.
    • Fill a gallon sized ziplock bag with half of the meat mixture and snip a corner off of the bag. Squeeze the filling into the pasta shells, arranging them in a 9x13" baking dish as you. Refill bag when needed and continue until all the filling is used.
    • Pour remaining sauce over the stuffed shells and top with mozzarella cheese. Cover with foil and bake 30-40 minutes or until hot and bubbly.

    Nutrition

    Serving: 1serving | Calories: 398kcal | Carbohydrates: 5g | Protein: 42g | Fat: 22g | Saturated Fat: 13g | Cholesterol: 127mg | Sodium: 1065mg | Potassium: 437mg | Sugar: 1g | Vitamin A: 705IU | Vitamin C: 0.7mg | Calcium: 469mg | Iron: 1.6mg

    Stuffed Lasagna Shells

    Toffee Bars

    By Heather LAST UPDATED July 23, 2019 · FIRST PUBLISHED September 18, 2015, 5 Comments

    Toffee Bars- Brimming with chocolate and sweet and sticky sweetened condensed milk, they are the perfect complement to a tall glass of milk or cup of tea. Crunchy, creamy, sweet and salty... they basically have it all. Toffee Bars

    I figure it's about time I give all you sugar addicts a little love here on HLF. I definitely like to focus on easy and flavorful meals, but every once in a while I need some goodies in my life-- hence these toffee bars. Please forgive the awful lighting in these pics. Even though I made these in the middle of the day, the lighting is my kitchen is akin to what cave lighting is like. Fortunately (also unfortunately) we're moving next week and I'll have a window(!) and a sliding glass door in my kitchen. Woot woot!

    For the base of these toffee bars, we're making a sort of cookie that is super crispy and tastes a lot like toffee. When you're mixing the dough it will look and feel just like cookie dough. Press it into a 9x13" pan and bake for 20-25 minutes or until it's golden brown.

    Toffee Bars

    When you take it out of the oven it will look craggy and kind of weird, but that's what you want.

    Toffee Bars

    While the base is cooling, pour a can of sweetened condensed milk into a small saucepan with 2 tablespoon of butter.

    Toffee Bars 
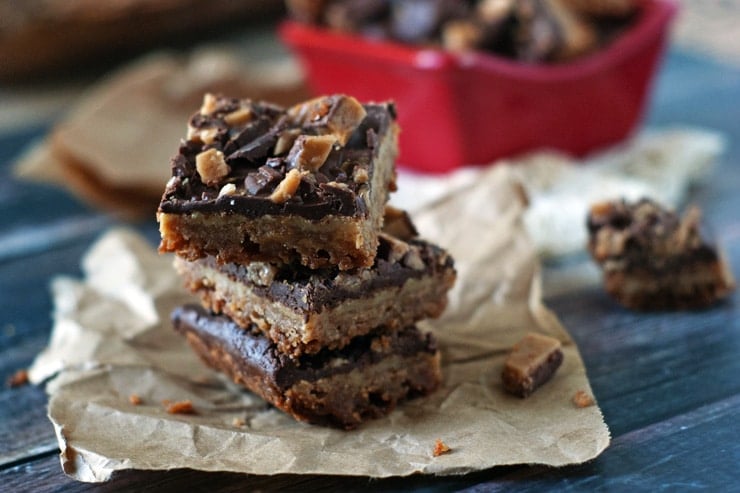
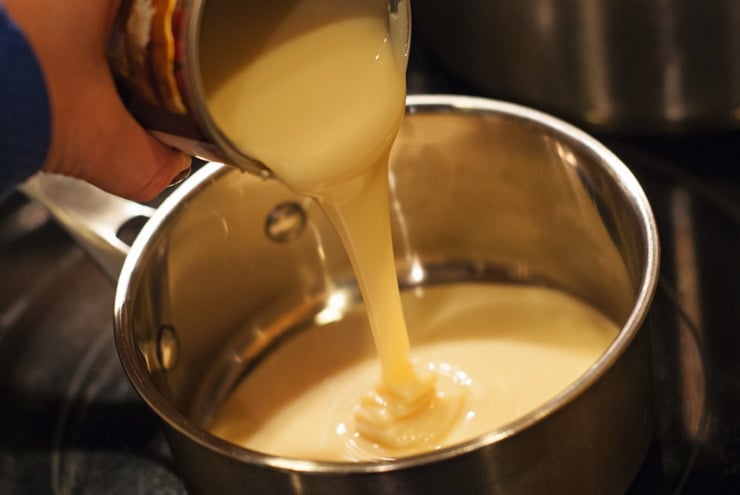
Cook over medium heat and stir it the whole time. It usually takes about 6-8 minutes. You want the milk to thicken up just a bit and you'll be able to tell when it's done. It's likely that you'll end up with little bits of caramelized milk throughout it from stirring up the layer from the bottom of the pan and that's okay.
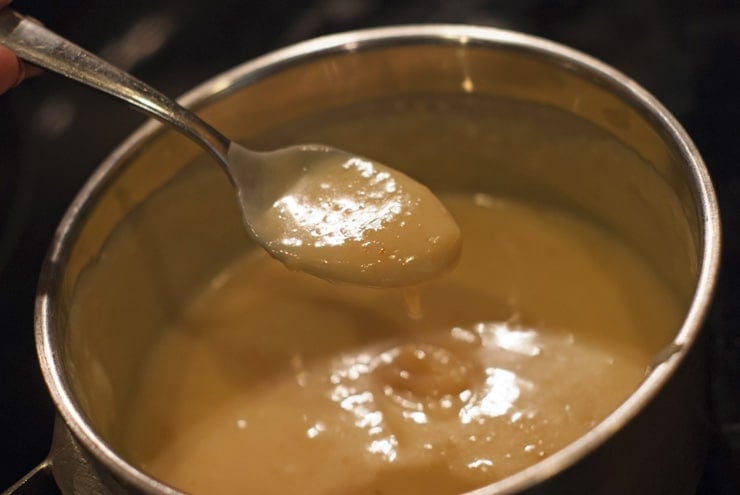
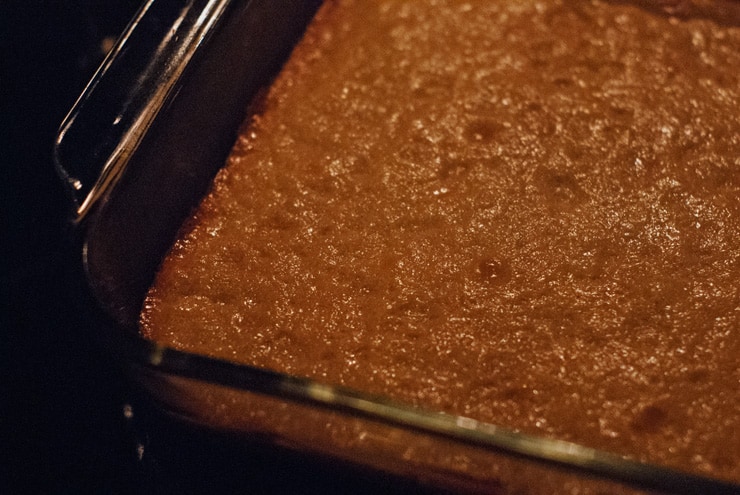
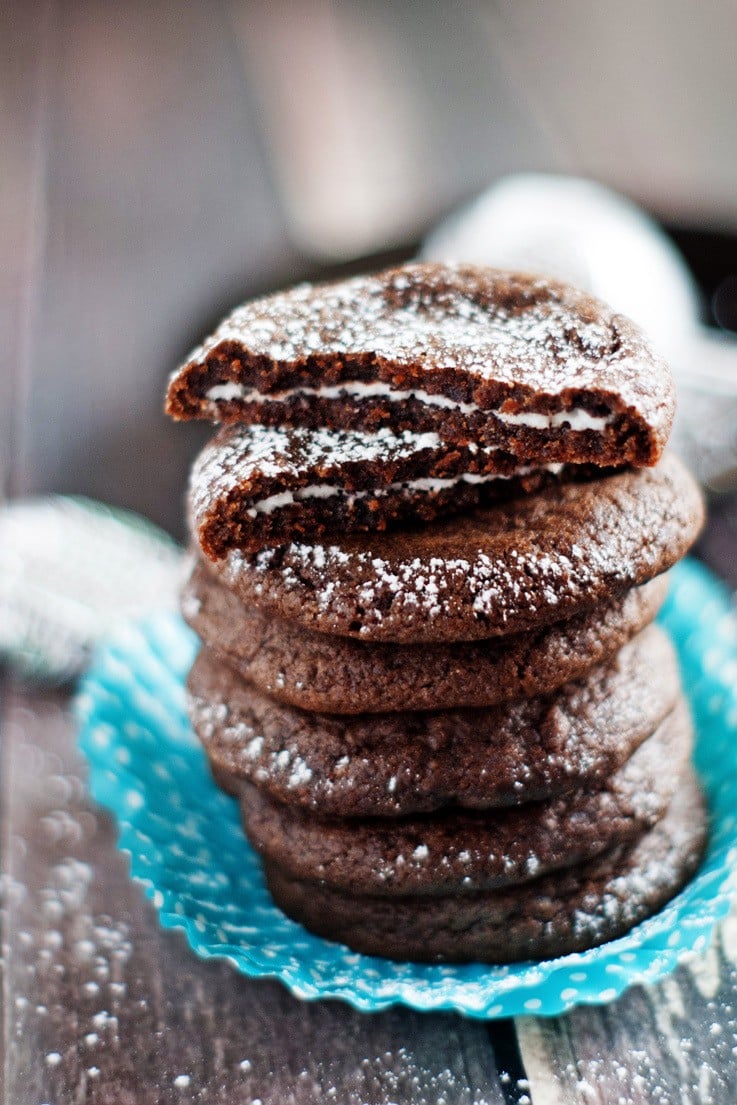
 Toffee Bars

    Spread the milk over the cookie base and put back into the oven until the milk is just lightly golden brown.

    Toffee Bars

    It will look a little something like this...

    Toffee Bars

    From here you'll immediately sprinkle milk chocolate chips over the milk layer and put back into the oven until they are shiny. Spread out the melted chocolate chips and top with some chopped up heath bars.

    Toffee Bars

    The hardest part of making these toffee bars is waiting what seems like FORRRREEVVVER for them to cool. If you try to cut into them before the chocolate has set you'll be asking for trouble. Sweet and messy trouble.

    Toffee Bars

    📖 Recipe

    Print Recipe
    4.74 from 19 votes

    Toffee Bars

    Brimming with chocolate and sweet and sticky sweetened condensed milk these bars are the perfect compliment to a tall glass of milk or cup of tea. Crunchy, creamy, sweet and salty... they basically have it all.
    Prep Time10 minutes mins
    Cook Time40 minutes mins
    Total Time50 minutes mins
    Course: Dessert
    Cuisine: American
    Keyword: cookie bars, heath bar dessert, holiday cookies
    Servings: 24 bars
    Calories: 227kcal
    Author: Heather Cheney

    Ingredients

    • ¾ cup butter softened
    • ¾ cup brown sugar
    • 1 ½ cup all-purpose flour
    • 10 ounces sweetened condensed milk
    • 2 tablespoons butter
    • 2 cups milk chocolate chips
    • 4 whole heath bars chopped

    Instructions

    • Preheat oven to 350 degrees.
    • Cream together butter, sugar and flour until is resembles cookie dough. Press evenly into a 9x13" pan and bake for about 25 minutes or until golden brown. It will look craggy, and that's OK!
    • While the base is cooling, pour milk into a small saucepan and stir in 2 tablespoon of butter. Cook, stirring constantly, until slightly thickened. It's okay if little bits of the milk caramelize on the pan and get scraped back into the mixture by stirring. It's all going to get caramelized eventually.
    • Once thickened, pour and spread over the cookie base. Bake for an additional 10-15 minutes or until milk is light golden brown.
    • Remove pan from oven and immediately sprinkle chocolate chips over the milk layer. Return to the oven for just a few minutes to melt the chips-- they will look shiny when ready. Remove pan from the oven and spread the melted chocolate evenly over the milk layer.
    • Sprinkle chopped Heath bars over the chocolate and allow to cool completely before slicing.

    Nutrition

    Serving: 1bar | Calories: 227kcal | Carbohydrates: 29g | Protein: 2g | Fat: 11g | Saturated Fat: 7g | Cholesterol: 24mg | Sodium: 86mg | Potassium: 63mg | Sugar: 22g | Vitamin A: 270IU | Vitamin C: 0.4mg | Calcium: 60mg | Iron: 0.6mg

    Picnic Macaroni Salad

    By Heather LAST UPDATED March 2, 2021 · FIRST PUBLISHED September 11, 2015, 3 Comments

    No more store bought, gloopy, overly sweet macaroni salad! This recipe is the perfect side for grilled chicken, burgers, and sandwiches. With a few pantry staples and a handful of fresh ingredients, this salad comes together quickly and simply and is my go-to recipe anytime I get a hankerin' for a starchy side.Picnic Macaroni Salad


    I need to get something off my chest.

    You know those pre-made deli salads you can buy in the refrigerated section? The ones that sometimes come in cardboard milk jug-type boxes? Yeah, those. Well, I think they are an abomination to the world of salads. A homemade potato or macaroni salad can be a wonderful, wonderful thing full of flavor and texture. But these boxed varieties just ruin it for everyone.

    Just imagine if one had based their views on potato salad based on what they experience from a box!

    "Nah, I don't like potato salad", they say. "Macaroni Salad is gross", they say. Just think about what they are missing out on!

    Fer shame.

    That's why I'm divulging my macaroni salad recipe today. Let's get started! I'm not a big fan of super sweet macaroni salad, and this one fits the bill. Instead of sweetness, we're dialing up the flavor with diced olives, pimentos, and green onions.

    Picnic Macaroni Salad

    Add some mayo, salt and pepper to the mix and you've got some pretty darn good dressing. I'm always tempted to add a little milk and lemon juice and throw it in the blender to make a smooth salad dressing...

    Picnic Macaroni Salad

    From here you just fold in the cooked macaroni and chopped egg until it's all mixed up. That's it!

    Picnic Macaroni Salad

    Now please, please promise me you'll never waste calories on packaged macaroni salad again. Can you do that?

    Picnic Macaroni Salad

    Want More Delicious Picnic Salad Recipes?

    • Broccoli Salad
    • Chopped Asian Chicken Salad
    • Bowtie Chicken Caesar Salad
    • The BEST Coleslaw ever!

    📖 Recipe

    Picinic Macaroni Salad
    Print Recipe
    4.58 from 7 votes

    Picnic Macaroni Salad

    No more store bought, gloopy, overly sweet macaroni salad! This recipe is the perfect side for grilled chicken, burgers, and sandwiches. With a few pantry staples and a handful of fresh ingredients, this salad comes together quickly and simply and is my go-to recipe anytime I get a hankerin' for a starchy side.
    Prep Time10 minutes mins
    Cook Time20 minutes mins
    Chilling Time30 minutes mins
    Total Time30 minutes mins
    Course: Salad
    Cuisine: American
    Keyword: deli macaroni salad, fourth of july salad, summer party recipe
    Servings: 12 servings
    Calories: 411kcal
    Author: Heather Cheney

    Ingredients

    • 1 pounds elbow macaroni
    • 4 ounces canned chopped black olives
    • 4 ounces chopped pimentos drained
    • 1 bunch green onions chopped
    • 2 cups mayonnaise
    • ½ teaspoon kosher salt
    • ¼ teaspoon black pepper
    • 7 whole hard boiled eggs peeled and chopped

    Instructions

    • Cook elbow macaroni according to package directions, drain and run under cold water to chill. Set aside.
    • In a large bowl combine olives, pimentos, onions, mayo, salt and pepper. Stir until smooth.
    • Fold in cooked and chilled macaroni and chopped egg. Cover and allow to chill for 1 hour before serving.

    Nutrition

    Serving: 1serving | Calories: 411kcal | Carbohydrates: 29g | Protein: 5g | Fat: 30g | Saturated Fat: 4g | Cholesterol: 17mg | Sodium: 485mg | Potassium: 110mg | Fiber: 1g | Sugar: 2g | Vitamin A: 320IU | Vitamin C: 8.3mg | Calcium: 16mg | Iron: 0.8mg


    Picinic Macaroni Salad

    Amazing 30 Minute Chili

    By Heather LAST UPDATED March 1, 2021 · FIRST PUBLISHED September 9, 2015, 45 Comments

    7 ingredients, one pan, and a whole lotta flavor! People won't believe how quick and easy this chili is to throw together when they taste it... but you'll know! Take all that extra time you'll have and take a nap. I'm pretty sure you need a nap. 🙂Amazing 30 Minute Chili


    It's the beginning of September and I'm all like "Heeeeellllooooo Soup making weather!". I think I'm on my 3rd soup making venture this week. Not even kidding. But that's okay because that means that I get to share with you THE best quick chili recipe ever today.

    Amazing 30 Minute Chili

    There's not a whole lot that beats a big bowl of warm chili on a cold day and this recipe is always on rotation during the winter months. And when it comes to chili, I usually want it dotted with big chunks of slow-cooked beef and simmered for hours on end (like this one), unless it's this 30 minute chili. You guys, you won't believe how much flavor this has and how easy it is to throw together!

    To start out, you'll brown 1 ½ lbs of hamburger with some sweet onion. When it's cooked, drain off the fat and season it up a bit with chili powder and salt.

    Amazing 30 Minute Chili

    Then, you'll dump a can of chili beans, stewed tomatoes, tomato sauce, and 2 cans of fire roasted green chilies. Don't let the amount of green chilies scare you. They are very mild and give it such good flavor.

    Amazing 30 Minute Chili

    Give it all a stir and let simmer for 20-25 minutes (or longer) to let the flavors marry. The longer it simmers, the better but 25 minutes is just about right for a quick dinner and it tastes great at that point.

    Amazing 30 Minute Chili

    When you're ready to eat it's great served by itself with all the usual chili toppings and corn bread, ladled over potatoes or hot dogs, or even served on top of spaghetti. Have you ever had chili spaghetti? I was a skeptic until I tried it and now I'm sold.

    Amazing 30 Minute Chili

    📖 Recipe

    Amazing 30 Minute Chili
    Print Recipe
    4.69 from 259 votes

    Amazing 30 Minute Chili

    7 ingredients, one pan, and a whole lotta flavor! People won't believe how quick and easy this chili is to throw together when they taste it... but you'll know! Take all that extra time you'll have and take a nap. I'm pretty sure you need a nap. ?
    Prep Time5 minutes mins
    Cook Time25 minutes mins
    Total Time30 minutes mins
    Course: Main Course
    Cuisine: American
    Keyword: chili beans, easy chili recipe, quick chili
    Servings: 6 servings
    Calories: 315kcal
    Author: Heather Cheney

    Ingredients

    • 1 ½ pounds lean ground beef
    • ½ whole large sweet onion chopped
    • ½ teaspoon kosher salt
    • 1 tablespoon chili powder
    • 14.5 ounces chili beans undrained
    • 14.5 ounces stewed tomatoes undrained
    • 15 ounces tomato sauce
    • 14 ounces fire roasted canned diced green chilies

    Instructions

    • In a large skillet brown hamburger and onions over medium heat until beef is cooked through. Drain off fat and return to pan on stove.
    • Season meat with salt and chili powder and cook, stirring for about 1 minute or until fragrant.
    • Add chili beans, tomatoes, tomato sauce and chilies to the beef mixture.
    • Bring to a boil and reduce heat to a low simmer. Cook, uncovered for 20 -25 minutes to allow flavors to blend and to thicken slightly. Serve with favorite chili toppings.

    Nutrition

    Serving: 1serving | Calories: 315kcal | Carbohydrates: 22g | Protein: 28g | Fat: 12g | Saturated Fat: 4g | Cholesterol: 73mg | Sodium: 1316mg | Potassium: 1199mg | Fiber: 5g | Sugar: 10g | Vitamin A: 895IU | Vitamin C: 17.7mg | Calcium: 92mg | Iron: 6.3mg


    Amazing 30 Minute Chili

    Baked Ricotta Chicken

    By Heather LAST UPDATED March 21, 2022 · FIRST PUBLISHED September 4, 2015, 4 Comments

    Italian marinated chicken breasts get quickly browned, topped with a luscious combination of cheeses, and baked until tender perfection in a tomato sauce. Serve over pasta for a hearty and pleasing meal.

    Baked chicken topped with ricotta cheese and parsley


    We're just going to jump right into the recipe here today. This ricotta-baked chicken was the result of a much-needed Sunday nap a few weeks back. I was laying down trying to motivate myself to peel myself up from the couch and racking my brain trying to figure out what to make for dinner and then, BOOM. Dinner was made. In my head. On the couch.

    Wouldn't that be nice if it was really made? I could get into those kinds of naps.

    To start, you'll marinade 6 chicken breasts in some Italian dressing. I used a seasoning packet and added my own vinegar, oil, and water but if you have a bottle in the fridge, by all means, use it up!

    Raw chicken breasts marinading in a ziplock bag.

    Once your chicken has been the hot tub of flavor long enough (3 hours- overnight), you get to work! Mix together some ricotta, mozzarella, parmesan, salt, pepper and just a pinch of nutmeg.

    Ricotta cheese, egg and parmesan cheese in a measuring cup

    Heat a large skillet on the stove top, add a little olive oil, and brown the chicken on both sides. You don't have to make sure it's cooked through, just browned. Set the chicken aside on a plate and then pour in a can of Italian seasoned diced tomatoes. Use you spatula to scrape up all the little browned bits that got stuck the bottom of the pan while cooking the chicken.

    Chicken breast being cooked in a pan

    When all the delicious little bits are up take the pan off the heat and put the chicken back into the pan.

    Five chicken breasts in a pan

    Take the cheese mixture and spoon it into mounds on top of the chicken breasts until it's all used and pop that sucker into the oven.

    Chicken breasts topped with ricotta cheese

    You'll bake it uncovered for about 20 minutes or until the cheese just starts to brown a little bit on the top, the sauce is bubbly, and the chicken is cooked through. Once it comes out you can sprinkle it with just a little bit of chopped parsley and more parmesan cheese.

    Four chicken breasts topped with ricotta cheese and herbs

    The tomato sauce has super flavor and is great served over pasta while the chicken stays moist from being baked under the cheese and is nicely seasoned from the dressing. I hope you'll try it!

    Baked chicken breast being lifted out of pan

    Other Chicken Recipes You Might Like

    • Chicken lo mein recipe
    • Pesto Parmesan Chicken
    • Easy Chicken Cacciatore
    • Smothered Chicken Breast
    • Honey Dijon Chicken Thighs
    • garlic chicken thighs
    • Simple Grilled Chicken Recipe
    • Chicken Keto Soup
    • Wingers Sticky Fingers
    • Sweet Chili Sauce Chicken
    • Barbecue Chicken
    • Chicken Curry with Coconut Milk

    📖 Recipe

    Baked Ricotta Chicken
    Print Recipe
    4.47 from 58 votes

    Baked Ricotta Chicken

    Italian marinated chicken breasts get quickly browned, topped with a luscious combination of cheeses, and baked until tender perfection in a tomato sauce. Serve over pasta for a hearty and pleasing meal.
    Prep Time10 minutes mins
    Cook Time40 minutes mins
    Marinade Time3 hours hrs
    Total Time3 hours hrs 50 minutes mins
    Course: Main Course
    Cuisine: Italian
    Keyword: baked chicken breast with cheese, baked chicken in tomato sauce, ricotta cheese recipe
    Servings: 6 servings
    Calories: 380kcal
    Author: Heather Cheney

    Ingredients

    • .6 ounces Italian Dressing Mix
    • ⅓ cup white wine vinegar
    • ⅓ cup lite olive oil
    • ⅓ cup water
    • 6 whole boneless skinless chicken breast halves
    • 2 tablespoons olive oil
    • 15 ounces Italian Seasoned Diced Tomatoes undrained
    • 2 cups ricotta cheese
    • 1 cup mozzarella cheese grated
    • ¼ cup parmesan cheese grated
    • ½ teaspoon kosher salt
    • ⅛ teaspoon black pepper
    • 1 pinch nutmeg

    Instructions

    • Mix Italian dressing mix with water, vinegar, and ⅓ C oil. Pour into a gallon sized ziplock bag and add chicken. Let marinade for at least 3 hours, up to overnight.
    • Combine cheeses, salt, pepper and nutmeg in a bowl and set aside.
    • Preheat oven to 350 degrees.
    • Heat a large, ovenproof skillet over medium-high heat and brown chicken in remaining olive oil in batches until browned on both sides, but not cooked all the way through. Set chicken aside on a plate.
    • Keep skillet on the heat and pour in the tomatoes, scraping up any browned bits left on the pan with a spatula until bottom of the pan is clean. Remove from heat. Return chicken to the pan with the tomatoes.
    • Using a spoon, evenly scoop the cheese mixture into mounds on top of each chicken breast. Place skillet into the oven and bake for 20 minutes or until the cheese is just starting to brown on top and chicken is cooked through.
    • Serve over pasta.

    Nutrition

    Serving: 1serving | Calories: 380kcal | Carbohydrates: 6g | Protein: 15g | Fat: 32g | Saturated Fat: 12g | Cholesterol: 60mg | Sodium: 803mg | Potassium: 175mg | Sugar: 1g | Vitamin A: 570IU | Vitamin C: 3.7mg | Calcium: 326mg | Iron: 0.9mg

    Confetti Chicken Big Bowl

    By Heather LAST UPDATED April 11, 2018 · FIRST PUBLISHED September 3, 2015, 4 Comments

    I love meals like these! Everything gets cooked in one pot and eaten out of bowls. Quick clean-up, huge flavor, and totally delicious! Confetti Chicken Big Bowl


    When I saw this recipe on the Better Homes and Gardens website, I knew I needed to make it. I love finding recipes that take cheap ramen noodles and turn them into something incredible and this recipe is just that. It's loaded with veggies, chicken and while it uses a bit of red curry paste is mild enough for my kiddos. I love the addition of fresh cilantro AND basil at the end of cooking. It just brightens the whole dish up and even my picky 4 year old slurped her bowl clean.

    Confetti Chicken Big Bowl

    Just a quick note on cooking with ramen noodles-- these noodles soak up liquid freakishly fast and become soggy and icky after sitting for more than 20 minutes in hot broth. So when making this, make sure you're ready to eat when it's ready! If you end of having leftovers you can lift them out of the soup and store separately until ready to reheat.

    Confetti Chicken Big Bowl

    📖 Recipe

    Confetti Chicken Big Bowl
    Print Recipe
    4.56 from 9 votes

    Confetti Chicken Big Bowl

    A one pot meal full of flavor!
    Prep Time10 minutes mins
    Cook Time15 minutes mins
    Total Time25 minutes mins
    Course: Main Course
    Cuisine: Thai
    Keyword: ramen noodles, ramen with chicken and vegetables, red curry ramen
    Servings: 4 servings
    Calories: 478kcal
    Author: Heather Cheney

    Ingredients

    • 1 pound boneless skinless chicken breasts cut into 1-inch pieces
    • 2 tablespoons vegetable oil
    • 8 cloves garlic minced
    • 4 teaspoons fresh ginger minced
    • 1 tablespoons red curry paste
    • 1 teaspoon ground cumin
    • 4 cups water
    • 14 ouncea unsweetened coconut milk
    • 2 cups shredded carrots 4 medium
    • 2 cups small broccoli florets
    • 1 cup red sweet pepper strips 1 medium
    • 6 ounces chicken-flavor ramen noodles broken. 2, 3 ounce packages
    • 2 cups snow pea pods
    • 2 tablespoons soy sauce
    • 4 teaspoons lime juice
    • 1 cups fresh basil finely cut
    • ⅓ cups fresh cilantro chopped

    Instructions

    • In a large soup pot, cook chicken in 1 tablespoon oil 3-4 minutes over medium-high heat until no longer pink. Remove from pot and set aside.
    • Add the remaining 1 tablespoon of oil to pot. Add garlic, ginger, curry paste and cumin. Cook and stir for 30 seconds. Stir in the water, coconut milk, carrots, broccoli, pepper, and noodles (without seasoning packet) and bring to a boil, reduce heat to a simmer and cook for 3 minutes.
    • Stir in cooked chicken, pea pods, 1 of the seasoning packets (discard the other), soy sauce, and lime juice. Stir in basil and cilantro. Serve in soup bowls.

    Nutrition

    Serving: 1serving | Calories: 478kcal | Carbohydrates: 45g | Protein: 33g | Fat: 18g | Saturated Fat: 10g | Cholesterol: 72mg | Sodium: 1584mg | Potassium: 1046mg | Fiber: 6g | Sugar: 8g | Vitamin A: 11840IU | Vitamin C: 125.7mg | Calcium: 122mg | Iron: 5.2mg


    Confetti Chicken Big Bowl

    • « Previous Page
    • 1
    • …
    • 5
    • 6
    • 7
    • 8
    • 9
    • …
    • 13
    • Next Page »
    Headshot of Heather in an apron

    Hi, I'm Heather! Want to become a rockstar cook? I’m a former chef, caterer, and culinary arts school graduate that just wants to help you make some killer food! I truly believe that with a little know-how anyone can totally rock their kitchen. Stick around for ultimate recipes of your favorite foods, cooking tips, guides, and more!

    More about me →

    Popular Recipes

    • BBQ chicken cut on a cutting board with a bottle of bbq sauce
      The Best Super Moist Oven Baked BBQ Chicken
    • One Pan Sour Cream Chicken Enchilada Skillet
      One Pan Sour Cream Chicken Enchilada Skillet
    • Hawaiian Shoyu Chicken-- so flavorful you'll forget how easy it is to make! Filled with flavors of ginger, garlic and just a touch of red pepper.
      Hawaiian Shoyu Chicken
    • Sloppy Joe on a paper bag
      The Best Sloppy Joe Sauce
    • Coffee Cake In A Mug-- the perfect remedy for a sugar craving when you don't want to spend a lot of time or heat up the oven. #coffee #cake #microwave #mug
      Coffee Cake in a Cup
    • Baked Ricotta Chicken
      Baked Ricotta Chicken
    • Mom's Classic Meatloaf Recipe
    • Beef Teriyaki Stir Fry
    Email opt in image

    Cooking Method

    • Slow Cooker
    • Grilling

    Footer

    ↑ back to top

    About

    • Privacy Policy
    • Disclaimer

    Newsletter

    • Sign Up! for emails and updates

    Contact

    • About
    • Email
    • Work With Me

    As an Amazon Associate I earn from qualifying purchases. This site uses cookies and generates income via ads.

    Copyright © 2022 Heather Likes Food, LLC

    Rate This Recipe

    Your vote:


    A rating is required
    A name is required
    An email is required