• Active
  • Blog
  • Cart
  • Checkout
  • Cooking Crew Recipes
  • Cooking Crew!
  • Disclaimer
  • Library
  • Media Kit
  • My account
  • Nutrition and Food Safety Disclaimer
  • Opt Out of 5 Chef Secrets
  • Press
  • Privacy Policy and Copyright
  • Recipe Index
  • Refund and Returns Policy
  • RSS Email Subscription Confirmation
  • Shop
  • Subscribe
  • Ultimate Recipes for Becoming a Rockstar Cook!
  • Welcome to Heather Likes Food!
  • Work With Me
  • About Heather Cheney
  • Contact
menu icon
go to homepage
subscribe
search icon
Homepage link
  • Recipe Index
  • About
  • Contact
  • Shop
    • Facebook
    • Instagram
    • Pinterest
    • YouTube
  • ×
    Home / Recipes

    German Crumb Cake, Cake Boss Style

    By Heather LAST UPDATED March 22, 2021 · FIRST PUBLISHED September 27, 2013, 22 Comments

    German Crumb Cake - Most of you here probably don't know that I used to have a cake decorating business. Wedding and sculpted cakes were kind of my niche but I even loved doing the simple sheet cakes. The hubs and I would stay up late into the night sculpting cakes that looked like the Island of Neverland and shoes (not the same cake thank goodness). It was fun and exciting but somehow nerve-wrecking and exhausting all at the same time.

    Homemade German Crumb Cake in a silver cake pan.

     I kind of loved it and really, I feel like I still thrive in high-stress situations. But doing it full-time with two kids in tow was a little bit more than I could handle.

    So, even though my big cake decorating days are over (for now), I still love learning the tricks and techniques of the trade. A few months ago my daughter and I started watching Cake Boss together on Netflix and it's been really fun. I'm pretty sure she watches it solely to see them make panda bears out of modeling chocolate, but I love watching how cakes are assembled and the creative process behind it. 

    We were watching Cake Boss a few days ago and Buddy, the main decorator on the show, was making their "famous" crumb cake on this episode and I started drooling. IT. LOOKED. SO. STINKIN'. GOOD. And I knew I must figure out a way to make it, ASAP!

    Coincidentally, (and I promise I'm not making this up, it's so serendipitous its kind of stupid) I needed to bake something in my new Cake Boss cake pan that I was just shipped to try out.  This German Crumb Cake seemed like the perfect, albeit cliche, thing I could make in it.

    Cake boss pan.

    How To Make German Crumb Cake

    Now of course Buddy didn't give out his recipe for their German crumb cake on this episode but he did say that the base was a traditional German bun dough so that's what we're using here today. It's actually a soft yeasted dough so it's a little different from the sponge cake version you might be familiar with and is super tender and just lightly sweet-- the perfect backdrop to a whole lotta crumbs! It starts out by cutting together some flour, sugar and cold butter that's been cut into small pieces. I'm using my Kitchenaid,  but this dough can definitely be made by hand. If you're using a mixer use the paddle attachment for mixing in the butter and then switch over to the dough hook for the rest of the recipe.

    Simple Crumb cake mix in an electric mixer.

    Combine warm whole milk with a few room temperature eggs and instant yeast. Give it a stir and let it sit for a few minutes for the yeast to activate.

    Warm milk, eggs and yeast in a glass measuring cup.

    Meanwhile, remove the zest from a whole lemon and add it into the flour mixture along with the milk, eggs and yeast.

    Removing the zest from a lemon onto a small white plate.

    Mix until it comes together fully and no dry spots remain and continue to mix for an addition 3-5 minutes or until its smooth, glossy and stretchy. The dough is very sticky but also very stretchy when it's done.

    Easy German Crumb Cake mix in a silver mixing bowl.

    Transfer the dough into a greased bowl and cover with plastic wrap to rise-- about an hour or until it about doubles in size.

    Easy German Crumb Cake dough in a greased yellow bowl covered with plastic wrap.

    Get Your Crumb On!

    While the dough is rising you can get your crumb on with this German crumb cake! I adapted this recipe from a segment Buddy did on the Rachael Ray show a few years back where he made New York style crumb cake. It looked similar to the ingredients that he used while making crumb cake at his bakery with the exception of one thing-- cake scraps. I don't know about you, but I just don't feel right about making a cake in order to make a cake so I opted to just stick with a classic streusel (still his recipe) and call it good.  Throw some flour, brown sugar, cinnamon, salt, shortening and corn starch into your mixer bowl and let her rip until the shortening is incorporated and there are coarse lumps.

     Flour, brown sugar, cinnamon, salt, shortening and corn starch in a mixing bowl.

    Cake Boss has come out with a new line of bakeware being sold at Michael's stores and just from this one pan that I got to try out and I can tell that they are quality, heavy duty pieces. I really, really like this 9x13 pan. AND it comes with a lid! Keep reading to learn out how you could win one for yourself! 😉

    Cake boss 9x13 cake pan.

    Turn your risen dough out into a 9x13" pan and press the dough down and into the corners.

    Pressing Cake dough in a cake boxx cake pan.

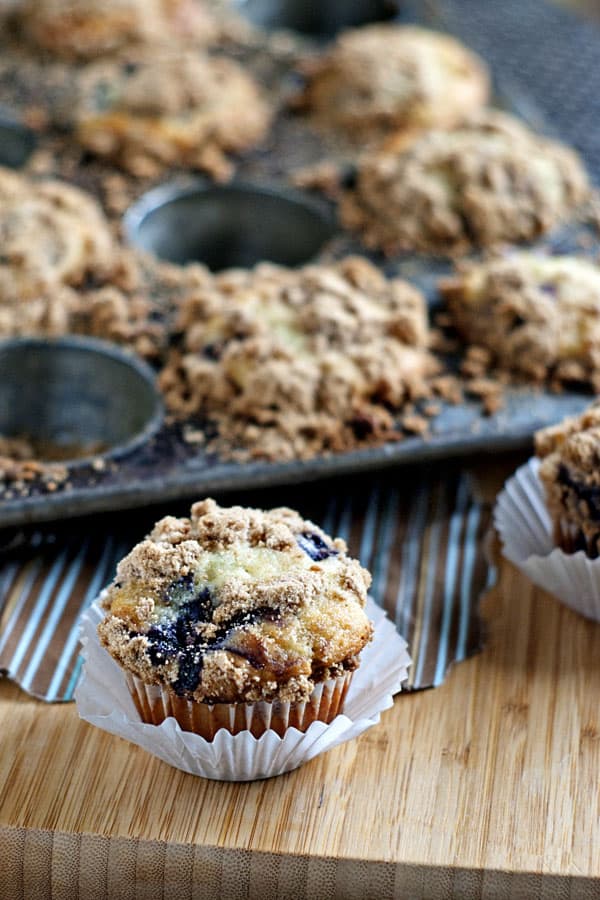
    After watching Buddy put his crumbs on the cake at the bakery I noticed that he takes big handfuls of the crumb and pushes it down in one big clump into the dough.

    Putting crumbs on German Crumb Cake dough in a cake pan.

    He then fills in all the gaps with loose crumbs too.

    Putting loose crumbs on cake dough in a cake pan.

    Let the German crumb cake sit on the counter for about 20 minutes after putting the crumb on and bake @ 350 for just about 30 minutes. The cake is done when a toothpick inserted into the middle of the cake comes out clean.

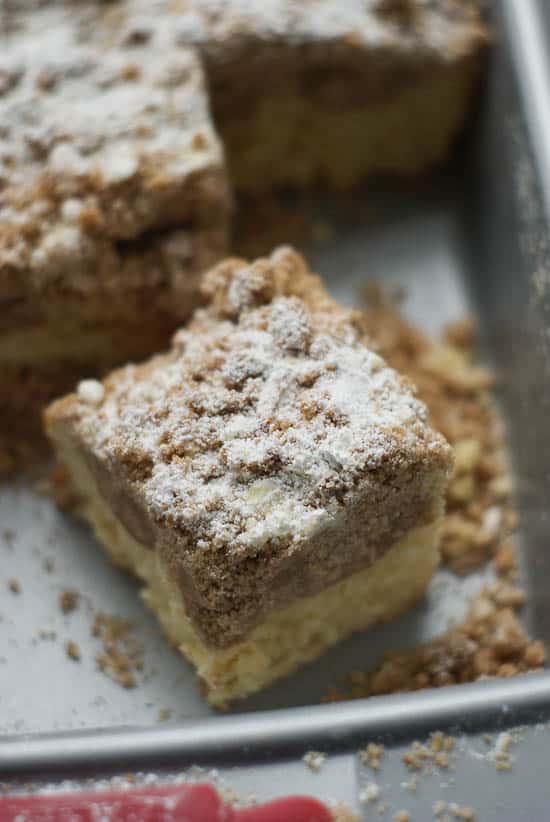
    Sprinkle the German Crumb Cake with LOTS of powdered sugar as soon as it comes out of the oven and for the love, please have a slice while it's still warm. Please?

    Slice of homemade German Crumb Cake on top of the rest of the cake.

    Interested in other delicious cake recipes?

    • Sticky Raspberry Bun Cake
    • Strawberries and Cream Pound Cake
    • Easy Black Forrest Cake


    📖 Recipe

    Slice of delicious crumb cake in a cake pan.
    Print Recipe
    4.20 from 25 votes

    German Crumb Cake, Cake Boss Style

    Part cake, part crumbs, this German crumb cake is a bit of a departure from your traditional coffee cake and will keep you coming back for seconds! 
    Prep Time30 minutes mins
    Cook Time30 minutes mins
    Rising Time1 hour hr
    Total Time2 hours hrs
    Course: Dessert
    Cuisine: German
    Keyword: cake boss recipe, coffee crumb cake, lots of crumbs
    Servings: 16 slices
    Calories: 483kcal
    Author: Heather Cheney

    Ingredients

    • 3 ⅓ cups All-purpose flour
    • ¼ cup + 2 tablespoon sugar
    • 6 tablespoon cold butter cut into small pieces
    • ½ teaspoon kosher salt
    • ¾ cup whole milk warm
    • 3 large eggs room temperature
    • 3 ½ teaspoons instant or active dry yeast
    • zest of 1 lemon
    • 1 cup packed brown sugar
    • ¼ cup granulated sugar
    • 2 tablespoons ground cinnamon
    • 1 teaspoon kosher salt
    • ½ cup butter softened
    • ¾ cup vegetable shortening
    • 3 ⅔ cups All-purpose flour
    • 1 ½ tablespoons corn starch
    • Powdered sugar for topping

    Instructions

    • Combine flour sugar, butter, in the bowl of a mixer and beat with the paddle until the butter is distributed well and the mixture looks mealy.
    • In a separate bowl combine warm (bath water temp.) milk with the eggs (room temperature so that they don't cool down the milk), and yeast. Whisk to combine and let rest for about 10 minutes to let the yeast activate and then add in the lemon zest and salt.
    • Remove the bowl from the mixer stand, add the yeast mixture and stir with a rubber spatula to make a moist, thick dough. Switch to the dough hook and beat on low speed for 1 minute. Increase the speed to medium and beat for 5 minutes, or until the dough becomes sticky and elastic and begins to pull away from the sides of the bowl. Scrape the bowl and the dough hook. The dough is very sticky, so don't let that fool you into adding more flour-- don't do it!
    • To mix crumb cake dough by hand: cut the butter into the flour and sugar using two forks or a pastry cutter. Continue to follow directions above, mixing by hand until it's sticky, smooth, and stretchy.
    • Coat a mixing bowl with non-stick cooking spray and transfer the dough into it. Cover with plastic wrap and allow to rise for about an hour or until it's doubled in size.
    • Combine all of the crumb ingredients in the bowl of a mixer or large mixing bowl. Beat with a paddle attachment or use a pastry cutter to incorporate the butter and shortening into the dry ingredients. The mixture should be crumbly, yet pliable when it's held.
    • Turn the risen dough into an un-greased 9x13" pan and press into an even layer. Top with handfuls of the crumb mixture, pressing them into the dough and sprinkle the loose crumbs around the larger clumps. Let rest for 20 mins.
    • Bake @350 degrees for about 30 minutes. The dough will rise to the top of the pan and a toothpick inserted into the center of the cake will come out clean when done.
    • Dust generously with powdered sugar and serve.

    Nutrition

    Serving: 1slice | Calories: 483kcal | Carbohydrates: 64g | Protein: 8g | Fat: 21g | Saturated Fat: 9g | Cholesterol: 62mg | Sodium: 331mg | Potassium: 134mg | Fiber: 2g | Sugar: 20g | Vitamin A: 380IU | Calcium: 52mg | Iron: 2.9mg

    Easy Beef Enchilada Skillet

    By Heather LAST UPDATED April 12, 2018 · FIRST PUBLISHED September 25, 2013, 4 Comments

    Easy Beef Enchilada Skillet - Here is it, 10:30 pm on Wednesday night and I'm trying my darnedest to come up with some fun story to accompany this post.

    It isn't happening.

    What is happening is that I just devoured a Coffee Cake in a Mug, I'm in my PJ's, in my bed, and my brain is floating around in space on a sugar high and lack of really genuine sleep. Needless to say, it's not exactly the perfect equation for a sound mind capable of retelling a story appropriate for this audience.  So we're just going to jump right in to this quick and easy dinner recipe.

    Easy Beef Enchilada Skillet topped with olives and green onions.

    How to Make This Easy Beef Enchilada Skillet

    I love this easy beef enchilada skillet because it takes all the flavors and textures of real, I-spent-all-day-slaving-over-rolled-bundles-of-goodness enchiladas, throws them into a pan and within 30 minutes is done!

    You'll start off with browning a pound of lean ground beef with some diced onion and a few spices. Remove the meat from the pan when it's cooked and spoon onto paper towels to drain off some of the fat.

    Ground beef and onions cooking in a large skillet.

    Give the skillet you just used to brown the meat a wipe with a paper towel to remove any excess grease and add just a tablespoon and a half of vegetable oil to the pan. Yes, I realize we're swapping fat for fat, but this is just the way it has to be. We're making enchilada sauce here and we need just a touch of oil to bring it all together.  I scaled down my original enchilada sauce recipe to work with this recipe and you can click over to the original post to see a step-by-step of the process. It's a super simple short-cut sauce that tastes infinitely better than anything you can get in a can.

    Mixing enchilada sauce in a skillet with a spatula.

    Cut about 15 corn tortillas into bite-sized squares...

    15 Corn tortillas cut into squares.

    and add the beef and the tortillas to the sauce, stirring until all the tortillas are moistened with sauce.

    Pouring enchilada sauce and beef over corn tortillas in a skillet.

    Cheese Time!

    Bring the tortillas, meat and sauce to a simmer, cover and let cook for about 15 minutes or until the tortillas have started to soften and have absorbed some of the sauce and remove the pan from the stove.

    Time for cheese!

    Sprinkling colby jack cheese over homemade Beef Enchilada recipe in a skillet.

    Sprinkle a generous amount of colby- jack cheese over the top and cover to help it melt.

    Homemade Beef Enchilada Skillet covered with a lid.

    Follow me on Pinterest

    Top with sour cream, olives, tomatoes, green onions, or whatever else your little heart desires and eat up!

    📖 Recipe

    From scratch Beef Enchilada Skillet topped with fresh olives and green onions.
    Print Recipe
    4.58 from 7 votes

    Easy Beef Enchilada Skillet

    All the flavor of regular ground beef enchiladas with none of the work! You're going to love this one-pan meal!
    Prep Time10 minutes mins
    Cook Time30 minutes mins
    Total Time40 minutes mins
    Course: Main Course
    Cuisine: American, Tex-Mex
    Keyword: Enchiladas, ground beef dinner, one pan
    Servings: 4 servings
    Calories: 467kcal
    Author: Heather Cheney

    Ingredients

    • 1 lb lean ground beef
    • 1 med-large onion chopped
    • ½ teaspoon kosher salt
    • 1 teaspoon ground cumin
    • 1 ½ tablespoon vegetable oil
    • 3 tablespoon corn starch
    • 3 tablespoon chili powder
    • 1 teaspoon ground cumin
    • 1 C tomato sauce
    • 2 C chicken broth
    • 15 corn tortialls cut into bite-sized squares
    • 1 ½ -2 C colby-jack cheese shredded
    • Sour cream black olives, green onions, tomatoes, etc for topping.

    Instructions

    • In a large skillet (10 inches or larger), brown ground beef with onion, salt, and 1 teaspoon cumin. Remove meat from pan and drain on paper towels-- set aside.
    • In the same skillet, heat vegetable oil over medium heat and stir in the chili powder, corn starch, and remaining teaspoon of cumin. Give it a stir and let cook for about 1 minute- once it becomes aromatic, you're good.
    • Stir the chicken broth and tomato sauce, mixing until it’s well combined and smooth. Keep stirring until it comes up to a boil, is starting to thicken and let boil for 1 minute.
    • Add meat and cut tortillas to the sauce, stirring until all the tortillas are moistened by the sauce. Bring to a simmer, cover and let cook over med-low heat for about 15 minutes or until the tortillas are soft and have absorbed some sauce. Remove pan from heat.
    • Top with grated cheese, cover to let the cheese melt and garnish as desired.

    Nutrition

    Serving: 1serving | Calories: 467kcal | Carbohydrates: 58g | Protein: 27g | Fat: 16g | Saturated Fat: 6g | Trans Fat: 1g | Cholesterol: 58mg | Sodium: 1162mg | Potassium: 996mg | Fiber: 10g | Sugar: 5g | Vitamin A: 1898IU | Vitamin C: 15mg | Calcium: 30mg | Iron: 6mg

    Whole Wheat Banana Blueberry Bread

    By Heather LAST UPDATED July 23, 2019 · FIRST PUBLISHED August 28, 2013, 11 Comments

    This Whole Wheat Banana Blueberry Bread is just lightly sweet, tender and perfect for a filling breakfast or snack.

    Whole Wheat Blueberry Banana Bread

    By now you probably know that I'm a major carb addict and I'm willing to bet that a good portion of you would gladly take your place beside me at a carb addict anonymous meeting. Bread is good stuff, right? But, the crazy thing is that it's so often villainized in the guidelines of fad diets that we (myself absolutely included) automatically equate bread with weight gain. It's ridiculous!

    As much as I want to, I can't tell you that a loaf of white french bread smothered in garlic butter will help you carve out a 6-pack (wouldn't that be awesome?!). But I do want to talk about the role that whole grains  play on our plates and in our bellies. Let's get scientific here: (in the most un-scientific way)

    Grains = Carbohydrates = Glucose = Fuel for our brain

    Without grains our body can't make the energy needed to function. Simple as that. There are thousands of ways to work grains into your meals like this Quinoa Apple Salad or Cheesy Vegetable Quinoa Bake. You can also visit GrainsForYourBrain.org for up-to-date information on grains and our bodies, and recipes from some of America’s favorite chefs and moms. It's recommended that adults eat 6 servings of grains/day, half of those coming from whole grains like whole wheat, quinoa, and brown rice. So let's start by getting a serving of whole wheat with this super moist whole wheat banana blueberry bread!

    Whole Wheat Blueberry Banana Bread | heatherlikesfood.com

    Whole Wheat Blueberry Banana Bread

    Now, onto this bread. In all honesty I wouldn't usually use exclusively whole wheat flour in a quick bread recipe for fear that it would be too heavy, dense and dry. But this recipe cured that fear 100%!  It's so moist, just lightly sweet and perfect for a filling breakfast or snack.

    Beat together the sugar and butter until smooth and add in some banana and vanilla. Mix until smooth again and then mix in your eggs honey, salt and baking soda.

    Whole Wheat Blueberry Banana Bread | heatherlikesfood.com

    Toss in some oats and some whole wheat flour.

    Whole Wheat Blueberry Banana Bread | heatherlikesfood.com

    And mix just slightly until there are no more dry spots-- over mixing the batter can cause the finished bread to be very dry.

    Whole Wheat Blueberry Banana Bread | heatherlikesfood.com

    Toss a cup of blueberries in a few teaspoons of flour and gently fold them into the batter. The flour will keep the berries from sinking to the bottom of the bread and from turning the batter blue.

    Whole Wheat Blueberry Banana Bread | heatherlikesfood.com

    Spoon the batter into a greased loaf pan and sprinkle with a few oats and brown sugar.

    Whole Wheat Blueberry Banana Bread | heatherlikesfood.com

    Bake at 350 degrees for 50 minutes, cover with foil to keep the top from browning too much and cook for an additional 10-15 minutes or until a skewer inserted in the middle comes out clean.

    Whole Wheat Blueberry Banana Bread | heatherlikesfood.com

    📖 Recipe

    Whole Wheat Blueberry Banana Bread
    Print Recipe
    5 from 4 votes

    Whole Wheat Banana Blueberry Bread

    This hearty banana bread is studded with blueberries and full of fiber thanks to whole wheat and oats!
    Prep Time20 minutes mins
    Cook Time1 hour hr 15 minutes mins
    Total Time1 hour hr 35 minutes mins
    Course: Bread
    Cuisine: American
    Keyword: banana oat bread, fiber, healthy
    Servings: 10 servings
    Calories: 225kcal
    Author: Heather Cheney

    Ingredients

    • ½ C butter softened
    • ½ C brown sugar packed
    • 1 teaspoon vanilla extract
    • ¾ teaspoon baking soda
    • ½ teaspoon salt
    • about 2 large over-ripe bananas cut into chunks- 1 lb weight before peeling
    • ¼ honey
    • 2 eggs room temperature
    • 1 ¾ C whole wheat flour
    • 1 C fresh or frozen blueberries + 2 teaspoon flour
    • ½ C old fashioned or quick-cooking oats
    • additional brown sugar and oats for top

    Instructions

    • Preheat your oven to 350°F. Lightly grease an 8½" x 4½" or 9" x 5" loaf pan.
    • In a large bowl, beat together the butter and sugar until smooth. Add the vanilla, baking soda, salt, and bananas, beating until well combined. The mixture will be fairly smooth, with some scattered small chunks of banana.
    • Beat in the honey and eggs.
    • Add the flour, then the oats, stirring until smooth. Combine blueberries with 2 teaspoon of flour and gently fold into the batter.
    • Spoon the batter into the prepared pan, smoothing the top. Sprinkle with additional oats and brown sugar if desired. Let it rest at room temperature for 10 minutes.
    • Bake the bread for 50 minutes, then gently lay a piece of aluminum foil across the top, to prevent over-browning. Bake for an additional 10 to 15 minutes, then remove the bread from the oven; a long toothpick or cake tester inserted into the center should come out clean.
    • Allow the loaf to cool for 10 minutes; then remove it from the pan, and set it on a rack to cool completely.

    Nutrition

    Serving: 1serving | Calories: 225kcal | Carbohydrates: 30g | Protein: 4g | Fat: 11g | Saturated Fat: 6g | Trans Fat: 1g | Cholesterol: 57mg | Sodium: 301mg | Potassium: 125mg | Fiber: 3g | Sugar: 12g | Vitamin A: 392IU | Vitamin C: 1mg | Calcium: 34mg | Iron: 2mg


    Whole Wheat Banana Blueberry Bread

    BBQ Chicken Chopped Salad

    By Heather LAST UPDATED April 12, 2018 · FIRST PUBLISHED August 23, 2013, 1 Comment

    BBQ Chicken Chopped Salad - Once upon a time I started this little blog and knew a whole lot about nothing on how to make food look good for pictures. This BBQ Chicken Chopped Salad is one of my favorites and it quickly made its way to my blog but the picture I posted of it has always left something to be desired. Since it's way too good to not have a picture that doesn't do it justice, I decided to give it a little makeover and post again. I want you ALL to be able to revel in it's goodness because I kind of like you.

    BBQ Chicken Chopped Salad with cilantro, corn and tomatoes in a large white bowl.

    How to Make BBQ Chicken Chopped Salad

    So, here we go...

    You'll start this deliciousness by roasting your pineapple and corn. Spread some fresh or frozen corn kernels and a can of pineapple tidbits ( i love that word) out on a baking sheet and sprinkle with salt, pepper, and a drizzle of olive oil. Stir around to make sure everything is well coated and bake at 450° for 15-20 minutes.

    Roasting pineapples and corn on a lined baking sheet.

    Once the tidbits are nice and caramelized, take them out of the oven and let cool. Try not to pick the pineapple out and eat it all before it even sees the salad. It's amazing. It will be hard and it will be worth it.

    Roasted pineapple and corn on a lined baking sheet.

    You'll also need some cooked chicken. This time around I used some leftover BBQ chicken because it seemed fitting, but plain chicken works well too since the dressing is so flavorful.

    Tomatoes, red onion...

    photo collage - fresh diced tomatoes. photo collage - fresh diced red onions.

    Lettuce. If you don't think this is pretty, you probably don't like pretty things and that's sad. I've always loved cutting into heads of lettuce and cabbage and looking at the patterns. I'm appreciative like that.

    A whole lettuce cut in half.

    It's coming together.

    Simple BBQ Chicken Chopped Salad ingredients in a large white bowl.

    I somehow managed to forget to take a picture of the avocado and cilantro. Don't forget to put it in your salad though-- that will make me sad.

    Once the corn and pineapple is cool you can add that into the bowl too, chicken too.

    Quick Chicken Chopped Salad with BBQ and corn and pineapple in a large white bowl.

    Follow me on Pinterest

    The Dressing!

    Now for the dressing! THIS DRESSING! It seems simple, but it totally makes this whole salad mesh into one big bowl of delight. Mix up these ingredients with a little bit of lime juice and you BBQ Chicken Chopped Salad is good to go!

    Milk, ranch, BBQ and Mayo on a wooden table.

    Toss, eat, consume, repeat.

    Healthy BBQ Chicken Chopped Salad in a large white bowl with a silver fork on a white table.


    📖 Recipe

    Simple BBQ Chicken Chopped Salad recipe in a large white bowl with a silver fork.
    Print Recipe
    4.54 from 13 votes

    BBQ Chicken Chopped Salad with Roasted Corn and Pineapple

    This BBQ chicken salad is packed with lots of fun ingredients and super fun to eat! Top it with a bbq ranch dressing for ultimate satisfaction!
    Prep Time30 minutes mins
    Cook Time20 minutes mins
    Total Time50 minutes mins
    Course: Salad
    Cuisine: American
    Keyword: dinner salad, loaded salad, roasted pineapple
    Servings: 4 big salads
    Calories: 1107kcal
    Author: Heather Cheney

    Ingredients

    • 3 C chopped cooked chicken
    • 2 to matoes diced
    • ½ red onion diced
    • 1 avocado diced
    • ¼ C chopped fresh cilantro
    • ½ head romaine lettuce chopped
    • 1 16 oz. can pineapple tidbits drained
    • 2 C fresh or frozen corn kernels
    • olive oil salt, pepper
    • 1 packet ranch dressing mix
    • ½ C + 2 tablespoon prepared BBQ sauce
    • ½ C mayonnaise
    • 1 C milk
    • 1 tablespoon lime juice

    Instructions

    • Preheat oven to 450°
    • Spread corn and drained pineapple on a baking sheet. Sprinkle with salt, pepper, and a little drizzle of olive oil.
    • Bake for 15-20 minutes or until the corn and pineapple starts to brown and caramelize. Let cool completely.
    • Combine all ingredients for salad and toss to combine.
    • Whisk dressing ingredients together and drizzle over salad when serving.

    Nutrition

    Serving: 1salad | Calories: 1107kcal | Carbohydrates: 76g | Protein: 15g | Fat: 90g | Saturated Fat: 11g | Trans Fat: 1g | Cholesterol: 18mg | Sodium: 603mg | Potassium: 1324mg | Fiber: 17g | Sugar: 39g | Vitamin A: 1267IU | Vitamin C: 34mg | Calcium: 180mg | Iron: 4mg

    Refrigerator Pickles and Giveaway!

    By Heather LAST UPDATED March 2, 2021 · FIRST PUBLISHED August 13, 2013, 22 Comments

    Refrigerator Pickles - In my hometown our church runs a pear farm and every August I would spend summer evenings picking pears with my friends so the pears could be shipped all over the country to aid in welfare relief efforts. It also meant that my mom and I would spend several sticky hours in our kitchen canning a ridiculous amount of pears that we would glean after the initial harvest was over.

    Refrigerator Pickles recipe in two glass mason jars.

    Follow me on Pinterest

    If you've never canned before it can be a seemingly intimidating process, but the truth is that it's pretty simple once you get a few basics down. But, instead of  try to organize my thoughts about canning in one post I'll just refer you to the professionals and let them give you the skinny. Canning is super simple and Ball brand canning wants you to know how to do it so they are hosting,

    National Can-It-Forward Day on Saturday, August 17.

    Refrigerator Pickles and Giveaway! | Heather Likes Food

    You can come and participate in a live webcast of canning demos where viewer questions will be answered in real-time!  Food Network star Ted Allen will be live on site demoing his favorite canning recipes for viewers too!   You can find information about how to participate in Can-It-Forward Day as well as watch the live stream at www.FreshPreserving.com.

    Cool, Right? I'm kind of excited about watching and learning something new. Until then, if you want to curb your craving for canning without really having to know how to can, these refrigerator pickles are for you! They use canning jars so you're basically canning, right? The only difference is that the finished pickles need to be stored in the fridge after making as opposed to being stored in the pantry. This makes for a quick project that is super easy.

    How to Make Refrigerator Pickles

    For this Refrigerator Pickles recipe you can basically pickle whatever vegetable your little heart desires but I went basic with cucumbers. Asparagus, young carrots, raddishes or green beans work well too. I used half pickling cumbers and half regular cucumbers in the pictures.

    Stack of pickles on a kitchen scale.

    Wash, slice, and get your veggies ready how you want them and peel 10 cloves of fresh garlic.

    Peeled garlic on a table.

    Fresh Dill

    In the meantime heat 4 C of water to boil, cook the garlic in the water for a few minutes, remove from the heat and stir in some vinegar and salt-- this is your brine. I LOVE fresh dill.  I love the way it smells. I love the way it looks. I love the way it tastes. I honestly wish I could have a vase of it in my kitchen year-round. Is that weird?

    Fresh dill.

    Divide about 1 C of fresh dill (stems attached) among two quart-sized canning jars.

    Fresh dill in two glass mason jars on a table.

    Remove the cooked garlic cloves from the brine and divide evenly along the jars. Add 2 teaspoon of pickling spice to each jar as well.

    Adding pickling spice into a glass mason jar with a metal measuring spoon.

    Pack each jar with your veggies-- you can pack them in there pretty tight if you want to.

    Homemade pickles in two glass mason jars on a table.

    Bring the bring back up to a boil and and fill each jar with it until the veggies are immersed. Allow to cool, place a lid on top and refrigerate until ready to eat!  They'll keep in the fridge for up to 3 months and so much better than your typical grocery store pickle! The recipe is at the bottom of the post, just past the giveaway info. Enjoy your Refrigerator Pickles!

    Simple pickles recipe in two glass mason jars.

    [pinit]

    Update: Giveaway closed.

    Giveaway!

    Two ways to win:

    1). Ball wants you to be ready to start canning once you learn all you need to know about canning on Saturday, so to one of you lucky ducks they are giving away:

    ·         The Ball Canning Discovery Kit

    ·         The Ball Blue Book Guide To Preserving

    ·         One coupon for a free case of Ball brand canning jars

    All you need to do is leave a comment on this post and tell me me what you want to can first! I'll pick a winner on August 27th and contact the winner via email.

    2.) One grand prize winner will receive a $500 gift card to Cooking.com and four runners up will receive a Ball branded package including a Ball Blue Book, Canning Discovery Kit and Case of Heritage Collection Jars by pinning a canning-related image on Pinterest and tag it with #canitforward. (Click on any of the "pin it" buttons below my pictures on this post to pin these pickles). Email your pin to canitforwarddaycontest@gmail.com to be entered to win!

    📖 Recipe

    Delicious Refrigerator Pickles in two large glass mason jars on a wooden table.
    Print Recipe
    5 from 4 votes

    Refrigerator Pickles

    Quick pickles that are easy to make and even easier to eat! If you've never made refridgator pickles, now is the time!
    Prep Time30 minutes mins
    Cook Time0 minutes mins
    Chilling Time1 day d
    Total Time1 day d 30 minutes mins
    Course: condiments
    Cuisine: American
    Keyword: Easy pickles, quick brine, quick pickle
    Servings: 20 servings
    Calories: 8kcal
    Author: Heather Cheney

    Ingredients

    • 10 cloves garlic peeled
    • 2 cups white vinegar
    • 2 tablespoons kosher salt
    • several sprigs fresh dill about 1 cup, stems attached
    • 4 teaspoon pickling spice
    • Desired vegetables I used all cucumbers, but green beans, asparagus, young carrots, raddish, sweet peppers, etc. work well

    Instructions

    • In a medium saucepan, bring 4 cups water to a boil, reduce heat to a simmer, and add the garlic. Cook for 5 minutes. Add the vinegar and salt, raise the heat, and bring to a boil, stirring until the salt dissolves. Remove from heat.
    • Evenly divide the dill among 2 1-quart canning jars. Divide the pickling spice among the jars as well. Using tongs, remove the garlic from the brine and place 5 cloves in each jar. Pack each jar with desired vegetables (I used about 2 pounds of cucumbers) until each jar is tightly stuffed.
    • Bring the brine back to a boil and pour over the veggies to cover completely. Allow to cool, then place the lids on the jars and refrigerate. Keep these in the fridge for up to 3 months.

    Nutrition

    Serving: 1serving | Calories: 8kcal | Carbohydrates: 1g | Protein: 1g | Fat: 1g | Saturated Fat: 1g | Sodium: 699mg | Potassium: 11mg | Fiber: 1g | Sugar: 1g | Vitamin A: 2IU | Vitamin C: 1mg | Calcium: 7mg | Iron: 1mg

    Really Crunchy French Toast

    By Heather LAST UPDATED July 18, 2019 · FIRST PUBLISHED August 1, 2013, Leave a Comment

    Really Crunchy French Toast - Way back in May when I was in Disney World for Food Blog Forum, my roommate told me about this amazing french toast coated in crushed Captain Crunch cereal. I was instantly intrigued. Then, not 2 hours after having this conversation, I boarded my flight home, pulled out my new Cook's Country magazine and what do I find? A recipe for Really Crunchy French toast made with Captain Crunch! Clearly I was meant to get this in my belly as fast as possible. It was one of those moments where I absolutely knew there was someone watching over my gastronomic well-being.  Whoever you are, thank you.

    Really Crunchy French Toast stacked on top of a white plate next to a glass of syrup and a silver fork. [Read more...]

    The Best Way To Cut A Watermelon

    By Heather LAST UPDATED May 5, 2021 · FIRST PUBLISHED July 22, 2013, Leave a Comment

    This fruit cutting technique is on my top-ten list of favorite kitchen tips that I've ever learned and I want to be sure you know how to do it too! If you love summer watermelon and want an easy and efficient way to cut it, this post is for you!

    Diced watermelon in a white bowl on a towel

    Are you ready for a life changing moment?

    I realize that a whole post on how to cut a watermelon may seem a little trivial, but stick with me.

    When I learned this handy little trick I felt like there wasn't a fruit or vegetable I couldn't conquer with my knife. Fruit Ninja! Ready to take on things like snickerdoodle peach cobbler or a curry with lots of vegetables!

    I LOVE watermelon, but every time I used to cut it I hated the amount of time it took to cut each slice into square pieces for salads, skewers, etc. But, no more! This trick gives you a whole watermelon cut into perfectly square pieces of watermelon in 7 steps. Do you believe me?

    Here's How We Do It

    Step 1. Pick A Ripe Melon

    You've got to start with a good melon- not because it will make cutting your watermelon easier, but because eating it will be more enjoyable, right?

    I know there are lots of ideas floating around about how to pick the perfect melon and I've used several of them (knocking, smelling, etc). But the technique that works best for me is a combination of color and weight.

    I always look for the darkest melon with a light or bright ripening spot. The longer the melon sits on the ground, the riper/sweeter (in theory) it will be.

    I also look for is how heavy it is in proportion to its size- the heavier the better. Once you have a ridiculously heavy, dark green melon with a bright ripening spot you should be good to go!

    Now that I've gotten you all riled up about picking the perfect melon, I might mention that the one I used for pictures was awful! It was dry and mealy and you'll notice in some of the pictures the meat was cracked throughout. Eh. Not the last watermelon I'll ever buy!

    A whole watermelon on a white cutting board.

    Step 2: Cut the watermelon into fourths long-ways

    You want the watermelon cut into four large, equal wedges.

    Three slices of fresh watermelon.

    Step 3: Start making horizontal cuts

    Using a sharp and somewhat long knife, make a horizontal cut across one section of melon going straight through to the rind. Repeat, moving down the melon until you have 3 or 4 horizontal lines depending on how small you want your pieces.

    Cutting into a slice of watermelon on a white cutting board.

    Step 4: Wash, Rinse and Repeat

    Turn the same section of melon around and repeat on the other side.

    Lines cut on a slice of watermelon on a white cutting board.

    Step 5: Cut top to bottom to make cubes

    Make vertical cuts starting from the top going straight down to the rind. Continue across the entire piece.

    Making vertical lines on a watermelon with a knife.

    Step 6: Cut along the rind

    This step is probably the trickiest of them all. Use your knife to make a cut around the base of the melon. I start on one side and then do the same to the other.

    Using a knife to cut into a watermelon and making diced watermelon.

    You're now loosening all of the little squares of melon from the rind.

    Loosening watermelon slices out of watermelon slice.

    Step 7: Tip and Dump

    Here's the fun part! Tip your cut watermelon over a big bowl and watch all of the little squares fall ever-so-gracefully into your bowl.

    Pouring watermelon cubes into a white bowl.

    Depending on how well you cut through the bottom, you may end up with a few stragglers. Trim them off and you're good to go!

    The Best Way to Cut a Watermelon .

    Repeat with the remaining 3 sections and you'll have yourself a perfectly cubed watermelon.

    I love that I only end up with FOUR big pieces of rind to throw away!

    If you've tried this technique I'd love to hear about it in the comments below!

    Melt In Your Mouth Waffles

    By Heather LAST UPDATED July 18, 2019 · FIRST PUBLISHED June 11, 2013, 1 Comment

    Melt in your mouth waffles

    I stumbled upon this recipe a few years ago on the Food Network site and its crazy name caught my attention right away-- Waffles of Insane Greatness. Good name, right? But at that time I was all hung up on my then-favorite waffle recipe that called for 42 separate bowls for mixing and whipping and folding and an eye of a newt.  By the time I was finished making them it looked like something nasty had been detonated in my kitchen but I was convinced there was no other way to get the perfect waffle. A few months later I met my good friend the yeasted waffle, fell in love all over again, appreciated that my kitchen wasn't nearly as trashed at the end of my waffle-ing and named it my new victor.

    Enter these waffles.

    A few months ago I was going through a binder of recipes I had printed out and found this one. It was nearing dinner time and I had whittled away my afternoon making meal plans for anytime besides the present so I decided to give them a go.  And as luck would have it they were quick, only dirtied one bowl (score!), and were absolutely, melt-in-your-mouth amazing!

    The "secret" ingredient in these is the addition of corn starch; it lightens the flour keeping them super moist and tender.

    Melt In Your Mouth Waffles | heatherlikesfood.com

    Combine your dry ingredients: flour, corn starch, baking powder, baking soda, salt, and sugar. Can I just tell you how thrilled I am to not have orange counter tops in our new house?!

    Melt In Your Mouth Waffles | heatherlikesfood.com

    Next add some buttermilk, and egg, oil, and vanilla to the try ingredients and whisk until no dry spots remain.

    Melt In Your Mouth Waffles | heatherlikesfood.com

    It's pretty hard to mess up this batter by over-mixing like you can with some waffles. Once it's mixed give it about 30 minutes to rest, though I've skipped this step in the past and have seen no big difference.

    Melt In Your Mouth Waffles | heatherlikesfood.com

    Whether you let it rest or not, know that the batter is SUPER runny. I'm able to scoop a pretty generous ⅔ cup  into my waffle maker  to make nice full waffles because it puffs up so beautifully though.

    Melt In Your Mouth Waffles | heatherlikesfood.com

    Cook until golden brown and smother in syrup. Our favorite is Buttermilk!

    [pinit]

    Melt In Your Mouth Waffles | heatherlikesfood.com

    [pinit]

    📖 Recipe

    Print Recipe
    4.86 from 14 votes

    Melt In Your Mouth Waffles

    My absolute favorite waffle recipe! It's soft and moist in the inside and crispy on the outside.
    Prep Time10 minutes mins
    Cook Time5 minutes mins
    Total Time15 minutes mins
    Course: Breakfast
    Cuisine: American
    Keyword: corn starch waffles, crunchy outside, light and fluffy
    Servings: 4 Waffles
    Calories: 334kcal
    Author: Heather Cheney

    Ingredients

    • ¾ C All Purpose Flour
    • ¼ C Corn Starch
    • ½ teaspoon baking powder
    • ¼ teaspoon baking soda
    • ½ teaspoon table salt
    • 1 ½ teaspoon sugar
    • 1 C buttermilk
    • ⅓ C vegetable oil
    • 1 egg
    • ¾ teaspoon vanilla extract

    Instructions

    • Whisk together dry ingredients and add wet ingredients. Whisk until well combined and no dry spots remain. Let rest for 30 minutes- batter will be thin.
    • Cook until golden brown per your waffle maker directions.

    Nutrition

    Serving: 1waffle | Calories: 334kcal | Carbohydrates: 30g | Protein: 6g | Fat: 21g | Saturated Fat: 16g | Trans Fat: 1g | Cholesterol: 48mg | Sodium: 439mg | Potassium: 173mg | Fiber: 1g | Sugar: 5g | Vitamin A: 158IU | Calcium: 101mg | Iron: 1mg

    Homemade Dole Whip

    By Heather LAST UPDATED July 18, 2019 · FIRST PUBLISHED May 29, 2013, 14 Comments

    Homemade Dole Whip: I'm not going to say it's an exact replica of Disney's treat, but it's pretty darn close and curbed my cravings quite nicely. 🙂

    Homemade Dole Whip

    Homemade Dole Whip

    I didn't even know these little delights existed until a few months ago. I had just bought my ticket for Food Blog Forum and joined a Facebook group for the attendees. As I was going down the feed I started to see a common thread- everybody was talking about how excited they were to have a Dole Whip (or seven). The thread soon progressed into a discussion and confessional for those that were then deemed "Dole Whip Virgins" and we playfully planned an initiation ceremony for all of us underprivileged bloggers.

    After the main conference on Saturday, I set off with a group of bloggers to the Magic Kingdom in search of the beloved Dole Whip. It was probably close to midnight so our pictures didn't turn out ideally, but I finally got to taste what everyone had been raving about and didn't have to introduce myself as Heather "the Dole Whip virgin", any longer.

    Homemade Dole Whip | heatherlikesfood.com

    Picture by Vijay @ noshonit

    So now, unless you are completely well-versed in Disney cuisine, you're probably wondering what this is, aren't you? Well, it's basically pineapple flavored soft-serve. You can order it a few different ways: swirled with vanilla or orange and served in a cup, or in a pineapple juice float. My favorite way to eat it is as a vanilla-swirled float.  At Disney World it's found at either Aloha Isle in the Magic Kingdom, or at Captain Cook's at the Polynesian Resort; it is well worth tracking down if you're visiting.  BUT, if you're not en queue for a trip to Disney World I've got your back because the Dole Whips are coming to you!

    The cravings set once I arrived home and I knew that I needed to figure out how to make these. After a few quick searches I found a few recipes that didn't need  an ice cream maker but rather called for some freezer time in a ziplock bag. I really wanted to find a way to make it taste authentic without an ice cream maker, but ultimately came to terms with the fact that it just wasn't going to happen.  So  yes, you need an ice cream maker for this recipe but it doesn't have to be a fancy one. Mine is an older-model Cuisinart and I love it. You know what else I love? I got it for $8 at a thrift store.

    HOMEMADE DOLE WHIP

    We're using 5 ingredients here: crushed pineapple, Cool Whip, lemon and lime juice, and just a touch of sugar.

    Homemade Dole Whip | heatherlikesfood.com

    In a blender puree 2 cans of crushed pineapple with the juice, 2 tablespoon of sugar, and 2 tablespoon of both fresh lemon and lime juice. Let it roll for as long as you'd like because you want it smooooth.

    Homemade Dole Whip | heatherlikesfood.com

    To the blender jar add in 1, 8 oz container of Cool Whip or whatever whipped topping you like. I'm typically not a whipped topping kind-of-gal and prefer whipped cream but I wanted to stay true to the original--and the original Dole Whip is dairy-free. So, Cool Whip it is!

    Homemade Dole Whip | heatherlikesfood.com

    Give it another go-around in the blender until it's well-mixed. I'm not gonna lie, it's pretty darn good even before it's frozen.

    Homemade Dole Whip | heatherlikesfood.com

    Pour the mixture into your ice cream maker and process for 10-20 minutes. Mine was ready at about the 15 minute mark.

    Homemade Dole Whip | heatherlikesfood.com

    If you're in a float kind of mood (like I was and probably always will be), fill a glass half-way with pineapple juice and top with the soft-serve. I filled up a piping bag and squeezed it into my glasses to make it look a little more authentic.

    Sip, savor, and enjoy! I'm not going to say it's an exact replica of Disney's treat, but this homemade dole whip comes pretty darn close and curbed my cravings quite nicely. 🙂

    Homemade Dole Whip

    Homemade Dole Whip

    📖 Recipe

    Print Recipe
    4.75 from 4 votes

    Homemade Dole Whip

    Bring a taste of Disneyland home and make these homemade dole whips!
    Prep Time10 minutes mins
    Cook Time0 minutes mins
    Chilling Time20 minutes mins
    Total Time30 minutes mins
    Course: Dessert
    Cuisine: American
    Keyword: cool whip, disneyland, Pineapple dole whip
    Servings: 8 servings
    Calories: 108kcal
    Author: Heather Cheney

    Ingredients

    • 2, 20 oz cans crushed pineapple
    • 2 tablespoon fresh lime juice
    • 2 tablespoon fresh lemon juice
    • 2 tablespoon sugar
    • 1, 8 oz container non-dairy whipped topping thawed.

    Instructions

    • Puree crushed pineapple and accompanying juice with lemon and lime juices and sugar until very smooth in a blender. Spoon in whipped topping and blend until smooth again.
    • Pour mixture into a prepared ice cream maker. Process for 10-20 minutes or until soft-serve consistency.
    • Spoon into glasses filled with pineapple juice for Dole Whip floats or enjoy on it's own.

    Nutrition

    Serving: 1servings | Calories: 108kcal | Carbohydrates: 24g | Protein: 1g | Fat: 2g | Saturated Fat: 1g | Cholesterol: 5mg | Sodium: 24mg | Potassium: 139mg | Fiber: 1g | Sugar: 19g | Vitamin A: 97IU | Vitamin C: 10mg | Calcium: 48mg | Iron: 1mg

    Homemade Dole Whip

    Homemade Dole Whip

    Creamy Spinach and Tomato Spaghetti

    By Heather LAST UPDATED April 12, 2018 · FIRST PUBLISHED May 1, 2013, 4 Comments

    Creamy Spinach and Tomato Spaghetti | heatherlikesfood.com

    If there is one thing I always make sure my pantry is stocked with it's canned tomatoes. I use them in everything ( see exhibit A, B, C, D) and they are especially helpful in getting dinner ready and on the table in minimal time.  This creamy spinach and tomato spaghetti is a family favorite of ours. It comes together super quickly and is great on it's own or along side a grilled chicken breast or sliced Italian sausage.

    I'm usually all about a funny side story, but my mind is totally drawing a blank right now. Is this what writer's block is? Good grief, I don't even know who I am anymore. Guess we'll just go straight to the recipe and hope for a better write-up with my next post. Pasta cures all, right? At least that's what my Italian grandmother would say if I had one. An Italian one, that is. I do have a grandma.

    Anyway...

    We start the sauce by building our first layer of flavor- caramelized onions. These will give the sauce some much needed sweetness and that tastes-like-its-been-simmering-for-hours effect.

    Creamy Spinach and Tomato Spaghetti | heatherlikesfood.com

    Once your onions have cooked down and caramelized in a couple tablespoons of olive oil with some garlic cloves, toss in dried oregano, red pepper flakes, salt and sugar. Next up is adding the chicken broth and the tomatoes; you'll need some canned diced tomatoes, tomato sauce and a couple tablespoons of tomato paste. If you're like me you hate opening up a whole can of tomato of paste for only a few tablespoons. So next time you're at the store look for tomato paste in a toothpaste-like squeeze tube. I've noticed quite a few store have started carrying them and they are prefect for recipes like these; squeeze out what you need and put the rest in the fridge for next time! Genius!

    Creamy Spinach and Tomato Spaghetti | heatherlikesfood.com

    Bring the sauce to a simmer, add the cream cheese to the sauce in chunks and stir until the cream cheese has melted into the sauce. I'm not going to lie- it takes a little bit of work to get the cream cheese to mix in completely but if you keep at it, I promise it will. This last time I used my non-stick skillet so I couldn't use a whisk and I was able to get it combined in about 5 minutes. If I had a silicone whisk it would have gone MUCH faster. A Note about types of cream cheese: some low-fat and all fat-free cream cheeses have stabilizers that make them extremely hard to combine with hot liquids and usually curdle. Substitute low-fat options at your own risk 🙂

    Creamy Spinach and Tomato Spaghetti | heatherlikesfood.com

    Once your sauce has come together or even before, throw a pound of spaghetti into a pot and cook until al dente. Before draining the cooked pasta, reserve a cup of the hot pasta water and set aside.

    Creamy Spinach and Tomato Spaghetti | heatherlikesfood.com

    Add 4 cups of fresh baby spinach to the sauce, stir until wilted and remove from the heat.

    Creamy Spinach and Tomato Spaghetti | heatherlikesfood.com

    Once your pasta has been drained add it directly to the sauce, adding a little bit of the pasta water to loosen it up a bit if needed. Top with grated parmesan cheese and get ready for a plate of pasta goodness.

    Creamy Spinach and Tomato Spaghetti | heatherlikesfood.com

    📖 Recipe

    Creamy Spinach and Tomato Spaghetti | heatherlikesfood.com
    Print Recipe
    5 from 4 votes

    Creamy Spinach and Tomato Spaghetti

    Creamy and easy to make, this simple spaghetti recipe will get made again and again!
    Prep Time10 minutes mins
    Cook Time30 minutes mins
    Total Time40 minutes mins
    Course: Main Course
    Cuisine: American
    Keyword: Cream Cheese Pasta, easy dinner, One pot
    Servings: 6 Servings
    Calories: 419kcal
    Author: Heather Cheney

    Ingredients

    • 1 medium onion diced
    • 2 cloves garlic sliced
    • 2 tablespoon olive oil
    • 1 tablespoon sugar
    • 1 tablespoon dried oregano
    • ⅛ teaspoon dried red pepper flakes
    • ¾ teaspoon salt
    • 1 can 14.5 oz petite diced tomatoes
    • 1 can 8 oz tomato sauce
    • 2 tablespoon tomato paste
    • 1 C chicken broth
    • 4 oz full-fat cream cheese low-fat and fat-free have the tendency to curdle
    • 4 C fresh baby spinach
    • 1 lb dry spaghetti

    Instructions

    • In a large skillet heat olive oil over medium heat and cook onions and garlic until the onions are soft, lightly browned and sweet.
    • Add sugar, oregano, red pepper, and salt to the onions and stir. Add tomatoes, sauce, paste, and chicken broth to the skillet and bring to a simmer.
    • Cut the cream cheese into small chunks and stir into the sauce. Continue to stir until the cream cheese has completely melted into the sauce- about 5 minutes.
    • Cook spaghetti according to package directions and reserve 1 C of the hot pasta water before draining. Set aside.
    • Add spinach to the sauce and stir until wilted. Remove from heat and transfer the cooked spaghetti into the sauce. Toss until coated, adding in a little bit of the pasta water to loosen it up if needed.
    • Serve topped with grated Parmesan cheese.

    Nutrition

    Serving: 1serving | Calories: 419kcal | Carbohydrates: 64g | Protein: 12g | Fat: 13g | Saturated Fat: 5g | Cholesterol: 21mg | Sodium: 559mg | Potassium: 434mg | Fiber: 4g | Sugar: 6g | Vitamin A: 2238IU | Vitamin C: 11mg | Calcium: 78mg | Iron: 2mg

    Spiced Apple Pork Burgers & Strawberry Banana Smoothie Pops

    By Heather LAST UPDATED March 22, 2021 · FIRST PUBLISHED April 25, 2013, 1 Comment

    Spiced Apple Pork Burgers | heatherlikesfood.com

    With the summer grilling season right around the corner I want to share a couple of recipes that are great for entertaining and warding off that summer heat: Spiced Apple Pork Burgers and Strawberry Banana Smoothie Pops

    When your husband finishes off 2 burgers and asks when you can make them again, you know you've got a good recipe on your hands---or more accurately, in your face. This recipe comes from my friends at Tree Top and I'm so glad they introduced me to it. In all honesty when I first looked at it I thought, "pork burgers? Is that really a thing?" but I quickly learned they were in fact a glorious thing when I had that first bite. They are juicy, full of flavor and I seriously can't wait to make them again.

    The secret ingredient in these is the addition of apple sauce to the ground pork.

    Spiced Apple Pork Burgers | heatherlikesfood.com

    The other thing that makes these so special is the combination of spices used to season the meat. Chili powder, cinnamon, ground mustard and black pepper marry together the apple flavor marvelously with the pork.

    Spiced Apple Pork Burgers | heatherlikesfood.com

    Give the meat a good little stir and portion it out for patties. When I make burgers I like to form the meat into a mound in the bowl and score it so I don't end up with one huge burger and a bunch of little ones or vice versa. It's not fair to give your burgers a little man complex.

    Spiced Apple Pork Burgers | heatherlikesfood.com

    These patties are great for grilling and work equally as well on the stove top. Cook just like you do regular burger patties; once they are  no longer pink in the middle you're set! The finishing touch on these burgers is a maple-dijon sauce. A super simple mixture of dijon mustard and real maple syrup makes a sweet and tangy sauce that is perfect on these

    Spiced Apple Pork Burgers | heatherlikesfood.com

    I topped our burgers with caramelized onions, fresh baby spinach, a tomato slice and, of course, that dreamy maple-dijon sauce.

    Hello, lover.

    Spiced Apple Pork Burgers | heatherlikesfood.com

    These burgers prove that apples are great for all types of cooking. I love using applesauce as a substitute for fats in my baking and adding apple juice to savory recipes like soups and sauces can create amazing layers of flavor. Tree Top's 3 Apple Blend juice is one of my absolute favorites for cooking and drinking alike.  Here's a fun little info graphic on the juice making process at Tree Top.  Click to enlarge

    Spiced Apple Pork Burgers | heatherlikesfood.com

    Speaking of using juice in your recipes, homemade smoothie popsicles are a great way to cool off, save money, and sneak copious amounts of fruit into your kid's unsuspecting bellies. This recipe uses fresh strawberries, bananas, apples, yogurt and apple juice. Just throw all the ingredients into the blender, mix until smooth, pour into a popsicle mold and freeze!

    Strawberry Banana Smoothie Pops | heatherlikesfood.com

    What's not to love about a popsicle speckled with  fresh strawberries? Ah, I love summer!

    Strawberry Banana Smoothie Pops | heatherlikesfood.com

    This is a sponsored post by Tree Top Inc. All comments and thoughts, as always, are uniquely mine. 

    Other Sandwich Recipes You Might Like

    • Italian Beef Recipe with Pepperoncini 
    • Garlic Bread Grilled Cheese
    • Pork Tenderloin Sandwich
    • Easy Pulled BBQ Chicken Sandwiches
    • Banh Mi Sandwiches
    • Slow Cooker BBQ Beef Sandwiches
    • Easy French Dip
    • Onion Soup Mix Burger
    • Sloppy Joe Sauce
    • Greek Turkey Burger Recipe
    • Doritos Burgers

    📖 Recipe

    Print Recipe
    5 from 2 votes

    Spiced Apple and Pork Burgers

    These Spiced Apple and Pork Burgers may sound like an odd combination, but they are definitely delicious!
    Prep Time10 minutes mins
    Cook Time15 minutes mins
    Total Time25 minutes mins
    Course: Sandwich
    Cuisine: American
    Keyword: Pork Burger
    Servings: 6 Burgers
    Calories: 555kcal
    Author: Heather Cheney

    Ingredients

    • 3 tbsp. maple syrup
    • 2 tbsp. spicy brown mustard
    • 2 pounds ground pork
    • ½ cup Tree Top Natural Apple Sauce
    • 1-½ tsp. salt
    • 1-½ tsp. chili powder
    • 1 tsp. dry mustard
    • ½ tsp. black pepper
    • ¼ tsp. ground cinnamon
    • 6 Hamburger buns
    • Baby Spinach leaves
    • Optional for garnish: Cheddar cheese grilled onions, pickles, tomatoes or other favorite toppings
    • Optional: Toast buns if desired

    Instructions

    • Stir maple syrup and mustard together in a small bowl. Set aside.
    • Spray a large non-stick grill pan or griddle with cooking spray and place over medium to medium high heat.
    • Mix pork, apple sauce, salt, chili powder, dry mustard, pepper and cinnamon together in a large mixing bowl. Form mixture into 6 patties. Place patties in pan and cook for 4-5 minutes, turn and cook additional 4-5 minutes or until done. To serve, spread bun bottoms with maple mustard mixture. Top each with a spinach leaf, a patty and bun tops.

    Notes

    Recipe Source: Tree Top

    Nutrition

    Serving: 1serving | Calories: 555kcal | Carbohydrates: 29g | Protein: 30g | Fat: 34g | Saturated Fat: 12g | Cholesterol: 108mg | Sodium: 522mg | Potassium: 541mg | Fiber: 1g | Sugar: 9g | Vitamin A: 130IU | Vitamin C: 1.8mg | Calcium: 113mg | Iron: 3.1mg

    📖 Recipe

    Spiced Apple Pork Burgers | heatherlikesfood.com
    Print Recipe
    5 from 2 votes

    Strawberry Banana Smoothie Pops

    Smooth and creamy, these healthy popsicles are easy to make and delicious!
    Prep Time20 minutes mins
    Cook Time0 minutes mins
    Chilling Time8 hours hrs
    Total Time8 hours hrs 20 minutes mins
    Course: Dessert
    Cuisine: American
    Keyword: fresh fruit, homemade popsicles, smoothie popscicles
    Servings: 8 popsicles
    Calories: 78kcal
    Author: Heather Cheney

    Ingredients

    • 1 cup Tree Top Apple Juice
    • 1 pint strawberries hulled, sliced and frozen
    • 1 banana sliced and frozen
    • 1 apple peeled, cored, sliced and frozen
    • 6 oz vanilla yogurt
    • 1 teaspoon vanilla

    Instructions

    • Put all ingredients in a blender and process until smooth. Pour into ice pop forms or paper cups, place ice pop sticks in center and freeze inverted for about 3 hours or until solid.

    Nutrition

    Serving: 1popsicle | Calories: 78kcal | Carbohydrates: 18g | Protein: 2g | Fat: 1g | Saturated Fat: 1g | Cholesterol: 1mg | Sodium: 16mg | Potassium: 246mg | Fiber: 2g | Sugar: 13g | Vitamin A: 38IU | Vitamin C: 38mg | Calcium: 50mg | Iron: 1mg

    Cheesy Vegetable Quinoa Bake

    By Heather LAST UPDATED April 12, 2018 · FIRST PUBLISHED April 23, 2013, Leave a Comment

    Cheesy Vegetable Quinoa Bake | heatherlikesfood.com

    Quinoa has been picking up a lot of speed lately in its popularity but I have a sneaking suspicion that some are still scared to try it. I mean, it does look a little alien once cooked and the germ unravels. But the truth is that it makes a great rice alternative and is an absolute superfood filled with vitamins and packed with protein. Did you know that it's actually a seed (as opposed to a grain) and is most closely related to spinach and and beets? Crazy! [Read more...]

    Sweet Potato and Chickpea Curry

    By Heather LAST UPDATED January 31, 2020 · FIRST PUBLISHED April 14, 2013, 1 Comment

    Sweet Potato and Chickpea Curry | heatherlikesfood.com

    A few weeks back we had a good friend return from India on a service trip. Ever since she came home with photos of brightly decorated buildings and clothes and told us of her elephant riding adventures and spice markets so fragrant she almost couldn't handle it, I've been longing to go. [Read more...]

    Stove Top Kettle Corn

    By Heather LAST UPDATED July 17, 2019 · FIRST PUBLISHED April 3, 2013, 4 Comments

    Stove Top Kettle Corn | heatherlikesfood.com

    First off, if you haven't subscribed to get my new posts delivered straight to your email inbox you can do so in the sidebar. Just enter in your email address and you'll be set to not miss a single recipe!

    Am I right about kettle corn being something that people either love or hate? I can't even fathom why people wouldn't like crunchy, sweet, and salty popcorn, but to each their own I guess.

    I'm going to share my recipe with you for how I make kettle corn, but it's the process that can either make or break your popping experience. If you're intimidated by the thought of making your own, don't be! It really is super simple, especially with a little know-how. We make this at least once a week as an after-school or movie night snack. It's the perfect balance of sweet and salty that satisfies both cravings effortlessly without making you feel like you've fallen of the wagon. Yes, I know it's sugar coated popcorn cooked in oil. But it's better than sitting down with a piece of carrot cake or bag of chips, right? 

    To start, you'll need a large pot that has a cover and is light enough to pick it up and shake around a bit. However, super light pots like aluminum stock pots with thin bottoms don't distribute heat very well and will leave you with a burned mess of sugar and un-popped corn.

    Get your popcorn ready by combining ½ c of popcorn kernels with ¼ C sugar.

    Stove Top Kettle Corn | heatherlikesfood.com

    Heat 2 tablespoon of vegetable oil in the pot over medium-high heat until it's just starting to smoke. I know you're going to want to put the popcorn in before the oil is hot enough, but don't do it! Watch for the smoke--you might have to get down and look horizontally over the pot because it can be hard to see.

    Once you see a wisp or two of smoke, pour in the popcorn and sugar and stir for about 30 seconds or so-- just long enough to mix up the sugar and let some of it start to melt.

    Stove Top Kettle Corn | heatherlikesfood.com

    This is where it gets fun! Put the lid on the pot and drape a kitchen towel over the top and onto the handles. You need to be able to pick up the pot and hold the lid on while shaking it without burning your fingers off. The corn should be starting to pop by now. If not, lift the lid for just a second to let some pressure out and they'll likely start.

    Stove Top Kettle Corn | heatherlikesfood.com

    Every 30 seconds or so, pick up the pot shake it all around and then put it back on the heat. Continue until the most of the popping stops and remove from heat. Sprinkle with as little or as much salt as you'd like and transfer into a bowl.

    Stove Top Kettle Corn | heatherlikesfood.com

    You'll want to start shoveling it in your face immediately but remember that we did just coat popcorn in molten sugar. Be patient or at least promise not to sue me for a burned mouth/fingertips. Don't say I didn't warn you :).

    Stove Top Kettle Corn | heatherlikesfood.com

    📖 Recipe

    Print Recipe
    5 from 1 vote

    Stove Top Kettle Corn

    Sweet and salty popcorn made on the stovetop for the ultimate homemade snack!
    Prep Time5 minutes mins
    Cook Time10 minutes mins
    Total Time15 minutes mins
    Course: Snack
    Cuisine: American
    Keyword: fair food, made on stovetop, sweet and salty
    Servings: 4 servings
    Calories: 186kcal
    Author: Heather Cheney

    Ingredients

    • 2 tablespoon vegetable oil
    • ½ C popcorn kernels unpopped
    • ¼ C sugar
    • salt to taste

    Instructions

    • Combine popcorn and sugar in a small bowl and set aside.
    • In lidded, a heavy-bottomed pot that is still light enough to pick up and shake, heat oil over medium-high heat.
    • Heat until the first few whisps of smoke form and pour popcorn and sugar into the pot. Stir for about 30 seconds to distribute the sugar and place the lid on the pot.
    • Drape a towel over the top of the pot and onto the handles to keep your hands cool.
    • Every 30 seconds pick up the pot, hold on the lid, and shake all around. Return to the heat and repeat this process until most of the popping has stopped.
    • Remove the pot from the heat and sprinkle with salt to taste.

    Nutrition

    Serving: 1serving | Calories: 186kcal | Carbohydrates: 28g | Protein: 2g | Fat: 8g | Saturated Fat: 6g | Sodium: 2mg | Potassium: 56mg | Fiber: 3g | Sugar: 13g | Calcium: 1mg | Iron: 1mg

    Chile Colorado Burritos

    By Heather LAST UPDATED March 22, 2021 · FIRST PUBLISHED March 27, 2013, 3 Comments

    Chile Colorado Burritos | heatherlikesfood.com

    Alright, on Monday when I sent you free with the knowledge of how to make your own enchilada sauce, did you really think I was just going to send you into the Mexican food jungle all by your lonesome? Doing that would just be silly and irresponsible, so today I'm giving you a great recipe to put that sauce to good use-- Chile Colorado Burritos.

    The filling were making for these is chile Colorado or slow-cooked beef in red enchilada sauce. The meat comes out tender, moist, and intensely flavored by the sauce and is perfect for stuffing burritos, topping nachos, or making sloppy (but good) tacos. It can be cooked in the slow-cooker or on the stove-top and I've included directions for both below.

    I typically use stew meat for this because it's cheap, lean and already cut (bonus!). Place the meat in your slow-cooker or large pot and season with some garlic powder, onion powder, and salt.

    Chile Colorado Burritos | heatherlikesfood.com

    Pour 2 cups of enchilada sauce over the meat and give a little stir to combine. I used my own homemade sauce this time and I highly recommend giving it a try, but canned works well too. Just make sure to get a brand that you know your family likes. All enchilada sauces have different levels of heat and acidity and since the sauce is a main player in this dish, you'll want to make sure you like it.

    Bring to a simmer on the stove-top and cook over MED-LOW heat for 2 hours, or in the slow-cooker for 7 hours on LOW or 3-4 on HIGH. The meat is done when it's tender and shreds easily.

    Chile Colorado Burritos | heatherlikesfood.com

    When the meat is done you're ready for some burrito makin'. We like to give each tortilla a nice schmear of refried beans...

    Chile Colorado Burritos | heatherlikesfood.com

    Followed by a few spoonfuls of meat.

    Chile Colorado Burritos | heatherlikesfood.com

    A little grated cheese makes basically everything better in my opinion too.

    Chile Colorado Burritos | heatherlikesfood.com

    Fold one side over, add a dab of beans to hold the other side in place...

    Chile Colorado Burritos | heatherlikesfood.com

    And smother the bad boy in the enchilada sauce the meat was cooked in and top with more cheese.

    Chile Colorado Burritos | heatherlikesfood.com

    To melt the cheese and crisp up the edges of the tortilla a bit, place the burrito under the broiler for about a minute. When it's done you'll have a plate of saucy, cheesy smothered burrito heaven. Enjoy! See you on Monday!

    Chile Colorado Burritos | heatherlikesfood.com

    📖 Recipe

    Chile Colorado Burritos | heatherlikesfood.com
    Print Recipe
    4.75 from 16 votes

    Chile Colorado Burritos

    Tender beef cooked in a red chili sauce and wrapped in a cheesy smothered tortilla.
    Prep Time10 minutes mins
    Cook Time8 hours hrs 10 minutes mins
    Total Time8 hours hrs 20 minutes mins
    Course: Main Course
    Cuisine: Mexican, Tex-Mex
    Keyword: beef burritos, Beef cooked in enchilada sauce, tender beef in sauce
    Servings: 6 burritos
    Calories: 246kcal
    Author: Heather Cheney

    Ingredients

    • 2 lbs cubed beef stew meat
    • 2 C enchilada sauce
    • ½ teaspoon garlic powder
    • 1 teaspoon onion powder
    • 1 teaspoon kosher salt
    • Refried Beans
    • Burrito-sized flour tortillas
    • shredded cheese

    Instructions

    • Place stew meat in a slow-cooker or large pot on the stove top. Season with onion and garlic powder and salt.
    • Pour enchilada sauce over the top and stir to combine.
    • Bring to a simmer and cook covered over LOW-MED heat for 2 hours on the stove top; 7 hours on LOW or 3-4 on HIGH in the slow-cooker.
    • Meat is done when it shreds easily with a fork.
    • Assemble burritos by layering refried beans, drained, cooked meat, and shredded cheese in each tortilla.
    • Top with the enchilada sauce the meat was cooked in and more cheese. Place under the broiler until the cheese is melted and serve.

    Nutrition

    Serving: 1serving | Calories: 246kcal | Carbohydrates: 7g | Protein: 35g | Fat: 8g | Saturated Fat: 3g | Cholesterol: 94mg | Sodium: 1166mg | Potassium: 522mg | Fiber: 1g | Sugar: 5g | Vitamin A: 534IU | Vitamin C: 2mg | Calcium: 30mg | Iron: 4mg

    Other Mexican Inspired Recipes You Might Like

    • Easy Mexican Rice Recipe
    • Oven Pork Carnitas
    • Chipotle Guacamole
    • Baked Tacos
    • One Pan Black Bean Burrito
    • Pozole Verde

    Homemade Enchilada Sauce

    By Heather LAST UPDATED July 18, 2019 · FIRST PUBLISHED March 25, 2013, 6 Comments

    Homemade Enchilada Sauce | heatherlikesfood.com

    When I need enchilada sauce I usually buy the canned stuff. There was one occasion years ago when I decided it was a good idea to grind and mix my own chili powder, make enchilada sauce, and spend hours (and hours) making homemade tamales. I've never been to keen on the taste of canned sauce but my one experience has been enough to leave me with PTSD flashbacks every time I consider making it again.

    It wasn't until a few weeks ago that I realized making my own sauce didn't mean I had to go through all the steps I once did to make chili powder- I could use store-bought chili powder, you know, like normal people do! Ding, ding. I'm a winner.

    And let me tell you, I can't believe it's taken me so long to have this realization! This enchilada sauce is so incredibly easy to make and it tastes infinitely better than the zippy-tinny sauce you can buy at the store.

    You'll start by heating a couple tablespoons of oil in a skillet and adding some chili powder, cumin, and corn starch to the pan. Give it a stir and let cook for about 1 minute- once you can start to smell it, you're good.

    Homemade Enchilada Sauce | heatherlikesfood.com

    Next, you'll stir in some chicken broth and tomato sauce, mixing until it's well combined and smooth. Keep stirring until it comes up to a boil and is starting to thicken and let boil for 1 minute. Remove from the heat.

    Homemade Enchilada Sauce | heatherlikesfood.com

    Stir in a few teaspoons of dried oregano.

    Homemade Enchilada Sauce | heatherlikesfood.com

    Give it a stir, and you're done!

    Homemade Enchilada Sauce | heatherlikesfood.com

    It's now ready for smothering burritos, baking enchiladas, making soup or straight up dipping chips in (do it).

    Homemade Enchilada Sauce | heatherlikesfood.com

    Um, yeah. I'm gonna need some chips.

    Homemade Enchilada Sauce | heatherlikesfood.com

    📖 Recipe

    Homemade Enchilada Sauce | heatherlikesfood.com
    Print Recipe
    4.84 from 12 votes

    Homemade Enchilada Sauce

    Once you try this homemade tex-mex style enchilada sauce you'll never go back to the canned version!
    Prep Time5 minutes mins
    Cook Time10 minutes mins
    Total Time15 minutes mins
    Course: Condiment
    Cuisine: Mexican, Tex-Mex
    Keyword: how to make enchilada sauce, not canned, tex-mex enchilada sauce
    Servings: 4 cups sauce
    Calories: 222kcal
    Author: Heather Cheney

    Ingredients

    • 3 tablespoon canola oil
    • ⅓ C corn starch
    • ⅓ C chili powder
    • 2 teaspoon ground cumin
    • 4 C chicken broth
    • 1 C tomato sauce
    • 2 teaspoon dried oregano
    • salt to taste

    Instructions

    • Heat canola oil over medium heat in a large skillet and stir in corn starch, chili powder, and cumin. Let cook, stirring for 1 minute or until fragrant.
    • Whisk chicken broth and tomato sauce into the spice mixture and mix until smooth. Bring to a simmer and let boil for 1 minute. Remove from heat.
    • Stir in oregano and season with salt as needed. All chili powders are different- some will need salt, others will not.

    Nutrition

    Serving: 1cup | Calories: 222kcal | Carbohydrates: 25g | Protein: 5g | Fat: 14g | Saturated Fat: 1g | Trans Fat: 1g | Sodium: 1507mg | Potassium: 806mg | Fiber: 8g | Sugar: 4g | Vitamin A: 6145IU | Vitamin C: 21mg | Calcium: 113mg | Iron: 6mg

    How To: Homemade Ice Cream Cake Crunchies

    By Heather LAST UPDATED July 23, 2019 · FIRST PUBLISHED March 11, 2013, 2 Comments

    Homemade Ice Cream Cake Crunchies


    You know you love it– that layer of crisp, creamy, cookie crunch that you find nestled between layers of  ice cream cake at places like Dairy Queen.  And if you’re like me, you strategically map your bites so that you get the perfect crunch-to-ice-cream ratio with every forkful. But no matter how hard you try, there’s never enough.

    NEVER ENOUGH!

    Well today's the day that there will be enough. Enough for every bite of ice cream. Enough to spoon over the tops of your sundaes. Enough to eat with a spoon if you so desire. It's a revolution, I tell you!

    These crunchies are super simple to make and have the potential to be very detrimental to my well-being. Things this good should not be so easy to make. But alas, I love you guys so I had to take one for the team and make up a batch just to show you how easy they are.

    You'll start with some Oreos and a bottle of Magic Shell. In a standard size package of Oreos you'll need 2 rows.

    Homemade Ice Cream Cake Crunchies

    Plop those cookies into a food processor or get out some aggression with the rolling pin. However you swing it you want to end up with a bowlful of finely crushed cookies. If you're in need of a  flippin' sweet food processor, don't forget to enter my Magimix giveaway!

    Homemade Ice Cream Cake Crunchies

    Pour an entire 7.5 oz bottle of Magic Shell over the Oreo crumbs...

    Homemade Ice Cream Cake Crunchies

    And mix until it's well combined. At this point you can spread it between layers of ice cream and brownies, swirl it into a milkshake, or use it as ice cream topping.

    Homemade Ice Cream Cake Crunchies

    These mint crunch parfaits were a huge hit at my house! I just layered mint brownie ice cream with the crunchies and topped it off with a little whipped cream and some Andes mints. So, so good!

    Homemade Ice Cream Cake Crunchies

    What would you add these ice cream cake crunchies to?

    📖 Recipe

    Homemade Ice Cream Cake Crunchies
    Print Recipe
    4.54 from 15 votes

    Homemade Ice Cream Cake Crunchies

    You know those crunchy cookie crumbles inside ice cream cakes? That's what this recipe is all about!
    Prep Time20 minutes mins
    Cook Time0 minutes mins
    Total Time20 minutes mins
    Course: Dessert
    Cuisine: American
    Keyword: Carvel Cake Crunchies, Dairy Queen Cake Middle, Homemade Ice Cream Cake
    Servings: 12 servings
    Calories: 15kcal
    Author: Heather Cheney

    Ingredients

    • ⅔ of a standard packaged of Oreos 2 ½ C Oreo cookie crumbs
    • 1 7.25 oz Magic Shell Ice Cream topping

    Instructions

    • Crush the Oreos and transfer into a bowl.. Pour the Magic Shell topping over the cookie crumbs and mix well to combine. Use as an ice cream topping or filling for frozen cakes or pies.

    Nutrition

    Serving: 1serving | Calories: 15kcal | Carbohydrates: 2g | Protein: 1g | Fat: 1g | Saturated Fat: 1g | Sodium: 3mg | Potassium: 8mg | Fiber: 1g | Sugar: 1g | Vitamin A: 1IU | Calcium: 1mg | Iron: 1mg

    Sweet and Smoky Goulash

    By Heather LAST UPDATED October 3, 2019 · FIRST PUBLISHED March 10, 2013, 30 Comments

    Sweet and Smoky Goulash

    I'm kind of in love with the word "goulash". Just saying it takes me to my grandma's kitchen and floods my mind with the smells and memories it holds. It's funny though because I can only remember her making it once while on a camping trip in her little camper trailer. I stood there, probably covered head-to-toe in soot, and watched as she cut the green peppers and onions. The fact that I was undeniably filthy didn't phase her.

    She still asked for my help stirring and tasting until it was perfected. We laughed, we ate, and spent hours together laughing, singing, and playing around the campfire.

    I always long for the summer time because it means the camping trips are coming. It's a chance to turn off the world and just have fun exploring, being together as a family, and enjoying each other. Wouldn't it be nice if we could do this with our family at least once a week and give ourselves a chance to re-charge and prepare for whatever life throws at us?

    I've recently teamed up with Manwich for their "Case of the Mandays" campaign. Our goal is to help families spend more quality time together by turning our Mondays into "Mandays". Their sweet and tangy tomato sauce is something that kids love and makes meal prep a snap, bringing the attention back to mealtime and away from everyday distractions. In all honesty it wasn't until talking with the other bloggers working on this that I realized how versatile Manwich really is. It's a great way to add tons of flavor for quick and easy meals.

    Sweet and Smoky Goulash

    So today I decided to take a basic goulash and give it a Manwich twist. It's chock full of Italian turkey sausage, tomatoes, pasta, veggies and is filling and satisfying. It comes together quickly and is a great one-pot meal so you have more time to spend with your family.

    Manwich also wants to give one of you an awesome "Manday Survival Kit"!

    Sweet and Smoky Goulash

    If you're the lucky winner you'll be set up with:

    • 1 Calphalon skillet ($80 value)
    • 4 Manwich bibs (one for each member of the family)
    • 1 wooden spoon
    • 1 mini canister of handwipes
    • $50 American Express gift card
    • Manwich product

    A $140 value! Enter for a chance to win at the end of this post.

    Enjoy! (she sure did)

    Sweet and Smoky Goulash

    📖 Recipe

    Sweet and Smoky Goulash
    Print Recipe
    4.34 from 3 votes

    Sweet and Smoky Goulash

    Old Fashiond Goulash with ground beef and macaroni noodles. Top with cheese for ultimate comfort!
    Prep Time10 minutes mins
    Cook Time30 minutes mins
    Total Time40 minutes mins
    Course: Main Course
    Cuisine: American
    Keyword: macaroni goulash, Old-fashioned, vintage recipe
    Servings: 6 servings
    Calories: 251kcal
    Author: Heather Cheney

    Ingredients

    • 1 ¼ lb Italian turkey sausage casings removed
    • 1 green bell pepper chopped
    • 1 large onion chopped
    • 2 14.5 oz cans petite diced tomatoes
    • 1 15 oz can Manwich BOLD Sauce
    • 1 ½ C water
    • 1 tablespoon Italian seasoning
    • 1 teaspoon garlic powder
    • 2 tablespoon soy sauce
    • 1 ½ teaspoon smoked paprika
    • 1 ¼ C dry elbow macaroni
    • 2 tablespoon fresh basil chopped

    Instructions

    • Brown and crumble turkey sausage in a large soup pot on the stove top over medium heat.
    • Remove cooked sausage from the pot and set aside. Place onion and pepper in the pot and cook until softened, about 4 minutes.
    • Stir in tomatoes, Manwich BOLD, water, spices and seasonings (except for the fresh basil), and soy sauce. Bring to a simmer.
    • Stir in elbow macaroni, cover and let cook for 20 minutes or until the pasta is tender. Remove from the heat and allow to rest 10 minutes before serving to thicken.

    Nutrition

    Serving: 1serving | Calories: 251kcal | Carbohydrates: 25g | Protein: 18g | Fat: 9g | Saturated Fat: 3g | Cholesterol: 50mg | Sodium: 1219mg | Potassium: 340mg | Fiber: 3g | Sugar: 5g | Vitamin A: 506IU | Vitamin C: 46mg | Calcium: 50mg | Iron: 10mg

    Homemade Chicken Nuggets

    By Heather LAST UPDATED July 18, 2019 · FIRST PUBLISHED March 8, 2013, 43 Comments

    Homemade Chicken Nuggets

    I think I've teased you enough with the Facebook post and tweets in the last few weeks about this giveaway that we're just going to dive right in. Today (well technically in 2 weeks) I get to give one of these shiny beauties to one of you--

    A Magimix by Robot-Coupe 16 Cup Food Processor, a $499 value!

    It totally feels like Christmas to me right now, I'm so excited! [Read more...]

    Hawaiian Style Macaroni Salad

    By Heather LAST UPDATED April 12, 2018 · FIRST PUBLISHED March 4, 2013, Leave a Comment

    Hawaiian Style Macaroni Salad

    When I posted the recipe for Hawaiian Shoyu Chicken a few weeks back I promised that a recipe for macaroni salad wouldn't be too far behind.  I'm willing to bet a solid gold doubloon that you've either been to Hawaii and tried their macaroni salad first hand, or have visited one of the many Hawaiian cafes that are popping up everywhere. Am I right?

    I love the meat and sticky rice combo that you can find there, but it's amazing what just a scoop of simple macaroni salad can do for the meal. The tangy, chewy noodles are the perfect compliment to the sweet meat. It's no wonder that plate lunches are such a huge part of Hawaiian cuisine because they are just down-right good. I love it because it's simple food. Simple ingredients. Simple preparations. Big flavor.

    Hawaiian Style Macaroni Salad

    You might be surprised by how few ingredients are actually in this salad, but like I said, Hawaiian food like this is simple.

    Okay, and Drool-worthy too.

    Hawaiian Style Macaroni Salad

    Who's ready to win a Magimix 16 Cup Food Processor? It's coming this week... stay tuned!

    📖 Recipe

    Hawaiian Style Macaroni Salad
    Print Recipe
    4.66 from 32 votes

    Hawaiian Style Macaroni Salad

    The perfect pair for some Shoyu Chicken and white rice!
    Prep Time10 minutes mins
    Cook Time30 minutes mins
    Chilling Time2 hours hrs
    Total Time2 hours hrs 40 minutes mins
    Course: Salad
    Cuisine: Hawaiian
    Keyword: Hawaiian Plate Lunch, Mac Salad, Macaroni and Mayonnaise
    Servings: 12 servings
    Calories: 268kcal
    Author: Heather Cheney

    Ingredients

    • 1 lb elbow macaroni
    • 1 C mayonnaise
    • ½ teaspoon kosher salt
    • 2 tablespoon grated white onion
    • ¼ teaspoon ground black pepper more to taste

    Instructions

    • Cook macaroni until just tender in salted water. Drain and set aside in a large bowl to cool.
    • Once cooled, stir mayonnaise, salt, onion, and pepper into the noodles until well combined.
    • Store in the refrigerator until ready to serve. If the salad seems dry add a bit of milk, 1 tablespoon at a time or a little more mayonnaise.

    Nutrition

    Serving: 1serving | Calories: 268kcal | Carbohydrates: 29g | Protein: 5g | Fat: 15g | Saturated Fat: 2g | Trans Fat: 1g | Cholesterol: 8mg | Sodium: 218mg | Potassium: 91mg | Fiber: 1g | Sugar: 1g | Vitamin A: 12IU | Vitamin C: 1mg | Calcium: 10mg | Iron: 1mg

    Greek Yogurt Blueberry Muffins

    By Heather LAST UPDATED July 18, 2019 · FIRST PUBLISHED March 1, 2013, 2 Comments

    Greek Yogurt Blueberry Muffins

    My 2 yr. old is the PICKIEST eater. At least she is compared to my first that might as well be dubbed the human garbage disposal or 6 yr olds. So I always keep a ginormous bag of frozen blueberries in the freezer because I know that at the end of the day, after she's turned her nose at everything I've tried to give her, she'll eat a bowl of them in a heartbeat. But sometimes the blueberries start taking over my freezer and it doesn't matter how many smoothies we make, there are still too many. It's about this time that the blueberry muffins make an appearance at our house.

    I've been working on this recipe for a while now and I think it's finally perfected. I will probably still try tweaking it down the road to make it healthier because let's be honest, in the US we want our muffins to taste like cake, thus making them not so healthy. --Random side note, my first term at culinary school we made muffins from a traditional European recipe and thought we had screwed them up because they were so bland and unsweetened. Turns out we just like our sugar over on this side of the pond-- But in the meantime, this recipe includes 2 cups of greek yogurt which gives them a good little protein boost while keeping them nice and moist.

    Greek Yogurt Blueberry Muffins

    Plus they are brimming with big juicy blueberries so you really can't feel guilty while eating one (or three, they go down really easy). If you want to make sure that the berries don't all sink to the bottom, much like this one below, toss them in a few tablespoons of flour before adding them to the batter. This will also help to keep the juices from running into the batter, making the muffin blue throughout.

    Greek Yogurt Blueberry Muffins

    📖 Recipe

    Greek Yogurt Blueberry Muffins
    Print Recipe
    4.50 from 14 votes

    Greek Yogurt Blueberry Muffins

    My favorite blueberry muffin recipe! The greek yogurt keeps them moist and the crumb topping is perfect!
    Prep Time30 minutes mins
    Cook Time25 minutes mins
    Total Time55 minutes mins
    Course: Snack
    Cuisine: American
    Keyword: bakery style, crumb topping
    Servings: 30 muffins
    Calories: 334kcal
    Author: Heather Cheney

    Ingredients

    • 4 eggs
    • 2 ½ C sugar
    • 1 C canola oil
    • 1 teaspoon vanilla
    • 2 C plain traditional Greek yogurt I've never tried using fat-free and don't know how it works
    • 4 C AP flour
    • 1 teaspoon kosher salt
    • 1 teaspoon baking soda
    • 3 C fresh or frozen blueberries tossed with 1 tablespoon of flour just before adding to the batter
    • ¾ C brown sugar
    • 1 ½ C AP flour
    • ½ C butter cut into small pieces
    • 2 teaspoon ground cinnamon

    Instructions

    • Preheat oven to 375 degrees
    • Make crumb topping by combining all ingredients in a bowl and pinching with your fingers until the butter is fully incorporated and it looks like coarse sand. Set aside.
    • Combine the eggs, sugar, oil, and vanilla; mixing until smooth.
    • In a separate bowl combine the flour, salt and baking soda.
    • Alternately add ⅓ flour and ⅓ yogurt to the sugar mixture and repeat, stirring just slightly between each addition. The key to moist muffins is to keep the batter from becoming over mixed. Only mix until no dry spots remain- there will be lumps and that's okay.
    • Gently fold in the blueberries, mixing only until they are evenly distributed.
    • Scoop batter into muffin tin until ⅔ full. Spoon 1½-2 tablespoon of crumb mixture on top of each muffin (it will look like a lot of crumbs).
    • Bake for 20-25 minutes or until the tops are golden and a toothpick inserted into the center comes out clean with only moist crumbs.

    Nutrition

    Serving: 1muffin | Calories: 334kcal | Carbohydrates: 47g | Protein: 6g | Fat: 14g | Saturated Fat: 3g | Trans Fat: 1g | Cholesterol: 31mg | Sodium: 454mg | Potassium: 114mg | Fiber: 1g | Sugar: 26g | Vitamin A: 135IU | Vitamin C: 1mg | Calcium: 72mg | Iron: 2mg

    Soft and Chewy Almond Butter Cookies

    By Heather LAST UPDATED July 18, 2019 · FIRST PUBLISHED February 24, 2013, 5 Comments

    Almond Butter Cookies

    Some days you just have to hunker-down in the kitchen and make some cookies with the ones you love. Sometimes it's really hard to convince them that putting almond butter in the dough isn't an abomination. And sometimes the results surprise them.

    "Cookie dough heaven!" is what she exclaimed through her toothless smile  as she licked the bowl clean. [Read more...]

    White Chicken Chili

    By Heather LAST UPDATED March 6, 2019 · FIRST PUBLISHED February 21, 2013, 4 Comments

    White Chicken Chili | heatherlikesfood.com

    Easy slow-cooker meals are definitely the way to my heart during crazy weekdays. If I can throw it in into the pot and not have to think about it again until I come home hours later to a deliciously scented home, I'm in love. Well, as long as it tastes good--there are a lot of things you can throw into a slow cooker and forget about that I wouldn't touch with a  pole. 20 even.

    This white chicken chili is the perfect "set it and forget it" kind of meal that I would gladly curl up in bed next to (I'm not sure what that even means). It goes into the pot and 3,4,5,6 hours and a few stirs and shreds later you have a super flavorful meal.

    Place your chicken, chicken broth, green salsa (click here for a few notes on green salsa), onion, beans, herbs and spices in your slow cooker. Set it to cook on LOW for 5-6 hours, or HIGH 3-4 hours.

    White Chicken Chili

    When time's up take the chicken out to shred and return to the chili; stir in some sour cream and cilantro.

    White Chicken Chili

    It should look a little something like this:

    White Chicken Chili

    Looks delish, no? Serve it with some tortilla chips or even better, this corn bread. You're welcome. 🙂

    Do you have any fun plans for the weekend?
    Try my Other Crockpot Chili Recipes:

    • Crockpot Chili; My Award Winning Chili Recipe!
    • Crock-Pot Hawaiian Chicken Chili
    • White Chicken Chili

    📖 Recipe

    White Chicken Chili | heatherlikesfood.com
    Print Recipe
    4.92 from 12 votes

    White Chicken Chili

    My favorite, creamy white chicken chili recipe! It's rich, flavorful and super easy to make!
    Prep Time20 minutes mins
    Cook Time8 hours hrs
    Total Time8 hours hrs 20 minutes mins
    Course: Soup
    Cuisine: American
    Keyword: easy chili recipe, sour cream chili, spicy chicken chili
    Servings: 4 servings
    Calories: 204kcal
    Author: Heather Cheney

    Ingredients

    • 2 boneless skinless chicken breasts
    • 1 8 oz can green salsa
    • 1 onion chopped
    • 3 C chicken broth
    • 2 cans beans any variety I used 1 white, 1 kidney, drained
    • ½ teaspoon granulated garlic
    • 1 teaspoon chili powder
    • 2 teaspoon ground cumin
    • 1 teaspoon dried oregano
    • 1 teaspoon kosher salt
    • 1 C sour cream
    • ½ C chopped cilantro

    Instructions

    • Combine all ingredients except for the sour cream and cilantro in a slow cooker.
    • Cook on LOW for 6-8 hours, HIGH 3-4 hours.
    • Remove cooked chicken from pot, shred into bite-sized pieces, and return to to chili.
    • Stir in sour cream and fresh cilantro.
    • Serve with tortilla chips or corn bread.

    Nutrition

    Serving: 1serving | Calories: 204kcal | Carbohydrates: 6g | Protein: 15g | Fat: 14g | Saturated Fat: 7g | Trans Fat: 1g | Cholesterol: 66mg | Sodium: 1351mg | Potassium: 512mg | Fiber: 1g | Sugar: 3g | Vitamin A: 550IU | Vitamin C: 16mg | Calcium: 103mg | Iron: 2mg

    Zuppa Toscana

    By Heather LAST UPDATED March 1, 2019 · FIRST PUBLISHED February 17, 2013, 2 Comments

    Zuppa Toscana

    I'm kind of a soup freak. I think I've already established this fact here on this little blog o' mine, but for the record-- soup freak.

    Zuppa Toscana

    I'm thrilled that spring is peaking it's head out of the ground in the form of flower bulbs and budding trees, but it also means that my justifiable soup making days are few. So I've got soup for you today.

    It's been a while since we've lived close to an Olive Garden, but I've always been a fan of their Zuppa Toscana. Now in all honesty, it's been years since I've had their version but I think this recipe comes pretty darn close. The best part about this soup is that it is 100% a meal on its own. With lots of meat, potatoes, and a serving a greens, this is a perfectly hearty meal when served with a good loaf of crusty bread.  I believe that the original version has bacon in it but I like it without-- I'm not much for multiple pork products in a meal. Also, I like to use a mix of regular Italian sausage and turkey Italian sausage to cut some calories but still keep it flavorful.

    Zuppa Toscana

    Are you one of those people that don't qualify soup as a full meal? Stop that silly logic! Seriously, people.

    Love it. Eat it. And let your bellies be filled by soup and soup alone!

    📖 Recipe

    Zuppa Toscana
    Print Recipe
    4.84 from 6 votes

    Zuppa Toscana (Olive Garden Copy-Cat)

    Everyone's favorite Olive Garden copycat recipe! A creamy soup filled with potatoes, fresh kale and Italian Sausage in a creamy broth!
    Prep Time10 minutes mins
    Cook Time30 minutes mins
    Total Time40 minutes mins
    Course: Soup
    Cuisine: Italian
    Keyword: easy soup recipe, italian sausage soup, olive garden soup
    Servings: 8 servings
    Calories: 353kcal
    Author: Heather Cheney

    Ingredients

    • ½ lb Italian Sausage mild or hot
    • ½ lb Turkey Italian Sausage
    • 4 sm.-med. russet potatoes cut in half and then in ¼" slices
    • 1 large onion diced
    • 2 cloves garlic minced
    • 6 C chicken broth
    • 1 teaspoon kosher salt
    • 2 C kale washed and chopped
    • 1 C heavy cream
    • Parmesan cheese for serving

    Instructions

    • In a soup pot or dutch oven, brown and crumble the sausages until cook through over medium heat.
    • Leaving behind about 1 tablespoon of the rendered fat, remove the sausage from the pan and transfer on to paper towels to drain.
    • Add onion and garlic to the fat in the pot and cook until soft and fragrant, about 3-4 minutes.
    • Stir chicken broth into the onions and garlic and stir in the potatoes and salt. Bring pot to a simmer and let cook until the potatoes are tender, about 12-15 minutes.
    • Stir the kale into the soup followed by the cream. Serve with crusty bread and Parmesan cheese.

    Nutrition

    Serving: 1serving | Calories: 353kcal | Carbohydrates: 25g | Protein: 13g | Fat: 23g | Saturated Fat: 11g | Cholesterol: 77mg | Sodium: 1430mg | Potassium: 840mg | Fiber: 2g | Sugar: 2g | Vitamin A: 2156IU | Vitamin C: 49mg | Calcium: 85mg | Iron: 5mg


    • « Previous Page
    • 1
    • …
    • 9
    • 10
    • 11
    • 12
    • 13
    • Next Page »
    Headshot of Heather in an apron

    Hi, I'm Heather! Want to become a rockstar cook? I’m a former chef, caterer, and culinary arts school graduate that just wants to help you make some killer food! I truly believe that with a little know-how anyone can totally rock their kitchen. Stick around for ultimate recipes of your favorite foods, cooking tips, guides, and more!

    More about me →

    Popular Recipes

    • BBQ chicken cut on a cutting board with a bottle of bbq sauce
      The Best Super Moist Oven Baked BBQ Chicken
    • One Pan Sour Cream Chicken Enchilada Skillet
      One Pan Sour Cream Chicken Enchilada Skillet
    • Hawaiian Shoyu Chicken-- so flavorful you'll forget how easy it is to make! Filled with flavors of ginger, garlic and just a touch of red pepper.
      Hawaiian Shoyu Chicken
    • Sloppy Joe on a paper bag
      The Best Sloppy Joe Sauce
    • Coffee Cake In A Mug-- the perfect remedy for a sugar craving when you don't want to spend a lot of time or heat up the oven. #coffee #cake #microwave #mug
      Coffee Cake in a Cup
    • Baked Ricotta Chicken
      Baked Ricotta Chicken
    • Mom's Classic Meatloaf Recipe
    • Beef Teriyaki Stir Fry
    Email opt in image

    Cooking Method

    • Slow Cooker
    • Grilling

    Footer

    ↑ back to top

    About

    • Privacy Policy
    • Disclaimer

    Newsletter

    • Sign Up! for emails and updates

    Contact

    • About
    • Email
    • Work With Me

    As an Amazon Associate I earn from qualifying purchases. This site uses cookies and generates income via ads.

    Copyright © 2022 Heather Likes Food, LLC

    Rate This Recipe

    Your vote:


    A rating is required
    A name is required
    An email is required