• Active
  • Blog
  • Cart
  • Checkout
  • Cooking Crew Recipes
  • Cooking Crew!
  • Disclaimer
  • Library
  • Media Kit
  • My account
  • Nutrition and Food Safety Disclaimer
  • Opt Out of 5 Chef Secrets
  • Press
  • Privacy Policy and Copyright
  • Recipe Index
  • Refund and Returns Policy
  • RSS Email Subscription Confirmation
  • Shop
  • Subscribe
  • Ultimate Recipes for Becoming a Rockstar Cook!
  • Welcome to Heather Likes Food!
  • Work With Me
  • About Heather Cheney
  • Contact
menu icon
go to homepage
subscribe
search icon
Homepage link
  • Recipe Index
  • About
  • Contact
  • Shop
    • Facebook
    • Instagram
    • Pinterest
    • YouTube
  • ×
    Home / Recipes

    Instant Pot Sloppy Joes

    By Heather LAST UPDATED May 21, 2021 · FIRST PUBLISHED May 21, 2021, 3 Comments

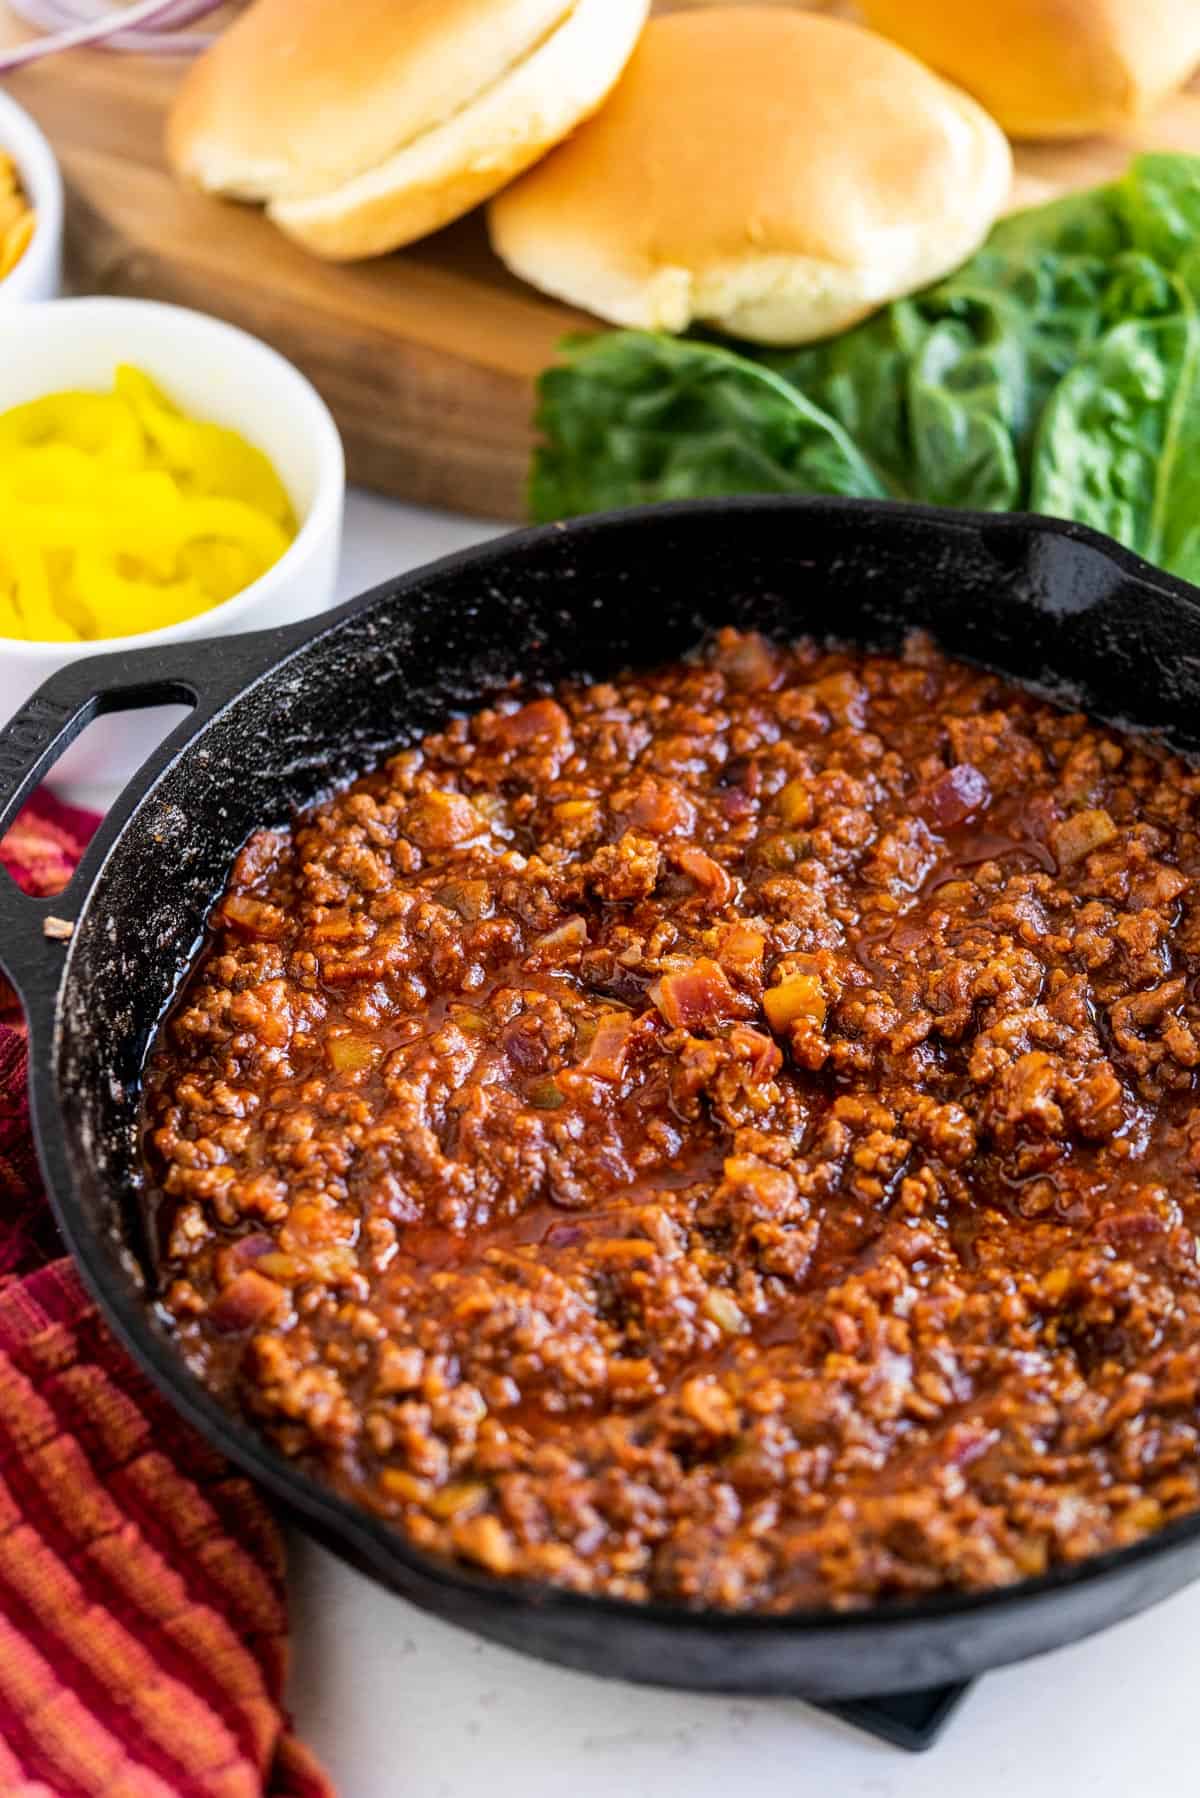
    Instant Pot Sloppy Joes are saucy, tender, and pack in the flavor. Let the Instant Pot do all the work as it turns simple ingredients into a crowd-pleasing meal. Better yet, this recipe is also freezer-friendly and ready in under 30 minutes!

    Sloppy Joe on a white plate with pickles and potato chips
    Pictured is a sloppy joe made with ground turkey

    Get the napkins ready because this is a messy one! Instant Pot Sloppy Joes are one of the easiest weeknight meals out there for you to try. Tender ground beef is drowned in a sweet and savory sauce, creating a kid-friendly dinner that’s fun to eat. 

    All you need to do is brown the beef, then throw everything else in the Instant Pot and let it do its thing for a few minutes. The high pressure seals all of the flavor into the meat, ensuring each bite is irresistible!

    Enjoy this recipe as an easy weeknight dinner or double the batch and freeze it for later.

    [feast_advanced_jump_to]

    📋 Why This Recipe Works

    The simple flavors in this recipe are elevated and complemented by the addition of chopped green chiles. You won’t be able to tell if they’ve been cooking all day in a slow cooker thanks to the Instant Pot’s ability to infuse all of the flavors together. Plus, the cooking time is shrunk down to just a few minutes rather than hours.

    🔪 How To Make The Recipe

    Ingredients for sloppy joes
    We're using ground turkey this time!

    Step 1.)

    Set the Instant Pot to “Saute” mode and add the ground beef and onion to the pot. Brown and crumble the beef until cooked through. Cancel “Saute” mode and drain the excess fat.

    Step 2.)

    Instant Pot insert with the ingredients for sloppy joe sauce inside.
    All the ingredients go into the pot!

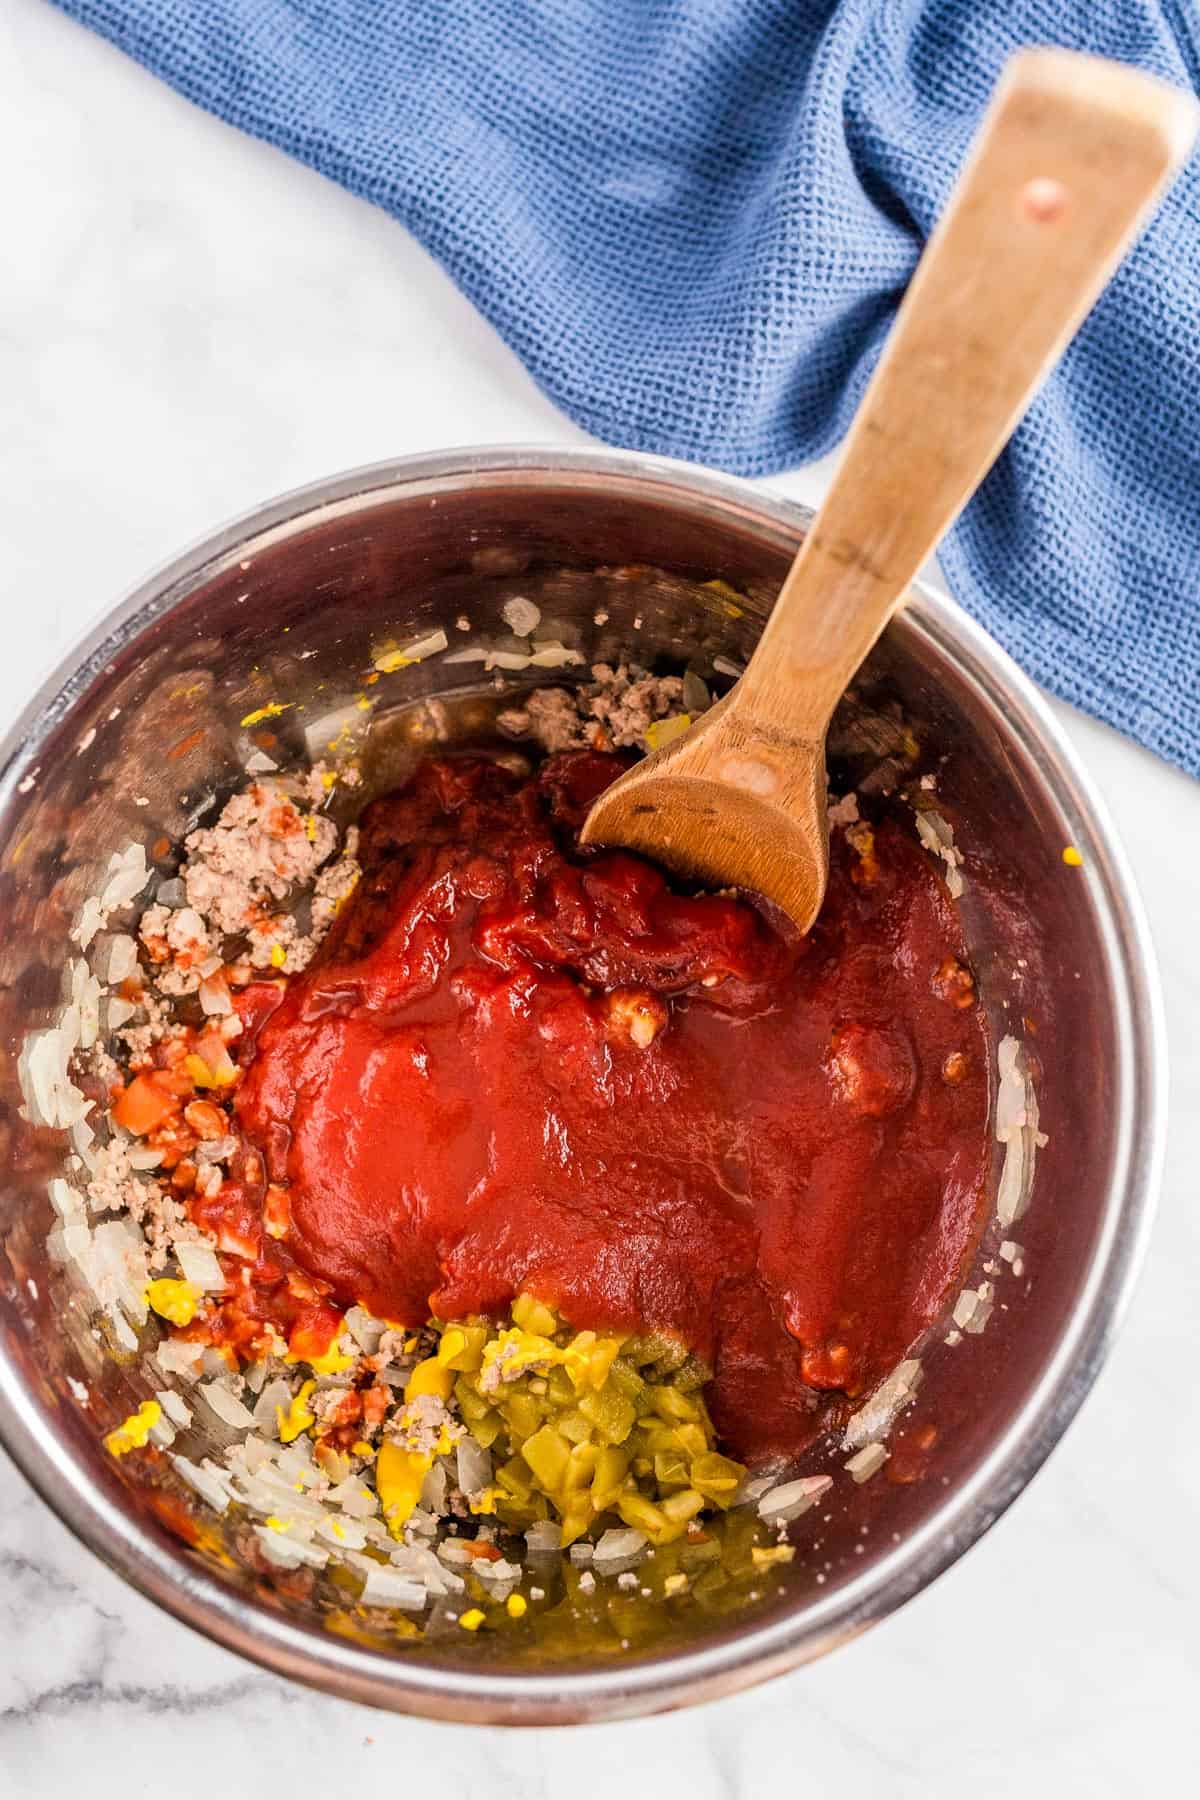
    Stir the green chiles, salt, brown sugar, chili powder, mustard, vinegar, ketchup, Worcestershire sauce, tomato sauce, and water into the beef and onions. Lock on the lid and make sure the venting valve is sealed. Set the Instant Pot to cook on high pressure for 3 minutes.

    Step 3.)

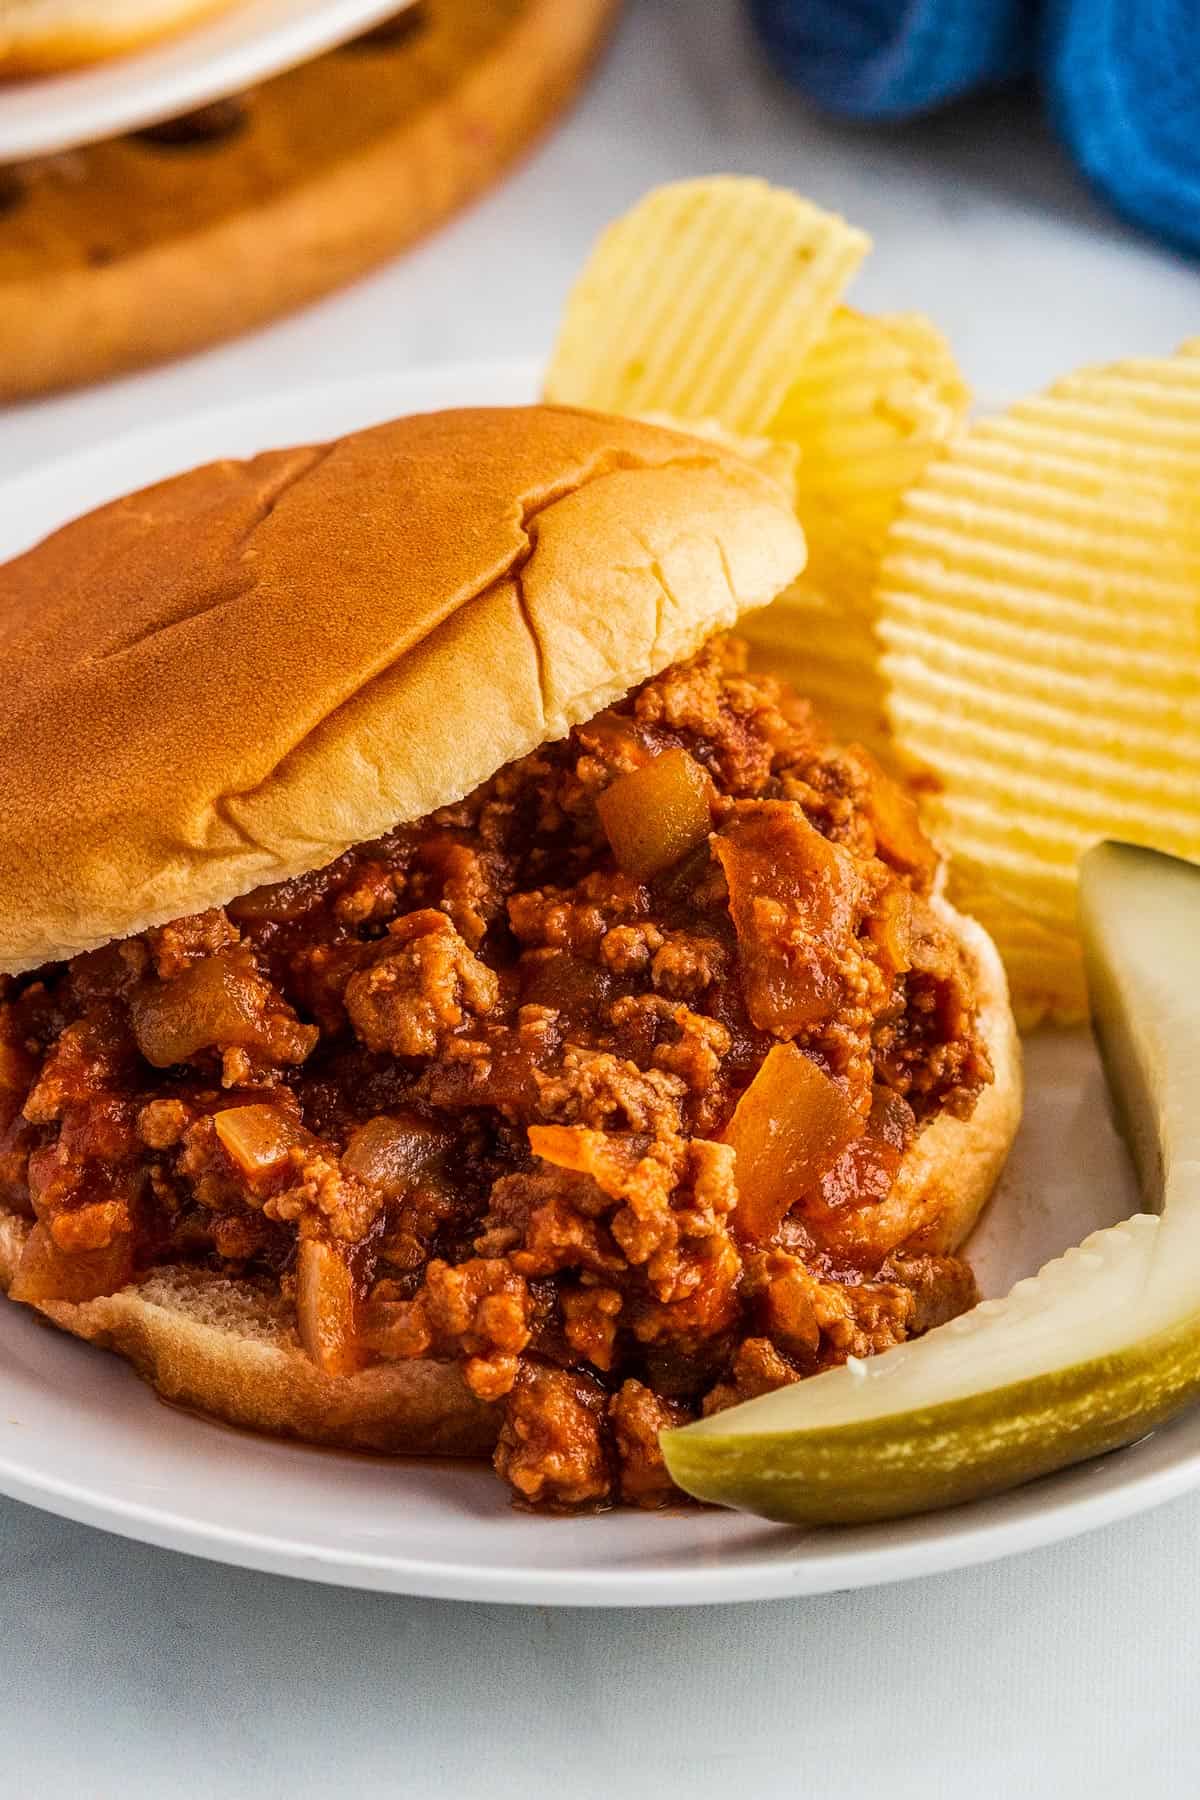
    Allow the pressure to release naturally for 5 minutes, then carefully turn the venting valve to release the remaining pressure. When the pressure pin drops, remove the lid. Serve the finished sloppy joe mixture on hamburger buns with toppings.

    👩🏻‍🍳 Pro Tips

    • Drain Fat: Thoroughly drain any excess fat from the beef before adding any other ingredients into the Instant Pot. This will keep your sloppy joe sauce grease-free.  
    • Simmer: If the sauce is too thin after cooking, set the Instant Pot on “Saute” mode and simmer until the sauce reaches the desired consistency.
    • Toast: Toast the hamburger buns before adding the filling and toppings. This will prevent the bread from becoming too soggy.
    • Not a fan of ground beef?: Make this recipe with ground turkey or chicken for a lighter option.

    👪 Scaling The Recipe

    Cooking for two or a crowd? This recipe is easily adaptable. Use the slider on the recipe card to change the quantity and the ingredient amounts will change accordingly.

    Sloppy joe sauce on a spoon
    Ready to eat!

    🍽 Serving and Topping Suggestions

    The beauty behind sloppy joes is that they already pack a punch of flavor without needing much else. But, just like a hamburger, it never hurts to load on the toppings. I highly recommend topping each bun with lots of toppings like:

    • Pickled red onions
    • Fresh coleslaw
    • Homemade mayonnaise
    • Sliced peperoncini’s
    • Dill pickle chips
    • Slices of bacon
    • Pineapple slaw
    • Sliced, melted cheese (American, cheddar or pepper jack)
    • Pickle slices
    • Avocado
    • Sour cream
    Sloppy joe with a bite taken out
    Not too shabby!

    💭 FAQs


    Can I make this in a slow cooker?


    Just like in the instructions for the Instant Pot, you can begin making sloppy joes in a slow cooker by browning the meat and onions in a skillet on the stovetop.

    After the excess grease has been drained, stir the meat and onion mixture into a crockpot along with the rest of the ingredients. Cook on High for 3 hours or on Low for 6 hours.

    Give it another stir when it’s done and serve on hamburger buns with your desired toppings.


    Can I make this on the stovetop?


    You sure can! All it takes to make sloppy joes on the stovetop is one pan and 20 minutes. Find the instructions over at my recipe for Homemade Sloppy Joes.


    What’s the Difference Between Manwich and Sloppy Joes?


    Canned Manwich sauce is a marketed version of sloppy joe sauce that you can find in the grocery store.

    Many people think using canned Manwich sauce will cut down on the time it takes to make sloppy joes, but it’s already such an easy recipe without any shortcuts!

    Sloppy joes are simply ground beef (or turkey) simmered in a sweet and tangy tomato-based sauce and served on hamburger buns.

    🥘 Leftovers and Storage

    Leftover sloppy joes make for a great lunch the next day or as a freezer-friendly meal later on. Make sure the batch has cooled completely before storing it away so it can stay as fresh as possible.

    Store leftovers in an airtight container in the fridge for up to 4 days. Alternatively, freeze them in a sealed freezer-safe container or bag for 3 months. 

    You can reheat the leftovers by heating them in a skillet on the stovetop over medium heat until warmed through.

    FREE RECIPE EBOOKS

    Join my free email list to receive TWO free ebooks!

      We respect your privacy. Unsubscribe at any time.

      📖 Recipe

      Sloppy Joe on a white plate with pickle and potato chips
      Print Recipe
      4.82 from 123 votes

      Instant Pot Sloppy Joes

      Let the Instant Pot do all the work for these simple and satisfying sandwiches!
      Prep Time5 minutes mins
      Cook Time25 minutes mins
      Total Time30 minutes mins
      Course: Main Course
      Cuisine: American
      Keyword: ground beef sandwich, ground turkey sandwich, instant pot sandwich
      Servings: 6 servings
      Calories: 276kcal
      Author: Heather Cheney

      Ingredients

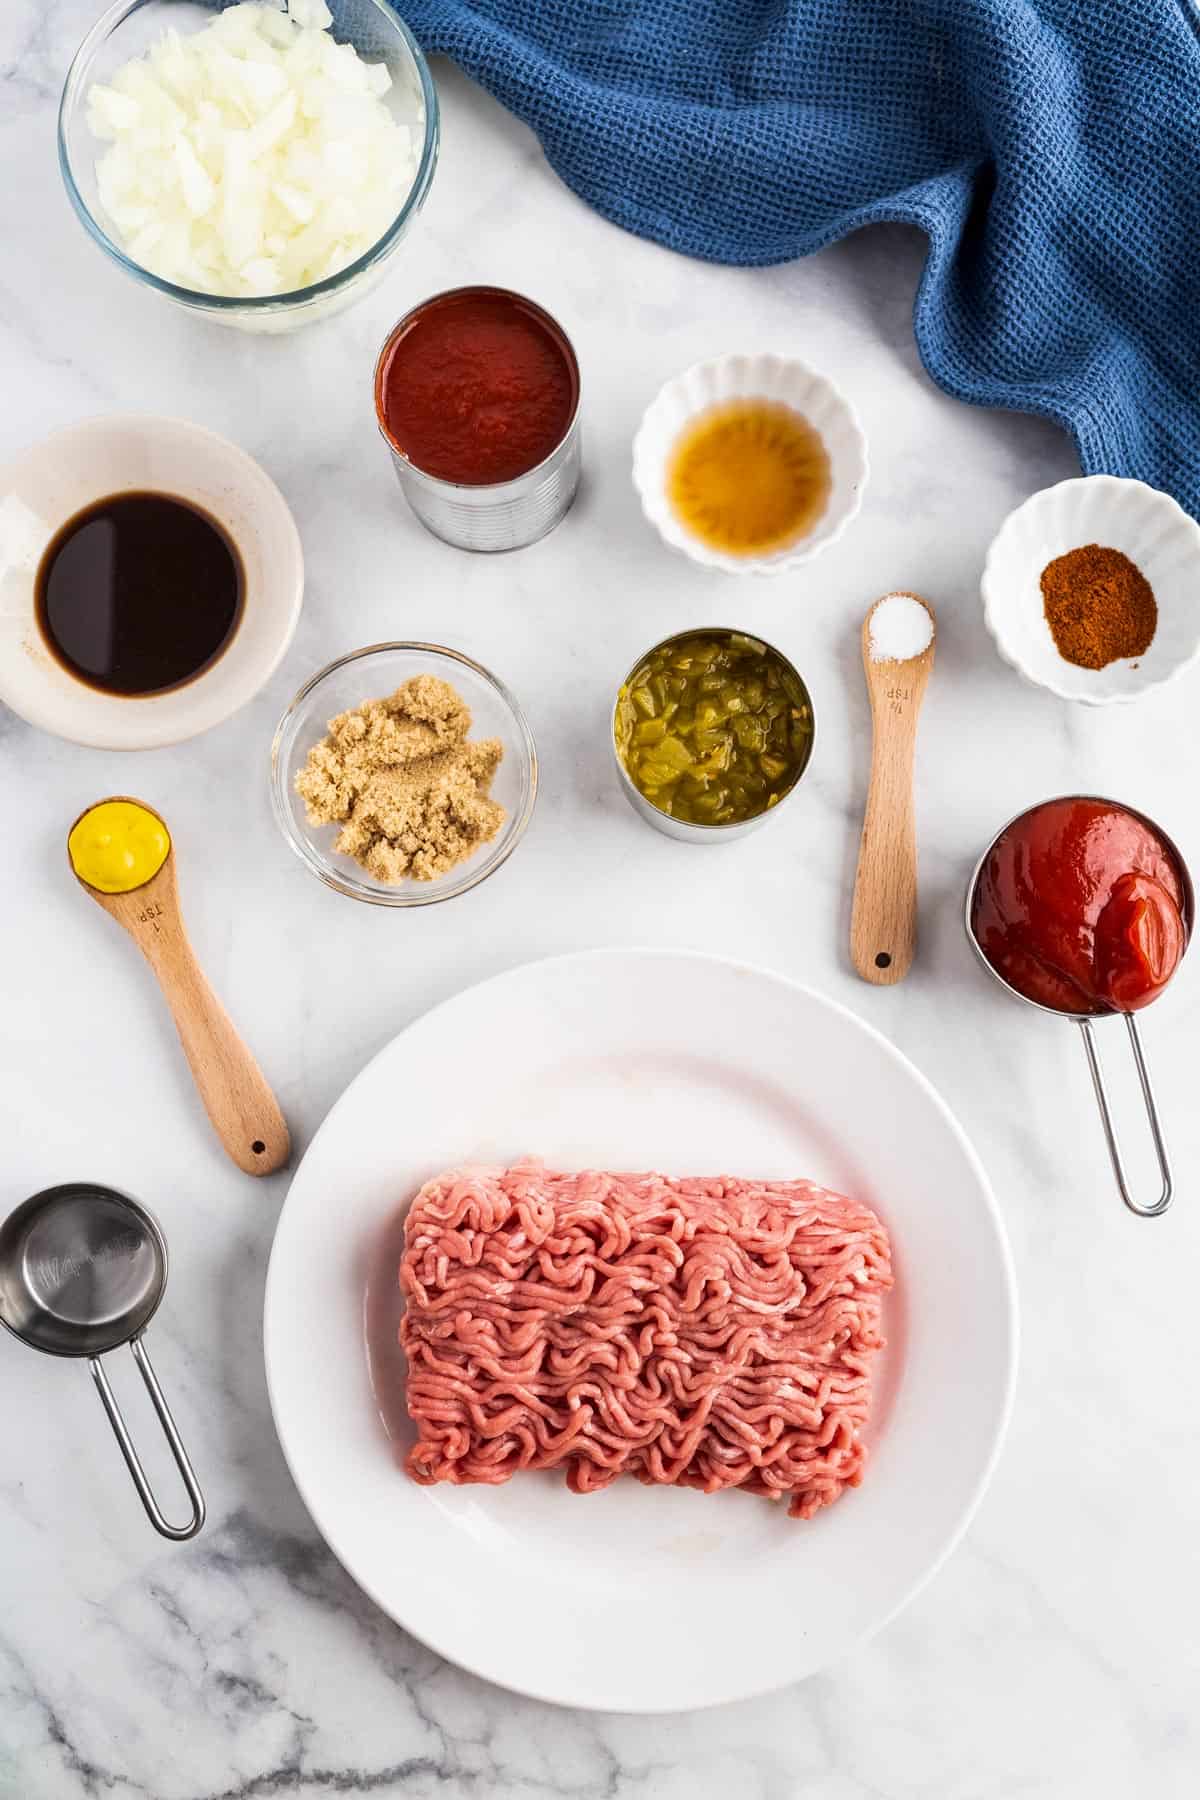
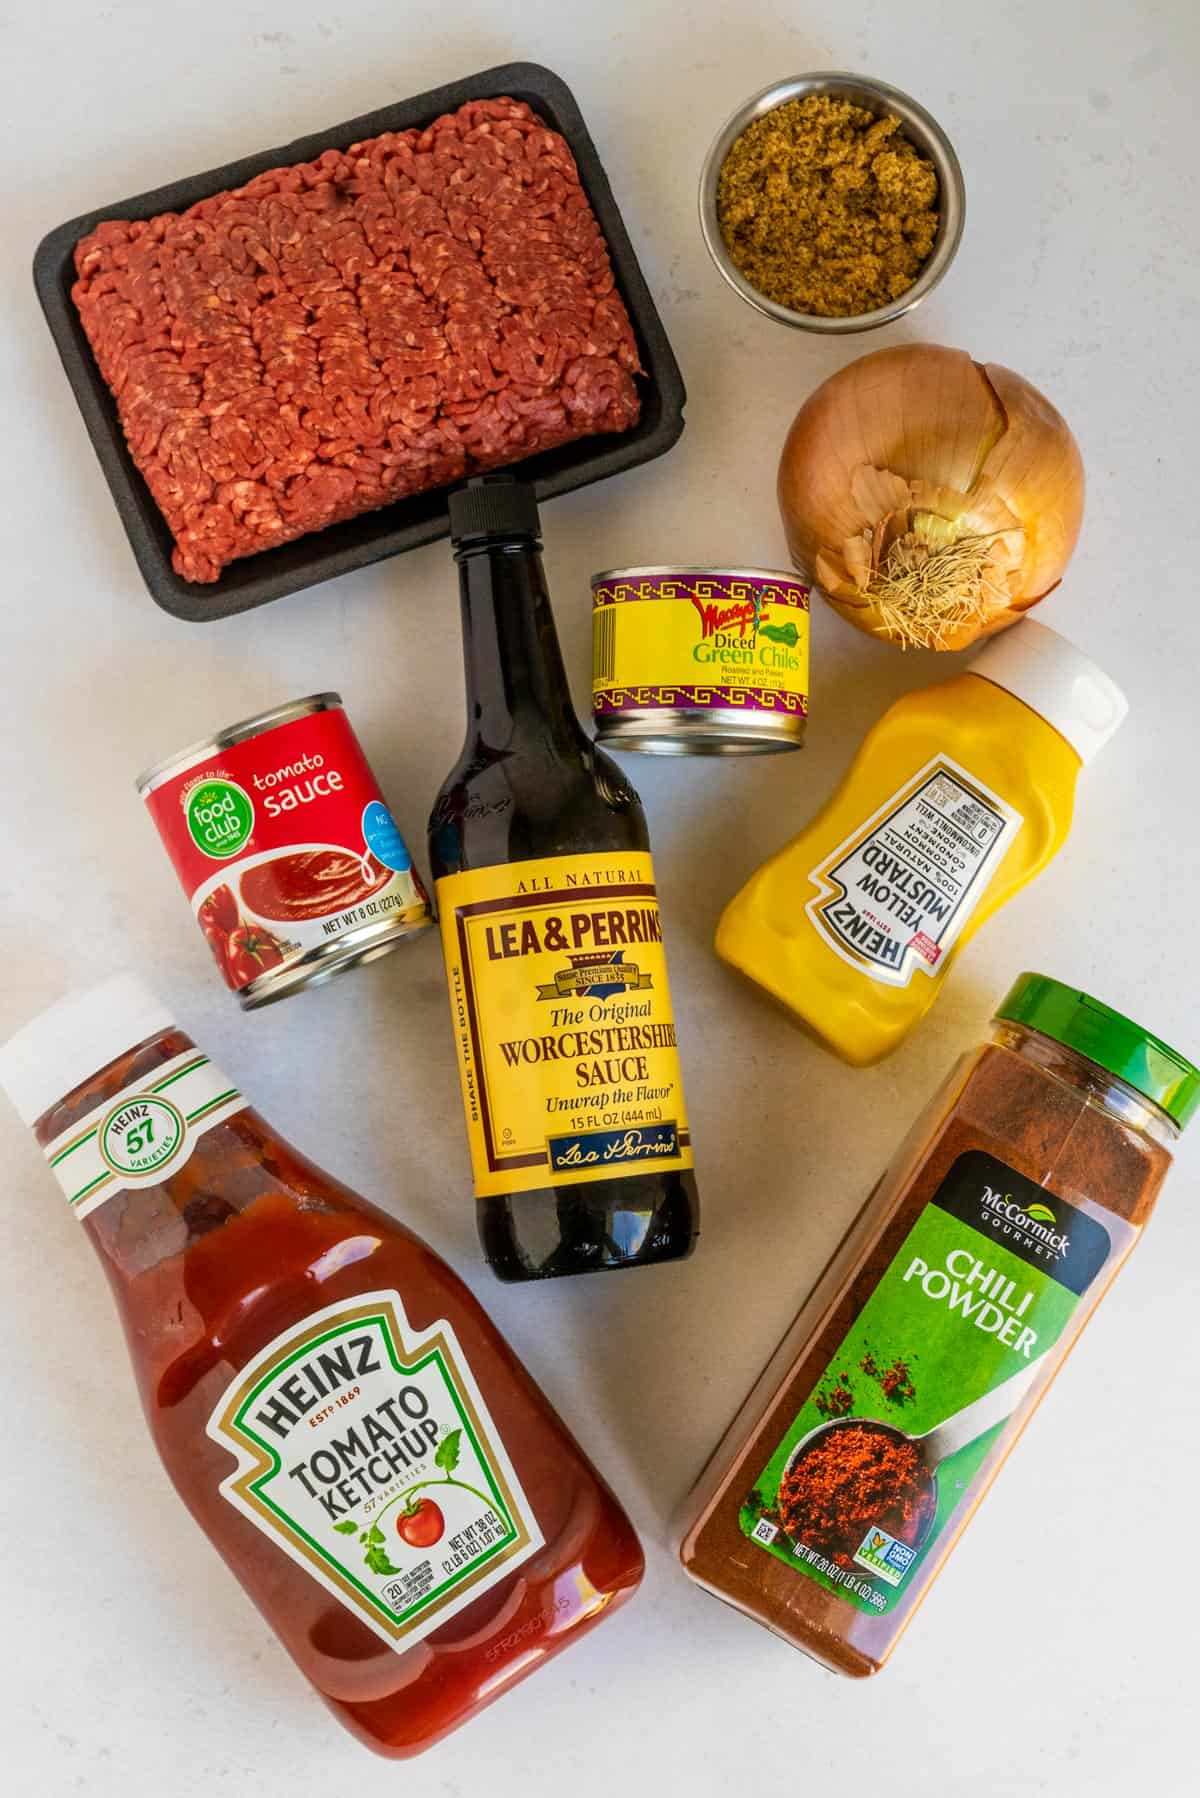
      • 1 pound lean ground beef or turkey
      • 1 small onion finely chopped
      • 1 4-ounce can diced green chiles
      • ½ teaspoon kosher salt
      • 2 tablespoons brown sugar
      • ½ tablespoon chili powder
      • 1 teaspoon mustard
      • 1 tablespoon apple cider vinegar
      • ½ cup ketchup
      • 2 tablespoons Worcestershire sauce
      • 1 8-ounce can tomato sauce
      • ¼ cup water
      • 6 hamburger buns

      Instructions

      • Set Instant Pot on “Saute” mode and add the ground beef and onion to the pot. Brown and crumble the beef until cooked through and cancel “Saute” mode.
      • Drain off any excess fat from the meat and stir in the green chiles, salt, brown sugar, chili powder, mustard, vinegar, ketchup, Worcestershire sauce, tomato sauce and water. Stir to combine.
      • Lock Instant Pot lid in place and make sure the venting valve is sealed.
      • Set Instant Pot to cook on high pressure for 3 minutes.
      • When the cooking time is up, allow the pressure to release naturally for 5 minutes, then carefully turn the venting valve to release the remaining pressure. When the pressure pin drops, remove the lid.
      • Serve on hamburger buns with desired toppings.

      Notes

      • Drain Fat: Thoroughly drain any excess fat from the beef before adding any other ingredients into the Instant Pot. This will keep your sloppy joe sauce grease-free.  
      • Simmer: If the sauce is too thin after cooking, set the Instant Pot on “Saute” mode and simmer until the sauce reaches the desired consistency.
      • Toast: Toast the hamburger buns before adding the filling and toppings. This will prevent the bread from becoming too soggy.
      • Not a fan of ground beef?: Make this recipe with ground turkey or chicken for a lighter option.

      Nutrition

      Serving: 1serving | Calories: 276kcal | Carbohydrates: 34g | Protein: 21g | Fat: 6g | Saturated Fat: 2g | Trans Fat: 1g | Cholesterol: 47mg | Sodium: 720mg | Potassium: 473mg | Fiber: 2g | Sugar: 12g | Vitamin A: 307IU | Vitamin C: 4mg | Calcium: 101mg | Iron: 4mg

      Mexican Style Ground Beef Taco Meat

      By Heather LAST UPDATED May 21, 2021 · FIRST PUBLISHED May 21, 2021, 10 Comments

      This is the recipe I reach for most often when we're making ground beef taco, burritos or nachos. It's full of flavor, saucy, and not much harder than reaching for that big bottle of taco seasoning!

      3 crunchy tacos on white platter
      Dig in!

      If you're tired of reaching for the Costco-sized container of taco seasoning every time you want need ground beef for tacos, enchiladas, or nachos, you have to try this recipe!

      I know I'm guilty of going the easy route too, but this recipe is really not that much harder than stirring in premade seasoning.

      It is perfect for a myriad of Mexican ground beef recipes and tastes so much better than anything you can shake out of a canister.

      [feast_advanced_jump_to]

      📋 Why This Recipe Works

      This recipe uses cumin, paprika, chili powder, and dried onion which are all elements in traditional taco seasoning. What sets it apart is the use of green enchilada sauce! The enchilada sauce adds acidity, moisture, and tons of flavor making these ground beef tacos saucy and delicious.

      Mexican ground beef in a cast iron skillet
      Ready to be put to work!

      🔪 How To Make The Recipe

      Ingredients for Mexican style ground beef
      All you need!

      1.) Gather your ingredients

      You'll need ground beef, paprika, cumin, chili powder, dried onion, and green enchilada sauce.

      2.) Brown and crumble the beef

      Place the meat in a skillet, cook, and use a spatula to break up and crumble the meat.

      3.) Remove the excess fat

      I like to fold up a paper towel and move it around in the pan to absorb the excess fat. Sometimes it takes a few paper towels, but it's much easier than transferring the meat into a strainer, in my opinion.

      4.) Add the seasoning!

      Stir the spices, onion and enchilada sauce into the meat.

      5.) Let it it simmer

      Let the meat simmer on low to soften the onion and allow the sauce to thicken up a bit. Allow it to simmer as long or little as you'd like or until it's your desired consistency.

      6.) Assemble!

      See my serving and topping tips below for suggestions on how to use this super versatile meat.

      Crunchy tacos with meat and cheese on their sides
      Ready for toppings.

      👩🏻‍🍳 Pro Tips

      • Salsa or Enchilada Sauce: Use what you have on hand! I've used both salsa and enchilada sauce with great results. Sometimes salsa is thicker and you may need to add a little bit of water to the meat while it simmers.
      • Bake the Shells: If you're making crunchy tacos with this meat, remember to bake or heat up the crunchy shells before assembling. It makes a huge difference!

      👪 Scaling The Recipe

      Cooking for two or a crowd? This recipe is easily adaptable. Use the slider on the recipe card to change the quantity and the ingredient amounts will change accordingly.

      🍽 Serving and Topping Suggestions

      I love to eat this taco meat in basic taco form with lettuce, tomatoes, and cheese but here are some other ideas:

      • Wrapped up in a tortilla with beans, spanish rice, and pico de gallo for burritos.
      • On top of corn chips with refried beans and cheese for some epic nachos
      • Mixed with red enchilada sauce and stuffed inside corn tortillas for beefy enchiladas
      • Served on greens with beans and veggies for fresh taco salads

      Want Super Fine Taco Meat?

      Ever wonder why some taco meat found at restaurants or in chili is ground SUPER fine and how they get it that way? That is the result of actually boiling the hamburger first. This method of cooking brings the temperature of the meat up slowly and prevents it from clumping, keeping it finely ground.

      If you'd like to try this method with this recipe, place the beef in a deep pan and add enough cold water to cover the meat. Slowly bring the pan to a boil, stirring often to separate the meat into small crumbles. Once it's to a boil, reduce heat to a simmer, cover and cook until the meat is brown and fully cooked.

      At this point, you'll drain off the water and add the remaining ingredients to the meat, following the recipe card below.

      3 crunchy tacos on a white platter
      Is there anything better than a basic, crunchy taco?

      💭 FAQs


      Can I use red enchilada sauce instead?

      Yes! The finished meat won't be as tangy, but will be saucy and flavorful!


      What kind of ground beef should I use?

      It's totally up to you! Both lean and fatty ground beef works well with this recipe. I prefer about 10% fat to keep things lean but still flavorful.


      Can I use ground turkey?

      Yes! Standard ground turkey works wonderfully! Ground turkey breast doesn't work AS well because it's so lean but will work.

      🥘 Leftovers and Storing

      This taco meat can be stored in the fridge in an airtight container for up to five days. It can also be place into a freezer zip-lock bag and kept frozen for up to 3 months. When you're ready to eat, place in a skillet with a little bit of water, bring to a simmer, and serve!

      Taco meat in a skillet with toppings all around
      Dinner, ready to go!

      🥣 Handy Tools For This Recipe

      • Lodge 10" Cast Iron Skillet: Cast Iron Skillets are your BEST friend and are totally underrated. Cast iron retains heat really well and allows you to get that irresistible sear on steaks and other meats you can usually only get at a restaurant. Pair this with the fact that they are CHEAP it's a no-brainer.
      • Chop Stir:  This strange little tool makes short work of browning ground meat with its odd shape that allows it to crumble the meat quickly as it cooks.

      FREE RECIPE EBOOKS

      Join my free email list to receive TWO free ebooks!

        We respect your privacy. Unsubscribe at any time.

        📖 Recipe

        3 crunchy ground beef tacos
        Print Recipe
        4.64 from 190 votes

        Mexican Style Ground Beef

        Forget that bottle of taco seasoning, try this recipe instead. You'll never go back!
        Prep Time5 minutes mins
        Cook Time20 minutes mins
        Total Time20 minutes mins
        Course: Main Course
        Cuisine: Mexican, Tex-Mex
        Keyword: green chiles, no taco seasoning, quick
        Servings: 6 servings
        Calories: 169kcal
        Author: Heather Cheney

        Ingredients

        • 1 pound lean ground beef 
        • 10 ounces green enchilada sauce
        • 2 tablespoons minced dried onion
        • 1 ½ teaspoons ground cumin
        • 1 teaspoon paprika
        • 1 teaspoon chili powder
        • Salt to taste

        Instructions

        • Heat a skillet over medium-high heat and brown and crumble ground beef until no longer pink. Drain excess fat.
        • Return meat to pan and add remaining ingredients, stirring to combine.  Let simmer for 5-6 minutes over medium-high heat or until most of the liquid is absorbed and is the consistency you like.

        Notes

        • Salsa or Enchilada Sauce: Use what you have on hand! I've used both salsa and enchilada sauce with great results. Sometimes salsa is thicker and you may need to add a little bit of water to the meat while it simmers.
        • Bake the Shells: If you're making crunchy tacos with this meat, remember to bake or heat up the crunchy shells before assembling. It makes a huge difference!
        • Add Water: If the meat seems a little dry after adding in the spices and enchilada sauce, add ½-1 cup water and stir to combine. Allow the meat to come to a simmer and reduce down to your desired consistency. 

        Nutrition

        Serving: 1serving | Calories: 169kcal | Carbohydrates: 4g | Protein: 16g | Fat: 8g | Saturated Fat: 3g | Cholesterol: 52mg | Sodium: 468mg | Potassium: 276mg | Fiber: 1g | Sugar: 3g | Vitamin A: 580IU | Vitamin C: 0.9mg | Calcium: 14mg | Iron: 2.5mg

        The Actual Chipotle Guacamole Recipe

        By Heather LAST UPDATED May 21, 2021 · FIRST PUBLISHED May 15, 2021, 17 Comments

        This really is the famed guacamole recipe from Chipotle! They posted it on their website several years ago and I've been holding onto it tightly ever since! It's so good, and so easy too!

        Guacamole with red onion and chip in a glass bowl
        Don't you just want to dig in?!?

        There are few things in life that give me as much joy as a big bowl of fresh guacamole and warm, salty tortilla chips. There was a time in my life that I thought avocados were an abomination, but that was a long, long time ago and I'm so glad I see the light now.

        It was probably five years ago that Chipotle put their famed guacamole recipe up on their website and I was pretty stinking excited. It's not like guacamole is rocket science, but I was super stoked to see the proportions they used so I could replicate it at home.

        And that's exactly what I've been doing ever since! Making it over and over and over again topping Enchilada Skillets, serving alongside Mexican Rice and beans, and everything in between.

        [feast_advanced_jump_to]

        📋 Why This Recipe Works

        Unless Chipotle was pulling our chain 5 years ago when they put the recipe up, this is their actual recipe for guacamole in their stores. It only uses a handful of fresh ingredients and has the perfect ratio of salt to acidity. I've also compared the guac in stores to my homemade version using this recipe and they are pretty identical!

        🔪 How To Make The Recipe

        Ingredients for guacamole
        All the players, lined up to go!

        1.) Gather your fresh ingredients

        Fresh, perfectly ripe avocados, red onion, cilantro, jalapeño, limes and salt are all you need!

        2.) Lime, Avocado and Salt first!

        Tossing the avocado with the lime helps to keep it green and the salt is essential for seasoning.

        3.) Mash, mash, mash

        Use a fork, mini potato masher, spoon, fist, whatever you have to mash the avocados into as smooth or as chunky a guacamole you like.

        5.) Fold

        Stir the rest of the ingredients into the mashed avocado.

        4.) Consume immediately or store

        This guac doesn't last long in my house, but if you do have any left follow the directions below for storing!

        👩🏻‍🍳 Pro Tips

        • Pick Ripe Avocados: Avocados can be tricky to pick out! My favorite trick is to pop the little button of a stem off the top and look at the color of the avocado underneath. If it's green it's ripe, yellow it's not ripe, and brown it's overripe.
        • Spice to Taste: The recipe suggests including the seeds from the jalapeno, but if you're sensitive to spice, just leave the seeds out! Much of the capsaicin (the chemical that creates spice on our tongue) is in the seeds and ribs of the peppers, not the flesh.
        Fresh Guacamole in a glass bowl
        Oh, mama! Sweet, sweet guacamole.

        👪 Scaling The Recipe

        Cooking for two or a crowd? This recipe is easily adaptable. Use the slider on the recipe card to change the quantity and the ingredient amounts will change accordingly.

        🍽 Serving and Topping Suggestions

        My favorite way to eat guacamole is just with warm, salty tortilla chips. But it's also great paired with so many different latin-inspired foods. Try topping Ground Beef tacos or Chile Colorado Burritos with it.

        Curious about my favorite tortilla chips? These right here are the best!

        💭 FAQs


        How does Chipotle Keep Their Guacamole Green?


        My guess is that they go through it so quickly, it doesn't have a chance to brown! See my storing suggestions below for more info.


        My avocados or guacamole are brown, can I eat them?


        Yes! Brown avocado isn't bad for you, it just might be more mushy and slightly more bitter.


        How do I make this spicier?


        You can add more jalapeño, use a hotter pepper like a serrano or habanero or add your favorite hot sauce.

        🥘 Storing Guacamole

        It's the age-old question: "How do I keep my guacamole green?". And the answer is, it's hard!

        Avocados oxidize naturally and turn brown pretty quickly, but there are a few tricks you can use to extend the life of you guacamole.

        My favorite trick involves smoothing down the guacamole in a bowl, making sure the sides are scraped as well and topping with a small layer of water.

        The water creates an airtight seal over the guacamole and keeps it from browning. When you're ready to eat, just drain off the water, stir and eat!

        FREE RECIPE EBOOKS

        Join my free email list to receive TWO free ebooks!

          We respect your privacy. Unsubscribe at any time.

          Guacamole in bowl with a tortilla chip dipped inside
          There she is, in all her glory!

          📖 Recipe

          Glass bowl of guacamole with chip inside
          Print Recipe
          4.75 from 182 votes

          Chipotle Guacamole

          This is the actual recipe from Chipotle themselves! They posted it on their website several years ago and I've been holding on tightly to it ever since!
          Prep Time10 minutes mins
          Cook Time0 minutes mins
          Total Time10 minutes mins
          Course: Appetizer
          Cuisine: Mexican
          Keyword: chipotle restaurant, copycat, homemade guacamole
          Servings: 6 servings
          Calories: 4kcal
          Author: Heather Cheney

          Ingredients

          • 2 whole Hass Avocados
          • 2 teaspoons lime juice
          • 2 tablespoons fresh cilantro chopped
          • ¼ cup red onion finely chopped
          • ½ whole jalepeno including seeds, finely chopped
          • ¼ teaspoon kosher salt

          Instructions

          • Choose the right avocado. It should feel squishy yet firm (like the palm of your hand), and be a nice dark green color on the inside.
          • Cut the avocados in half and the remove the pits (carefully!)
          • Scoop out the avocados and place in a medium bowl.
          • Toss and coat the avocado with lime juice.
          • Add the salt and using a fork or potato masher, mash until a smooth consistency is achieved.
          • Fold in the remaining ingredients and mix well.
          • Taste the guacamole (over and over) and adjust seasoning if necessary.

          Notes

          • Pick Ripe Avocados: Avocados can be tricky to pick out! My favorite trick is to pop the little button of a stem off the top and look at the color of the avocado underneath. If it's green it's ripe, yellow it's not ripe, and brown it's overripe.
          • Spice to Taste: The recipe suggests including the seeds from the jalapeno, but if you're sensitive to spice, just leave the seeds out! Much of the capsaicin (the chemical that creates spice on our tongue) is in the seeds and ribs of the peppers not the flesh.

          Nutrition

          Serving: 1serving | Calories: 4kcal | Carbohydrates: 1g | Protein: 1g | Fat: 1g | Saturated Fat: 1g | Sodium: 97mg | Potassium: 14mg | Fiber: 1g | Sugar: 1g | Vitamin A: 11IU | Vitamin C: 1mg | Calcium: 2mg | Iron: 1mg

          The Easiest Homemade Drop Biscuits

          By Heather LAST UPDATED May 20, 2021 · FIRST PUBLISHED May 14, 2021, 3 Comments

          This crazy easy drop biscuit recipe is my go-to when I need something quick, warm, and carb-y to go with dinner. They bake up fluffy on the inside and crunchy on the outside-- the perfect biscuit without all the work!

          A split biscuit with a pat of butter on it
          Take a look at that tender crumb!

          I've been making this drop biscuit recipe for 10+ years and it's one of my absolute favorites! When I learned that buttery, tender biscuits were achievable without all the fuss of mixing, rolling, and cutting traditional biscuits, I was sold!

          Yes, it's true, you don't have to have a degree in baking to make some crazy delicious and buttery biscuits! Pull out a bowl, a wooden spoon or spatula, and a cookie sheet and you'll be good to go!

          I've made these to go along with sausage gravy for breakfast and to top chicken pot pies, but they are also great on their own with jam and butter or alongside a big bowl of chili, or a rack of bbq ribs!

          [feast_advanced_jump_to]

          📋 Why This Recipe Works

          Traditional biscuits are made with cold butter, lard, or shortening to create tender and flaky lakers. If the dough is handled too much, the fats melt and the flakiness is lost. This recipe skips the solid fats and uses heavy whipping cream instead. The cream is fat-heavy and creates a thick dough that is placed by the spoonful on a baking sheet, forgoing the rolling and cutting that is needed for traditional biscuits. The result is tender, moist, and buttery biscuits, just as satisfying as their traditional counterpart, without all the fussy work.

          🔪 How To Make The Recipe

          Ingredients for drop biscuits
          Here's all you'll need- flour, baking powder, sugar, salt, and heavy whipping cream.

          Step 1.) Mix The Dry Ingredients

          The dry ingredients include flour, baking powder, sugar, and salt. Give them a good whisk in a large mixing bowl and that's it!

          Step 2.) Add the Heavy Whipping Cream

          Just pour that heavy cream right into the dry ingredients.

          Whipping cream being poured into a bowl with other ingredients
          In she goes!

          Step 3.) Mix gently and don't over mix!

          Once the cream is in gently start stirring. Stir just until no dry spots remain, no longer! The dough will be thick!

          Flour and Whipping cream in a glass bowl being stirred
          Mix until combined, but don't over mix.

          Step 4.) Scoop and Bake

          Use a spoon or large cookie scoop to place even-sized mounds of dough onto a lined baking sheet (hence the name drop biscuits!). Bake at 425 degrees Fahrenheit until the biscuits are golden brown on tops and bottoms.

          Drop biscuit dough on a baking sheet
          All scooped up and ready to go!

          👩🏻‍🍳 Pro Tips

          • Don't Over Mix: The more you stir, the tougher your biscuits will be! When flour and water (in this case cream) are combined they form gluten. Gluten is what gives bread structure and the more it is kneaded, the more structure it has. We want our biscuits to stay light and fluffy, so only stir it until no dry spots remain.
          • The Cream Matters: Opt for the carton that says "Heavy Whipping Cream" when grocery shopping. It has a higher butterfat content which means richer, fluffier, more buttery rolls.

          👪 Scaling The Recipe

          Cooking for two or a crowd? This recipe is easily adaptable. Use the slider on the recipe card to change the quantity and the ingredient amounts will change accordingly.

          These drop biscuits are a great homemade side to make when you're feeding a large number of people because they are so easy to mix and bake.

          Baked cream biscuits on a cutting board
          Isn't she lovely?

          🍽 Serving and Topping Suggestions

          • Top with country sausage gravy
          • Use as a crust for chicken or turkey pot pies
          • Serve with lemon curd or fresh jam and butter
          • Make a breakfast sandwich with soft scrambled eggs and bacon
          • Scoop spoonfuls of the dough into boiling soup to make dumplings

          💭 FAQs


          Can you use this recipe for chicken and dumplings?


          Yes! Note that they will create a fluffier dumpling that won't be as dense, but will still be delicious!


          Is whipping cream the same as heavy whipping cream?


          No. The difference is in the butterfat content. Heavy whipping cream has a higher fat content and will whip up thicker and hold its shape longer. Whipping cream has a lower fat content and will whip up lighter and softer.


          What kind of flour should I use?


          Use all-purpose flour for this recipe.

          🥘 Storing, Reheating, and Freezing

          I'll be surprised if you have any leftovers, but if you do, place cooled biscuits in a large ziplock baggie and place them in the fridge. When you're ready to reheat, place the biscuits in a baking dish tented loosely with foil and bake at 400' for 5 minutes or until heated through.

          You can also freeze the baked biscuits for up to 3 months in an airtight bag or container. When ready to eat, use the reheating directions above, adding a few extra minutes if the biscuits are still frozen.

          Drop biscuits in a pile with butter on top
          Butter will always be my topping of choice!

          FREE RECIPE EBOOKS

          Join my free email list to receive TWO free ebooks!

            We respect your privacy. Unsubscribe at any time.

            📖 Recipe

            Close up of biscuit with a pat of butter on it
            Print Recipe
            4.74 from 101 votes

            Whipping Cream Drop Biscuits

            The most perfect, easiest biscuit recipe, ever. 
            Prep Time10 minutes mins
            Cook Time15 minutes mins
            Total Time25 minutes mins
            Course: Bread
            Cuisine: American
            Keyword: Drop Biscuits, No butter biscuits, Whipping Cream Biscuits
            Servings: 8 biscuits
            Calories: 272kcal
            Author: Heather Cheney

            Ingredients

            • 2 cups all-purpose flour
            • 2 teaspoons sugar
            • 2 teaspoon baking powder
            • ½ teaspoon salt
            • 1 ½ cups heavy whipping cream

            Instructions

            • Adjust oven rack to the upper-middle position, Preheat oven to 425 degrees fahrenheight and line a baking sheet with parchment paper.
            • Whisk together the flour, sugar, baking powder and salt in a medium bowl.
            • Add in the cream and mix by hand just until smooth and no dry spots remain- do not over mix!
            • Using a spoon or ice cream scoop, spoon even portions of dough onto baking sheet.
            • Bake until golden brown, about 15 minutes, and serve hot!

            Notes

            • Don't Over Mix: The more you stir, the tougher your biscuits will be! When flour and water (in this case cream) are combined they form gluten. Gluten is what gives bread structure and the more it is kneaded, the more structure it has. We want our biscuits to stay light and fluffy, so only stir it until no dry spots remain.
            • The Cream Matters: Opt for the carton that says "Heavy Whipping Cream" when grocery shopping. It has a higher butterfat content which means richer, fluffier, more buttery rolls.

            Nutrition

            Serving: 1biscuit | Calories: 272kcal | Carbohydrates: 26g | Protein: 4g | Fat: 16g | Saturated Fat: 10g | Cholesterol: 61mg | Sodium: 163mg | Potassium: 167mg | Sugar: 1g | Vitamin A: 655IU | Vitamin C: 0.2mg | Calcium: 77mg | Iron: 1.5mg

            The Best Sloppy Joe Sauce

            By Heather LAST UPDATED May 21, 2021 · FIRST PUBLISHED May 5, 2021, 14 Comments

            This sloppy joe sauce will 100% become your new favorite! I have a big thing for these sandwiches and spent years perfecting this recipe. Yes, judge me all you want for dedicating so much time to something as silly as ground beef sandwiches, but I'll never regret it!

            A sloppy Joe on a paper napkin
            Does anything look better than this sloppy joe?

            The sauce is sweet, but not too sweet. Tangy, but not too tangy. And the ingredient that makes all the difference? Canned green chiles! If sloppy joes are your thing, I'm confident you won't be disappointed here. 🙂

            Like I said above, this is a recipe I've tweaked and perfected for a long time. It's perfect for my tastes and is even more perfect when served with a side of some of the best coleslaw or homemade french fries!

            [feast_advanced_jump_to]

            📋 Why This Recipe Works

            The tricky part about sloppy joe sauce is balancing the flavors. It should be sweet and tangy but still let the flavor of the meat shine through. This recipe has a perfect blend of those sweet and tangy notes and an additional depth of flavor created by adding diced green chiles and Worcestershire sauce for a perfectly balanced taste.

            🔪 How To Make The Recipe

            Ingredients needed for sloppy joes
            All you need to make sloppy joe sauce!

            Step 1.) Choose Your Meat

            This sloppy joe sauce works well with both ground beef and turkey. I'm not a huge fan of ground chicken, so I've never tried it, but if you do and it turns out well, let me know!

            Step 2.) Make the Sauce

            The sauce includes brown sugar, chili powder, mustard, onion, vinegar, ketchup, Worcestershire sauce, tomato sauce, and my secret ingredient, diced green chilies.

            After you brown the meat just add all the sauce ingredients to the pan and let simmer!

            Step 3.) Simmer WELL

            The longer you can simmer the sauce, the better! I'm usually making these because I'm in a time crunch and need something quick, but if you have the time, let it simmer away to let all the flavors develop and meld together. Or use the slow cooker method below.

            Step 4.) Assemble!

            Sloppy joes are typically served on hamburger buns, but can be served on just about any kind of bread. See my serving suggestions below to make these even more delicious than they are.

            2 sloppy joes on a white plate with potato chips
            Two Sloppy Joes ready to eat!

            👩🏻‍🍳 Pro Tips

            • Toast Them Buns: Brush buns with melted butter and place face up under the broiler for just a minute (watch closely!). The toasted, buttered buns hold the sloppy joe sauce better and add texture and flavor.
            • Fat Content Matters: Ground beef and Turkey come in many different forms and fat contents. If the meat is too lean the end result will be tough and too fatty the sandwiches might be greasy. I've found that 85/15 ground beef (85% meat, 15% fat) and 90/10 ground turkey are perfect!
            Sloppy joe sauce in a cast iron skillet
            Ready to assemble!

            👪 Cooking For a Crowd

            Sloppy joes make a great meal for any size crowd because they are budget-friendly and super easy to make.

            The best way to make them for a crowd is using the slow cooker method talked about in the FAQs. For more fun, create a sloppy joe bar using the topping suggestions below.

            Need To Know How Much To Make?

            When cooking for a crowd, it can be hard to figure out how much food to purchase-- especially meat!

            This recipe makes six good-sized sandwiches. So, if you need to make sloppy joes for 50, you'll need to multiply the recipe by 8 and buy 8 pounds of ground meat. 

            One good rule of thumb is is to estimate about 2 and a half ounces of raw meat per person when dealing with ground meat.

            Up close sloppy joe on a bun and paper bag
            Don't forget to toast your buns before assembling!

            🍽 Serving and Topping Suggestions

            Want to make this recipe super special? Make a sloppy joe bar! It's the perfect way to dress up these basic sandwiches and makes a fun and easy dinner for a crowd. Here are some of my favorite toppings:

            • Thinly sliced red onion
            • Dill pickle chips
            • Yellow Pepper rings
            • Crispy bacon slices
            • French-fried onions (like those you put on green bean casserole)
            • Sliced Cheese- cheddar, pepper jack, muenster, American
            • Sour Cream
            • Potato Chips or Fritos
            Sloppy joe toppings on a wooden cutting board.
            Some of my favorite toppings- American cheese, red onion, pickles, pepperoncini, and Fritos!

            💭 FAQs

            How Did Sloppy Joes Get Their Name?


            Sloppy Joes originated in Sioux City, Iowa by a cook named Joe in the 1930's. Loose-meat sandwiches were a popular staple at casual lunch-counter restaurants and were known to be sloppy and messy to eat. Albeit, super tasty! (Wikipedia)


            Can You Make This Recipe In an Instant Pot?


            Yes! Turn the Instant Pot on saute mode and prepare the recipe as written below. When it comes time to simmer the sauce, add ½ cup water, lock the Instant Pot lid in place making sure the venting valve is sealed, and set to cook on high pressure for 5 minutes.

            When the cooking time is up, allow the pressure to release naturally for 5 minutes, then carefully turn the venting valve to release the remaining pressure.

            When the pressure pin drops, remove the lid and stir. If the sauce is thin, you can turn on saute mode and allow the sauce to simmer until thickened to your liking.


            Can You Make This Recipe In a Crock-Pot?


            If you'd like to make this recipe in the slow cooker, brown the meat with the onion, drain off the fat, and stir with the remaining sloppy joe sauce ingredients in the slow cooker.

            Cook on high for at least an hour or low for 2 hours. It can be left in there longer if you'd like.


            What's the Difference Between Manwich and Sloppy Joes?


            Manwich is the marketed version of sloppy joe sauce that you can find in the grocery store. It's meant to make Sloppy Joes easy to make, but the truth is that they are easy to make even without a can of sauce!


            Can I make this Keto/Low Carb?


            I've made this recipe using monk fruit sweetener and low carb ketchup with good results. Use the same amount of ketchup and sweeten to taste with your sweetener of choice.


            How can I make this recipe spicier?


            Substitute a can of diced jalapeños in place of the canned green chiles.

            🥘 Leftover Ideas

            Don't feel like you have to be bound to a hamburger bun! This recipe can be used for many things. The sauce is slightly sweet and is similar to a BBQ sauce.

            It's great served over a baked potato or even used as a topping for "Nachos." Or make a "Sloppy Dog" and top a hot dog with it like you would a chili dog.

            FREE RECIPE EBOOKS

            Join my free email list to receive TWO free ebooks!

              We respect your privacy. Unsubscribe at any time.

              📖 Recipe

              Sloppy Joe on a paper bag
              Print Recipe
              4.69 from 86 votes

              The Best Sloppy Joe Sauce

              This recipe seriously makes the best sloppy joes! It's tangy, saucy and sweet, with just a little bit of a kick-- it's my favorite sloppy joe recipe and I hope it will become yours, too! 
              Prep Time5 minutes mins
              Cook Time20 minutes mins
              Total Time25 minutes mins
              Course: Main Course
              Cuisine: American
              Keyword: easy sandwich, ground beef sandwich, Quick dinner
              Servings: 6 sandwiches
              Calories: 333kcal
              Author: Heather Cheney

              Ingredients

              • 1 pound ground beef or turkey see notes
              • 4 ounces canned diced green chiles
              • ½ teaspoon kosher salt
              • 2 tablespoons brown sugar
              • ½ tablespoon chili powder
              • 1 teaspoon mustard
              • 1 small onion finely chopped
              • 1 tablespoon apple cider vinegar
              • ½ cup ketchup
              • 2 tablespoon Worchestershire Sauce
              • 8 ounces tomato sauce
              • 4 hamburger buns

              Instructions

              • Heat a large skillet over medium-high heat. Add hamburger and onion, cooking and crumbling the meat until no longer pink.
              • Remove meat from pan and place on a plate lined with paper towels or bags to drain off the excess fat.
              • Once drained, put the meat back into the skillet and add all remaining ingredients. Stir until combined and let simmer 10-15 minutes or until slighlty thickened. 
              • Serve on toasted hamburger buns with a slice of cheese if you'd like. 

              Notes

              • Choosing Meat: I've found that 85/15 ground beef (85% meat, 15% fat) and 90/10 ground turkey is perfect to keep the meat tender and avoid greasiness.
              • Simmer as long as you'd like: Simmering the meat in the sauce allows the meat to cook down and the flavors of the sauce to meld. I typically am making sloppy joes because I need something quick, but always enjoy them more when I let the sauce simmer 30 minutes on low. If the sauce becomes too thick, add a little bit of water to loosen it up. 
              • Toast The Buns: Toasted, buttered buns hold the sloppy joe sauce better and add texture and flavor. Brush the buns with melted butter and place them face up under the broiler for just a minute (watch closely!)

              Nutrition

              Serving: 1sandwich | Calories: 333kcal | Carbohydrates: 29g | Protein: 17g | Fat: 17g | Saturated Fat: 6g | Trans Fat: 1g | Cholesterol: 54mg | Sodium: 865mg | Potassium: 498mg | Fiber: 2g | Sugar: 12g | Vitamin A: 489IU | Vitamin C: 12mg | Calcium: 89mg | Iron: 3mg

              Easy Tortellini Bacon Carbonara

              By Heather LAST UPDATED March 11, 2021 · FIRST PUBLISHED February 23, 2021, 4 Comments

              Easy Tortellini Bacon Carbonara is a rich and creamy alternative from the traditional Italian recipe. Made with an easy cream sauce and no eggs, you can have this served and ready to eat within 30 minutes.

              Creamy tortellini in a white bowl with bacon and peas

              Easy Tortellini Bacon Carbonara is simple and much faster compared to the traditional spaghetti carbonara recipe. Instead of using raw eggs, this cheesy pasta dinner is finished with a creamy sauce made from simple storebought ingredients. The leftovers are easy to store and can be enjoyed the next day!

              Traditional carbonara can be intimidating even though it contains just a handful of ingredients. Because it’s made with raw eggs, there’s always a risk of not cooking them fully or the eggs scrambling as soon as they hit the pan. There’s no worrying involved in this recipe because we’re replacing the eggs with heavy cream, cheese, lemon juice, and salt and pepper instead. 

              My simple and easy cream sauce elevates the flavor in each bite and complements the creamy cheese-filled tortellini shells. Rich and filling on its own, you can serve this cheesy main dish for dinner with a fresh salad and garlic bread on the side.

              Cheese tortellini in a cream sauce with bacon

              What is tortellini carbonara?

              Traditional pasta carbonara is made with a long cut pasta, like spaghetti, and finished with salted pork and a sauce made from eggs, cheese, and leftover pasta water. The extra starch in the water makes it creamy without adding any extra cheese.

              Well, in my recipe for carbonara with tortellini, we’re increasing the cheese! This recipe is made with tortellini pasta instead of spaghetti and is mixed with a simple sauce made from cream, cheese, and parsley. This version has a little more substance from the added peas and bacon, and tastes herby, complex, and creamy.

              Why This Recipe Works

              Cheese-filled tortellini is cooked and then tossed with a rich carbonara sauce that uses cream for a base instead of the traditional egg-based carbonara sauce. The sauce is simple to make and tastes much more complicated than it is. Crispy bacon, peas, and parmesan cheese round out the dish making this simple meal feel elegant and special.

              Tortellini in a white bowl with bacon, peas and parsley

              How to make creamy bacon carbonara

              Hello, easy and creamy dinner idea! You’ll have this tortellini carbonara recipe done and ready to eat in no time. Here’s how to make it:

              Step 1:

              In a large skillet, bring the cream and parsley up to a simmer. Once it’s starting to thicken, stir in the parmesan until the cheese is melted.

              Step 2:

              Mix in the tortellini, peas, and bacon.

              Step 3:

              Once the peas and tortellini are warmed through, stir in the lemon juice, pepper, and salt. Serve and enjoy!

              Overhead view of ingredients needed for bacon carbonara

              Heather's Tips for Recipe Success

              • Cook the tortellini until it’s “al-dente” before stirring into the sauce. Al-dente means the pasta is cooked but still slightly firm. When the pasta is added to the sauce, it will soften and cook fully.
              • Keep a close eye on the sauce when it’s on the stove. The cream won’t burn, but it can boil over quickly.
              • Cream sauces can be hard to reheat without separating. If you need to reheat, heat the sauce up slowly on the stovetop, adding a few splashes of cold heavy cream, and stirring until it’s heated through. 
              Bowl of tortellini with a wooden spoon

              Variations

              • Use any veggies you want: I made this recipe with frozen peas, but you can mix in broccoli, cauliflower, asparagus, or sun-dried tomatoes instead.
              • How to serve: Serve with lots of parmesan or pecorino romano cheese on top, as well as fresh herbs like parsley or basil.
              • Want to make it vegetarian? Swap the bacon for more veggies and herbs.
              • If you want to make this carbonara without cream, you can replace it with milk or a mix of 2 eggs, parmesan cheese, and leftover pasta water.

              Storing leftovers

              Leftover carbonara is really easy to store. Just keep the cooled down pasta in an airtight container in the fridge for 3 to 4 days. You can reheat it over low heat on the stove, stirring in a few splashes of cold cream to bring back the creaminess.

              A plate and large bowl with carbonara tortellini and a fork

              More creamy pasta recipes

              I have many more pasta dishes that are dreamy, creamy, and delicious:

              • Lasagna Bombs
              • Five Cheese Stuffed Lumaconi
              • Instant Pot Pasta Al Forno
              • 5 Cheese Stuffed Manicotti
              Graphic saying "Pin this recipe"

              📖 Recipe

              Bowl of tortellini with a wooden spoon
              Print Recipe
              4.61 from 33 votes

              Easy Bacon Carbonara Tortellini

              This super easy Tortellini Bacon Carbonara is a rich and creamy alternative from the traditional Italian recipe. The simple cream sauce makes it quick and easy!
              Prep Time10 minutes mins
              Cook Time10 minutes mins
              Total Time20 minutes mins
              Course: Main Course
              Cuisine: Italian
              Keyword: Bacon, Carbonara, Tortellini
              Servings: 6 servings
              Calories: 749kcal
              Author: Heather Cheney

              Ingredients

              • 1 ¾ cup heavy whipping cream
              • ¼ cup fresh parsley chopped
              • ½ cup parmesan cheese shredded
              • 1, 18- ounce package fresh or frozen cheese tortellini, cooked and drained
              • 1 cup frozen green peas
              • 8 strips bacon cut into bite-sized pieces and cooked until crispy
              • 2 teaspoons fresh lemon juice
              • ¼ teaspoon black pepper
              • ½ teaspoon salt

              Instructions

              • In a large skillet combine the cream and parsley and bring to a simmer. Simmer until the sauce is slightly thickened and stir in the parmesan cheese. Stir the sauce until the cheese is melted.
              • Add the cooked tortellini, peas, and bacon and continue to simmer for 3-4 minutes longer or until the peas and tortellini are warmed through.
              • Stir the lemon juice, black pepper and salt into the pan and serve.

              Notes

              • Cook the tortellini until it’s “al-dente” before stirring into the sauce. Al-dente means the pasta is cooked but still slightly firm. When the pasta is added to the sauce, it will soften and cook fully.
              • Keep a close eye on the sauce when it’s on the stove. The cream won’t burn, but it can boil over quickly.
              • Cream sauces can be hard to reheat without separating. If you need to reheat, heat the sauce up slowly on the stovetop, adding a few splashes of cold heavy cream, and stirring until it’s heated through. 

              Nutrition

              Serving: 1serving | Calories: 749kcal | Carbohydrates: 73g | Protein: 21g | Fat: 41g | Saturated Fat: 22g | Trans Fat: 1g | Cholesterol: 120mg | Sodium: 556mg | Potassium: 394mg | Fiber: 4g | Sugar: 4g | Vitamin A: 1492IU | Vitamin C: 14mg | Calcium: 174mg | Iron: 2mg

              One Pan Lemon Garlic Chicken and Potatoes

              By Heather LAST UPDATED March 25, 2021 · FIRST PUBLISHED January 19, 2021, 1 Comment

              Try this One Pan Lemon Garlic Chicken and Potatoes for an easy weeknight dinner or meal prep. The potatoes and juicy chicken breasts are seasoned in plenty of spices and dressed with a lemon garlic butter, turning each bite into an explosion of flavor!

              Pan of chicken breasts with cut potatoes on the bottom

              One pan recipes are the best because they’re easy to throw together on a busy weeknight and there’s barely any cleanup! As everything bakes in the oven, all of the ingredients mingle together to create a unique and flavorful meal.

              In this One Pan Lemon Garlic Chicken and Potatoes recipe, juicy chicken breasts and potatoes are seasoned with tons of spices, then baked together in the oven. The natural drippings from the meat soak into the potatoes, making them pillowy and soft. 

              As if it couldn’t get any better, this one pan chicken bake is finished with a heavenly lemon garlic butter. Poured all over the meat and potatoes, the butter packs a punch of flavor and adds even more moisture into each bite. It’s the cherry on top of an otherwise delectable dinner!

              Why This Recipe Works

              The potatoes are the first to go in the oven and are left to bake for 30 minutes before the chicken is added. This helps us avoid overcooking and drying out the delicate chicken breasts. The finishing touch of simple lemon garlic butter sauce poured over the top of the cooked chicken and potatoes adds a ton of flavor and a bit of moisture.

              Baked chicken breast on a white plate

              How to make lemon garlic chicken and potatoes in one pan

              Ingredients for baked chicken and potatoes

              Juicy and tender chicken and potatoes are only a few steps away. Luckily, this recipe is super simple and can be prepared in under an hour. Here’s how to make it:

              Step 1:

              Preheat your oven and combine the brown sugar, paprika, Italian seasoning, salt, garlic powder, pepper, and chili powder in a small bowl.

              Step 2:

              Place the potatoes in a shallow baking dish and drizzle with oil. Next, sprinkle on some of the seasoning so the potatoes are lightly coated. 

              Step 3:

              Bake the potatoes, uncovered, for 30 minutes. While they bake, prepare the chicken by drizzling the remaining oil and seasoning mix on both sides.

              Step 4:

              Take the potatoes out of the oven when they’re done and place the seasoned chicken breasts on top. Place the pan back in the oven and cook for another 20 minutes.

              Step 5:

              Combine the butter, lemon juice, garlic, salt, and dill in a small saucepan and heat over medium-low heat. Stir it all together and cook until the garlic is soft and fragrant. 

              Step 6:

              Once the potatoes and chicken are done, take them out of the oven and pour the lemon garlic sauce over top. Leave the chicken to rest for 5 minutes, then serve!

              Chicken breast on a plate with a bite cut out

              Heather's Tips for Recipe Success

              • Pound the chicken breasts until all 4 are 1 inch thick. A consistent thickness ensures each of them cook evenly.
              • Same goes for the potatoes! Cut them all into uniform 1 inch pieces so they all cook evenly. 
              • A meat or instant read thermometer is your best friend when determining if the chicken is properly cooked and not dried out. The internal temperature of the thickest point of the breast should be 165ºF by the time it’s done.
              • A 9 x 13 baking dish is the best choice when baking the potatoes and chicken together. This dish will safely hold all of the natural juices that drip from the chicken and make a shallow bath for the potatoes to soak in all of the flavors.
              Garlic chicken and potatoes in a white dish

              Recipe variations

              Make this meal your own by making some slight variations. It’s very flexible and you can make additions or subtractions where you see fit!

              • Want to add in more vegetables? Add in broccoli florets, green beans, brussel sprouts, or zucchini to the pan when you add the chicken breasts.
              • Both white or red potatoes work in this recipe. Just make sure they’re cut into evenly sized cubes or quarters.
              • Feel free to leave out the chili powder and/or paprika to keep the spice level low.
              • Want to make this with sweet potatoes instead? Peel and cut 1 large or 2 medium-sized sweet potatoes into 1” cubes. These do tend to cook a little faster, so only bake them for 20-25 minutes before adding the chicken.
              • Make it a complete meal with the right side dishes. This one pan chicken recipe would go well with my Homemade Creamed Corn, Shaved Brussels Sprout Saute, or Green Bean Casserole.
              4 seasoned chicken breasts in a pan with potatoes

              Storing leftovers

              Seal the chicken and potatoes together or separately in shallow, airtight containers. They’ll stay fresh in the fridge for up to 4 days.

              Reheat leftovers in a shallow dish in a 400ºF oven until warmed through. You can reheat them in a microwave, but the potatoes might turn out overly soft or mushy.

              Overheat shot of chicken and potatoes in a casserole dish with a red towel

              More one pan chicken recipes

              I have plenty of one pan chicken recipes to save you time on those busy weeknights:

              • Sour Cream Chicken Enchilada Skillet
              • Garlic Herb Chicken Thighs
              • Smothered Chicken Skillet
              • BBQ Chicken Sandwiches
              • Chicken Florentine Spaghetti
              Graphic saying "Pin this recipe"

              📖 Recipe

              Garlic chicken and potatoes in a white dish
              Print Recipe
              4.64 from 22 votes

              One Pan Lemon Garlic Chicken and Potatoes

              Try this One Pan Lemon Garlic Chicken and Potatoes for an easy weeknight dinner or meal prep. The potatoes and juicy chicken breasts are seasoned in plenty of spices and dressed with a lemon garlic butter, turning each bite into an explosion of flavor!
              Prep Time10 minutes mins
              Cook Time50 minutes mins
              Total Time1 hour hr
              Course: Main Course
              Cuisine: American
              Keyword: Baked Chicken, One Pan Chicken and Potatoes
              Servings: 4 servings
              Calories: 458kcal
              Author: Heather Cheney

              Ingredients

              • 1 tablespoon brown sugar
              • 1 ½ teaspoon paprika
              • 1 teaspoon Italian seasoning
              • 1 ¼ teaspoon salt divided
              • ½ teaspoon garlic powder
              • ½ teaspoon onion powder
              • ¼ teaspoon black pepper
              • 1 teaspoon chili powder
              • 2 pounds yellow or red potatoes cut into 1" cubes
              • 1 ½ tablespoons olive oil divided
              • 4 boneless skinless chicken breasts pounded to 1" thickness
              • ¼ cup butter
              • 1 tablespoon fresh lemon juice
              • 2 cloves garlic minced
              • ½ teaspoon dried dill weed

              Instructions

              • Preheat oven to 425 degrees Fahrenheit.
              • Combine the brown sugar, paprika, Italian seasoning, 1 teaspoon salt, garlic powder, pepper, and chili powder in a small bowl and mix until combined.
              • Place the potatoes in a 9x13" baking dish and drizzle with 1 tablespoon of oil. Toss to coat. Sprinkle 1 ½ teaspoons of the seasoning mix over the potatoes.
              • Place the potatoes in the oven and bake, uncovered, for 30 minutes.
              • Drizzle the remaining ½ tablespoon of olive oil over the chicken and season front and back with the remainder of the seasoning mix. Set aside until the potatoes are finished cooking.
              • After 30 minutes remove the potatoes from the oven and arrange the seasoned chicken breasts on top of the potatoes.
              • Return the pan to the oven and continue to cook for 20 minutes, or until the chicken is cooked through and has an internal temperature of 165 degrees F.
              • In a small saucepan, combine the butter, lemon juice, garlic, remaining ¼ teaspoon salt, and dried dill weed over medium-low heat. Stir and cook until the garlic is softened and very fragrant. Remove from the heat and set aside.
              • When the chicken and potatoes are done, remove the pan from the oven and pour the garlic butter sauce over the top of the chicken and potatoes. Allow the chicken to rest for 5 minutes and serve.

              Notes

              • Pound the chicken breasts until all 4 are 1 inch thick. A consistent thickness ensures each of them cook evenly.
              • Same goes for the potatoes! Cut them all into uniform 1 inch pieces so they all cook evenly. 
              • A meat or instant read thermometer is your best friend when determining if the chicken is properly cooked and not dried out. The internal temperature of the thickest point of the breast should be 165ºF by the time it’s done.
              • A 9 x 13 baking dish is the best choice when baking the potatoes and chicken together. This dish will safely hold all of the natural juices that drip from the chicken and make a shallow bath for the potatoes to soak in all of the flavors.

              Nutrition

              Serving: 1serving | Calories: 458kcal | Carbohydrates: 41g | Protein: 29g | Fat: 20g | Saturated Fat: 9g | Cholesterol: 103mg | Sodium: 1011mg | Potassium: 1477mg | Fiber: 5g | Sugar: 6g | Vitamin A: 922IU | Vitamin C: 23mg | Calcium: 42mg | Iron: 3mg
              Graphic saying "Did you make this recipe?"

              Southwest Black Bean Stuffed Sweet Potatoes

              By Heather LAST UPDATED March 22, 2021 · FIRST PUBLISHED January 15, 2021, Leave a Comment

              Look no further than these Southwest Black Bean Stuffed Sweet Potatoes for an easy, quick, and filling vegetarian dinner. Made in the Instant Pot, these potatoes are done in no time and stuffed with all of the flavorful toppings you can imagine.

              Sweet Potatoes with southwest filings

              I’ve already figured out how to make the perfect baked sweet potato, but what about stuffed sweet potatoes? And how can we speed things up?

              These Southwest Black Bean Stuffed Sweet Potatoes are just as good as the baked version but are ready to eat faster, thanks to the Instant Pot. The recipe is super flexible, so you can fill the potatoes with almost anything you like. It’s easy, quick, and stress-free! 

              This vegetarian dinner has lots of flare and doesn’t skimp on the flavor. With black beans, corn, onion, cheese, and all the toppings you want, you’ll be full and satisfied after just one potato. Serve these as a main with a few healthy side dishes, like Mexican Rice and Coleslaw.

              Why This Recipe Works

              As usual, the Instant Pot comes to our rescue and helps us cook sweet potatoes in a flash. These usually take up to an hour in the oven! Top the potatoes with your favorite Southwest-inspired toppings and warm them in the microwave if desired. 

              3 sweet potatoes on a plate stuffed with toppings

              What’s the best way to cook sweet potatoes?

              Almost any way you can imagine! I like to cook sweet potatoes in the Instant Pot because it’s the fastest method. Otherwise, they can be grilled, baked in an oven for around 1 hour, or cooked in the microwave for about 5 minutes per side.

              bowl of black beans and corn and other southwest flavored toppings

              How to make Black Bean Stuffed Sweet Potatoes

              Let’s turn regular black bean sweet potatoes into a treat from the Southwest in only a few simple steps:

              Step 1:

              Place a trivet on the bottom of the Instant Pot, then pour in 1 cup of water. Add in the sweet potatoes.

              Water being poured into an Instant Pot

              Step 2:

              Secure the lid and seal the pressure valve. Cook on high for 15 minutes. Let pressure naturally release for 10 minutes, then quick release the remaining pressure.

              Sweet potatoes cut in half with the middles scooped out

              Step 3:

              Remove the potatoes and slice in half. Scoop out a bit of the filling in the centers.

              Step 4:

              Fill the centers with black beans and corn, then top with cheese. Heat them in the microwave for a minute or until the cheese is melted. Garnish with more toppings and serve!

              Sweet potato halves stuffed with black beans, corn and cheese

              Topping suggestions

              Throw as many Mexican or Southwest toppings onto these potatoes that you like. My favorites are sour cream, sliced jalapenos, fresh cilantro, red onion, sliced avocado, guacamole, or salsa. You can even use tortilla chips to scoop out the center!

              If you want to get really fancy, make my Slow Cooker Salsa Chicken Chili and add a scoop to the inside of the potatoes with avocado or cilantro on top. Otherwise, my regular chili will work just as well.

              3 sweet potatoes on a plate stuffed with toppings

              Heather's Tips for Recipe Success

              • Cooking sweet potatoes: Sweet potatoes come in a variety of sizes and their size will dictate how long you will need to cook them. The recipe card shows the cooking time for an up to 2-inch wide sweet potato. If your sweet potatoes are bigger, use these times:
                • 2-3 inches wide: 30 minutes cook time, 10 minutes natural pressure release
                • 3-4 inches wide: 60 minutes cook time, 10 minutes natural pressure release
              • To make this recipe vegan: Just remove the cheese!
              • To add meat: Add in shredded cooked chicken to the bean and corn mixture, or use pulled pork for a bit more flavor.

              Can I make these ahead of time?

              Definitely! Cook the sweet potatoes in the Instant Pot as normal and wrap them in foil or store in an airtight container in the fridge. When you’re ready, slice them open, stuff with your toppings, and reheat in an oven or the microwave.

              half a sweet potato stuffed with mexican toppings on a white plate

              More vegetarian dinner recipes

              • Instant Pot Lentil Soup
              • Sweet Potato and Chickpea Curry
              • One Pan Bean Burritos
              • Southwestern Corn and Potato Chowder
              Graphic saying "Pin this recipe"

              📖 Recipe

              half sweet potato on a plate with onion, jalepeno, black beans and cheese
              Print Recipe
              4.64 from 11 votes

              Southwest Black Bean Stuffed Sweet Potatoes

              Look no further than these Southwest Black Bean Stuffed Sweet Potatoes for an easy, quick, and filling vegetarian dinner. Made in the Instant Pot, these potatoes are done in no time and stuffed with all of the flavorful toppings you can imagine.
              Prep Time10 minutes mins
              Cook Time35 minutes mins
              Total Time45 minutes mins
              Course: Main Course
              Cuisine: American
              Keyword: black bean stuffed sweet potatoes, southwest sweet potatoes, Stuffed sweet potato
              Servings: 4 servings
              Calories: 388kcal
              Author: Heather Cheney

              Ingredients

              • 4, 2 ”-wide sweet potatoes
              • 1 cup water
              • 1 cup black beans
              • 1 cup corn
              • ⅔ cup red onion - chopped
              • 1 cup mexican cheese- shredded
              • Optional garnished: sour cream jalapeno, fresh cilantro, avocado, salsa

              Instructions

              • Place 1 cup of water in Instant Pot. Add trivet and sweet potatoes.
              • Close lid, seal pressure valve, and cook on high for 15 minutes.
              • Let pressure naturally release for 10 minutes, then quick release the remaining pressure.
              • Carefully remove the sweet potatoes and slice in half. Scoop out a small amount of the sweet potato centers.
              • Fill with black beans and corn. Top with cheese. Microwave for 1-2 minutes or until the cheese has melted.
              • Garnish with preferred toppings.

              Notes

              • Cooking sweet potatoes: Sweet potatoes come in a variety of sizes and their size will dictate how long you will need to cook them. The recipe card shows the cooking time for an up to 2-inch wide sweet potato. If your sweet potatoes are bigger, use these times:
                • 2-3 inches wide: 30 minutes cook time, 10 minutes natural pressure release
                • 3-4 inches wide: 60 minutes cook time, 10 minutes natural pressure release
              • To make this recipe vegan: Just remove the cheese!
              • To add meat: Add in shredded cooked chicken to the bean and corn mixture, or use pulled pork for a bit more flavor.

              Nutrition

              Serving: 1serving | Calories: 388kcal | Carbohydrates: 64g | Protein: 15g | Fat: 9g | Saturated Fat: 5g | Cholesterol: 27mg | Sodium: 323mg | Potassium: 1022mg | Fiber: 11g | Sugar: 12g | Vitamin A: 32348IU | Vitamin C: 8mg | Calcium: 264mg | Iron: 3mg
              Graphic saying "Did you make this recipe?"

              Instant Pot Garlic Butter Chicken and Mashed Potatoes

              By Heather LAST UPDATED March 11, 2021 · FIRST PUBLISHED January 12, 2021, Leave a Comment

              My heavenly Instant Pot Garlic Butter Chicken and Mashed Potatoes is perfect for the whole family. Easy to make in the Instant Pot, you’ll have this dinner recipe done and served in no time!

              Blue plate with mashed potatoes and sliced chicken

              The best Instant Pot recipes require almost no work, and this is no exception. My Instant Pot Garlic Butter Chicken is made by throwing a few ingredients into the pot, making a garlic butter, sauce, and then combining everything together! The chicken and mashed potatoes together with garlic butter sauce is heavenly, comforting, and a real crowd-pleaser.

              Cooking the chicken from frozen saves us so much time. There’s no need to wait for it to thaw or brown the chicken beforehand, thanks to the Instant Pot. It takes care of the hard work for us!

              Serve this easy chicken recipe next to more veggies on the side, like Roasted Broccoli or a Shaved Brussels Sprout Saute. It’s a great recipe to enjoy as a quick weeknight dinner or for leftovers the next day!

              Why This Recipe Works

              The frozen chicken breasts only cook in the Instant Pot for a short amount of time under high pressure. When the Instant Pot releases its pressure naturally, it continues to cook the meat, leaving you to enjoy pieces of juicy and flavorful chicken. The potatoes also soak in all of the drippings from the chicken as they cook right underneath the meat. Just when you think it can’t get any better, we’re finishing each plate with a drizzle of garlic butter. In the end, you get a creamy and luscious dish that tastes like a party in your mouth!Sliced chicken and herbs on top of mashed potatoes

              Can I make this with frozen chicken thighs?

              This recipe will still work if you prefer to make it with frozen chicken thighs instead of breasts. Cook the thighs for about 12 minutes in the Instant Pot. Adjust the time depending on the size of the meat (add 1 or 2 minutes for larger thighs or less 1 or 2 minutes for smaller).

              How to make garlic butter chicken in the Instant Pot

              Bowls of chicken, butter, potatoes, sour cream, herb and spices

              This garlic butter chicken recipe is bound to be a new family favorite. So luscious and buttery with velvety smooth mashed potatoes. What’s not to love?

              Step 1:

              Place the cut potatoes in the Instant Pot and the frozen chicken breasts on top. Then pour in the chicken broth and sprinkle the chicken with salt, pepper, and sage. To finish, place the whole cloves of garlic in the pot.

              Step 2:

              Lock the lid in place and set the IP to cook at high pressure for 5 minutes. When the cooking time is up, allow the pressure to release naturally for 18 minutes, then carefully turn the venting valve to release any remaining pressure. 

              Step 3:

              Melt the butter in a saucepan on the stove and stir in the rest of the garlic and some salt. Stir until the garlic is cooked, then set aside.

              Step 4:

              Take the chicken out of the pot and leave it on a cutting board to rest for a few minutes, then slice it into strips.

              potatoes and sour cream in an Instant Pot

              Step 5:

              Drain any excess chicken broth from the potatoes and mash with a potato masher. Stir in the remaining butter, heavy cream, and sour cream. Serve the cooked chicken on top of the mashed potatoes with garlic butter drizzled over top.

              Heather's Tips for Recipe Success

              • Size and weight matters. The weight of the chicken will affect the cooking time. If your chicken breasts are smaller or larger, refer to the chicken cooking guide in the recipe notes. 
              • Cut your potatoes into uniform pieces for easy mashing.
              • Don’t rush the natural pressure release. The chicken and potatoes need that time to cook all the way through. 
              • I like to use Yukon gold potatoes for their creaminess and buttery taste, but you can use any kind of potato you wish.
              • You don’t have to mash the potatoes if you don’t want to. Finish this recipe in less time by serving the cooked potato chunks as is with extra butter and garlic sauce on top.
              • Store leftovers in an airtight container for up to 2 days. This is a great recipe to enjoy as leftovers the next day! Easily reheat it in the microwave or in a skillet on the stovetop.

              Mashed potatoes and sliced garlic butter chicken on a blue plate

              More chicken recipes to try

              • Slow Cooker Monterey Chicken
              • Garlic Ranch Chicken
              • Bacon Wrapped Pesto Chicken
              • Baked Parmesan Pesto Chicken

              Other popular Instant Pot recipes

              • Mac and Cheese
              • Chicken Fettuccini Alfredo
              • Sour Cream Chicken Enchilada Casserole
              • Vegetable Beef Soup

              Graphic saying "Pin this recipe"

              📖 Recipe

              Blue plate with mashed potatoes and sliced chicken
              Print Recipe
              4.85 from 26 votes

              Instant Pot Garlic Butter Chicken and Mashed Potatoes with Sage

              My heavenly Instant Pot Garlic Butter Chicken and Mashed Potatoes is perfect for the whole family. Easy to make in the Instant Pot, you’ll have this dinner recipe done and served in no time!
              Prep Time15 minutes mins
              Cook Time35 minutes mins
              Course: Instant Pot, Main Course
              Cuisine: American
              Keyword: Garlic Butter Chicken and Mashed Potatoes, Instant Pot Chicken
              Servings: 4 servings
              Calories: 662kcal
              Author: Heather Cheney

              Ingredients

              • 1.5-2 pounds yukon gold potatoes quartered and peeled if desired
              • 3-4 frozen boneless skinless chicken breasts about 10-12 ounces each
              • 2 cups chicken broth
              • ½ teaspoon salt divided
              • ¼ teaspoon black pepper
              • 1 teaspoon rubbed sage use ½ teaspoon if using ground sage
              • 4 garlic cloves 2 minced, 2 left whole
              • 6 tablespoons butter divided
              • ½ cup heavy cream
              • ⅔ cup sour cream

              Instructions

              • Place the cut potatoes in the Instant Pot and place the frozen chicken breasts on top of the potatoes. Pour the chicken broth into the pot and sprinkle the chicken with ¼ teaspoon of the salt and pepper followed by the sage.
              • Place the 2 whole cloves of garlic in the pot and lock the Instant Pot lid in place, making sure the venting valve is sealed.
              • Set the Instant Pot to cook at high pressure for 5 minutes. When the cooking time is up allow the pressure to release naturally for 18 minutes, then carefully turn the venting valve to release any remaining pressure.
              • In a small saucepan, melt 4 tablespoons of the butter over medium heat and stir in the remaining 2 cloves of minced garlic and ¼ teaspoon salt. Continue stirring until the garlic is cooked to your liking, remove from the heat, and set aside.
              • Remove the chicken from the pot and set aside to cool, then slice.
              • Drain off any excess chicken broth from the potatoes, leaving the 2 cloves of garlic in the potatoes. Mash with a potato masher until the potatoes reach your desired consistency. Stir the remaining 2 tablespoons of butter, heavy cream, and sour cream into the potatoes.
              • Serve the cooked chicken on top of the mashed potatoes, drizzled with the garlic butter.

              Notes

              • Size and weight matters. The weight of the chicken will affect the cooking time. If your chicken breasts are smaller or larger, refer to the chicken cooking guide in the recipe notes. 
              • Cut your potatoes into uniform pieces for easy mashing.
              • Don’t rush the natural pressure release. The chicken and potatoes need that time to cook all the way through. 
              • I like to use Yukon gold potatoes for their creaminess and buttery taste, but you can use any kind of potato you wish.
              • You don’t have to mash the potatoes if you don’t want to. Finish this recipe in less time by serving the cooked potato chunks as is with extra butter and garlic sauce on top.
              • Store leftovers in an airtight container for up to 2 days. This is a great recipe to enjoy as leftovers the next day! Easily reheat it in the microwave or in a skillet on the stovetop.

              Nutrition

              Serving: 1serving | Calories: 662kcal | Carbohydrates: 33g | Protein: 42g | Fat: 40g | Saturated Fat: 23g | Cholesterol: 214mg | Sodium: 1120mg | Potassium: 1526mg | Fiber: 4g | Sugar: 3g | Vitamin A: 1252IU | Vitamin C: 45mg | Calcium: 108mg | Iron: 2mg

              Graphic saying "Did you make this recipe?"

              Grilled Thai Chicken Bowls with Peanut Sauce

              By Heather LAST UPDATED March 11, 2021 · FIRST PUBLISHED January 8, 2021, Leave a Comment

              These Grilled Thai Chicken Bowls with Peanut Sauce are full of flavor and fresh ingredients. The grilled marinated chicken on top of crisp Asian vegetables and rice is a heavenly mix you’ll want to eat again and again. Healthy, delicious, and easy!

              Thai Chicken Bowl with rice and peanut sauce

              Hello, fresh flavor! These Grilled Thai Chicken Bowls with Peanut Sauce are full of veggies, juicy grilled chicken, and the best homemade peanut sauce. They’re guaranteed to liven up your weeknight dinners!

              Put together with a variety of healthy ingredients, these rice bowls will make you feel so good with every bite. They’re surprisingly easy to put together, and you can even prepare the toppings ahead of time to get it done faster. By the time dinner rolls around, all you have to do is grill the chicken and serve!

              One bite of the grilled Thai chicken and you’ll be hooked. Better yet, try it in a bunch of different recipes! Add it to coconut curry, Thai lemongrass ramen, stir fry, or a fresh noodle salad for variety in your meals all week long.

              Grilled thai chicken on a cutting board

              What is grilled Thai chicken?

              Authentic Thai grilled chicken, also known as gai yang, is traditionally cooked with a whole chicken. It’s a popular street food that’s made with a lemongrass, fish sauce, and soy sauce marinade. 

              Thai grilled chicken can be served on its own, added to other dishes, or marinated in many variety of tasty seasonings. It’s a flexible meal you can make to fit almost anyone’s preference!

              Sliced Thai chicken breast on a cutting board

              What kind of chicken is best?

              I used chicken breasts that were about 1 inch thick in this recipe, but it could be made with almost any cut. Grilling boneless chicken breasts only takes 8 or 10 minutes to cook and you don’t run the risk of drying out the meat. Bone-in chicken thighs, wings, or the whole bird will take longer, but will still work for the recipe.

              Why This Recipe Works

              Marinating the lean meat for hours before grilling adds moisture and flavor to the chicken, and the sugars caramelize around the outside to add a tasty char to each bite. We’re avoiding heaviness from the rice bowl thanks to crisp and fresh cabbage, daikon, carrots, green onion, and cilantro. To finish it off, the peanut sauce is perfectly sweet and slightly spicy, adding another layer of flavor to the rice, chicken, and fresh veggies.

              Grilled chicken on rice with carrots, celery and cilantro

              How to make Grilled Thai Chicken Bowls with Peanut Sauce

              Marinating chicken is a foolproof way to get juicy and flavorful meat you can enjoy with so many meals. When added to a rice bowl, you’ll end up with a healthy, delicious, and easy weeknight dinner. Here’s how to make this recipe:

              Ingredients needed for Thai grilled chicken bowls

              Step 1:

              Place the chicken breasts in a ziplock bag. Whisk together the garlic, lime juice, Sriracha, fish sauce, vinegar, soy sauce, sesame oil, brown sugar, and black pepper in a small bowl. Pour the marinade over the chicken in the bag and allow it to marinate in the fridge for at least 3 hours to soak in all of the delicious flavors.

              Step 2:

              Make the peanut sauce by adding all of the ingredients into a blender or food processor, and blending until smooth.

              Step 3:

              When it’s finished marinating, remove the chicken from the bag and grill over medium-high heat. Let it rest on a cutting board for 10 minutes before slicing.

              Step 4:

              Assemble the rice bowls by layering in the rice, sliced chicken, cabbage, carrots, daikon, green onion, and cilantro. Top each bowl with the peanut sauce and serve!

              What if I don’t have a grill?

              No problem! Use a grill pan over medium heat on the stovetop instead of using an outdoor grill. Alternatively, bake the chicken breasts in a 450°F oven for 15 to 18 minutes. It’s ready when the internal temperature of the meat reaches 165°F.

              How to marinate chicken breasts

              Most marinades include 3 essential parts: acid, fat or oil, and seasonings. The marinade in this recipe has lots of acid, meaning it will tenderize the meat and add in so many layers of flavor.

              It’s important to not let the chicken sit in the marinade for more than 8 hours because eventually, it will actually start to cook the delicate chicken tissue. The texture will become mushy or rubbery, which isn’t very appetizing. Marinating anywhere from 3 to 6 hours is ideal.

              Overhead view of grilled chicken on a cutting board and rice bowl ingredients

              Heather's Tips for Recipe Success

              • Allow the chicken to marinate for at least 3 hours for the best flavor. It can be left for up to 8 hours before grilling if needed. 
              • A small blender cup or food processor is best when making the peanut sauce. This ensures everything blends together nicely and the consistency is ultra-smooth. If it’s not coming together the way you like, just add a little water.
              • Wondering what kind of rice to use in the bowls? I like a short-grain, like Botan brand Calrose rice. You can use whatever you like, whether it’s brown rice, basmati, or quinoa instead.
              • Daikon is a Japanese radish and is similar in taste to traditional small radishes. It adds a bit of spice and crunch the bowl. Regular radishes can be substituted or the daikon or be omitted completely. 
              • Keep it simple and use my basic grilled chicken recipe instead of the Thai chicken. It’s easy, well-seasoned, and doesn’t need to sit in a marinade.

              close up of grilled chicken and peanut sauce

              Storage

              This is an easy recipe to make ahead of time. Chop all of your salad toppings, cook the rice, and prepare the marinade 1 day before serving and store them in the fridge. Let the chicken marinate in the fridge during the day so it will be ready in time for dinner, then grill it up and serve!

              If you end up with leftover chicken, keep it in a shallow airtight container or wrap it tightly in foil or plastic wrap. Store it in the fridge for 3 to 4 days.

              Keep the peanut sauce in a sealed jar or container in the fridge for up to 1 week.

              More chicken dinner recipes you might like

              • Asian Chicken Salad
              • Slow Cooker Monterey Chicken
              • Easy Chicken Cacciatore
              • Oven Baked BBQ Chicken
              Graphic saying "Pin this recipe"

              📖 Recipe

              Grilled Thai Chicken Bowls
              Print Recipe
              4.64 from 63 votes

              Grilled Thai Chicken Bowls with Peanut Sauce

              Flavorful, crisp, and healthy these comforting Thai-flavored bowls will be a hit on your dinner table.
              Prep Time3 hours hrs
              Cook Time20 minutes mins
              Total Time3 hours hrs 20 minutes mins
              Course: Main Course, Salad
              Cuisine: Asian, Thai
              Keyword: Grilled Thai Chicken
              Servings: 4
              Calories: 536kcal
              Author: Heather Cheney

              Ingredients

              For the Chicken:

              • 4-6 chicken breasts about 1" thick
              • 6 cloves garlic minced
              • 2 tablespoons fresh lime juice
              • 1 teaspoon Sriracha hot sauce
              • 1 tablespoon fish sauce
              • 1 tablespoon rice vinegar
              • 2 tablespoons soy sauce
              • 1 teaspoon sesame oil
              • ¼ cup brown sugar
              • ¼ teaspoon black pepper

              For the Peanut Sauce:

              • 2 cloves garlic
              • ½ cup peanut butter
              • 2 tablespoons soy sauce
              • 1 tablespoon + 2 teaspoons brown sugar
              • 2 teaspoons Sriracha hot sauce
              • ½ cup water
              • 2 tablespoons lime juice
              • 1 " piece fresh ginger peeled and cut in half.

              For the Bowls:

              • Steamed rice
              • Diced daikon Japanese radish, Optional
              • Diced carrots
              • Sliced green onion
              • fresh cilantro
              • shredded cabbage
              • lime wedges

              Instructions

              • Place the chicken breasts in a ziplock bag. Set aside.
              • Combine the garlic, lime juice, Sriracha, fish sauce, vinegar, soy sauce, sesame oil, brown sugar, and black pepper in a small bowl and whisk until combined. Pour the mixture over the chicken in the bag and allow to sit in the marinade for at least 3 hours, refridgerated.
              • Make the peanut sauce by placing all the ingredients in a small blender cup or food processor and blending until smooth. Set aside.
              • Remove the chicken from the marinade and grill over medium-high heat until cooked through. Remove from the heat, allow to rest for 10 minutes, and slice.
              • If desired, pour the remaining marinade into a small saucepan and bring to a boil. Cook the marinade at a boil for at least 3 minutes and until slighlty thickened. Brush the grilled chicken with the marinade sauce before serving.
              • Assemble the bowls by layering the rice, chicken, cabbage, carrots, daikon, green onion, and cilantro. Top each bowl with the peanut sauce and serve.

              Notes

              • Allow the chicken to marinate for at least 3 hours for the best flavor. It can be left for up to 8 hours before grilling if needed. 
              • A small blender cup or food processor is best when making the peanut sauce. This ensures everything blends together nicely and the consistency is ultra-smooth. If it’s not coming together the way you like, just add a little water.
              • Wondering what kind of rice to use in the bowls? I like a short-grain, like Botan brand Calrose rice. You can use whatever you like, whether it’s brown rice, basmati, or quinoa instead.
              • Daikon is a Japanese radish and is similar in taste to traditional small radishes. It adds a bit of spice and crunch the bowl. Regular radishes can be substituted or the daikon or be omitted completely. 
              • Keep it simple and use my basic grilled chicken recipe instead of the Thai chicken. It’s easy, well-seasoned, and doesn’t need to sit in a marinade.

              Nutrition

              Serving: 1serving | Calories: 536kcal | Carbohydrates: 25g | Protein: 59g | Fat: 23g | Saturated Fat: 5g | Cholesterol: 145mg | Sodium: 1855mg | Potassium: 1133mg | Fiber: 2g | Sugar: 17g | Vitamin A: 68IU | Vitamin C: 11mg | Calcium: 47mg | Iron: 2mg
              Graphic saying "Did you make this recipe?"

              Salsa Black Bean Chili

              By Heather LAST UPDATED March 11, 2021 · FIRST PUBLISHED January 5, 2021, Leave a Comment

              Comforting Salsa Black Bean Chili with beef is easy to make and has simple ingredients. Full of protein and flavor, enjoy each bowl topped with tangy cilantro crema and shredded cheese. Crockpot, Instant Pot, and stovetop instructions included.

              Close up of Salsa Black Bean Chili in slow cooker

              Warm and rich bowls of Salsa Black Bean Chili are the cure for the long winter ahead. All you need to do is sit back and let the slow cooker do all the work! With a little spice and a lot of protein, you’ll be left full and happy after each bowl.

              This is an easy chili recipe you can enjoy for weeknight dinners, for lunches throughout the week, or freeze a batch and heat it when you don’t feel like cooking. Made with stew beef, black beans, and chunky salsa, each bite has tons of texture and depth.

              Most chili recipes are flexible, but this one leaves room for plenty of modifications. It can easily be cooked in a crockpot, Instant Pot, or on the stove. As a bonus, it’s naturally gluten-free and easy to make vegan or vegetarian!

              Enjoy a pot of this healthy and nourishing chili with my homemade cornbread and some crispy bacon on top.

              Why This Recipe Works

              This recipe uses beef stew meat instead of ground beef because we want the richest flavor possible. Stew meat is chunky, tender, and beefy. Perfect for a hearty chili! To make this recipe even easier, mixing in a storebought chunky salsa to the chili adds tons of flavor, reduces prep work, and allows you to regulate the heat level. As a finishing touch, top each bowl with a homemade cilantro crema. This easy sour cream alternative adds a bit of acidity to the rich chili and makes each bite feel a little fancier and gourmet.

              A bowl of black bean chili with cilantro crema on top

              How to make black bean chili in a slow cooker

              Letting the chili cook low and slow for a few hours in a crockpot is the best way to make this recipe. It really doesn’t get much easier than this:

              Ingredients for black bean chiliStep 1:

              Place the beef, onion, garlic, chili powder, cumin, and salsa into the slow cooker and stir. Cover with a lid and cook on LOW for 5 to 6 hours so all the flavors can get to know each other.

              Step 2:

              Add the bell pepper and black beans to the slow cooker and season with salt. Continue to cook on LOW for 2 more hours.

              Step 3:

              Make the cilantro-lime crema by mixing the sour cream, cilantro, and lime juice together in a small bowl.

              Step 4:

              Serve the finished chili with crema, tortilla chips, cheese, and avocado on top.

              Note: You can also make black bean chili in an Instant Pot or on the stovetop. Head to the recipe card for detailed instructions.

              Heather's Tips for Recipe Success

              1. Use a “thick and chunky” salsa: This type of salsa adds some body to the chili and holds its shape better than thinner varieties.
              2. Use more beef stew meat for a meatier chili: 1 pound of beef is enough to add a few big pieces in every bowl but doesn’t make the batch super meaty. Feel free to add another half pound if you like!
              3. Let it simmer longer for better flavors: The longer you let the chili simmer in the crockpot, the better the flavor will be! Alternatively, store the batch of chili in the fridge overnight and eat it the next day or bigger and bolder flavors.
              4. If you like a thick chili: Masa harina, or cornflour, is an excellent thickener. Sprinkle a tablespoon or 2 over the finished chili and stir. Simmer in the crockpot for about 10 minutes. The masa harina will absorb some of the extra liquid and make your chili thicker. The crockpot version of the chili is pretty thick made as is, but you may want it if you're cooking it in the Instant Pot or on the Stovetop.
              Overhead view of chili in slow cooker and cilantro crema

              Recipe variations

              Chili is the perfect meal to make your own. Load up on veggies, add more meat or adjust the spiciness. There’s plenty of variations available:

              • Switch up the meat and make the chili with ground turkey, chicken, or pork instead. 
              • If you don’t want to use stew meat, use ground beef instead.
              • Add as many veggies as you want. Chili is delicious with corn (frozen or fresh), butternut squash, sweet potatoes, lentils, or anything you like!
              • To give this chili some kick, add some cayenne pepper or use finely chopped spicy green chilis.
              • Make it vegetarian or vegan by swapping the beef for a plant-based ground beef alternative.
              • Mix up the toppings! Try shredded cheese, crema, sliced jalapenos, plain sour cream, crispy bacon, cilantro, avocado, red or green onions, and freshly cracked pepper on top. 
              • Don’t forget the cornbread and tortilla chips on the side!
              A bowl of chili surrounded by limes and cilantro sour cream

              Storing and freezing tips

              Make sure the chili has cooled down before storing the leftovers away. This will help it stay fresh. Once it’s cooled, transfer the leftovers to a sealed container and refrigerate for up to 3 days. 

              This black bean chili is also freezer-friendly. Keep the leftovers in a freezer-safe container or sealed bag and freeze for up to 3 months. When you’re ready to eat it, leave the frozen chili in the fridge overnight to thaw or reheat from frozen.

              To reheat the leftover chili, heat it in the microwave for 2 to 3 minutes (stirring in between each minute) or until heated through. Alternatively, heat it in a pot on the stove over medium heat until it’s hot.

              More chili recipes to try

              It doesn’t stop here! I have plenty of other slow cooker and Instant Pot chili recipes for you to try:

              • Award-Winning Crockpot Chili
              • Instant Pot BBQ Chicken Chili
              • 30 Minute Chili
              • Slow Cooker Salsa Chicken Chili

              📖 Recipe

              Close up of Salsa Black Bean Chili in slow cooker
              Print Recipe
              4.37 from 11 votes

              Salsa Black Bean Chili

              A super simple chili with a ton of flavor thanks to some good ol' jarred salsa
              Prep Time10 minutes mins
              Cook Time6 hours hrs
              Course: Main
              Cuisine: American
              Keyword: Black Bean Chili, Chili, Stew Meat
              Servings: 6 servings
              Calories: 285kcal
              Author: Heather Cheney

              Ingredients

              For the Chili

              • 1 pound boneless beef stew meat
              • 1 large yellow onion diced
              • 2 cloves garlic minced
              • 1 tablespoon chili powder
              • 2 teaspoons ground cumin
              • 1, 24- ounce jar thick and chunky salsa at your desired heat level
              • 1 red bell pepper seeded and diced
              • 2, 15- ounce can black beans drained and rinsed
              • ½-1 teaspoon salt to taste

              For the Cilantro Lime Crema

              • ⅔ cup sour cream
              • ¼ cup fresh cilantro finely chopped
              • 2 tablespoons fresh lime juice

              Instructions

              For the Slow Cooker

              • Put the meat, onion, garlic, chili powder, cumin, and salsa into the slow cooker and stir to combine. Cover and cook on LOW for 5-6 hours.
              • Add the bell pepper and black beans to the slow cooker and season to taste with salt. Continue to cook on LOW for an additional 2 hours.
              • Combine the sour cream with the cilantro and lime juice in a small bowl and set aside.
              • When the chili is done, serve topped with the crema, tortilla chips, cheese, and diced avocado.

              For the Instant Pot

              • Place the meat, onion, garlic, chili powder, cumin, salsa and 1 cup beef broth in the Instant Pot. Lock the lid in place, making sure the venting valve is sealed.
              • Set Instant Pot to cook on high for 35 minutes. When the cooking time is up, allow the pressure to release naturally for 10 minutes, then carefully turn the venting valve to release any remaining pressure. When the pressure pin drops, remove the lid.
              • Set the Instant Pot on "Saute' mode and stir in the red pepper and black beans. Bring to a simmer and cook just until the peppers are tender to your liking.
              • If a thicker chili is desired, stir 2 tablespoons of masa harina into the chili and bring to a simmer, stirring constantly until thickened. Cancel "Saute" mode and serve topped with the cilantro crema.

              For the Stove Top

              • Place the meat, onion, garlic, chili powder, cumin, salsa, and 1 cup beef broth in a large pot on the stove.
              • Turn the heat to medium-high and bring to a simmer. When simmering, cover and reduce the heat to low.
              • Allow to simmer for 1.5-2 hours or until the meat is very tender.
              • Stir the beans and peppers into the chili and continue to cook for another 15 minutes or until the peppers are tender to your liking.
              • If a thicker chili is desired, stir 2 tablespoons of masa harina into the chili and bring to a simmer, stirring constantly until thickened. Remove the chili from the heat and serve topped with the cilantro crema.

              Notes

              1. Use a “thick and chunky” salsa: This type of salsa adds some body to the chili and holds its shape better than thinner varieties.
              2. Use more beef stew meat for a meatier chili: 1 pound of beef is enough to add a few big pieces in every bowl but doesn’t make the batch super meaty. Feel free to add another half pound if you like!
              3. Let it simmer longer for better flavors: The longer you let the chili simmer in the crockpot, the better the flavor will be! Alternatively, store the batch of chili in the fridge overnight and eat it the next day or bigger and bolder flavors.
              4. If you like a thick chili: Masa harina, or corn flour, is an excellent thickener. Sprinkle a tablespoon or 2 over the finished chili and stir. Simmer in the crockpot for about 10 minutes. The masa harina will absorb some of the extra liquid and make your chili thicker. The crockpot version of the chili is pretty thick made as is, but you may want it if you're cooking it in the Instant Pot or on the Stovetop.

              Nutrition

              Serving: 1serving | Calories: 285kcal | Carbohydrates: 27g | Protein: 25g | Fat: 10g | Saturated Fat: 4g | Cholesterol: 60mg | Sodium: 1229mg | Potassium: 984mg | Fiber: 9g | Sugar: 7g | Vitamin A: 1796IU | Vitamin C: 33mg | Calcium: 123mg | Iron: 4mg

              Instant Pot Sour Cream Chicken Enchilada Casserole

              By Heather LAST UPDATED March 11, 2021 · FIRST PUBLISHED November 13, 2020, Leave a Comment

              This Instant Pot Sour Cream Chicken Enchilada Casserole is super creamy and delightfully easy. Throw the simple ingredients in the Instant Pot and enjoy every cheesy, tangy bite in no time. It’s the perfect option for family-friendly dinners and makes for excellent leftovers!

              Spoonful of Instant Pot sour cream chicken enchilada casserole

              Bring excitement to your weeknight meals with my Instant Pot Sour Cream Chicken Enchilada Casserole. There’s almost no prep time involved and you only need simple and inexpensive ingredients. Let the Instant Pot do all the work and enjoy!

              This is the same recipe for my One Pan Sour Cream Chicken Enchilada Skillet but made in an Instant Pot. Guaranteed to cut down on cooking time and make your life a whole lot easier.

              This tangy and flavorful meal can be satisfying on its own or enjoyed with an abundance of zesty side dishes. Serve this easy chicken dish on a bed of Mexican rice or greens, and with a chopped salad on the side.

              Why This Recipe Works

              Frozen chicken breasts are cooked in a flavorful broth for only a few minutes at high pressure and then allowed to cook the rest of the way with a natural pressure release. This keeps the chicken juicy and super tender! To avoid a burn notice, the sauce is thickened and tortilla pieces are added in at the end.

              Pot and spoon with enchilada casserole inside

              How to Make Sour Cream Chicken Enchilada Casserole in an Instant Pot

              Forget about rolling up the filling into individual tortillas, like with traditional enchiladas. This recipe is super simple and doesn’t require any tedious prep work. Here’s how we do it:

              step-by-step collage of making sour cream chicken enchilada casseroleStep 1: 

              Place the black olives, green chiles, chipotle chili powder, oregano, salt, and chicken broth in the Instant Pot. Stir to combine, then place the frozen chicken breasts into the broth mixture. 

              Step 2: 

              Lock the lid in place, making sure the venting valve is sealed. Cook on high pressure for 3 minutes. When the cooking time is up, allow the pressure to release naturally for 18 minutes, then do a quick pressure release. When the pressure pin drops, remove the lid.

              Step 3: 

              Remove the chicken from the broth. Place it on a cutting board and allow it to cool for a few minutes. Next, cut or shred the meat into bite-sized pieces.

              Step 4: 

              Mix the cornstarch with the sour cream in a small bowl and whisk to combine. Turn your Instant Pot to "Saute" mode and bring the broth mixture to a simmer. Once it’s simmering, stir in the cornstarch and sour cream until the mixture has thickened (about 1 minute).

              Step 5:

              Next, stir in the chicken and tortilla pieces. Cook for only 1 minute more, then turn off the Instant Pot. 

              Step 6:

              Sprinkle cheese over the top of the casserole and cover with the lid until the cheese is melted.

              two plates with servings of sour cream chicken enchilada casseroleDo I have to use an Instant Pot?

              If you don’t have an Instant Pot, you can make this recipe in a skillet or slow cooker. Click here for my instructions on making this recipe in a skillet on the stove.

              To make it in a slow cooker, add in the black olives, green chiles, chipotle chili powder, oregano, salt, and chicken broth. Stir, and then add the frozen chicken breasts. Place the lid on top and cook on HIGH for 4 hours or on LOW for 8 hours.

              Once the chicken is cooked, remove it from the crockpot and shred it on a cutting board. Mix your cornstarch and sour cream mixture in a small bowl. Place the shredded chicken, cornstarch and sour cream, and tortilla strips into the bowl and stir.

              Cook for another 40 to 60 minutes. Afterward, sprinkle the cheese on top and cover with the lid until the cheese is fully melted.

              A forkful of sour cream chicken enchilada casserole

              Heather's Tips for Recipe Success

              • Frozen boneless skinless chicken breasts are best for this recipe. Chicken thighs would also work, especially if you’re making this recipe in a crockpot (they won’t dry out as quickly). Bone-in chicken breasts could add more flavor if that’s what you want to use, but they will take longer to cook.
              • Weigh your chicken beforehand. If the breasts are larger than 8-10 ounces, follow the chicken cooking guide at the end of this recipe to adjust the cooking time.
              • Shred the cheese yourself. Pre-shredded cheese has anti-caking ingredients that don't melt as nicely and won’t be as creamy. 
              • Make each bite a bit spicier by stirring in a can of chopped jalapenos or adding several dashes of hot sauce.
              • Add even more heat with my homemade enchilada sauce. Stir it in when you add the sour cream.
              • Leftovers store easily in the fridge or freezer. Make sure they’re in an airtight container before storing for a few days in the fridge or for up to a month in the freezer. Reheat on the stovetop or in the oven or microwave.

              More Instant Pot Recipes

              • Zesty Instant Pot Homemade Vegetable Beef Soup
              • Instant Pot BBQ Chicken Chili with Pineapple
              • Instant Pot Zuppa Toscana
              • Instant Pot Lentil Soup
              A serving of sour cream chicken enchilada casserole on a plate
              Pinterest Call To Action Image

              📖 Recipe

              Spoonful of chicken enchilada casserole with melted cheese
              Print Recipe
              4.53 from 23 votes

              Instant Pot Sour Cream Chicken Enchilada Casserole

              An easy casserole with all the flavor of rolled enchiladas without all the work! A weeknight dinner staple at our house!
              Prep Time5 minutes mins
              Cook Time30 minutes mins
              Total Time35 minutes mins
              Course: Main
              Cuisine: American, Mexican
              Keyword: Casserole, Enchiladas, Instant Pot Dinner, Sour Cream Chicken Enchiladas
              Servings: 4 servings
              Calories: 758kcal
              Author: Heather Cheney

              Ingredients

              • 1 4-ounce can chopped black olives
              • 1 4-ounce can chopped green chiles
              • ¼ teaspoon chipotle chili powder
              • ¼ teaspoon oregano
              • ½ teaspoon salt
              • 2 cups chicken broth
              • 3 frozen boneless skinless chicken breasts (about 8-10 ounces each)
              • 2 tablespoons cornstarch
              • 1 cup sour cream
              • 12 corn tortillas cut into 1" pieces
              • 2 cups colby jack cheese shredded

              Instructions

              • Place black olives, green chiles, chipotle chili powder, oregano, salt and chicken broth in the Instant Pot. Stir to combine and place frozen chicken breasts into the broth mixture.
              • Lock Instant Pot lid in place making sure the venting valve is sealed.
              • Cook on high pressure for 3 minutes.
              • When the cooking time is up, allow the pressure to release naturally for 18 minutes, then do a quick pressure release and when the pressure pin drops, remove the lid.
              • Remove the chicken from the broth and place on a cutting board. Allow to cool for a few minutes and cut or shred into bite-sized pieces.
              • Set Instant Pot on "Saute" mode and bring broth to a simmer.
              • In a small bowl, mix the cornstarch with the sour cream until smooth and whisk into the simmering broth. Whisk until smooth and bring to a simmer. Cook until thickened-- about 1 minute and stir in the chicken and tortilla pieces. Cook for 1 minute longer and turn off the Instant Pot.
              • Sprinkle cheese over the top of the casserole and cover with the lid until the cheese is melted.

              Notes

              • Frozen boneless skinless chicken breasts are best for this recipe. Chicken thighs would also work, especially if you’re making this recipe in a crockpot (they won’t dry out as quickly). Bone-in chicken breasts could add more flavor if that’s what you want to use, but they will take longer to cook.
              • Weigh your chicken beforehand. If the breasts are larger than 8-10 ounces, follow the chicken cooking guide at the end of this recipe to adjust the cooking time.
              • Shred the cheese yourself. Pre-shredded cheese has anti-caking ingredients that don't melt as nicely and won’t be as creamy. 
              • Make each bite a bit spicier by stirring in a can of chopped jalapenos or adding several dashes of hot sauce.
              • Add even more heat with my homemade enchilada sauce. Stir it in when you add the sour cream.
              • Leftovers store easily in the fridge or freezer. Make sure they’re in an airtight container before storing for a few days in the fridge or for up to a month in the freezer. Reheat on the stovetop or in the oven or microwave.

              Nutrition

              Serving: 1serving | Calories: 758kcal | Carbohydrates: 43g | Protein: 58g | Fat: 40g | Saturated Fat: 21g | Cholesterol: 201mg | Sodium: 1416mg | Potassium: 1031mg | Fiber: 5g | Sugar: 3g | Vitamin A: 1102IU | Vitamin C: 11mg | Calcium: 594mg | Iron: 2mg
              Instagram Call To Action

              Instant Pot Pasta Al Forno

              By Heather LAST UPDATED March 11, 2021 · FIRST PUBLISHED November 11, 2020, Leave a Comment

              Instant Pot Pasta Al Forno may be a play on words, but we’re not playing around with the flavor! This meaty, cheesy, and creamy comfort food is perfect for the whole family. Made with simple ingredients and done in under 30 minutes!

              A spoon scooping out a serving of pasta al forno

              Herby and satisfying Italian flavors come together in the Instant Pot to create this new family favorite. Traditionally made in the oven, my Instant Pot Pasta Al Forno will save you tons of time and doesn’t skimp on the flavor. Chewy noodles, creamy sauce, and heavenly sausage create a simple yet intricate meal that’s perfect for weeknight dinners or leftovers.

              This luxurious comfort food is made from simple ingredients like rigatoni pasta, Italian sausage, fresh basil, and a creamy white sauce. It’s finished with a layer of melted cheese on top for that stretchy and gooey picture-perfect scoop. This drool-worthy easy dinner is complete with a dash of fresh basil, garlic bread, and caesar salad on the side.

              Overhead shot of ingredients for Pasta al Forno

              What is pasta al forno?

              Al forno translates to “oven baked” in Italian, meaning any type of baked pasta dish, pizza, or even bread can fall under the “al forno” category.

              Classic baked pasta dishes are held together with sauce, meat, and cheese. While my Instant Pot version isn’t technically “al forno”, it’s a great solution when you’re craving a baked ziti or something similar but need it made much faster.

              Why This Recipe Works

              The sausage is a real flavor-booster in this recipe. It adds to the sauce and the pasta noodles soak in all of its natural juices. The white bechamel-like sauce is made on the stovetop while the rest of the dish cooks in the Instant Pot. After it’s stirred in at the end, the completed dish ends up being super creamy and you never have to worry about the two separating.

              Milk being poured into a pan of rouxHow to make pasta al forno in the Instant Pot

              Forget about the oven and pull out the Instant Pot! You still get all of the infused flavors as you would in a traditional pasta al forno, except the cooking time and effort is cut way down. Here’s how to make this recipe:

              Step 1:

              Using “Saute” mode on the Instant Pot, brown and crumble the sausage until it’s cooked through. Next, add the tomatoes, garlic, basil, salt, and water and stir to combine. 

              Step 2:

              Pour the pasta into the sauce. Don’t stir! Make sure they’re submerged without moving the pasta around too much. Lock on the lid and seal the venting valve. Cook on high pressure for 5 minutes. 

              Step 3:

              Make the creamy white sauce by melting the butter in a saucepan on the stove. Once it’s melted, stir in the flour and cook for 1 minute. Slowly stir in the milk until there are no lumps. Once the sauce has thickened, remove it from the heat and stir in the salt and nutmeg.

              Step 4:

              Release the venting valve for a quick pressure release once the pasta is done cooking. Remove the lid when the pin drops.

              Step 5:

              Gently combine the white sauce with the pasta. Spread the shredded cheese over the pasta and place the lid back on until it’s melted.

              Can I bake this instead?

              Of course! If you don’t have an Instant Pot, just follow my instructions to make baked pasta al forno instead.

              Heather's Tips for Recipe Success

              • Submerge the pasta in the water the best you can. It’s ok if a few noodles are sticking out. Whatever you do, DO NOT stir the pasta.
              • Use at least 2% milk for the white sauce. The more fat, the better because it allows the sauce to thicken and be as creamy as possible. You can use low-fat milk if that’s all you have, but the finished meal will be grainy and not very creamy. 

              Plate of baked pasta with basil on top

              Storing leftovers

              Store the leftover pasta in an airtight container after it’s cooled down significantly. Place it in the fridge and eat within 3 days.

              Reheat the leftovers for a few minutes in the microwave (stirring once or twice in between) or place it in a baking dish and heat in a 325ºF oven until warmed through.

              Closeup of a forkful of pasta

              More comforting pasta recipes

              Warm yourself up with any of these tasty and comforting pasta recipes:

              • Instant Pot Mac and Cheese
              • Instant Pot Chicken Fettuccini Alfredo
              • Pizza Tortellini Bake
              • One Pan Cheeseburger Macaroni

              Graphic saying "Pin this recipe"

              📖 Recipe

              Baked Pasta inside an Instant Pot
              Print Recipe
              4.84 from 6 votes

              Instant Pot Pasta Al Forno

              This easy pasta dish has all the flavor of its baked counterpart and takes a fraction of the time to make !
              Prep Time5 minutes mins
              Cook Time25 minutes mins
              Total Time30 minutes mins
              Course: Main Course
              Cuisine: Italian
              Keyword: Bechamel, Instant Pot, Mozzarella, Pasta, Rigatoni
              Servings: 8 servings
              Calories: 769kcal
              Author: Heather Cheney

              Ingredients

              • 1 ½ lbs ground Italian sausage
              • 2 14.5-ounce cans petite diced tomatoes
              • 4 cloves garlic minced
              • 1 tablespoon dried basil or 3 tablespoons fresh
              • ¾ teaspoon salt
              • 4 cups water
              • 1 pound dry rigatoni pasta

              For the White Sauce:

              • 4 ounces butter 1 stick
              • ½ cup + 2 tablespoons all-purpose flour
              • 2 ½ cups milk 2% or greater
              • ¼ teaspoon salt
              • dash of ground nutmeg
              • 2 cups mozzarella cheese shredded

              Instructions

              • Set Instant Pot on "Saute" mode and heat until hot. Add sausage. Brown and crumble until cooked through.
              • Add tomatoes, garlic, basil, salt and water to the sausage and stir to combine.
              • Pour pasta into the sauce, but do not stir. Instead, gently submerge the pasta into the sauce with the back of a spatula so that most of the pasta is covered as best you can.
              • Lock Instant Pot lid in place making sure the venting valve is sealed.
              • Cook on high pressure for 5 minutes.
              • While the pasta is cooking make the white sauce by melting the butter in a medium-sized saucepan on the stove. When melted, stir the flour into the butter and cook for 1 minute, stirring until smooth.
              • Slowly stir the milk into the pan, stirring until no lumps remain. Cook, stirring frequently, until the sauce is thickened. Remove from the heat and stir in the salt and nutmeg. Set aside.
              • When the cooking time for the pasta is up, carefully release the venting valve to do a quick pressure release. When the pressure pin drops, remove the lid.
              • Gently stir the white sauce into the pasta until evenly combined. Spread the shredded mozzarella over the pasta and replace the lid just until the cheese is melted.
              • Serve hot with garlic bread and a salad.

              Notes

              • Submerge the pasta in the water the best you can. It’s ok if a few noodles are sticking out. Whatever you do, DO NOT stir the pasta.
              • Use at least 2% milk for the white sauce. The more fat, the better because it allows the sauce to thicken and be as creamy as possible. You can use low-fat milk if that’s all you have, but the finished meal will be grainy and not very creamy. 

              Nutrition

              Serving: 1serving | Calories: 769kcal | Carbohydrates: 54g | Protein: 29g | Fat: 48g | Saturated Fat: 22g | Cholesterol: 125mg | Sodium: 1232mg | Potassium: 491mg | Fiber: 2g | Sugar: 6g | Vitamin A: 667IU | Vitamin C: 2mg | Calcium: 276mg | Iron: 3mg

              Graphic saying "Did you make this recipe?"

              Instant Pot Mac and Cheese

              By Heather LAST UPDATED March 11, 2021 · FIRST PUBLISHED October 16, 2020, Leave a Comment

              My easy and creamy Instant Pot Mac and Cheese has layers of flavor you won’t find in a stovetop or boxed version. You can make this recipe in under 30 minutes when you’re low on groceries or need an easy dinner recipe! It’s the perfect comfort food for the whole family, 

              Bowl of Mac and Cheese

              This one’s for my dairy lovers. Creamy, smooth, and stretchy Instant Pot Mac and Cheese uses super simple ingredients and takes less than 30 minutes to come together. Make this for dinner the next time you need to please picky eaters or just aren’t in the mood to make something more complicated.

              Why is this recipe so different and more delicious than stovetop macaroni and cheese? Because the noodles are cooked in broth for extra flavor, a little mustard gives each bite a zing, and there are not 1, but 3 types of cheeses! No overly processed cheese included (see ya later, Velveeta!).

              Try it for family meals, when you need something quick and easy when you’re low on groceries, and enjoy it for lunches all week long. It would also be delicious as a side dish next to my Pork Chops or Baked BBQ Chicken.

              Why This Recipe Works

              The dry pasta is cooked in chicken broth which adds an extra layer of flavor that would normally be missed as the pasta water is drained. Plus, when the cream is added at the end, you get to tailor the level of creaminess to your liking. Bowl of and cheese with cheese on top

              How to make Instant Pot Mac and Cheese

              Collage of mac and cheese instructions

              Instant Pot recipes don’t get much easier than this. Once you’re done making this delicious and family-friendly dinner, you’ll marvel at how creamy and delectable it is! Here’s how to make it:

              Step 1:

              Turn your Instant Pot on "Sauté" mode and add in the chicken broth, butter, mustard, and seasoned salt. Bring to a simmer. Finish by stirring in the pasta noodles.

              Step 2:

              Turn off Saute mode and lock the lid in place, making sure the venting valve is sealed. Set the Instant Pot to cook on high pressure for 4 minutes. When it’s done, carefully turn the venting valve to release the pressure and remove the lid once the pressure pin drops.

              Step 3:

              Stir the pasta, add half of the cheese, and stir again. Let it melt before adding the remaining cheese.

              Step 4:

              Finish by stirring in the cream until it’s blended with the cheese. Add salt to taste and enjoy!

              How to cook on the stove

              If you don’t own an Instant Pot, this recipe can easily be made on the stovetop instead. Just follow my recipe for Homemade Mac and Cheese!

              two bowls of macaroni and cheese

              Heather's Tips for Recipe Success

              1. Don’t add all of the cheese at once. Adding the cheese into the cooked macaroni a little at a time will prevent it from becoming too stringy. You can even alternate between adding in the cheese and the cream to make sure the batch is as creamy as possible. 
              2. Is the sauce looking a little thin? Be patient and allow the macaroni and cheese to sit (covered) for a few minutes. It will naturally thicken as it cools.
              3. Add an extra layer of deliciousness! Place the finished batch in a baking dish and add more cheese, some seasoned breadcrumbs, and a drizzle of melted butter on the top. Then, place under a broiler and cook until browned and bubbly. 

              Mac and cheese on wooden spoon

              Recipe variations

              There’s plenty of wiggle room available in this cheesy recipe to fit your taste and preferences. Just think of it as a blank canvas! Add or substitute as many flavors as you want:

              • Swap the macaroni for any pasta you have at home. Bite-sized is best!
              • Mix in broccoli, tomatoes, bacon, or shredded chicken for more texture.
              • If you don’t have chicken broth at home, veggie broth or water will work just as well.
              • Don’t use canned or evaporated milk in this recipe. For best results, follow the recipe and use heavy cream.
              • Pre-shredded cheese is fine to use, but I highly recommend shredding it yourself. Storebought shreds contain additives, which could make the sauce clumpy.
              • Mix up the cheese if you wish. Mozzarella, Gouda, Gruyere, Havarti, or sharp cheddar are all great options.
              • Stir in hot sauce and a little garlic powder before cooking for even more flavor.
              • Want to use gluten free macaroni instead? Best to stick to the stovetop version, otherwise they may turn to mush in the Instant Pot.

              Storing leftovers

              Leftovers will make for a yummy snack the next day or for lunches throughout the week. Store them in an airtight container in the fridge for 3 or 4 days.               

              The leftovers may need an extra splash of milk or cream upon reheating. Just add a teaspoon at a time while reheating the leftovers in a microwave until it’s super creamy and warmed through.

              Mac and cheese inside of Instant Pot

              What to serve with mac and cheese

              Serve the mac and cheese on the side of any of these tasty, family-friendly dinner recipes:

              • Sticky Chicken Fingers
              • Garlic Ranch Chicken
              • Spiced Apple Pork Burgers
              • The Best Sloppy Joes

              Graphic saying "Pin this recipe"

              📖 Recipe

              Bowl of and cheese with cheese on top
              Print Recipe
              5 from 6 votes

              Instant Pot Macaroni and Cheese

              Quick and easy homemade Mac and Cheese that is creamy and full of cheese!
              Prep Time5 minutes mins
              Cook Time30 minutes mins
              Course: Instant Pot, Main Course
              Cuisine: American
              Keyword: Instant Pot Dinner, Instant Pot Mac and Cheese, Mac and Cheese
              Servings: 6
              Calories: 663kcal
              Author: Heather Cheney

              Equipment

              • Electric Pressure Cooker (like an Instant Pot)

              Ingredients

              • 4 cups chicken broth
              • 4 tablespoons butter
              • 1 teaspoon Dijon mustard
              • ½ teaspoon seasoned salt more to taste
              • 1 pound elbow macaroni
              • 2 cups cheddar cheese shredded
              • 1 cup Monterey Jack cheese shredded
              • ¼ cup Parmesan cheese shredded
              • ½ -1 cup heavy cream Add enough to reach desired creaminess

              Instructions

              • Turn Instant Pot on "Sauté" mode. Add chicken broth, butter, mustard and seasoned salt to the pot and bring to a simmer.
              • Stir in the pasta and lock the Instant Pot lid in place making sure the venting valve is sealed.
              • Set Instant Pot to cook at high pressure for 4 minutes, or half of the time the pasta package directions recommends.
              • When the cooking time is up, carefully turn the venting valve to release the pressure, starting slowly with little bursts to make sure no cooking liquid spews out. When the pressure pin drops, remove the lid.
              • Stir the pasta and then add ½ of the cheese and stir. Let it melt before adding the remaining cheese.
              • Add the cream and stir until creamy and blended with the cheese.
              • Adjust salt to taste.
              • Cover and let sit for a few minutes. The sauce will be thin but will thicken as it cools.

              Nutrition

              Serving: 1serving | Calories: 663kcal | Carbohydrates: 58g | Protein: 27g | Fat: 36g | Saturated Fat: 22g | Cholesterol: 106mg | Sodium: 1257mg | Potassium: 361mg | Fiber: 2g | Sugar: 2g | Vitamin A: 1080IU | Vitamin C: 11mg | Calcium: 502mg | Iron: 2mg

              Graphic saying "Did you make this recipe?"

              Slow Cooker Monterey Chicken

              By Heather LAST UPDATED March 22, 2021 · FIRST PUBLISHED July 10, 2020, 23 Comments

              This Slow Cooker Monterey Chicken recipe has explosive flavors, using only simple ingredients. The chicken thighs are cooked low and slow in a smokey barbeque sauce and served with a generous helping of melted pepper jack cheese. Set it and forget it until dinner time!

              Saucy chicken over rice topped with avocado, bacon and tomato on a white plate with a forkHave you ever ordered the Monterey Chicken from Chili’s? The restaurant chain made a deliciously seasoned chicken breast, served with a savory barbecue sauce and melted cheese on top. It was so good until they removed it from the menu!

              Homemade Slow Cooker Monterey Chicken is a family-friendly recipe that is even better than the restaurant version. This recipe will save you time, money, and doesn’t skimp on the flavor! 

              I’m using chicken thighs instead of breasts for the most tender and juicy meat possible. When made in the slow cooker, the barbeque sauce and chicken seasoning have hours to get to know each other and infuse into the meat.

              Finish the crockpot Monterey chicken off with an extra layer of melted pepper jack cheese, as well as avocado and crispy bacon! There are no complicated ingredients whatsoever in this recipe.

              Monterey chicken is an easy dinner recipe that is best served with a wide range of delicious sides. Try the chicken over cooked rice with a broccoli salad on the side.

              Why This Recipe Works

              This recipe uses chicken thighs, which retain their moisture much more than chicken breasts. They’re the optimal piece of meat when cooking over a long period of time in a slow cooker. The chicken will soak in the wide range of flavors from varying ingredients. The finished result is an overall easy dish with expertly complimented flavors.chicken thighs, sauce and melted pepper jack cheese in a black slow cooker

              What is Monterey Chicken?

              Monterey chicken is traditionally made using chicken breasts. The meat seasoned with salt and pepper is cooked in a skillet on the stovetop, then slathered in barbeque sauce. It’s finished with a generous helping of melted cheese on top with bacon and green onions.

              It’s a recipe your wallet is going to love. All of the ingredients you need are very common, affordable, and budget-friendly.

              No matter how it’s cooked or served, Monterey chicken can be made quickly and with a variety of ingredients to fit your taste. Just like in my recipe, you can include a mix of barbeque sauce and tomatoes, make it smokey by adding smoked paprika, or add a variety of different toppings. 

              How To Make Monterey Chicken In A Slow Cooker

              Crockpot chicken recipes can be so easy! There are only 5 steps involved when making delicious homemade slow cooker Monterey chicken. Here’s how to do it:

              Seasoned chicken thighs in a black slow cooker on a white board

              Step 1:

              Place the onion, chili powder, barbeque sauce, and dijon mustard into the slow cooker and stir to combine. 

              Step 2:

              Season the chicken thighs with salt and pepper on both sides and nestle them into the sauce in the slow cooker. Cover with a lid and cook until the chicken is tender, about 4 to 5 hours on LOW.

              Step 3:

              After 4 or 5 hours, transfer the cooked chicken to a cutting board. Let it rest for 5 to 10 minutes. Next, shred or cut the meat into bite-sized pieces.

              Step 4: 

              Place the chicken pieces back into the slow cooker, then add in the tomatoes. Stir with the sauce. Sprinkle the cheese over the chicken, cover, and cook on LOW for an additional 10 minutes or until the cheese is melted.

              Step 5:

              Serve the chicken and sauce over cooked rice, topped with the diced avocado and crispy bacon. 

              What If I Don’t Have A Crockpot?

              You can make Monterey chicken in an oven-safe, nonstick skillet using chicken breasts if you don’t own a slow cooker. To do so, first pound the chicken until it’s mostly flat, then season with salt and pepper. Cook the chicken in the skillet until cooked through and golden brown on both sides.

              Preheat your oven to 400ºF. In the skillet, add your sauce and cheese on top of the chicken. Place the skillet in the heated oven until the sauce is hot and the cheese is melted (about 5 minutes).

              How To Make Keto Monterey Chicken

              Making Monterey chicken keto is easy! The chicken and cheese are already keto-friendly. Just make sure to use a barbeque sauce and dijon mustard with no added sugar.

              Monterey chicken with rice is not keto, so enjoy the dish on its own or with steamed veggies. 

              Chicken, rice and toppings on a white plate with a fork and cutting board with toppings in the background

              Heather's Tips for Recipe Success:

              • Use chicken thighs instead of chicken breasts. Chicken thighs will retain their moisture and become more tender when cooked for hours in a slow cooker. Chicken breasts are more likely to dry out when cooked for this long.
              • Low and slow is the best method for this recipe. The chicken will be the most tender and juicy when cooked on low for 4 to 5 hours in a crockpot.
              • Let the chicken rest for a few minutes before cutting into bite-sized pieces. If the meat doesn’t have a chance to rest for 5 to 10 minutes, its natural juices could leak out and you won’t get to enjoy a moist and tender chicken.

              More Slow Cooker Recipes You’ll Love

              Put your slow cooker to good use and try these other delicious family-friendly recipes:

              • Meatloaf and Potatoes with Garlic Butter
              • Italian Beef Sandwiches
              • BBQ Ribs
              • Pizza Chicken

              Let's Make This Recipe Together!


              Graphic saying "Pin this recipe"

              📖 Recipe

              Saucy chicken over rice topped with avocado, bacon and tomato on a white plate with a fork
              Print Recipe
              4.48 from 17 votes

              Slow Cooker Monterey Chicken

              A slow cooked version of saucy bbq flavored chicken topped with avocado, bacon, tomatoes, and lots of melted pepper jack cheese.
              Prep Time10 minutes mins
              Cook Time5 hours hrs
              Total Time5 hours hrs 10 minutes mins
              Course: Main Course
              Cuisine: American
              Keyword: Monterey Chicken
              Servings: 6 servings
              Calories: 594kcal
              Author: Heather Cheney

              Equipment

              • Slow Cooker

              Ingredients

              • 1 red onion halved and sliced
              • 1 tablespoon chili powder
              • ½ cup barbeque sauce
              • 1 tablespoon dijon mustard
              • 2 pounds boneless skinless chicken thighs trimmed of excess fat
              • Salt and Pepper
              • 2 fresh tomatoes diced
              • 1 ½ cups shredded pepper jack cheese
              • 4-6 cups cooked rice
              • 1 avocado pitted and cut into chunks
              • 4 slices bacon cooked until crisp and chopped

              Instructions

              • Place onion, chili powder, barbeque sauce, and dijon mustard into slow cooker and stir to combine.
              • Season chicken thighs with salt and pepper and nestle into the sauce in the slow cooker.
              • Cover and cook until chicken is tender-- about 4-5 hours on low.
              • Transfer chicken to a cutting board and shred into bite-sized pieces.
              • Put Chicken back into the slow cooker, add in the tomatoes, and stir with the sauce. Sprinkle the cheese over the chicken, cover and cook on low for an additional 10 minutes, or until the cheese is melted.
              • Serve chicken and sauce over cooked rice, topped with the diced avocado and crisp bacon.

              Notes

              • Use chicken thighs instead of chicken breasts. Chicken thighs will retain their moisture and become more tender when cooked for hours in a slow cooker. Chicken breasts are more likely to dry out when cooked for this long.
              • Low and slow is the best method for this recipe. The chicken will be the most tender and juicy when cooked on low for 4 to 5 hours in a crockpot.
              • Let the chicken rest for a few minutes before cutting into bite-sized pieces. If the meat doesn’t have a chance to rest for 5 to 10 minutes, its natural juices could leak out and you won’t get to enjoy a moist and tender chicken.

              Nutrition

              Serving: 1g | Calories: 594kcal | Carbohydrates: 46g | Protein: 42g | Fat: 26g | Saturated Fat: 10g | Cholesterol: 178mg | Sodium: 683mg | Potassium: 779mg | Fiber: 4g | Sugar: 10g | Vitamin A: 923IU | Vitamin C: 8mg | Calcium: 257mg | Iron: 2mg

              Graphic saying "Did you make this recipe?"

              Super Crispy Pork Chops

              By Heather LAST UPDATED March 22, 2021 · FIRST PUBLISHED June 19, 2020, 3 Comments

              These super crispy pork chops are everything you could want out of a pork chop! The breading is light and flavorful but still super crispy. If you're craving the Shake N' Bake chops of your childhood, these will fit the bill and then some.    I've never been a huge pork chop fan.

              Honestly, they don't really occur to me as a viable dinner option very often. But, when they do occur to me, I'm always pleasantly surprised! My mom used to make Shake n' Bake pork chops when I was a kid and this recipe tastes like a grown-up version of it.

              They come out of the oven super crispy (hence the name), juicy and really flavorful. The perfect main dish to serve with some delicious rice pilaf or "homemade" mac and cheese and some Shaved Brussels sprouts.

              Why This Recipe Works

              This recipe uses panko bread crumbs to coat the pork chops which are innately crunchy. To add to this, the recipe uses mayonnaise to bind the crumbs to the pork chops which adds flavor and enough fat to keep those crumbs nice and crunchy. Lastly, the pork chops are baked on a wire rack above the baking sheet so that the underside of the pork chops stay nice and crunchy and essentially oven-fried. 

              breaded pork chop sliced on a white plate

              How to make Crispy Pork Chops

              The trick to making these the crispiest pork chops WITHOUT frying them is the use of two things: Panko bread crumbs and mayonnaise. The panko is able to hold its crunch and texture so well because we're using mayonnaise as the binding agent as opposed to eggs used in standard breading. The mayonnaise gives just enough moisture to allow the breadcrumbs to adhere to the pork chops and also adds the fat the breadcrumbs need to cook efficiently and stay crunchy.

              White plate with breadcrumbs and spices on it and 2 raw pork chops

              Can I make these if I don't have panko bread crumbs?

              There are a few ingredients I might substitute panko bread crumbs for in this recipe if I really needed to. These being Kettle Cooked Potato Chips and Corn Flakes. When crushed, both of these would be a suitable alternative and still create a nice, crispy crust. I am, however, partial to the Panko bread crumbs. They create a similar experience to Shake n bake pork chops and really make this recipe shine!

              2 pork chops with mayonnaise on them on a wire rack

              What are panko bread crumbs?

              Panko is a type of flaky breadcrumb. It's typically made from white bread without any crust, processed into large "flakes" and then dried. Panko bread crumbs are very common in Asian cuisine but have become more and more popular with other cuisines as well. It has a very light and crispy texture that allows it to crisp while it cooks. It's great for frying foods because panko absorbs less oil than regular breadcrumbs allowing it to remain light and crispy. They can be found in most grocery stores near other varieties of breadcrumbs.

              2 pork chops covered in bread crumbs on a rack

              Heather's Tips for Recipe Success

              • Don't skip the Mayonnaise. If mayo isn't your thing, maybe this recipe isn't either. Using it is essential to the recipe, adding flavor and needed fat to properly crisp the breadcrumbs.
              • Use a baking rack. If you don't have a dedicated baking rack, a cookie rack or even a broiler pan will work almost as well. Putting the pork chops on a rack allows the hot air to circulate evenly across all the surfaces of the meat so you're not left with a soggy bottom. Nobody likes a soggy bottom. 🙂
              • Allow your Porkchops to rest before serving. Just like any other steak or cut of meat, it's always wise to let your meat rest a few minutes (5-10 mins) after cooking before cutting into it. This allows the juices to redistribute in the meat and keeps it nice and juicy.

              If you like this Crispy Pork Chop recipe, give these Parmesan Artichoke Pork Chops a try!

              Overhead shot of breaded pork chop on a white plate with a salad

              Graphic saying "Pin this recipe"

              📖 Recipe

              Breaded pork chop sliced on a white plate with a green salad and forl
              Print Recipe
              4.46 from 35 votes

              Super Crispy Pork Chops

              These super crispy pork chops are everything you could want out of a pork chop! The breading is light and flavorful but still super crispy thanks to the use of some panko bread crumbs and a secret ingredient.
              Prep Time15 minutes mins
              Cook Time25 minutes mins
              Total Time40 minutes mins
              Course: Main Course
              Cuisine: American
              Keyword: crispy pork chops
              Servings: 4 servings
              Calories: 413kcal
              Author: Heather Cheney

              Ingredients

              • 1 cup Panko bread crumbs
              • ½ teaspoon salt
              • ½ teaspoon garlic powder
              • ½ teaspoon onion powder
              • ½ teaspoon smoked paprika
              • ½ teaspoon dried thyme
              • 1 pinch sugar
              • 6 tablespoons full-fat mayonnaise
              • 4 boneless thick cut pork chops ½-3/4" thick

              Instructions

              • Pre-heat oven to 425 degrees Fahrenheit
              • Line a baking sheet with foil or parchment paper and place a wire baking rack on top.
              • Combine the bread crumbs and seasonings in a large ziplock bag and add 2 tablespoon of the mayonnaise to the crumb mixture. Close the bag and mix the mixture with hands until the mayo is incorporated. Dump the crumbs into a pie plate or other high rimmed plate.
              • Coat each pork chop with about 1 tablespoon of mayo, or just until all surfaces are covered. Then, working with one chop at a time, use your fingers to thoroughly coat all sides with the crumb mixture. Place coated pork chops on your prepared wire rack.
              • Bake the pork chops until the coating is golden brown and cooked through ( between 140-145 degrees Fahrenheit). It took mine about 20 minutes. Let the chops rest for 5-10 minutes before serving to allow juices to redistribute and get happy.

              Notes

              Heather's Tips For Recipe Success:
              • Don't skip the Mayonnaise. If mayo isn't your thing, maybe this recipe isn't either. Using it is essential to the recipe, adding flavor and needed fat to properly crisp the breadcrumbs.
              • Use a baking rack. If you don't have a dedicated baking rack, a cookie rack or even a broiler pan will work almost as well. Putting the pork chops on a rack allows the hot air to circulate evenly across all the surfaces of the meat so you're not left with a soggy bottom. Nobody likes a soggy bottom. 🙂
              • Allow your Porkchops to rest before serving. Just like any other steak or cut of meat, it's always wise to let your meat rest a few minutes (5-10 mins) after cooking before cutting into it. This allows the juices to redistribute in the meat and keeps it nice and juicy.

              Nutrition

              Serving: 1pork chop | Calories: 413kcal | Carbohydrates: 11g | Protein: 31g | Fat: 25g | Saturated Fat: 5g | Cholesterol: 98mg | Sodium: 598mg | Potassium: 529mg | Sugar: 1g | Vitamin A: 135IU | Calcium: 37mg | Iron: 1.6mg

              Graphic saying "Did you make this recipe?"

              Tools I used for Making these Crispy Pork Chops

              Sugar Crusted Banana Walnut Bread

              By Heather LAST UPDATED March 11, 2021 · FIRST PUBLISHED June 2, 2020, 5 Comments

              Moist banana bread studded with walnuts and wrapped in a crunchy sugar crust-- It's banana bread at it's finest! (and most decadent)

              Loaf of banana bread and 2 slices on a striped wood cutting board

              I have a few recipes for banana bread that I absolutely love. The first being my mom's (which I've yet to gain permission to divulge the recipe of), this Healthy-ish Chocolate Chip Banana Bread, my Whole Wheat Banana Blueberry Bread, and last (but certainly not least) this delicious gem!

              Why This Recipe Works

              It has a high ratio of banana to butter which makes for a very moist bread with a tender crumb and also uses bread flour instead of all-purpose flour that keeps gummy-ness at bay. To top it all off, the pans and tops are coated in sugar that adds sweetness, crunch, and texture. 

              Sliced banana bread on a white plate with butter on a striped cutting board


              Graphic saying "Heather's tips for recipe success."

              For Best Results Do this:

              1. Use VERY ripe bananas. Ripe bananas are sweeter and have more "banana-y" flavor that will add depth and loads of banana flavor to your bread. When I have some overly ripe banana on my counter, I like to peel and place them in a zip-top freezer bag. The bananas store well in the freezer for a few months and you'll always have some on hand for baking!
              2. Use ROOM temperature ingredients. Adding cold eggs or bananas to warm butter makes the butter clump and your batter won't be as smooth.
              3. Don't over mix! The key to moist and tender banana bread is to keep the mixing as minimal as possible! You want to stir it by hand, just long enough to combine the dry ingredients into the wet, but no longer. The batter will be lumpy and chunky and that's ok!
              4. Toast your walnuts. Toasting the walnuts slightly before adding to the batter adds an extra layer of nuttiness to the bread and helps the walnuts stay crunchy during baking.

              bread pan sprinkled with sugar

              How to dust baking pans with sugar

              Dusting your baking pans with sugar before adding the banana bread batter to the pan does two things: It keeps the bread from sticking to the pan and adds a layer of crunchy sugar to the outside of the bread. Here's how to do it:

              1. Spray baking pan evenly with non-stick cooking spray.
              2. Add a few tablespoons of granulated sugar to the pan and tilt and turn the pan until all the sprayed surfaces are coated in sugar.
              3. Tilt any remaining sugar into a bowl to save for later use or tilt over the sink like I usually do.

              A loaf of sliced banana bread on a striped cutting board with knifeGraphic saying "Pin this recipe"

              Let's Make it Together!


              📖 Recipe

              Sliced banana walnut bread on a white plate with butter
              Print Recipe
              4.75 from 31 votes

              Sugar Crusted Banana Walnut Bread

              Crunchy, crusty, moist, and sweet this banana bread is decadence in a pan.
              Prep Time20 minutes mins
              Cook Time1 hour hr
              Total Time1 hour hr 20 minutes mins
              Course: Bread
              Cuisine: American
              Keyword: Banana Walnut Bread
              Servings: 2 standard-sized loaves
              Calories: 3381kcal
              Author: Heather Cheney

              Ingredients

              • 10 ounces salted butter melted
              • 2 ¼ cups white granulated sugar
              • 2 ¼ cups over-ripe bananas mashed, room temperature (about 5 large bananas)
              • 3 large eggs room temperature
              • 1 teaspoon vanilla extract
              • 3 ¼ cups bread flour
              • 2 teaspoons kosher salt
              • 2 teaspoons baking soda
              • 1 ⅓ cups walnuts chopped

              Instructions

              • Preheat Oven to 350° F
              • Combine the sugar with the melted butter and stir in the mashed bananas, eggs, and vanilla.
              • Pour the flour over the banana mixture and sprinkle with the baking soda and salt.
              • Gently mix just until no dry spots remain- the batter will be lumpy, do not over mix.
              • Heat a medium-sized skillet over medium heat and add the walnuts. Cook, stirring until the walnuts are gently toasted and remove form the heat.
              • Prepare 2 standard-sized loaf pans by spraying liberally with non-stick cooking spray and coating the sides with granulated sugar by swirling and tapping until all the sides of the pan are coated.
              • Fill the pans ⅔ of the way full and sprinkle more sugar on top.
              • Bake for 55-65 minutes. Bread is done when a toothpick inserted into the middle comes out clean or with just a few moist crumbs on it and the bread is just starting to pull away from the sides of the pan.
              • Remove bread from the oven and cool on a wire rack for 10 minutes, then invert to remove loaves from the pan.

              Nutrition

              Serving: 1loaf | Calories: 3381kcal | Carbohydrates: 422g | Protein: 48g | Fat: 176g | Saturated Fat: 80g | Cholesterol: 550mg | Sodium: 4535mg | Potassium: 1276mg | Fiber: 14g | Sugar: 248g | Vitamin A: 4007IU | Vitamin C: 16mg | Calcium: 186mg | Iron: 6mg

              Graphic saying "Did you make this recipe?"

              Grilled Asian Chicken Salad

              By Heather LAST UPDATED March 11, 2021 · FIRST PUBLISHED May 20, 2020, 1 Comment

              A flavorful, crunchy, and delightfully filling Asian Chicken Salad that makes a perfect summer lunch or light dinner. Fresh lettuce, carrots, and green onion meet crunchy chow mein noodles, water chestnuts, toasted almonds, and sesame seeds and get tossed in a sweet and slightly spicy sesame peanut dressing. 

              Grill the chicken outdoors to avoid heating up your chicken or take it inside to cook in the oven like you can this Basic Grilled Chicken, 7-Up Grilled Chicken, or Gorgeous Grilled Chicken. All the details on how are below!

              Two Asian salads with grilled chicken in a grey bowls on a white tablecloth with dressing, almonds, and sesame seed next to them.

              Graphic: Heather's Tips For Recipe Success

              • I love to use a combination of Iceberg lettuce and Napa cabbage for the best crunch and flavor.
              • Allow the grilled Asian chicken to rest for at least 10 minutes after grilling before slicing. This allows the juices in the meat to redistribute and keeps the chicken nice and juicy.
              • Don't dress the salad too soon! Add the noodles, almonds, and dressing just before serving for the best CRUNCH!

              Grilled chicken, cabbage, carrots, noodles, almonds and poppy seeds on cutting board

              Don't have a grill? No problem!

              This chicken can also be cooked on a grill pan (like this one) on the stove, OR baked in the oven. Just preheat your oven to 400˚F for 20 minutes, flip then cook an additional 5-15 minutes or until the chicken reaches an internal temp of 165˚F. Just note that baking the chicken will not give you the nice charred flavor and grill marks that cooking on the grill or indoor grill pan will give.

              Chinese chicken salad with carrots, green onions and lettuce on a cutting board with dressing, crunchy noodles, almonds and sesame seeds.

              Assembling the salad for now... and for serving later

              If you're serving your Asian Chicken Salad now, just follow the directions for assembly in the recipe card. BUT if you're like me and LOVE to have salads ready to go in your fridge for quick lunches follow these few tips:

              • Combine individual portions of the lettuce/cabbage, carrots, green onion, water chestnuts, and grilled chicken in air-tight containers and refrigerate.
              • Combine the sesame seeds, almonds, and crunchy noodles and store separately at room temperature.
              • Keep the salad dressing in a dressing bottle or distribute it into individual portions and refrigerate.
              • When ready to eat, top the individual salads with the crunchy toppings and drizzle with the dressing.

              Glass bottles of sugar and oil and a glass bowl of vinegar with an Asian chicken salad in the background.

              What are some good side dishes for Asian Chicken Salad?

              I feel like this salad has just about all you might need in a meal with the grilled chicken, veggies, crunchies, and flavorful dressing, but here are some ideas:

              • Dumplings, potstickers or wontons
              • Edamame (steamed soy beans)
              • BBQ Pork or Skewered Beef


              2 bowls of salad in grey bowls with a glass of asian salad dressing, almonds, poppy seeds, and crunchy noodles next to them. red graphic saying "Pin This Recipe!"

              📖 Recipe

              Chinese Chicken Salad in 2 grey bowls on a white table cloth and turquoise napkins
              Print Recipe
              4.94 from 72 votes

              Grilled Asian Chicken Salad

              A flavorful, crunchy, and delightfully filling Asian Chicken Salad that makes a perfect summer lunch or light dinner. 
              Prep Time5 minutes mins
              Cook Time40 minutes mins
              Marinade time3 hours hrs
              Total Time3 hours hrs 45 minutes mins
              Course: Salad
              Cuisine: Asian, Grilling
              Keyword: Asian Chicken Salad, Chinese Chicken Salad
              Servings: 4 entree-sized salads
              Calories: 488kcal
              Author: Heather Cheney

              Ingredients

              For the Chicken:

              • 3 boneless skinless chicken breasts
              • ¼ cup low sodium soy sauce
              • 2 tablespoons olive oil
              • 2 cloves garlic minced
              • 2 teaspoons sesame oil
              • 2 teaspoons honey

              For the Salad:

              • 1 head lettuce or napa cabbage torn or thinly sliced
              • 3 green onions thinly sliced
              • 1 cup shredded carrots
              • 1 (8-ounce) can water chestnuts, drained and chopped
              • 2 tablespoons sesame seeds
              • 1 tablespoon poppy seeds
              • ¼ cup sliced almonds
              • 1-2 cups crunchy chow mein noodles

              For the Dressing:

              • ¼ cup canola or olive oil
              • 2 tablespoons rice vinegar
              • 1 tablespoon + 1 teaspoon soy sauce
              • 2 teaspoons sesame oil
              • 2 tablespoons creamy peanut butter
              • ¼ cup sweet chili sauce
              • 1 tablespoon water

              Instructions

              • Prepare the chicken by combining the soy sauce, olive oil, garlic, sesame oil and honey in a gallon-sized zip top bag. Add the chicken and allow to marinade for 2-3 hours up to overnight.
              • Remove the chicken from the marinade and grill until cooked through and the internal temperature reads 165 degrees F. Allow chicken to cool, then slice into bite-sized pieces. Set chicken aside.
              • Make the dressing in a small bowl by whisking together the canola oil, rice vinegar, soy sauce, sesame oil, peanut butter, chili sauce and water. Whisk until smooth and creamy and set aside.
              • Place the sesame seeds, poppy seeds and almonds in a small non-stick pan and cook over medium-heat, stirring frequently until lightly toasted. Remove from the heat and set aside.
              • Assemble the salad by combining the lettuce, green onion, carrots and water chestnuts in a large bowl. Toss to combine and then add the toasted sesame and poppy seeds and almonds. Top the salad with the sliced, grilled chicken and drizzle with the dressing. Serve topped with a handful of crunchy chow-mein noodles.

              Nutrition

              Serving: 1serving | Calories: 488kcal | Carbohydrates: 23g | Protein: 31g | Fat: 30g | Saturated Fat: 3g | Cholesterol: 72mg | Sodium: 867mg | Potassium: 1032mg | Fiber: 5g | Sugar: 15g | Vitamin A: 6220IU | Vitamin C: 60.6mg | Calcium: 177mg | Iron: 2.3mg

              Graphic saying: "Did you make this recipe? Tag @heatherlikesfood and hashtag your photo #heatherlikesfood"

              Beef Teriyaki Stir Fry

              By Heather LAST UPDATED March 21, 2022 · FIRST PUBLISHED October 22, 2019, 9 Comments

              Beef Teriyaki Stir-Fry is the simple dinner you need to make tonight! It's a favorite at my house and everyone else that has tried it! Simple, easy ingredients make this meal one you'll make again and again!

              Saucy beef and broccoli in a large pan

              This Beef Teriyaki stir fry recipe is one that my family can't get enough of. I almost always have the ingredients on hand, it is cooked in just about 30 minutes and who doesn't love a bowl of beef and veggies with a homemade teriyaki sauce over rice? No one! Well, my kids could take or leave the vegetables...

              Why This Recipe Works

              This Teriyaki Beef Stir Fry Recipe uses pre-cut stir-fry steak to make this a perfect, quick weeknight meal with no slicing meat. If you want to make this even faster, use precut fresh or frozen veggies! The sauce is a simple mixture of soy sauce, sugar, mirin, sesame oil, and garlic and gets thickened by a corn starch slurry at the end. The result is a stir-fry that is sweet with tender beef and veggies bathed in a lightly sticky sauce that is perfect over a bed of white rice. The perfect quick meal? Maybe.

              How Do you Make Teriyaki Beef?

              1. To make life super simple, you'll start with a package of pre-cut beef strips labeled "beef for stir-fry," which is usually pretty easy to find in your grocer's meat aisle. If you can't find something similar, top sirloin cut across the grain is an excellent choice for this recipe.
              2. You'll make the sauce with soy sauce, sugar, mirin, garlic, red pepper flakes, and corn starch. Stir it in a bowl and set it aside.Homemade Teriyaki Sauce in a small bowl with a whisk.
              3. You'll want to lightly cook your fresh broccoli before throwing it into the stir-fry pan so that you don't end up with raw broccoli and/or over-cooked and chewy meat. A saute pan with a lid and a little bit of water in the pan does the trick to steam the florets until just tender and bright green. If you are using frozen broccoli, throw it into the microwave for a few minutes to get the chill off and drain the excess water.Fresh broccoli in a large skillet
              4. In a wok or large saute pan, heat a tablespoon of oil and quickly brown the meat, often stirring, working in batches if needed-- about 3-4 minutes each batch. Remove the meat from the pan and set aside. Add the sauce to the hot pan, bring to a simmer and stir in the cooked meat and broccoli.Homemade Beef Teriyaki In a Wok
              5. Give the pan a stir to make sure the beef and broccoli are well coated with the sauce and serve your Teriyaki Beef Stir Fry over hot steamed rice.

              How Do You Make Homemade Teriyaki Sauce?

              Teriyaki sauce is traditionally equal parts soy sauce, sugar, mirin, and Sake. For this Beef Teriyaki Recipe, I use soy sauce, sugar, and mirin, but omit the Sake for some sesame oil, garlic, and red chile.

              Is Your Teriyaki Sauce Too Thin?

              Sometimes you just want a thicker sauce! To make your sauce thicker, combine a bit of cornstarch with some room-temperature water and whisk into the hot sauce. This can be repeated as necessary until it reaches the desired thickness.

              Tips For the Best Beef Teriyaki

              • Use pre-cut "Stir-fry beef" to make things easy, but if you can't find it, beef top sirloin is a good choice. It's relatively inexpensive and cooks up pretty tender in the sauce. To make cutting it easier, place the steak into the freezer for about 30 minutes to firm it up a bit and then slice.
              • Lightly steam raw vegetables before mixing with the sauce and beef to make sure they are cooked through.
              • If the sauce is too thin for your liking after coming to a boil, add an additional teaspoon of cornstarch mixed with a tablespoon of water and whisk into the sauce. Bring to a boil and check thickness. Repeat as needed.

              What To Serve With Beef Teriyaki

              In my family, we love to eat it right on top of a big bowl of short-grain white rice! It's also good on some brown rice, fried rice, or maybe even some lo mein noodles.

              Beef Teriyaki Variations

              This stir-fry recipe uses broccoli, but you can absolutely use any vegetable you'd like! Fresh or frozen, here are some ideas:

              • Bell Peppers: Red, Green, Orange, Yellow
              • Mushrooms
              • Zucchini or Summer Squash
              • Green Beans
              • Cauliflower
              • Carrots
              • Asparagus
              • Cabbage
              • Sweet Onion
              • Peas

              Can I Reduce The Sugar In Homemade Teriyaki Sauce?

              Yes! This recipe uses a 1:1 ratio of sugar to soy sauce like a traditional teriyaki sauce, but you can absolutely reduce the sugar to your taste without any ill effects on the finished product.

              If you make this Beef Teriyaki, I'd love to know! Leave a comment below or tag me on Instagram-- #heatherlikesfood

              Image that says "Pin this recipe"

              📖 Recipe

              Easy beef and Broccoli Stir Fry in a large skillet with a silver fork.
              Print Recipe
              4.76 from 75 votes

              Teriyaki Beef and Broccoli Stir Fry

              This Beef and Broccoli stir fry recipe is super quick and takes just a handful of ingredients, making it a perfect weeknight meal! It's loaded with fresh (or frozen broccoli), tender beef strips, and is drenched in a sweet and savory sauce. 
              Prep Time10 minutes mins
              Cook Time15 minutes mins
              Total Time25 minutes mins
              Course: Main Course
              Cuisine: Chinese
              Keyword: Beef and Broccoli, Beef Teriyaki, Homemade Teriyaki Sauce
              Servings: 4 servings
              Calories: 531kcal
              Author: Heather Cheney

              Equipment

              • Stainless Steel Tongs
              • Non-Stick Wok

              Ingredients

              • 2 pounds "Stir Fry" Beef Found precut at the butcher counter
              • ½ cup soy sauce
              • ½ cup sugar
              • 2 tablespoon mirin sweet cooking rice wine
              • 1 clove garlic minced
              • 1 tablespoon corn starch
              • ⅛ teaspoon red pepper flakes
              • 1 teaspoon sesame oil
              • 1 pound fresh broccoli cut into florets
              • 2 tablespoon vegetable oil

              Instructions

              • Whisk the soy sauce, sugar,mirin, garlic, cornstarch, red pepper flakes, and sesame oil together and set aside.
              • In a saute pan with a lid, steam broccoli florets w/ ¼ C of water over med-high heat until just tender and bright green. Remove from the heat and set aside.
              • Heat 1-2 tablespoon of oil in a large skillet or wok over medium high heat and and brown the meat, about 3-4 minutes, then transfer to a bowl. Working in batches if needed.
              • Re-stir the sauce and pour into hot skillet, scraping any brown bits from the pan and bring to a simmer. Cook until thickened- about 2 minutes.
              • Add beef and broccoli to the sauce, stirring to coat until hot. Serve with rice.

              Notes


              • Use pre-cut "Stir-fry beef" to make things easy, but if you can't find it, beef top sirloin is a good choice. It's relatively inexpensive and cooks up pretty tender in the sauce. To make cutting it easier, place the steak into the freezer for about 30 minutes to firm it up a bit and then slice. 
              • Lightly steam raw vegetables before mixing with the sauce and beef to make sure they are cooked through. 
              • If the sauce is too thin for your liking after coming to a boil, add an additional teaspoon of cornstarch mixed with a tablespoon of water and whisk into the sauce. Bring to a boil and check thickness. Repeat as needed. 

              Nutrition

              Serving: 1serving | Calories: 531kcal | Carbohydrates: 39g | Protein: 56g | Fat: 16g | Saturated Fat: 8g | Cholesterol: 133mg | Sodium: 1850mg | Potassium: 1229mg | Fiber: 3g | Sugar: 29g | Vitamin A: 725IU | Vitamin C: 101.4mg | Calcium: 109mg | Iron: 5.2mg

              How Long To Cook A Turkey

              By Heather LAST UPDATED March 25, 2021 · FIRST PUBLISHED October 17, 2019, Leave a Comment

              How Long To Cook A Turkey is a common phrase I hear the last few weeks of November and into December each year because no one likes a dry turkey!  Keep reading to learn the proper cooking times and tips on knowing when your turkey is cooked perfectly! 

              Roasted Turkey In White Dish with Green Onions and Potatoes

              Turkey is typically the star of the show each Thanksgiving and Christmas, and there's nothing worse than having the turkey you spent hours preparing and cooking turn out dry or overcooked because you didn't know how long to cook it!

              Below you'll find cooking-time guidelines for all of the many ways you can cook a turkey! If I missed one, comment below and I'll be sure to add it to the list!

              In This Article (Click To Go To Each Topic)

              How Long To Cook A Turkey In A Bag
              How Long To Cook A Turkey In The Oven
              How Long To Cook A Turkey In A Convection Oven
              How Long To Deep Fry A Turkey
              How Long To Cook A Turkey In An Electric Roaster
              How Long To Cook A Stuffed Turkey
              How To Know If Your Turkey Is Done
              How To Check The Temperature Of Turkey

              DISCLAIMER: It's super important to note that you should ALWAYS check the internal temperature of the turkey with a thermometer before determining if your turkey is done. I'll go into more detail about checking the temperature of the turkey below, but I wanted to mention it before you got much further into looking at the cooking times.

              Turkey Cooked in Oven Bag

              How Long To Cook A Turkey In A Bag

              Cooking turkey in an oven bag is one of the most fool-proof ways to roast a whole turkey. It seals in the moisture, so even if you overcook it a bit, it still stays relatively moist. The downside to cooking it in a bag is that the skin doesn't get quite as crispy as it would by roasting in an open oven. Moist turkey vs. Crispy Skin? Your call!

              Times Based On Cooking In A Bag at 350 Degrees Fahrenheit

              10-12 pound turkey:  1 ½ hours - 2 hours

              12-16 pound turkey:  2 hours - 2 ½ hours

              16-20 pound turkey: 2 ¼ hours - 2 ½ hours

              20-24 pound turkey: 2 ½ hours - 3 hours

              Raw Turkey going into an oven with rosemary

              How Long To Cook A Turkey In The Oven

              If you have an oven, you can roast a turkey! As long as you're following the basics like adding a fat under or on the skin and some simple seasonings, you should end up with a tender turkey by following the guidelines below and using a thermometer to check that the internal temperature of the thigh meat is 165 degrees F.

              Times Based On Cooking In The Oven at 350 Degrees Fahrenheit

              10-18 pound turkey:  3 hours - 3 ½ hours

              18-22 pound turkey:  3 ½ hours - 4 hours

              22-24 pound turkey: 4 hours - 4 ½ hours

              24-29 pound turkey: 4 ½ hours - 5 hours

              Turkey being roasted in oven in roasting pan

              How Long To Cook A Turkey In A Convection Oven

              Convection ovens are great because they cook a turkey in less time and with more even results! Convection ovens work by circulating hot air through the oven for faster, more even cooking. Because they are so efficient at cooking, usually both the roasting temperature and time can be reduced when using a convection oven -- 300 Degrees F is an excellent place to start!

              Times Based On Cooking In A Convection Oven at 300 Degrees Fahrenheit

              14-18 pound turkey:  2 ¼ hours - 2 ½ hours

              18-22 pound turkey:  2 ½ hours - 3 hours

              Turkey being deep fried in outdoor fryer

              How Long To Deep Fry A Turkey

              Deep frying turkey can be tricky, but the results are well worth it, in my opinion! Not only does it produce a super juicy bird with crispy skin, but the cooking time is also significantly reduced from roasting in the oven. If you do end up frying, and use a propane turkey fryer, never leave it unattended and make sure your turkey is fully thawed and you're using the correct amount of oil. Be safe, friends!

              Cooking Times For Deep Frying Based On Oil Heated to 375 degrees

              3-4 minutes per pound of turkey

              How Long To Cook A Turkey In An Electric Roaster

              An electric turkey roaster can be a handy tool when cooking a turkey. It frees up the oven, so it's available to bake all your side dishes! Electric roaster ovens cook at approximately the same temperature and in the same amount of time as a conventional oven. Still, I do like to lower the heat to 325 degrees F when using a roaster.

              Cooking Times For Cooking In A Roaster at 325 Degrees Fahrenheit

              8-12 pound turkey:  2 ¾ hours - 3 hours

              12-14 pound turkey:  3 hours - 3 ¼ hours

              14-18 pound turkey: 3 ¾ hours - 4 ¼ hours

              18-20 pound turkey: 4 ¼ hours - 4 ½ hours

              20-24 pound turkey:  4 ½ hours - 5 hours

              Stuffed Turkey cooked in a glass dish with herbs

              How Long To Cook A Stuffed Turkey

              Baking stuffing in the cavity of a turkey adds flavor and moisture to the bird, creates flavorful dressing to serve alongside the meat, but also increases the cooking time of the turkey. Generally, a stuffed turkey takes about 1 hour longer to cook than it would be unstuffed. When cooking a stuffed turkey, it's vital that the internal temperature is taken of the meat as well as the stuffing-- both should be at least 165 degrees F.

              Times Based On Cooking In The Oven at 350 Degrees Fahrenheit

              10-18 pound turkey:  3 ¾ hours - 4 ½ hours

              18-22 pound turkey:  4 ½ hours - 5 hours

              22-24 pound turkey: 5 hours - 5 ½ hours

              24-29 pound turkey: 5 ½ hours - 6 ¼ hours

              roasted turkey in roasting pan with rack

              How To Tell If Your Turkey Is Perfectly Cooked

              As I mentioned before, the only safe and most effective way to know if your turkey is truly cooked is to check the internal temperature of the meat. This is done with a meat thermometer! There are many types of thermometers that you can use-- here are a few to consider.

              OXO oven-safe thermometer

              • Oven-Safe Leave-In Thermometer This type of thermometer can be inserted into the turkey before placing it in the oven and left in during cooking. They are inexpensive but require you to open the oven to read the temperature, letting heat escape. See an example here

              Arima Instant Read Thermometer

              • Instant Read Thermometer Instant Read thermometers are great because they do just what you'd think-- read the temperature instantly! Just open the oven, insert it into the turkey, and almost immediately, the temperature will appear on the screen. See an example here

              Dual Probe Meat Thermometer

              • Leave-In Probe Thermometer When cooking a turkey, probe thermometers are definitely my favorite tool! They come with a probe (or 2) connected to a wire that is oven safe and connects to a digital box that you can read the temperature on. The box stays outside of the oven so it's easily read and you can even set alarms that will alert you when the turkey is the correct temperature! 2 probe thermometers are especially handy when cooking a stuffed turkey because you can monitor the temperature of the meat as well as the stuffing. See an example here

              Thermometer in turkey leg

              Where to Check Turkey Temperature

              It's crucial that when you check the temperature of the turkey, you're taking it in the right spot! White meat cooks faster than dark meat, so the breast will always be done before the thighs.

              Because of this, insert your meat thermometer into the thickest part of the turkey thigh, poking the bird just between the thigh and the place where the turkey breast starts — and pushing it into the thigh meat. When the thermometer reads 165 degrees F, your turkey is ready!

              sliced turkey with gravy and vegetables on plate

              What To Do Once Your Turkey Is Cooked

              Just like when you're cooking a steak, turkeys need time to rest after being cooked!  This resting period allows the juices to redistribute throughout the turkey. Once the turkey comes out of the oven, loosely wrap a few pieces of aluminum foil around the bird to retain some heat, and allow to rest for at least 30 minutes before carving.

              Need Some Side Dish Recipes To Go With Your Turkey? I've got you covered!

              • Super Creamy Crock Pot Mashed Potatoes
              • Easy Au Gratin Potatoes with Fennel and Olives
              • Sweet Potato Casserole With Coconut
              • Corn Spoon Bread
              • Best Dinner Roll Recipe
              • Fresh Green Bean Casserole
              • Homemade Creamed Corn
              • Cranberry Fluff
              • Pumpkin Turnovers
              • Never Fail Pie Crust
              • Caramel Apple Pie with Crumb Topping

              If you make a killer turkey this year from knowing how long to cook a turkey, I want to hear about it! Leave a comment below or tag me on Instagram! #heatherlikesfood

              Southwestern Potato Corn Chowder

              By Heather LAST UPDATED March 11, 2021 · FIRST PUBLISHED October 14, 2019, 1 Comment

              Potato Corn Chowder full of all the goodness of the classic chowder, loaded with tons of southwestern flavor-- peppers, chiles, black beans, cumin, and chili powder! It's seriously good. Potato Corn Chowder with Beans and Chiles in a brown mug

              This Southwest Corn and Potato Chowder is hearty and has tons of flavor.  On the night that I was working on this recipe (many years ago, I'm finally updating the pictures for this recipe!), I was craving tacos, but I had already prepped that morning to make a regular corn and potato chowder. So like any reasonable person, I spent 3 hours developing a soup recipe that should have taken 30 minutes to make.

              Thankfully, it won't take YOU that long to make this. 🙂

              Why This Recipe Works

              This potato corn chowder recipe is delightful for a few reasons! It combines zesty southwest flavors like green chilies, cumin, and chipotle chilies, with a creamy soup base of potatoes and corn. This creamy soup base is made possible by making a basic Monterrey Jack cheese sauce and stirring it into the soup at the end. This brings the creamy and cheesy factor into the soup BIG TIME and ties the whole thing together.

              How to Make Southwestern Potato Corn Chowder

              Step-by-step collage of how to make southwest potato corn chowder
              1. In a large, heavy-bottomed pot, heat oil over medium heat until it starts to shimmer. Place onions and garlic in oil and let cook until the onion begins to soften-- about 6 minutes.
              2. Add in the cumin and chili powder and stir until very fragrant, about 1 minute. Add the chicken broth and diced potatoes to the pot, bring to a low boil, cover and cook until the potatoes pierce easily with a fork.-- about 20 minutes.
              3. Once the potatoes are cooked, stir the corn, beans, and green chilies into the broth and potatoes.
              4. Melt the butter in a medium-sized saucepan. Once butter is melted, stir in the flour and cook, continually stirring for a minute.
              5. Gradually stir in milk and continue to stir, making sure to clean the bottom of the pan with each stir, so it doesn't burn. As it comes to a boil, the mixture will start to thicken. Continue to stir and cook for 1 minute longer. Remove from the heat and stir in the cheese. Add the cheese sauce into the broth mixture and stir until well combined.
              6.  Season with ¼ teaspoon kosher salt, adding more depending on the salt content of the broth you used. Sprinkle with chopped fresh cilantro and a spoonful of pico de gallo if desired.
              close up picture of potato corn chowder with black beans and cilantro

              Tips for Making the BEST Corn and Potato Chowder

              • Cut your potatoes into even pieces-- If your potatoes are cut into pieces that are about the same size, they will cook evenly. This prevents some of the pieces to be mushy and others overdone.
              • Bloom your spices! In step #2 you'll add the spices to the hot pan and cook until fragrant. This step will allow the spices to release their flavor oils and create a more flavorful soup!
              • Season, season, season! The key to delicious corn and potato chowder is building layers of flavor. You're doing this by browning your onions, blooming your spices, and making a separate cheese sauce to stir in. Make sure to season each step with a little bit of salt and make sure to taste it at the end and season to taste before serving.

              Can You Freeze Potato Corn Chowder?

              Milk-based soups don't typically freeze very well because they often separate and curdle upon reheating. I've had some success with warming frozen milk-based soups very slowly, constantly stirring while heating, and adding a little bit of cream while stirring.

              What Do You Serve Corn Chowder With?

              This Southwest Corn Chowder is best served with cornbread or corn chips, some fresh pico de gallo, and some diced avocado.

              spoonful of southwest potato corn chowder

              What Is The Difference Between Soup and Chowder

              Soups are typically thinner with more broth, while chowders are thicker with ingredients cut into larger pieces.

              How Do I Thicken Potato Corn Chowder?

              Chowder is traditionally thickened by a roux (flour + butter) and is added to the recipe before the broth is introduced into the pan. If your chowder needs to be thickened after it's cooked, combine a couple of tablespoons of flour or cornstarch with some cold broth or water and whisk into the chowder. Bring the soup to a boil, and cook, stirring for one minute.

              What Type of Potatoes Should I Use For Potato Corn Chowder?

              It depends on the results you're looking for. Starchy potatoes, like russets, break down more quickly and create a thicker chowder base. Choose a waxy potato like Yukon gold if you'd like your potatoes to stay in-tact after cooking.

              How to Make Potato Corn Chowder In The Slow Cooker or Instant Pot

              Slow Cooker Directions

              1. Combine onion, garlic, chicken broth, potatoes, corn, black beans, chiles, cumin, chili powder, and salt in the slow cooker. Cook on high for 4 hours or 6 hours on low, or until the potatoes are tender.
              2. Cook cheese sauce, as stated in the recipe, and stir into the slow cooker.
              3. If chowder is too thin, combine two tablespoons of corn starch with ¼ cup cold water and whisk into the chowder. Cover and cook on high for 15 minutes or until thickened.

              Instant Pot Directions

              1. In the Instant Pot, saute onion and garlic in oil until tender. Stir in cumin and chili powder and cook, stirring for one minute more or until fragrant. Stir in chicken broth, potatoes, corn, black beans, and chiles. Cook on high pressure for 10 minutes, allow pressure to release naturally for 5 minutes.
              2. Cook cheese sauce, as stated in the recipe, and stir into the Instant Pot.
              3. Season to taste with salt and serve.

              📖 Recipe

              Southwest potato corn chowder in brown mug
              Print Recipe
              4.69 from 19 votes

              Southwest Potato and Corn Chowder

              This Southwest Potato and Corn Chowder is full of all the goodness of classic corn and potato chowder and loaded with tons of southwestern flavor-- peppers, chiles, black beans, cumin, and chili powder!
              Prep Time15 minutes mins
              Cook Time30 minutes mins
              Total Time45 minutes mins
              Course: Soup
              Cuisine: American
              Keyword: Potato and Corn Chowder
              Servings: 6 servings
              Calories: 429kcal
              Author: Heather Cheney

              Equipment

              • Heavy Bottomed Pot
              • Chef Knife
              • Whisk
              • Cheese Grater
              • Saucepan

              Ingredients

              • 3 cups russet potatoes peeled and diced
              • 1 tablespoon olive oil
              • ½ whole medium onion diced
              • 1 clove garlic minced
              • ¼ teaspoon ground cumin
              • ⅛ teaspoon chipotle chili powder
              • 6 cups chicken or vegetable broth
              • 14.5 ounces black beans drained and rinsed
              • 15 ounces canned corn or frozen
              • 4 ounces canned diced green chiles
              • 2 tablespoons butter
              • 2 tablespoons flour
              • 12 ounces evaporated milk
              • 1 cup Monterrey Jack Cheese grated
              • ¼ teaspoon kosher salt more to taste
              • 2 tablespoons fresh cilantro chopped

              Instructions

              • In a heavy-bottomed pot, heat oil over medium heat until it starts to shimmer. Place onions and garlic in oil and let cook until the onion starts to soften-- about 6 minutes.
              • Add in the cumin and chili powder and stir until very fragrant, about 1 minute. Add the chicken broth and diced potatoes to the pot, bring to a low boil, cover and cook until the potatoes pierce easily with a fork.-- about 20 minutes. 
              • Once the potatoes are cooked, stir the corn, beans, and green chilies into the broth and potatoes.
              • Melt the butter in a medium-sized saucepan. Once melted stir in the flour and cook, stirring constantly for a minute. 
              • Gradually stir in the milk and continue to stir, making sure to clean the bottom of the pan with each stir so it doesn't burn. As it comes to a boil, the mixture will start to thicken. 
              • Continue to stir and cook for 1 minute longer. Remove from the heat and stir in the cheese.
              • Add the cheese sauce into the broth mixture and stir until well combined. Season with ¼ teaspoon kosher salt, adding more depending on the salt content of the broth you used. Stir in cilantro and serve topped with fresh pico de gallo.

              Notes

              • Cut your potatoes into even pieces-- If your potatoes are cut into pieces that are about the same size they will cook evenly. This prevents some of the pieces to be mushy and others overdone.
              • Bloom your spices! In step #2 you'll add the spices to the hot pan and cook until fragrant. This step will allow the spices to release their flavor oils and create a more flavorful soup!
              • Season, season, season! The key to delicious corn and potato chowder is building layers of flavor. You're doing this by browning your onions, blooming your spices, and making a separate cheese sauce to stir in. Make sure to season each step with a little bit of salt and make sure to taste it at the end and season to taste before serving.

              Nutrition

              Serving: 1serving | Calories: 429kcal

              Other Recipes That Go Great With Soup!

                Other Soup Recipes You Might Like

                • Award Winning Best Crockpot chili recipe
                • Keto Chicken Soup
                • Crockpot Tortilla Soup
                • Slow Cooker Tortellini Soup
                • Thai Ramen
                • Instant Pot Lentil Soup
                • Chicken Salsa Chili
                • BBQ Chicken Chili
                • Instant Pot Chicken Dumpling Soup

                Easy Mexican Rice Recipe

                By Heather LAST UPDATED March 22, 2021 · FIRST PUBLISHED October 11, 2019, 1 Comment

                This Easy Mexican Rice Recipe is super simple to make and takes only a few ingredients. It's the perfect, easy side to serve with so many different Mexican entrees'.

                Mexican Spanish Rice in pan with wooden spoon

                Hey everyone! Today I'm sharing this post I wrote for The Salty Marshmallow a few weeks ago on Spanish Rice. It's seriously simple and I love making it.

                I love rice in all its many forms, but Mexican Rice might take the cake for being my favorite. This recipe will give you results just like you find at your favorite Mexican restaurant and gets made at my house frequently!

                Why This Recipe Works

                This Mexican Rice is super easy to make (most rice is!), but the key to flavorful rice like this recipe provides is to toast the rice prior to cooking. This does two things-- it gives the rice a slightly nutty flavor, and dries out the grain of rice to reduce cooking time and make a fluffier end product.

                How to Make Easy Mexican Rice

                How to Make Spanish White Rice Step-by-step collage

                This recipe makes about eight servings of rice, and it's best to cook it in a non-stick, high-sided skillet, like the one pictured above.

                1. Heat a few tablespoons of neutral oil like canola or vegetable in a skillet over medium-high heat.
                2.  When hot, add the rice to the pan and stir.
                3. Continue stirring until all the grains turn opaque and then golden brown.
                4. Heat water until boiling in the microwave and whisk tomato paste and chicken broth base.
                5. Pour hot water mixture into the browned rice and stir in salt, cumin and garlic powder. Bring to a boil.
                6. Cover pan, reduce heat to low and cook for 25-3o minutes or until the rice is tender and the liquid is fully absorbed.

                What Is The Difference Between Spanish Rice and Mexican Rice?

                Spanish and Mexican rice are pretty similar-- they both use toasted rice with a tomato-based cooking liquid. The difference between the two is that traditionally, the Spanish version was seasoned with saffron threads, while the Mexican version was flavored with cumin.

                However, today the two names are pretty much used interchangeably.

                Spanish Mexican Rice cooked in pan

                What Goes Well With Mexican Rice?

                This rice is a great side dish because it is mildly spiced and goes with just about anything with Mexican-inspired flavors.This Sour Cream Chicken Enchiladas Skillet, or Tacos or Burritos made with my Taco Meat are both great choices!

                Spanish White Rice on a White plate

                What Kind of Rice is Best for Mexican Rice?

                I like to use long-grain white rice. It has a lower starch content than other, shorter-grained rice, and turns out nice and fluffy every time! Especially when you toast it first!

                If you make this Easy Mexican Rice Recipe I'd love to hear it! Let me know in the comments below or tag me on Instagram! @heatherlikesfood

                📖 Recipe

                Spanish White Rice on a White plate
                Print Recipe
                4.58 from 14 votes

                Easy Mexican Rice Recipe

                Simple and easy, this rice will be the perfect pair for any Mexican entree!
                Prep Time5 minutes mins
                Cook Time35 minutes mins
                Course: Side Dish
                Cuisine: Mexican
                Keyword: Mexican RIce, Mexican Spanish Rice Recipe, Spanish Rice, Spanish White Rice
                Servings: 8 servings
                Calories: 206kcal
                Author: Heather Cheney

                Ingredients

                • 2 tablespoons canola or vegetable oil
                • 2 cups long-grain white rice
                • 4 ¼ cups water boiling
                • 3 tablespoons tomato paste
                • 2 teaspoons chicken broth base or 1 chicken bouillon cube
                • 1 teaspoon salt
                • ½ teaspoon ground cumin
                • ¼ teaspoon garlic powder
                • cilantro for garnish

                Instructions

                • Heat oil in a large skillet over medium-high heat.
                • When the oil is hot, add the rice to the pan and stir. Continue stirring until all the grains turn opaque and then golden brown.
                • Heat water until boiling in the microwave and whisk in tomato paste and chicken broth base.
                • Pour hot water mixture into the browned rice and stir in salt, cumin and garlic powder.
                • Bring the pan to a boil, cover and reduce heat to low. Cook for 25-30 minutes or until the rice is tender and the liquid is fully absorbed.
                • Top with chopped fresh cilantro, if desired, and serve.

                Nutrition

                Serving: 1serving | Calories: 206kcal

                Other Mexican Inspired Recipes You Might Like

                • Chile Colorado
                • Oven Pork Carnitas
                • Chipotle Guacamole
                • Baked Tacos
                • One Pan Black Bean Burrito
                • Pozole Verde

                Other Popular Recipes People Really Like

                • Chicken Keto Soup
                • Ranchers Roast Beef
                • Ricotta Chicken
                • Ranch Chicken Marinade
                • Instant Pot St. Louis Ribs


                Easy Au Gratin Potatoes with Fennel and California Ripe Olives

                By Heather LAST UPDATED March 25, 2021 · FIRST PUBLISHED October 9, 2019, 1 Comment

                This Au Gratin Potato Recipe is creamy, cheesy and full of flavor thanks to some sliced fennel and sliced black olives. They will be the perfect side dish at your Thanksgiving or holiday table this year and go great served alongside turkey or ham!  

                Au Gratin Potato recipe with fennel baked in a glass dish

                This post is sponsored by California Ripe Olives and is part 3 of 3 recipes I’ll be sharing in partnership with them in 2019. –all thoughts and opinions are my own!

                I know it's only September, but I'm getting excited for all things fall, and that means that I'm also already planning my Thanksgiving menu! #sorrynotsorry

                Creamy Au Gratin potatoes adorn our Thanksgiving table almost every year. Sometimes it's my sweet potato au gratin, and sometimes it's funeral potatoes, but no matter what, we some form of cheesy, creamy potatoes on the table. So, when California Ripe Olives asked me to come up with a Thanksgiving recipe including olives, I knew it had to be a variation of Potatoes Au Gratin!

                Why This Recipe Works

                For this recipe, I use russet potatoes and combine them with sliced fennel and onion. The fennel adds a mild and bright, spring-like flavor to the dish that sets it apart from other au gratin potato recipes. For the cheese, I use a combination of nutty Gruyere and mild and creamy Jarlsberg. While both are from the swiss cheese family, they balance one another out and pack an incredible punch of flavor and creaminess.                                                       

                The heavy cream will act as the sauce and cooking liquid, keeping the potatoes, onion, and fennel moist while cooking and will thicken up into a rich sauce as it bakes and cools. It may look fancy, but this recipe is easy and takes very little prep, aside from the slicing.

                Glass Dish with potatoes au gratin inside

                For as long as I can remember into my childhood, Thanksgiving (and Christmas) dinner at my grandparent's house meant two things-- bowls of sweet baby gherkin pickles and black olives. I loved sneaking into the kitchen while the adults cooked, to stealthily pick olive after olive off the vegetable platter. I would stick them on the tips of each of my fingers and run away to the front room where I could enjoy my olives in solitude.

                I've matured quite a bit in the ways that I enjoy California Ripe Olives now, but I would be lying if I pretended like I still don't indulge in an occasional "olive finger" reenactment now and again. I love the fact that olives are so versatile and can be added to so many recipes to add flavor and texture. They can be dressed up, like in this Potato Au Gratin Recipe, or totally dressed down and be nothing but a bowl of olives that little ones can nibble from off their fingers. Either way, olives are amazing and always stocked in my pantry.

                Baked Dish of Au Gratin Potatoes

                How To Make Easy Potato Au Gratin with California Ripe Olives

                Step-by-step photo collage of Au Gratin Potato Recipe
                1. Prep your potatoes, onions, and fennel. I used this Mandoline slicer to slice my veggies and love how quick and easy it makes it. If you don't have a mandoline and/or don't want to purchase one quite as big as the one I have, I also have this handheld slicer and use it almost daily. The thicker you slice the veggies, the longer they will take to cook. I typically like to slice mine just under ⅛ of an inch.
                2. Sauté the onion and fennel over medium-low heat in some olive oil until tender and starting to caramelize. This will take about 15 minutes.
                3. Mix the sliced potatoes and olives with the heavy whipping cream, salt, pepper, and all but a few tablespoons of the cheese. Add the sautéed fennel and onion and mix to combine.
                4. Pour potato mixture into an 8x8 baking dish or deep pie plate. Flatten the surface, making sure all the potatoes are submerged in the cream.
                5. Combine remaining cheese with a couple of tablespoons whipping cream and sprinkle over the top of the potatoes.
                6. Bake for 45-60 minutes or until the potatoes are very tender and the top is golden brown.

                Do These Things For The Perfect Au Gratin Potatoes:

                • Use a Mandoline Or Handheld Slicer This will ensure that your vegetables are sliced uniformly and will cook evenly. It also makes the dish look polished and well put together. 🙂
                • Use HEAVY Whipping Cream At the grocery store, look for the carton labeled HEAVY whipping cream or heavy cream. These two are the same product and contain 36% milkfat, which means it's the richest and creamiest. You may see "whipping cream" or even "light whipping cream" but these two products will give you different results in your recipe as the milk fat content is typically 10-20% lower than the "heavy" variety.
                • Pick the Right Cheese Virtually any kind of cheese can be used in this recipe-- so use what you have on hand or your favorite. I love the combination of Gruyere and Jarlsberg, though! It's mild, nutty, and creamy and pairs excellently with meats like turkey and ham without tasting too cheesy. 
                • Check For Tenderness The Au Gratin is done when a fork or sharp knife glides smoothly through the potatoes in the center. If there is any resistance, continue cooking. If needed, you can tent the top with a piece of tin foil to prevent the top from getting too brown.
                • Choose California Ripe Olives These olives undergo a seven-day storage and curing process, proprietary to California Ripe Olives, resulting in a consistent taste in every olive. At the grocery store, check the label and as long as it says they are from California, you're getting the best olives!
                  A Potato Au Gratin Recipe Baked in a glass pie dish

                What does Au Gratin Mean?

                An au gratin is something sprinkled with breadcrumbs and/or cheese and then browned.

                Au Gratin Potatoes vs. Scalloped Potatoes-- what's the difference?

                Scalloped potatoes are cooked in a creamy sauce, traditionally without cheese. Since Au Gratin Potatoes ARE sprinkled with cheese, the difference is basically the use of cheese. However, over the years, the two terms have become somewhat interchangeable.

                What Goes Good With Au Gratin Potatoes?

                Au Gratin Potatoes are mild and creamy and go good with just about anything. Some of my favorites are Brined Turkey Breast, Classic Meatloaf, Slow Cooker Roasted Pork, Baked BBQ Chicken, or Grilled Chicken

                📖 Recipe

                Print Recipe
                5 from 7 votes

                Easy Au Gratin Potato Recipe with Fennel and California Ripe Olives

                These potatoes really are easy! Just slice, saute, mix and bake for creamy, cheesy potatoes!
                Prep Time15 minutes mins
                Cook Time1 hour hr
                Course: Side Dish
                Cuisine: American
                Keyword: Au Gratin Potato Recipe, Easy Potato Au Gratin, Scalloped Potatoes with Fennel
                Servings: 6 servings
                Calories: 418kcal
                Author: Heather Cheney

                Equipment

                • Mandoline Slicer
                • 8x8" Baking Dish

                Ingredients

                • 1 bulb fennel washed, stalks removed, and cored
                • ½ whole yellow onion
                • 2 large russet potatoes washed and peeled
                • 1 tablespoon olive oil
                • 1 tablespoon salted butter
                • 1 cup plus 2 tablespoons heavy whipping cream divided
                • ¾ cup Gruyere cheese grated, divided
                • ¾ cup Jarlsberg cheese grated, divided
                • ½ cup California Ripe Olives sliced
                • ½ teaspoon kosher salt
                • ⅛ teaspoon black pepper

                Instructions

                • Preheat oven to 350 degrees Fahrenheit.
                • Thinly Slice fennel, onion, and potatoes using a mandoline or handheld slicer. Can be hand-sliced if you'd like just be sure to adjust the cooking time as thicker slices will take longer to cook.
                • In a medium-sized pan, heat butter and olive oil and saute onion and fennel over medium-low heat for 15 minutes or until very tender. Remove from heat.
                • In a large bowl, combine sliced potatoes with the cream, olives, salt, pepper, and all but 2 tablespoons of each of the cheeses.
                • Add cooked fennel and onion to the bowl and stir to combine.
                • Transfer potato mixture to an 8x8" baking dish or deep pie plate and flatten the surface so all the potatoes are mostly submerged in the cream.
                • Combine remaining 2 tablespoons of each cheese in a small bowl with 2 tablespoons of cream. Sprinkle cheese over the top of the potatoes evenly.
                • Bake at 350 degrees for 45-60 minutes or until potatoes are very tender the top is golden brown and bubbly. Check for tenderness by inserting a fork or sharp knife through the potatoes in the center of the dish. If needed, tent the dish with a piece of foil to preven the top from becoming to brown.
                • Allow to cool for at least 15 minutes before serving.

                Video

                Notes

                • Use a Mandoline Or Handheld Slicer This will ensure that your vegetables are sliced uniformly and will cook evenly. It also makes the dish look polished and well put together. 🙂
                • Use HEAVY Whipping Cream At the grocery store, look for the carton labeled HEAVY whipping cream or heavy cream. These two are the same product and contain 36% milkfat, which means it's the richest and creamiest. You may see "whipping cream" or even "light whipping cream" but these two products will give you different results in your recipe as the milk fat content is typically 10-20% lower than the "heavy" variety.
                • Pick the Right Cheese Virtually any kind of cheese can be used in this recipe-- so use what you have on hand or your favorite. I love the combination of Gruyere and Jarlsberg, though! It's mild, nutty, and creamy and pairs excellently with meats like turkey and ham without tasting too cheesy. 
                • Check For Tenderness The Au Gratin is done when a fork or sharp knife glides smoothly through the potatoes in the center. If there is any resistance, continue cooking. If needed, you can tent the top with a piece of tin foil to prevent the top from getting too brown.

                Nutrition

                Serving: 1serving | Calories: 418kcal

                More Potato Recipes You Might Like

                • Baked Sweet Potatoes
                • Steakhouse Potatoes
                • Grilled Sweet Potatoes
                • Slow Cooker Mashed Potatoes
                • Oven Roasted Potatoes

                Other Recipes For Your Thanksgiving Dinner Menu

                • Sweet Potato Casserole With Coconut
                • Corn Spoon Bread
                • Best Dinner Roll Recipe
                • Fresh Green Bean Casserole
                • Homemade Creamed Corn
                • Cranberry Fluff
                • Pumpkin Turnovers
                • Never Fail Pie Crust
                • Caramel Apple Pie with Crumb Topping

                Sweet Chicken Lo Mein Recipe

                By Heather LAST UPDATED March 22, 2021 · FIRST PUBLISHED October 7, 2019, 3 Comments

                A Chicken Lo Mein Recipe that's slightly sweet and makes finding ingredients easy by using linguine noodles and just about any veggies you have in your fridge. A super flexible recipe that is great for a quick dinner! Chicken Lo Mein recipe in a wok

                This Chicken Lo Mein Recipe is one of my family's favorite quick and easy dinners! I love that I almost always have linguine (or spaghetti) noodles in my pantry and some vegetables in the fridge that need to be used before spoiling. I can throw this easy, homemade recipe together in under 30 minutes and everyone at the table practically licks the pan clean- just like when I make this Teriyaki Beef Stir Fry-- another favorite!

                Why This Recipe Works

                Chicken Lo Mein is a Chinese dish made with soft egg noodles. My easy Chicken Lo Mein Recipe uses fresh-cooked linguine noodles in place of the egg noodles and ingredients you probably already have in your pantry to make the sauce. There's no need for specialty Chinese ingredients that will sit on your pantry shelf unused. The result is a sweet and savory noodle dish with flavorful chicken and crisp-tender vegetables.

                What Is Chicken Lo Mein?

                Chicken Lo Mein is a Chinese noodle dish with soft, steamed egg noodles, a rich sauce, lean protein (chicken, shrimp, beef), and vegetables that are typically stir-fried together.

                Chicken Chow Mein vs. Lo Mein

                "Mein" or "mian" is the Chinese word for "noodles". Lo Mein means "tossed noodles," while "chow mein" or "chao mian" means "fried noodles." Lo Meins generally have soft noodles and more sauce, while chow meins have a lighter sauce and firmer texture because they are fried.

                What Noodles Are Used For Lo Mein?

                Fresh egg noodles that are about ¼" wide are traditionally used for Chinese Lo Mein dishes. For this recipe, I use dried linguine noodles to make things easy.

                How To Make Chicken Lo Mein

                Chicken Lo Mein Recipe photo collage of step-by-step instructions

                1. Make the sauce by combining ¼ cup soy sauce, apricot jam, garlic, brown sugar, sesame oil, ½ teaspoon vinegar, and corn starch in a small bowl. Set aside
                2. Cut chicken breasts into ½ inch strips and toss in 2 tablespoons of soy sauce.
                3. Cook the linguine by following the directions on the box. Drain off cooking water and set aside.
                4. Heat a few tablespoons of vegetable oil in a large skillet over medium-high heat and add the chicken. Cook, stirring frequently until chicken is just cooked through and transfer into a separate bowl.
                5. Heat an additional tablespoon of oil in the skillet and add vegetables and water chestnuts. Stir-fry by stirring them quickly around the pan until they are tender, but still a little bit crisp.
                6. When veggies are done, add the chicken and noodles to the pan. Pour the sauce mixture over all ingredients in the pan, stir to combine, and cook for 1 minute more. Remove from heat and serve.

                Chicken Lo Mein Recipe in wok with broccoli, carrots and peas

                Heather's Tips For Recipe Success:

                • Cook your Linguine just until Al Dente. "Al Dente" means "to the tooth" and explains when pasta is cooked until its tender but still gives a bit of resistance when it's bitten into. The pasta will continue cooking all the way when added to the pan with the veggies and sauce.
                • Use a Wok if you have one. Woks are the best for cooking quickly over high heat-- the perfect stir fry pan for chicken lo mein!
                • Cut your veggies uniformly. Stir-fried veggies are cooked quickly and if they aren't all about the same size, you may be left with veggies that are underdone or overcooked when the rest of the veggies are cooked perfectly.

                If you Make this Chicken Lo Mein Recipe, please let me know!

                📖 Recipe

                Print Recipe
                4.52 from 29 votes

                Sweet Chicken Lo Mein

                A Sweet Chicken Lo Mein Recipe using linguine noodles and just about any veggies you have in your fridge. A super flexible recipe that is great for a quick dinner! 
                Prep Time10 minutes mins
                Cook Time20 minutes mins
                Total Time30 minutes mins
                Course: Main Course
                Cuisine: Asian
                Keyword: Chicken Lo Mein Recipe, Chicken Lo-Mein, easy chicken lo mein, homemade chicken lo mein
                Servings: 4 servings
                Calories: 614kcal
                Author: Heather Cheney

                Ingredients

                • 2 chicken breasts boneless, skinless
                • 2 tablespoons soy sauce
                • 3 tablespoons vegetable oil divided
                • 8 ounces dry linguine cooked and drained
                • 5 cups stir fry veggies I used a mix of broccoli, mushrooms, baby carrots, and sugar snap peas
                • 6 ounces water chestnuts drained

                For The Sauce

                • ¼ cup soy sauce
                • ⅓ cup apricot jam
                • 2 cloves garlic minced
                • 2 tablespoons brown sugar
                • 1 teaspoon sesame oil
                • ½ teaspoon white vinegar
                • 1 teaspoon corn starch

                Instructions

                • Make the sauce by combining 2 tablespoons soy sauce, apricot jam, garlic, brown sugar, sesame oil, vinegar, and corn starch in a small bowl. Set aside for later.
                • Cut chicken breasts into about ½ inch strips and toss in 2 tablespoons of soy sauce.
                • Cook linguine noodles per the package instructions until "Al-dente" or just barely tender.
                • Heat 2 tablespoons of vegetable oil in a large skillet over medium-high heat.
                • Add the chicken to the pan and cook, stirring frequently until chicken is just cooked through and transfer into a separate bowl.
                • Heat an additional tablespoon of oil in the skillet and add vegetables and water chestnuts. Stir-fry by moving the vegetables around the pan quickly, until they are just tender. 
                • When veggies are done, add the chicken and noodles to the pan. Pour the sauce mixture over the entire pan, stir to combine, and cook for 2 minutes more. Remove from heat and serve.

                Notes

                • Cook your Linguine just until Al Dente. "Al Dente" means "to the tooth" and explains when pasta is cooked until its tender but still gives a bit of resistance when it's bitten into. The pasta will continue cooking all the way when added to the pan with the veggies and sauce.
                • Use a Wok if you have one. Woks are the best for cooking quickly over high heat-- the perfect stir fry pan for chicken lo mein!
                • Cut your veggies uniformly. Stir-fried veggies are cooked quickly and if they aren't all about the same size, you may be left with veggies that are underdone or overcooked when the rest of the veggies are cooked perfectly.

                Nutrition

                Serving: 1serving | Calories: 614kcal

                Other Chicken Recipes You Might Like

                • Barbeque Chicken 
                • Pesto Parmesan Chicken
                • Easy Chicken Cacciatore
                • Smothered Chicken Breast
                • Honey Dijon Chicken Thighs
                • garlic chicken thighs
                • Ranch Chicken Marinade
                • Simple Grilled Chicken Recipe
                • Chicken Keto Soup
                • Wingers Sticky Fingers
                • Sweet Chili Sauce Chicken
                • Oven Fried Chicken Breast
                • Chicken Ricotta
                • Instant Pot Chicken Alfredo
                • Hawaiian Shoyu Chicken
                • Chicken Curry with Coconut Milk

                Other Popular Recipes People Really Like

                • Instant Pot Brisket
                • Ranchers Roast Beef
                • Mexican Ground Beef
                • Instant Pot St Louis Ribs
                • Easy Cornbread
                • Sour Cream Chicken Enchiladas Skillet
                • 1
                • 2
                • 3
                • …
                • 13
                • Next Page »
                Headshot of Heather in an apron

                Hi, I'm Heather! Want to become a rockstar cook? I’m a former chef, caterer, and culinary arts school graduate that just wants to help you make some killer food! I truly believe that with a little know-how anyone can totally rock their kitchen. Stick around for ultimate recipes of your favorite foods, cooking tips, guides, and more!

                More about me →

                Popular Recipes

                • BBQ chicken cut on a cutting board with a bottle of bbq sauce
                  The Best Super Moist Oven Baked BBQ Chicken
                • One Pan Sour Cream Chicken Enchilada Skillet
                  One Pan Sour Cream Chicken Enchilada Skillet
                • Hawaiian Shoyu Chicken-- so flavorful you'll forget how easy it is to make! Filled with flavors of ginger, garlic and just a touch of red pepper.
                  Hawaiian Shoyu Chicken
                • Sloppy Joe on a paper bag
                  The Best Sloppy Joe Sauce
                • Coffee Cake In A Mug-- the perfect remedy for a sugar craving when you don't want to spend a lot of time or heat up the oven. #coffee #cake #microwave #mug
                  Coffee Cake in a Cup
                • Baked Ricotta Chicken
                  Baked Ricotta Chicken
                • Mom's Classic Meatloaf Recipe
                • Beef Teriyaki Stir Fry
                Email opt in image

                Cooking Method

                • Slow Cooker
                • Grilling

                Footer

                ↑ back to top

                About

                • Privacy Policy
                • Disclaimer

                Newsletter

                • Sign Up! for emails and updates

                Contact

                • About
                • Email
                • Work With Me

                As an Amazon Associate I earn from qualifying purchases. This site uses cookies and generates income via ads.

                Copyright © 2022 Heather Likes Food, LLC

                Rate This Recipe

                Your vote:


                A rating is required
                A name is required
                An email is required