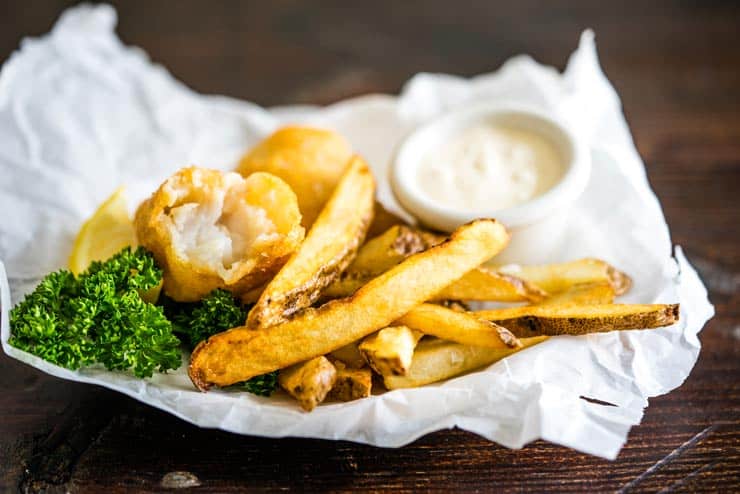
Ever wonder how to make crispy beer-battered fish and chips just like you get at the restaurant? It might not be as daunting a task as it seems! I'm sharing all my favorite tips and trick here for battering, frying and serving both the fish and the chips!
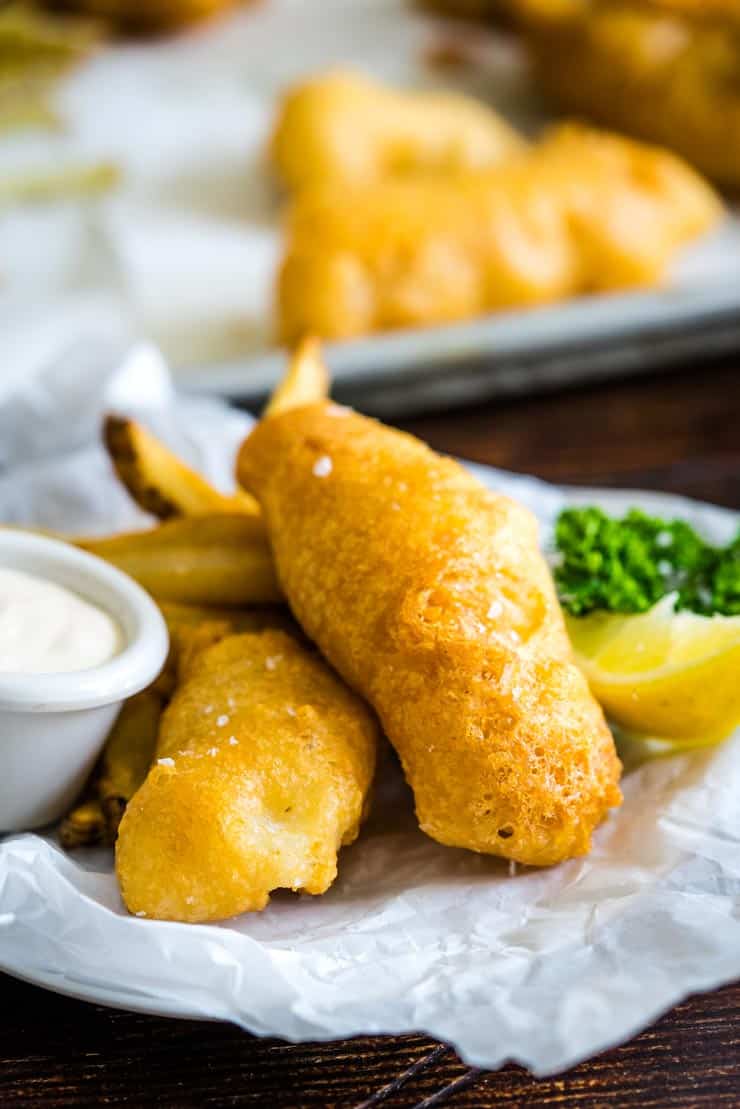
I was a late bloomer when it came to enjoying any water-dwelling creature because I didn't eat a lot of it growing up. Fish and chips were one of my introductory foods when it came time to open my horizons to fish, and it's still is a favorite of mine. I mean, you can't really go wrong by wrapping tender fish in a crispy beer batter, served with hot fries and tartar sauce, can you? But, if you're already a fish lover, you'll probably dig this Broiled Salmon, Oven Baked Tilapia, or this Seared Salmon. It took me a while to enjoy fish, but I think I'm pretty much there now. 🙂
Let's get started on these fish and chips!
Why This Recipe Works
Science!... and a little technique. Deep-fried foods like fish and chips really shine when the temperature of the oil has been regulated well during frying. If the oil is too hot or cold, the fish and potatoes will either cook too slowly and absorb excess oil, or cook too fast and be unevenly cooked. In this recipe, I'll clearly outline what temperature the oil needs to be for perfect results every time!
Also, when it comes to making fries at home, the secret to making them crispy is to fry them TWICE! The first fry is at a lower temperature to cook them through, and the second round in the fryer is at a higher temperature to make them golden brown and delicious.

How To Make Fish and Chips
- Choose a firm-fleshed white fish and cut into 1-inch strips. Cod, pollock, haddock, or halibut are all great choices. Dry the fish well with paper towels. Set aside.
2. Cut russet potatoes into fries and submerge in a large bowl of COLD water.
3. Heat 2-3 quarts of peanut or canola oil in a dutch oven or large heavy-bottomed pot over high heat. Attach a deep-fry thermometer to the side of the pot.
4. Whisk together flour, baking powder, and spices in a mixing bowl.

5. Slowly whisk in the beer, mixing until the batter is smooth. Place in the fridge and chill for 15 minutes to allow the batter to thicken, thus sticking better to the fish.
6. Drain the potatoes and use a salad spinner (if you have one) to remove as much water as possible. If you don't have a salad spinner, pour the potatoes out onto paper towels and blot them dry as thoroughly as possible.
7. When the oil reaches 320 degrees Fahrenheit, cook the fries in batches for 2-3 minutes or until they are pale and floppy. Remove from the oil and place on paper towels to drain. Increase the oil temperature t0 350 degrees.
8.While the oil is heating up, dredge the fish in corn starch, tapping off as much of the excess cornstarch as you can.
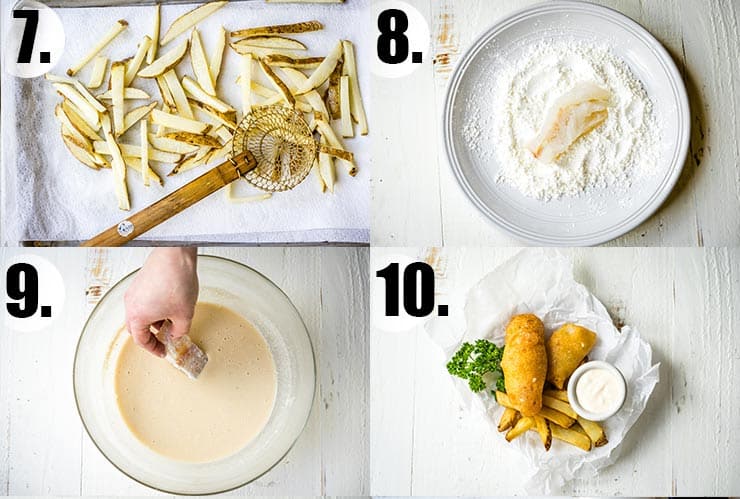
9. When the oil reaches 350 degrees, dip the fish into the chilled batter and gently place into the oil. Only fry a few pieces of fish at a time-- do not crowd the pan! When the batter is set and browned on one side, turn the fish over and cook until golden brown.
10. Place fried fish on a baking sheet lined with a cooling rack and put in a 200-degree oven to keep warm.
Heather's Tips For Recipe Success
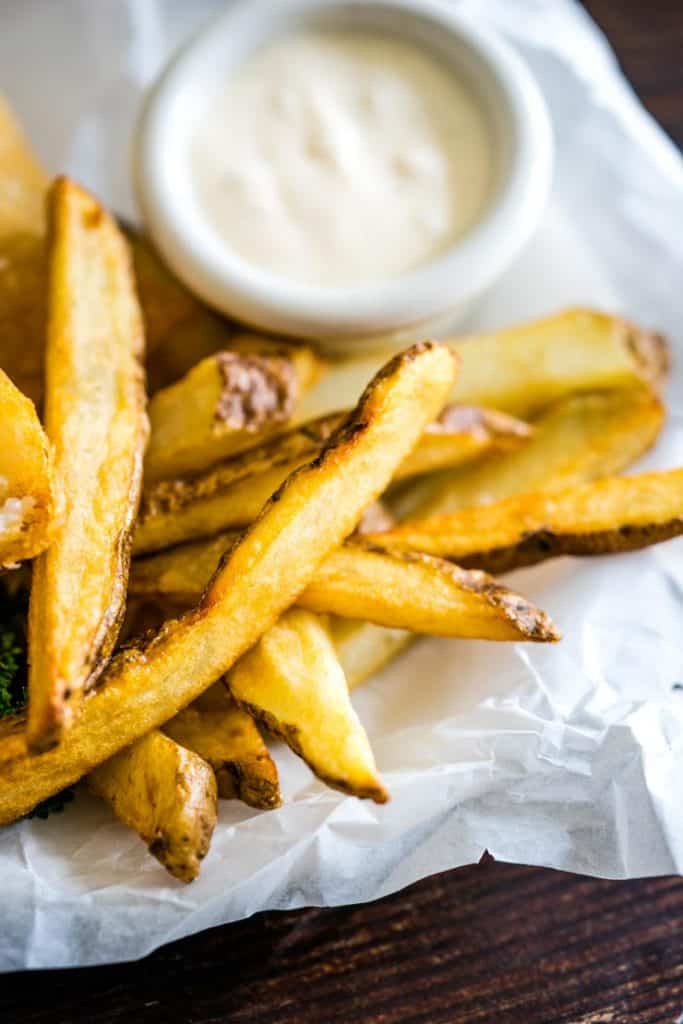
- Use Russet Potatoes for the Chips. Russets are the starchiest and densest of all the potato varieties and have the least amount of moisture. This golden combination makes for some super crispy fries!
- Use a Deep Fry Thermometer. Keeping an eye on and knowing the temperature of the oil is crucial in having good results with this recipe. They are relatively inexpensive, and you can also use them for making candy or jelly, so you'll be able to get good use out of it if you don't already have one. This one is similar to the thermometer I use.
- Use COLD Beer. Cold beer holds its bubbles (C02) better than it does warm, so this will make your batter lighter.
- Dry the Potatoes WELL. Use a salad spinner to dry the potatoes if you have one. If not, you can use paper towels to really dry them. Not only does this step create crispy fries, but it will also prevent oil splatters and keep your kitchen cleaner (and safer).
- Dredge don't Drown. Dredge or coat the fish in corn starch and then tap off as much of the excess cornstarch as you can. You want it to be as thin as possible so that it can adhere to the batter and the fish at the same time. If there's too much starch, the batter will slide right off of the fish.
- Don't Overcrowd the Pan. When frying, it's important to not cook too much at once. Putting cold food into hot oil reduces the oil temperature and the more food you put in, the harder it is for the oil to get back to the temperature it needs to be to cook correctly. I suggest frying the potatoes in 3-4 batches and cooking no more than 3-4 pieces of fish at a time.
Why is Beer Used In Fish Batter?
Beer is used when battering fish because it gives the batter good flavor and the bubbles make the batter light, airy and cook faster so the fish inside can come out juicy and not over-cooked.
Which Beer is Best for Beer Batter?
When making fish and chips, a malty lager or English ale will impart the best, traditional flavor. But, for the most part, any bubbly, freshly opened beer will do. It really depends on what you're frying and how much flavor you want the batter to have vs. the ingredient you're battering.
What Can You Sub for Beer in Fish and Chips?
If you don't want to use beer, but would like to make a "beer batter', unflavored sparkling water will make the batter light like beer does, but won't add the flavor it does either. So just be prepared that it won't taste the same as other beer batters.
Other Recipes People Really Like
- Fry Bread Tacos
- Super Juicy BBQ Chicken Breasts
- One Pan Chicken Enchiladas
- Chicken Queso Soup
- Broiled Fish Tacos
- Baked Salmon with Maple
📖 Recipe
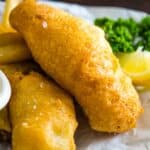
Crispy Beer Battered Fish and Chips
Ingredients
For The Fish
- 1 ½ pounds firm white fish cod, pollock, haddock, or halibut. Cut into strips.
- 1 cup all-purpose flour
- 1 teaspoon kosher salt
- 1 ½ teaspoon baking powder
- 1 dash cayenne pepper
- 1 cup brown beer COLD
- ½ cup cornstarch
- 3 quarts canola or peanut oil for frying
For The Chips
- 2 large russet potatoes
- salt
Instructions
- Cut potatoes into fries move into a large bowl filled with cold water.
- Whisk together the flour, salt, baking powder, and cayenne in a medium-sized bowl. Slowly whisk in the beer, mixing until no lumps remain and the batter is smooth. Place in the fridge for at least 15 minutes, but no longer than an hour.
- Heat the oil in a large dutch oven of heavy-bottomed pan over high heat. Use a deep-fry thermometer and watch the oil temperature carefully.
- Drain the potatoes from the water and use a salad spinner or paper towels to dry the potatoes as much as possible.
- When the oil reaches 320 degrees, cook the potatoes in batches for 2-3 minutes or until they are pale and floppy. Remove them from the oil and place on a baking sheet lined with paper towels.
- Increase the oil temperature to 350 degrees.
- While the oil is heating, dip the fish strips into the corn starch and tap and brush off as much of the excess as you can.
- When the oil is 350 degrees, dip the fish into the batter and slowly lower it into the oil. Cook only 3-4 pieces of fish at a time, as to not crowd the pan. When the batter is set on one side, turn the fish over and cook on the other side until golden brown. Repeat until all the fish is cooked and keep the fish hot in a 200-degree oven, on a baking sheet lined with a baking rack, while preparing the fries.
- Increase the oil temperature to 375 degrees. When the oil reaches temperature, refry the potatoes in batches until they are golden brown. Drain on paper towels, season with salt and serve the fish and chips with fresh lemon juice, malt vinegar, and tartar sauce.
Notes
- Use Russet Potatoes for the Fries. Russets are the starchiest and densest of all the potato varieties and have the least amount of moisture. This golden combination makes for some super crispy fries!
- Use a Deep Fry Thermometer. Keeping an eye on and knowing the temperature of the oil is crucial in having good results with this recipe. They are fairly inexpensive and you can also use them for making candy or jelly, so you'll be able to get good use out of it if you don't already have one. This one is similar to the thermometer I use.
- Use COLD Beer. Cold beer holds its bubbles (C02) better than it does warm, so this will make your batter lighter.
- Dry the Potatoes WELL. Use a salad spinner to dry the potatoes if you have one. If not, you can use paper towels to really dry them. Not only does this step create crispy fries, but it will also prevent oil splatters and keep your kitchen cleaner (and safer).
- Dredge don't Drown. Dredge or coat the fish in corn starch and then tap off as much of the excess cornstarch as you can. You want it to be as thin as possible so that it can adhere to the batter and the fish at the same time. If there's too much starch, the batter will slide right off of the fish.
- Don't Overcrowd the Pan. When frying it's important to not cook too much at once. Putting cold food into hot oil reduces the oil temperature and the more food you put in, the harder it is for the oil to get back to the temperature it needs to be to cook properly. I suggest frying the potatoes in 3-4 batches and cooking no more than 3-4 pieces of fish at a time.